Manager
Follow a step-by-step procedure for appropriately configuring SAP Solution Manager 7.1 to enable SAP Business Process Blueprinting 1.0.
Key Concept
SAP Business Process Blueprinting 1.0 enables business process modeling in the three hierarchy levels: business scenario, business process, and process step. It provides the means to modify and enhance existing business processes in a graphical, visual, and intuitive way using an Eclipse-based solution. It eases the Blueprint phase in implementing new solutions by using the predefined industry-specific business process content delivered by SAP in the Business Process Repository.
Business process modeling is an important part of using SAP Solution Manager to its fullest extent. SAP Business Process Blueprinting (BPB) 1.0, available for SAP Solution Manager 7.1, allows you to modify your existing business processes and make the Blueprint phase of new implementations easier due to its pre-delivered business process content.
With direct synchronization with SAP Solution Manager and the corresponding Blueprint phase in transaction SOLAR01, you can guide, design, and control business process requirements in a complete life cycle fashion. This allows you to perform process modeling, perform simulation and workflows, and manage business processes with ease using the basic set of Business Process Modeling Notation 2.0 (BPMN) elements. Establish a common understanding of the business requirements and define the scope in detail, while still in the Requirements phase, before going to the Realization (configuration) phase.
Improve your business processes by documenting them properly, with consistency and clarity, lower the number of exceptions, and reduce potential risk of project failure due to poorly established requirements and standards. With BPB, you can adapt SAP best practice processes to serve your business accordingly by leveraging the SAP cross-industry business maps, the Business Process Repository (BPR), the SAP Help portal, SAP NetWeaver, and Enterprise Service Workplace integrated within the BPB rich client platform (RCP).
The following prerequisites are required to perform and continue with the process of configuring BPB in SAP Solution Manager 7.1. In the SAP Service Marketplace, download BPB 1.0, along with its guides, its notes, Solution Composer as an add-on, and SAP Cryptographic Library (SAPCRYPTOLIB).
To move forward, you need to have the following installed:
- SAP Solution Manager 7.1 Support Package 01 or higher
- Solution Composer on SAP Solution Manager 7.1
- SAPCRYPTOLIB (Activate HTTPS)
- BPB on the client
- Microsoft Windows XP, Microsoft Windows Vista, or Microsoft Windows 7
- Microsoft Internet Explorer 6 and above
- 32-bit version of Java Runtime Environment (JRE) 6 and above or 32-bit version of Java Development Kit (JDK) 6 and above
BPB is new with SAP Solution Manager 7.1. With new capabilities, new challenges arise during the configuration. The end-to-end detailed description in this article provides the necessary information for a quick configuration process.
The following are five steps to configure SAP Solution Manager 7.1 for BPB:
- Step 1. Create endpoints in SAP Solution Manager
- Step 2. Create external aliases in SAP Solution Manager
- Step 3. Create a Remote Function Call (RFC) destination in SAP Solution Manager
- Step 4. Create logical ports for SAP Solution Manager
- Step 5. Connect BPB with SAP Solution Manager
Note: This article is based on SAP Solution Manager 7.1, Support Package 03, running on Microsoft Server 2008 SP1 with MSSQL 2008 SP1 database.
Before I take you through the five-step process, I’ll show you about some admin user roles you need to create.
Procedure
Prior to moving forward with the configuration procedure, you need to create a few admin user roles that contain all the authorizations for Web services.
Start by creating the user roles SAP_BC_WEBSERVICE_ADMIN, SAP_BC_WEBSERVICE_ADMIN_TEC, and SAP_BC_WEBSERVICE_CONFIGURATOR, which contain all the authorizations for Web services. Use transaction code SU01 and click the check mark icon to go to the User Maintenance page (Figure 1). Enter the User name and Alias (if applicable) and click the display (glasses) icon.
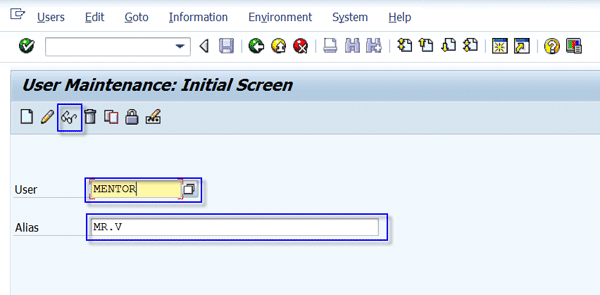
Figure 1
Enter a user name and alias
Click the Roles tab and add the required user roles (Figure 2).
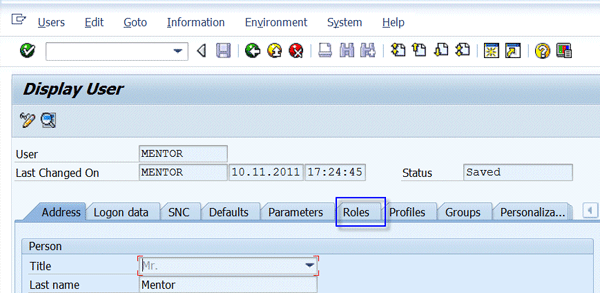
Figure 2
Add the user roles
Click the display/change (pencil) icon (Figure 3). This allows you to simply copy and paste the user roles into the Role Assignments rows. Then save and the system takes you back one step, but activates the user roles. Log in with your user credentials and click the display icon.
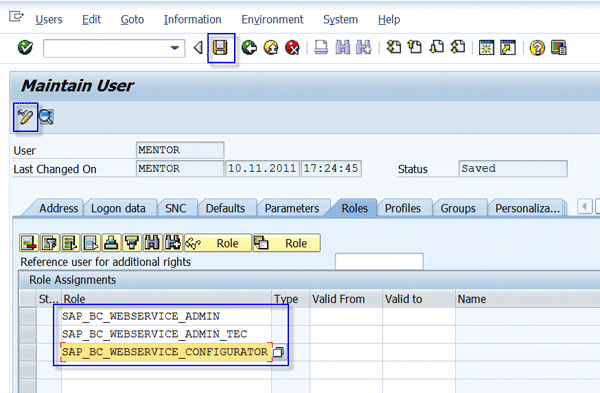
Figure 3
Add roles to the Role Assignments section
Click the Roles tab again (Figure 4). The status of the user roles is shown in green, which indicates that they were successfully applied and are active.
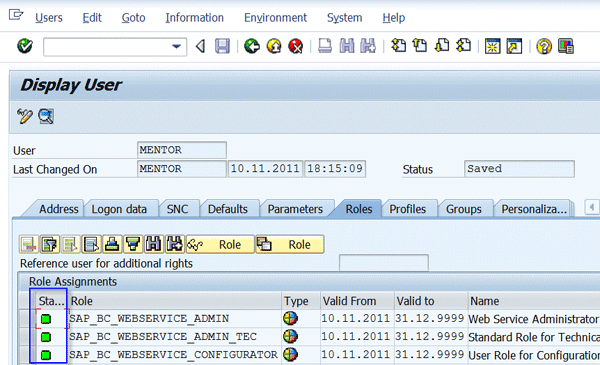
Figure 4
The user roles are now active
After adding the required admin user roles and verifying their status, you can now move forward and start configuring SAP Solution Manager 7.1 by completing the five steps I mentioned before.
Step 1. Create Endpoints in SAP Solution Manager
You need to create endpoints to access the required data in SAP Solution Manager. Create endpoint BsiProjectDirectoryInterface. Use transaction soamanager and click the check mark icon (Figure 5). Click the Service Administration tab and then click the Web Service Configuration link.

Figure 5
Click the Web Service Configuration link
In the resulting screen, click the Search tab and select Service Definition in the Search by drop-down (Figure 6). Enter *Bsi* in the Search Pattern field and click the Go button. Two end points should appear. Select the first one (BSIPROJECTDIRECTORYINTERFACE) and click the Apply Selection button.

Figure 6
The end points appear
To create the first endpoint, select the Configurations tab and click the Create button (Figure 7).
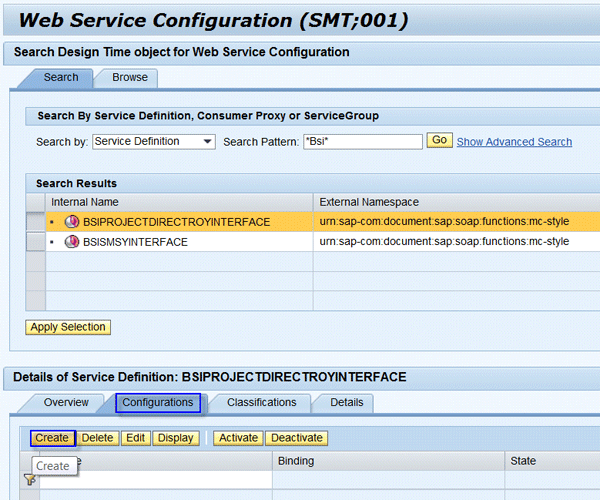
Figure 7
Create the first endpoint
In the blank fields for Service Name and New Binding Name, enter BSIPROJECTDIRECTORYINTERFACE and then enter a brief Description (e.g., BPB Endpoint 1) (Figure 8). Then click the Apply Settings button.

Figure 8
Apply the settings
Scroll down to see the rest of the page. Under Transport Channel Authentication, select the User ID/Password check box and click the Save button (Figure 9).

Figure 9
Select the User ID/Password check box
Under Details of Service Definition, click the Display button to ensure the state of the endpoint is Active (Figure 10). If it isn’t, select the BSIPROJECTDIRECTORYINTERFACE row and click the Activate button.

Figure 10
Activate the endpoint
Now you create the second endpoint (BSISMSYINTERFACE). Go back to the Web Service Configuration screen and select the BSISMSYINTERFACE row to create the second endpoint (Figure 11). Click the Apply Selection button, choose the Configurations tab, and click the Create button.
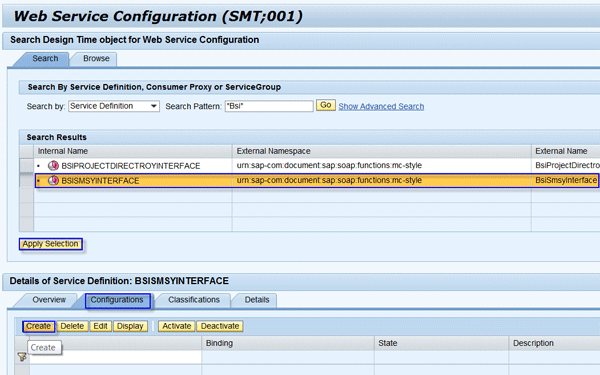
Figure 11
Create the second endpoint
The SOA Management Window populates (Figure 12). In the blank fields for Service Name and New Binding Name, enter BSISMSYINTERFACE, and then enter a brief Description (e.g., BPB Endpoint 2). Then click the Apply Settings button.
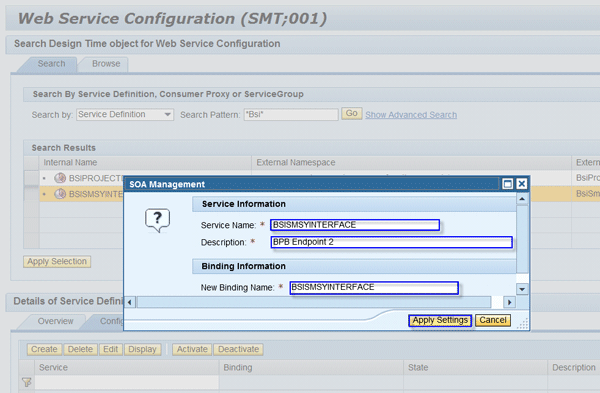
Figure 12
Apply the settings
Scroll down to see the rest of the page and under Transport Channel Authentication select the User ID/Password check box and save (Figure 13).
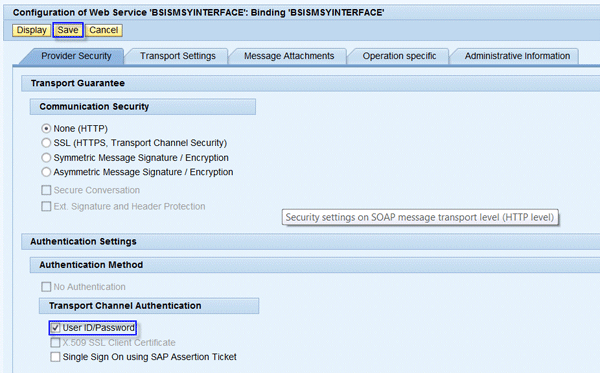
Figure 13
Select the User ID/Password check box
Under Details of Service Definition, click the Display button to ensure the State of the endpoint is Active (Figure 14). If it is not, select the BSISMSYINTERFACE row and click the Activate button.

Figure 14
Activate the endpoint
Scroll all the way to the top of the page and click the Back button. This brings you to the SOA Management page; click the Logoff button to terminate the session. The pop-up screen in Figure 15 appears. Click the Yes button.
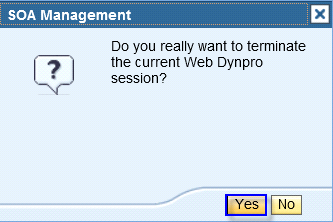
Figure 15
Terminate the current session
Step 2. Create External Aliases in SAP Solution Manager
You create external aliases to establish a connection between BPB and SAP Solution Manager. Use transaction SICF and click the check mark icon to go to the Maintain Services page (Figure 16). Click the execute icon.
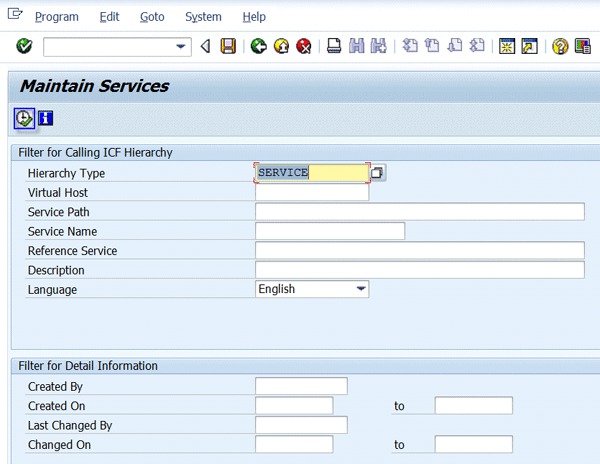
Figure 16
Click the execute icon
In the resulting screen, click the External Aliases button in the toolbar (Figure 17).

Figure 17
Click the External Aliases button
In the Virtuelle Hosts/Services display area, choose default_host and then click the create icon in the toolbar (Figure 18).
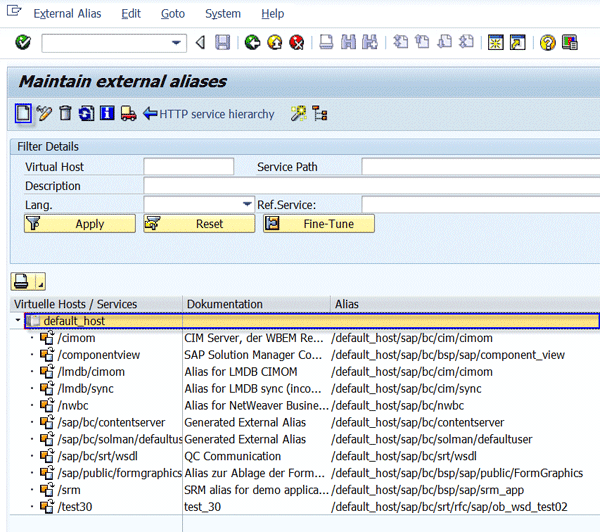
Figure 18
Create the virtual host
Enter /ebb in the External Alias field (Figure 19). In the Description fields, one explanatory identification is sufficient but you may enter up to three. In this example, I entered two descriptions: External Aliases for EBB and Business Process Blueprinting. Under the Logon Data tab, select Alternative Logon Procedure, then select the Use All Logon Procedures check box. In the Client field, enter the client you are using (e.g., 001). Enter a logon language in the Language field. Note that the User field must be blank for BPB to validate your credentials.
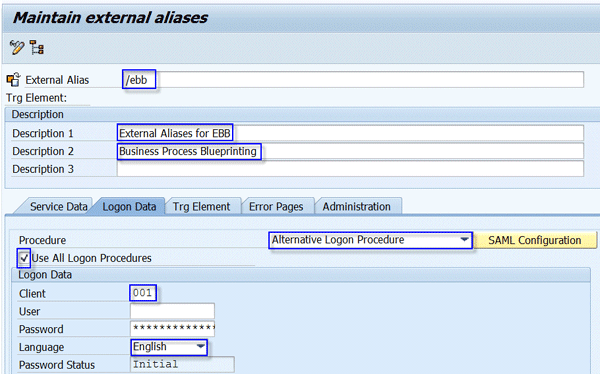
Figure 19
Maintain external aliases
On the Trg Element tab, follow and expand the path below /default_host/sap/bc/bsp/soco/ebbrepos (Figure 20). Ensure the service is activated (Figure 21). If it isn’t, right-click ebbrepos, select Activate Service, and click the save icon.
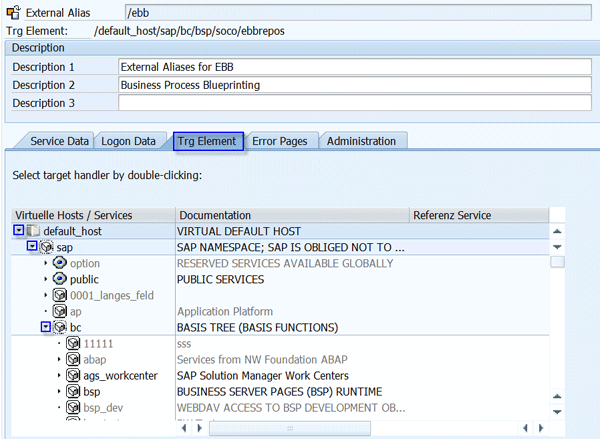
Figure 20
Ensure the service is activated
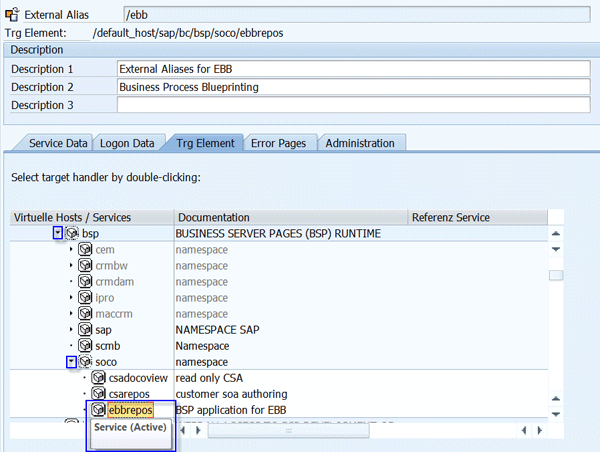
Figure 21
Activate the service
Enter /solmanbprinterface in the External Alias field (Figure 22). In the Description fields, one is sufficient but you may enter up to three. In this example, I entered External Aliases for BPR and Business Process Blueprinting. (You can see what the effect of entering two Description items would be in Figure 23.) Click the Logon Data tab and select Alternative Logon Procedure. Then select the Use All Logon Procedures check box. In the Client field, enter the client you are using (e.g., 001). Enter a logon language in the Language field. Once again, the User field must be blank for BPB to validate your credentials.
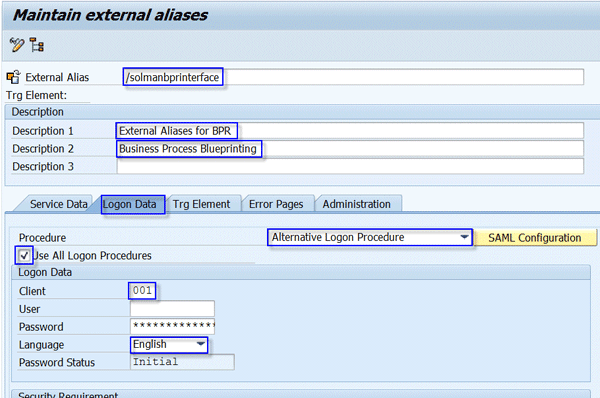
Figure 22
Enter logon data

Figure 23
Where the two Description entries would be listed
On the Trg Element tab, follow and expand the path below /default_host/sap/bc/solman/bpr and ensure the service is activated (Figure 24). If it isn’t, right-click bpr, select Activate Service, and save (Figure 25).
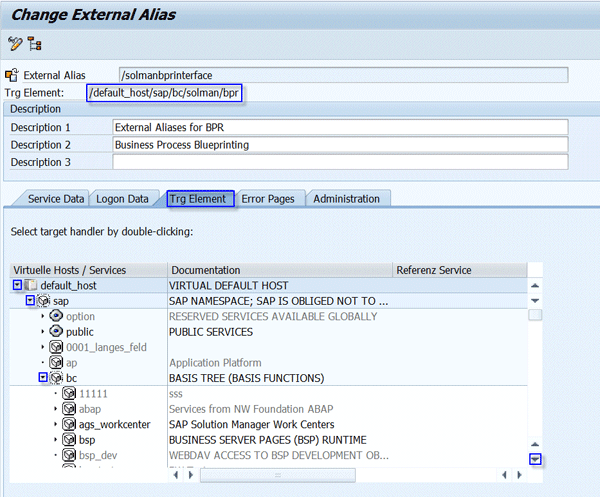
Figure 24
Ensure the service is activated
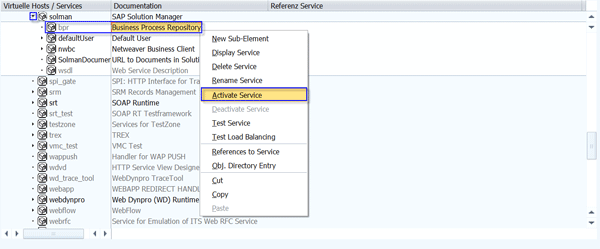
Figure 25
Activate the service if needed
Step 3. Create an RFC Destination in SAP Solution Manager
You perform this step to establish a connection with the BPR. Use transaction SM59 and on the Configuration of RFC Connections page, select the HTTP Connections to ABAP System folder (Figure 26). Then click the create icon in the toolbar.
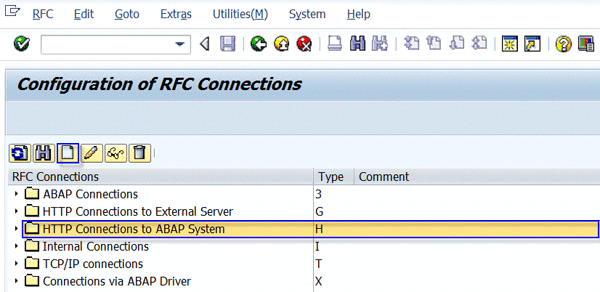
Figure 26
Configure the RFC connections
On the RFC Destination screen, enter the name of your destination. On the Technical Settings tab, enter the Target Host (the system name) and Service Number (the HTTP port number) details. To locate the Service Number, use transaction SMICM and click the services icon  . This displays the ports used. On the main menu under Services, you can verify the HTTP port is activated. In my example, I entered RFC Solution Composer for the description. In the Path prefix, enter /solmanbprinterface (Figure 27).
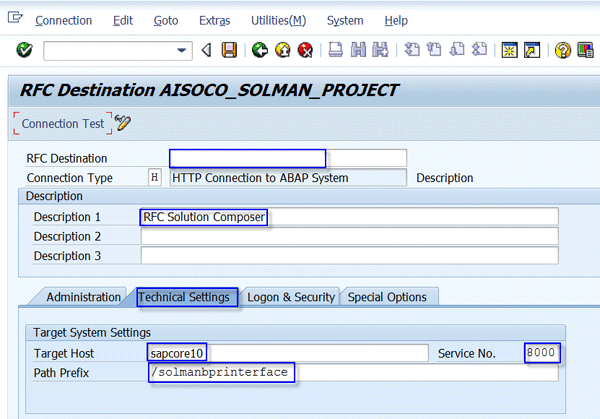
Figure 27
Enter the technical settings
On the Logon & Security tab, in the Logon with User display area, select the Basic Authentication radio button (Figure 28). Enter EN for English and the Client number. For user details, enter the User name and Password or select the Current User check box to have the currently logged-on user’s credentials filled.

Figure 28
Enter logon settings
Save and you see a message that indicates the destination is saved.
Step 4. Create Logical Ports for SAP Solution Manager
You need to create logical ports to push the blueprints back to SAP Solution Manager. Establish the first Logical Port /SOCO/CO_BSI_PROJECT_DIRECTORYINTERFACE. Use transaction soamanager and click the check mark icon. On the SOA Management screen, choose Service Administration tab and click the Web Service Configuration link (Figure 29).
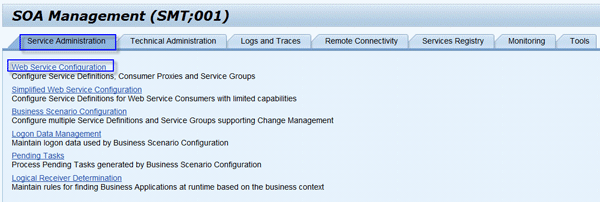
Figure 29
Click the Web Service Configuration link
On the Web Services Configuration screen, in the Search by drop-down list, select Consumer Proxy (Figure 30). Enter *Bsi* in the Search Pattern field. From the Search Results, select the first row /SOCO/CO_BSI_PROJECT_DIRECTORY_INTERFACE and click the Apply Selection check box.

Figure 30
Select the row and apply the selection
Under Details of Consumer Proxy, choose the Configurations tab and then click the Create button to create a logical port (Figure 31).

Figure 31
Create the logical port
In the SOA Management pop-up, select Manual Configuration as the Configuration Type (Figure 32).
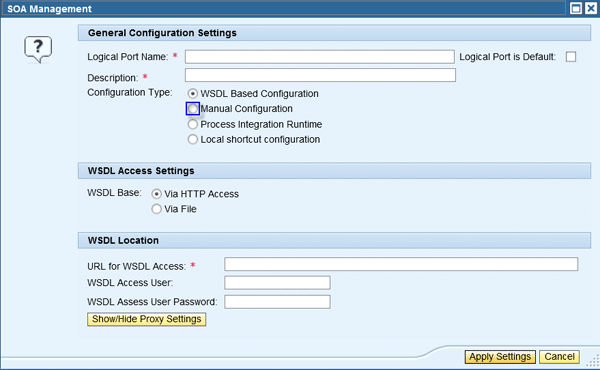
Figure 32
Set the configuration type
Enter LP_SOCO_SOLAR in the Logical Port Name field (Figure 33). Select the Logical Port as Default check box and enter a Description (e.g., Logical Port for BPB SolMan 7.1). Select the Manual Configuration radio button and then click the Apply Settings button.

Figure 33
Set the general configuration settings
Under the Web Service Configuration of Proxy Definition section, click the Consumer Security tab (Figure 34). Enter your User Name and Password.

Figure 34
Enter user credentials
Then select the Transport Settings tab (Figure 35). In the blank field for the URL Access Path, enter the following string: /sap/bc/srt/rfc/sap/bsiprojectdirectroyinterface/<client number>/bsiprojectdirectroyinterface/bsiprojectdirectroyinterface. To get the client number, navigate to the bsiprojectdirectroyinterface port using transaction SICF. If the bsiprojectdirectroyinterface port is inactive, then right-click and choose Activate Service.

Figure 35
Enter the transport settings
For the Computer Name of Access URL, enter the server name (e.g., sapcore10). Enter the Port Number of Access URL (e.g., 8000) and then save. To locate the port number, use transaction SMICM and click the services icon to display the ports that are used. On the main menu under Services, you can verify that the HTTP port is activated. Verify the State of the port as Active (Figure 36).

Figure 36
Verify the port is activated
Establish the second Logical Port /SOCO/CO_BSI_SMSY_INTERFACE. From the Search Results, select the second row for /SOCO/CO_BSI_SMSY_INTERFACE then click the Apply Selection button (Figure 37).
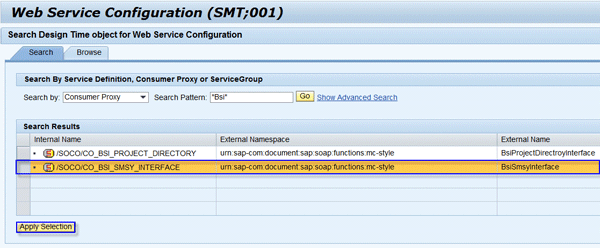
Figure 37
Select the second row
Under Details of Consumer Proxy, click the Configurations tab and then click the Create button (Figure 38).

Figure 38
Create the logical port
In the SOA Management pop-up, select Configuration Type as Manual Configuration (Figure 39).
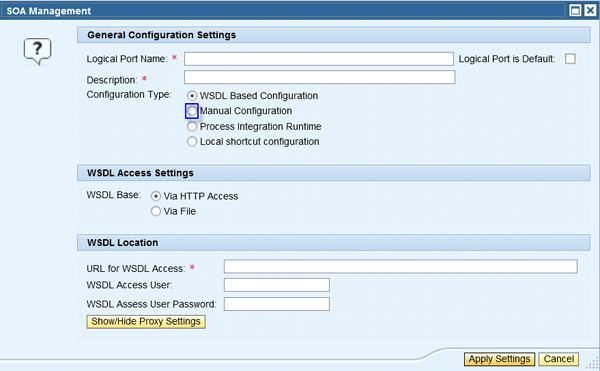
Figure 39
Choose the Manual Configuration radio button
Enter LP_SMSY as the Logical Port Name (Figure 40). Select the Logical Port is Default check box and enter a useful Description (e.g., Logical Port for BPB SolMan 7.1). Select Manual Configuration as the Configuration Type and then click the Apply Settings button.

Figure 40
Enter general configuration settings
Under the Web Service Configuration of Proxy Definition section, click the Consumer Security tab (Figure 41). Enter your User Name and Password.

Figure 41
Enter authentication information
Then click the Transport Settings tab (Figure 42). In the URL Access Path field, enter the string: /sap/bc/srt/rfc/sap/bsismsyinterface/<client number>/bsismsyinterface/bsismsyinterface. To get the client number, navigate to the bsismsyinterface port using the transaction SICF. If the bsismsyinterface port is inactive, then right-click and choose Activate Service. For the Computer Name of Access URL, enter the server name (e.g., sapcore10) and in the Port Number of Access URL field, enter the port number (e.g., 8000). Then save.
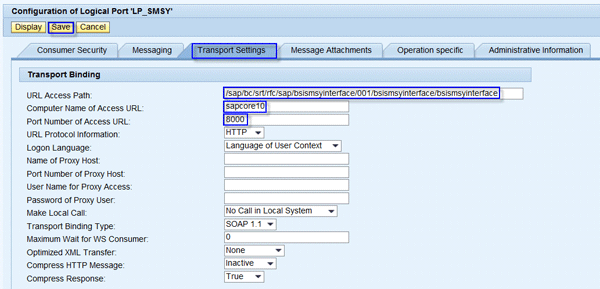
Figure 42
Enter transport settings
The last thing is to verify the state of the port is active, at which point you may log off and terminate the Web Dynpro session (Figure 43).

Figure 43
Verify the status as active
Step 5. Connect BPB to SAP Solution Manager
After completing the previous steps, including the prerequisites, open the following URL: https://<server> :< http port number>/ebb/setup.asp. The URL link should take you to the Business Process Blueprinting Server Administration page (Figure 44). Create a workspace by clicking Add New Workspace to produce the screen in Figure 45.
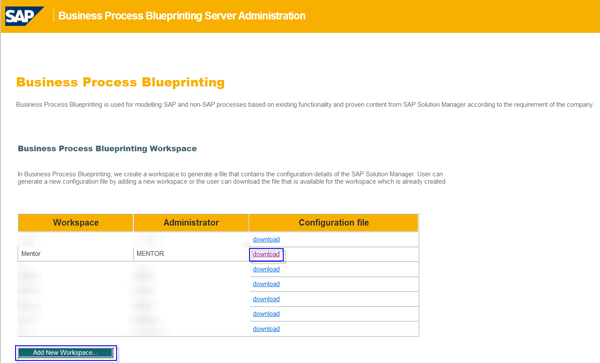
Figure 44
Open the BPB Server Admin page

Figure 45
Add a new workspace
Enter a name of your choice and click the Ok button. In the screen in Figure 44, a new key string is generated in the ebbconfig.txt file for every additional BPB client-side user. Click the download link in the Configuration file column and save the file ebbconfig.txt to your computer. The following information is included in the file:
- Server Name: The three character system ID
- Server: The fully qualified domain name
- The HTTP and HTTPS port, including the PackageID (referred above as the key string), which is 32 characters long
Then open the BPB client and on the main page click Dashboard and then Change Preferences (Figure 46).
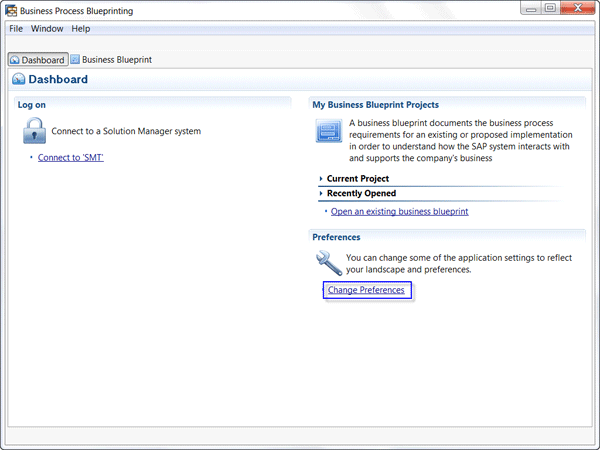
Figure 46
Change preferences
Fill in the blank highlighted fields: System Name, Server, and Port (Figure 47). Click the Advanced tab and in the blank field for Default Context, enter the key string obtained from the ebbconfig.txt file. Then enter the User Name and Password, and click the Apply and OK buttons. You should then be back on the main BPB page and under Dashboard you should be able to connect to SAP Solution Manager.
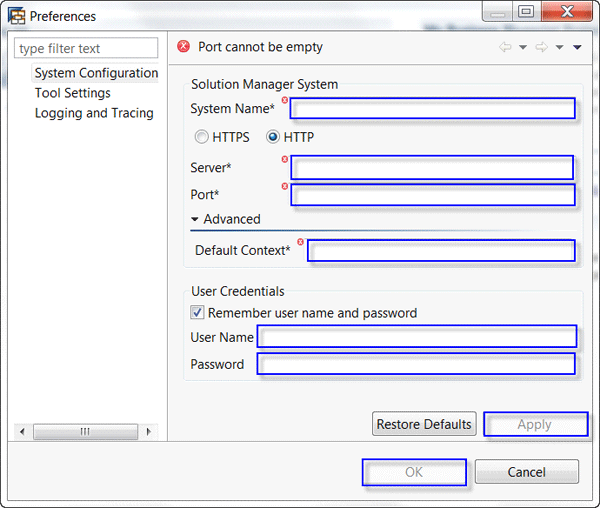
Figure 47
Fill in preferences
Mentor Visoka
Mentor Visoka is a consultant at CoreALM Corp., specializing in SAP Application Lifecycle Management with emphasis in SAP Solution Manager 7.0 and 7.1 and third-party solutions that are integrated with SAP Solution Manager. He has experience in project implementation and upgrades, specializing in requirements and design, including test management. He is a team leader in business process improvement, reverse business engineering, and defining process requirements via visualization. Mentor graduated with a degree in political science and a minor in international studies from George Fox University in 2005. He is experienced in CGMP and GAMP standards and is certified in ISO 9001:2008.
If you have comments about this article or publication, or would like to submit an article idea, please contact the editor.


