Set up standard Payroll infotypes to read payroll results without extensive programming or third-party products. In five steps you can extract the payroll results to infotypes. Then display the results, using standard transaction codes, or add them to a custom InfoSet for the creation of flexible queries.
Key Concept
Payroll infotypes are standard infotypes that you can map to Payroll results using wage types. Once the infotypes are set up, you can access them through standard HR transactions or queries to meet common payroll reporting needs.
Recently, I was training automotive company employees on what changes to expect when they upgrade from SAP Release 4.6C to SAP ERP 6.0. While I was covering new functionalities, they raised a question about the lack of flexibility for reporting on payroll results. Like most of us, they were using standard reporting, such as report RPCLSTRD, which you reach via transaction code PC00_M01_CLSTR (display payroll results).
To my great surprise, they did not realize that ever since Release 4.6B, SAP has enhanced its system, providing a quick way to retrieve payroll results through payroll infotypes. They were in fact missing a great functionality.
I will describe the five steps to enable this functionality in your system, along with the process for integrating them to a dedicated InfoSet. I trust this will reduce your daily pain by providing access to real Payroll data for your Payroll administrators – for example, to check, report on, or simply access payroll figures.
My examples use Germany (MOLGA 01) and standard SAP wage types (for example /101). I’m making the following assumptions:
- You have dedicated an infotype range such as 9000 to 9999 for Payroll infotypes
- You have already set up Payroll processes in SAP (for example, wage types)
- Payroll results are available in the payroll clusters
- You have relevant cross-client customizing authorizations and access to payroll clusters and master data (for example, objects P_PCLX and object P_ORGIN). Additional authorizations might apply according to your company’s policies.
- You are working in a sandbox environment to test this functionality.
Tip!
Before going into SAP Customizing, assign the relevant country code (MOLGA) in your user’s parameters. Otherwise, the system always prompts you to select a country among the list of all countries available. Access these parameters via transaction code SU3.
Set up the Payroll Infotypes
All Customizing activities in my article deal with cross-client tables, which means you should take care as any action you take affects the whole system. When accessing the customizing point, your SAP system triggers the warning message TB113 (Warning – Cross Client customizing in use). For more information, read the full documentation of system message TB113, which is provided inside the message, by clicking on the question mark icon.
To set up Payroll infotypes, follow IMG menu path SAP Customizing Implementation Guide>Personnel Management>Human Resources Information System>Payroll Results. To enable the access to the Payroll results, follow these five steps.
Step 1. Define evaluation wage types (transaction code S_AHR_61010413). In this step, you choose the name of the reporting wage type for reporting. Set the following information:
- The name of the evaluation type (be careful to abide by the rules for the naming conventions of a wage type)
- Set the cumulation type, if applicable. Typically, you could use a monthly, quarterly, or yearly cumulation.
- Choose the amount or the number value of the wage if necessary
- Set a long text field to describe the evaluation wage type (in international environments, do not forgot to translate the long text)
Note that table T52IC was missing some fields from Release 4.5B through Release 4.6C. Refer to SAP Note 377344 for correction details. Figure 1 illustrates the naming of the evaluation wage type.

Figure 1
View of table T52IC
Step 2. Assign wage types (transaction code S_AHR_61010418). You now map the evaluation wage type (Eval WT) against the wage type from the payroll wage type catalog. You access the wage type catalog by viewing table T512W. If you do not already have a list of all active wage types in your company, your payroll team should provide it.
One choice available in this step is the cumulation type, which is optional. Typically, you would use monthly, quarterly, or yearly cumulation. If the amount of the wage type is to be negative, mark the Neg. check box. Figure 2 shows how to map evaluation wage type /101 with the payroll wage type /101 Total gross amount.

Figure 2
The mapping between the evaluation wage type and the payroll wage type
I have used a one-to-one relationship in the naming convention. It is easier to identify the mapping when accessing the customizing activity. An evaluation wage type could be mapped against different payroll wage types, as needed.
Step 3. Set up Payroll infotypes (transaction code S_AHR_61010423). This is the most critical customizing activity because you are generating a new infotype in two steps:
- Set up a Payroll infotype with a naming convention such as 9XXX
- Validate which evaluation wage type this infotype will store
To set up the Payroll infotype, you need the following information:
- The Payroll infotype name, which must be included in the customer namespace 9000-9999
- The country grouping, which is defaulted by the system as you indicated a MOLGA while customizing each activity
- Type of Payroll infotype: leave blank for international (check the drop-down list for additional entries available for the US)
- Set the cumulation type if required
- Set the name of the infotype (in international projects, do not forget to translate the description)
- Flag the check box as active so that the Payroll infotype is active and can then be evaluated when you fill the Payroll infotypes
- (Optional) If using cumulated wage types, map your Payroll infotype against the same number – 9XXX, for example
Figure 3 shows the creation and naming of a dedicated payroll infotype

Figure 3
The creating, naming, and activation of a dedicated Payroll infotype
Click on the save icon (or use the shortcut Ctrl-F11). The system requests a transport order as a normal procedure. Save the information into a transport order. Select the new entry and left-click on Assign Evaluation WTs. Confirm the work area as shown in Figure 4.
Set the following information:
- The infotype number (your 9XXX infotype)
- The evaluation wage type
- (Optional) the cumulation type

Figure 4
Determine work area
Enter by clicking on the green V validation icon and then you see the information on the screen. Save the new entries by clicking on the floppy disk icon. To select the evaluation wage type to be part of the dedicated Payroll infotype, go to Dialog Structure>Payroll Infotypes>Assign Evaluation WTS.
Generate the Payroll infotype using the generate payroll infotype icon. Then confirm the creation of infotype 9976, as displayed in a standard pop-up message.
You then receive an information message directing you to read SAP Note 315000, regarding temporary data elements.
In the pop-up window that appears, provide and assign a transport package, as provided by your IT team. Do not assign in a local object because it leads to payroll infotype generation failure. Your system prompts you to assign a customizing transport request, which is provided by your Basis team. A success message is displayed, that confirms the creation of your infotype. If successful, proceed to step 4. If unsuccessful, review steps 1 through 3 again. This process is convenient because you do not need to perform the technical step required to create an infotype in transaction PM01.
Once created, the Payroll infotype bears the same technical properties as a Personnel Administration (PA) infotype. It means that it has a table PA9XXX, which you can view using transaction code SE16N, as of SAP Release 4.6C. In lower SAP releases you can use transaction code SE16 and structure P9XXX, which you can view using transaction code SE11. Figure 5 shows the newly created table PA9976.
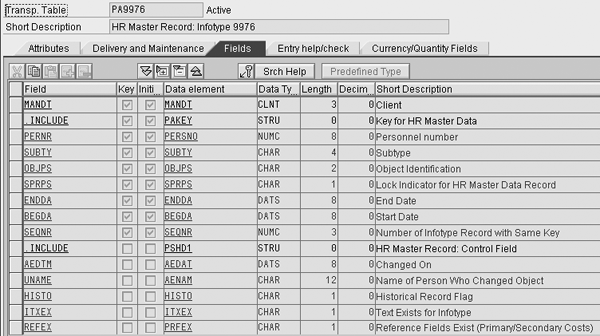
Figure 5
Display of transparent table PA9976
Step 4. Set up assignment to Payroll (transaction code S_AHR_61010427). This step marks Payroll infotypes that are meant to receive data automatically once Payroll runs, so a manual feed of infotypes is not required. To activate the automatic payroll reception, select the Active check box next to infotype 9976.
You can exit Customizing because you carried out all of the activities. However, note that some users like to stay in control and run the fill Payroll infotype process manually. This manual procedure is described in step 5. Because you created new Payroll infotypes, you or your administrator must update the authorization profile or you’ll be denied access to them.
Step 5. Run program fill Payroll infotypes (program RPABRI00). As this is your first time using this report (Figure 6), prior to any use of this program, I advise you to read the documentation provided in the program’s header menu (use the shortcut SHIFT-1).
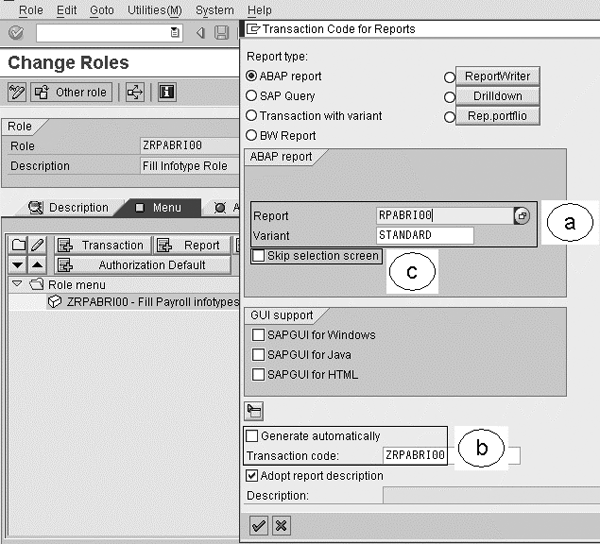
Figure 6
The addition of a report in the user menu
This program is not linked to any standard transaction code and most system administrators are not keen to grant access to transaction codes SA38 or SE38. Therefore, a smart alternative would be to add this program directly in the user’s menu. You can do so by taking advantage of the Profile Configurator (transaction PFCG). Your authorization team can take care of it, as shown in section a of Figure 6. Even smarter, when assigning this program, take advantage of the option that allows the assignment of a dedicated transaction – for example, ZRPABRI00 (section b) – instead of the standard generated transaction code. You could skip the selection screen (section c) to avoid giving users too wide a selection that might affect the system’s response time.
Run Program RPABRI00
If you want to run this program manually, provide the following information in the selection screen:
- Period – for example, January 2001 until December 2006
- Personnel number – for example 1011 or information to identify the target group
- The payroll infotype – for example, 9976
- Display statistics (notifications)
Now, run the report. Figure 7 illustrates the selection screen of the program RPABRI00.
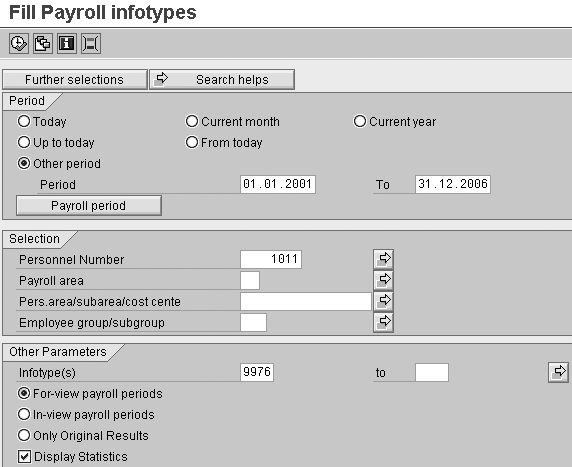
Figure 7
Selection options for running the report Fill Payroll infotypes
Check the notifications (statistics) as shown in Figure 8, which tell you whether or not the system found Payroll data in the clusters and transferred it to the Payroll infotype.

Figure 8
Successful notifications that payroll data has been found and transferred to Payroll infotype
Payroll infotype 9976 is now loaded with clustered payroll data. Payroll data is now available in the Payroll infotypes. If no notifications are available, it probably means that you have no payroll results in the cluster. Check with your Payroll department to see if this is the case.
Note
In the case of retroactive Payroll, changes are not directly fed into these Payroll infotypes unless you are using, as described previously, the automatic feed of the Payroll infotypes. If an automatic run is not active, you simply run program RPABRI00 once more.
Batch/Background Processing
Ideally, program RPABRI00 should run right after payroll has run in an automatic recurrent background run. I also suggest using transaction SM36 to set up an automatic background job. Figure 9 illustrates the sequence from time collection to payroll data extraction.

Figure 9
Cartography of programs sequencing for defining background job
You have now successfully mapped and filled the payroll results in five steps into dedicated Payroll infotypes. You now have two options for reading the newly accessible Payroll results.
Option 1: Access Payroll infotypes with transaction code PA20. Once you have created and loaded the Payroll infotypes with Payroll data from the Payroll cluster, you can view the information contained in the infotypes (display only) through standard transaction PA20 (display HR master data). Figure 10 illustrates a Payroll infotype selection screen. Figure 11 shows a Payroll infotype detailed overview screen. Figure 12 shows a payroll infotype with a focus on one Payroll result.
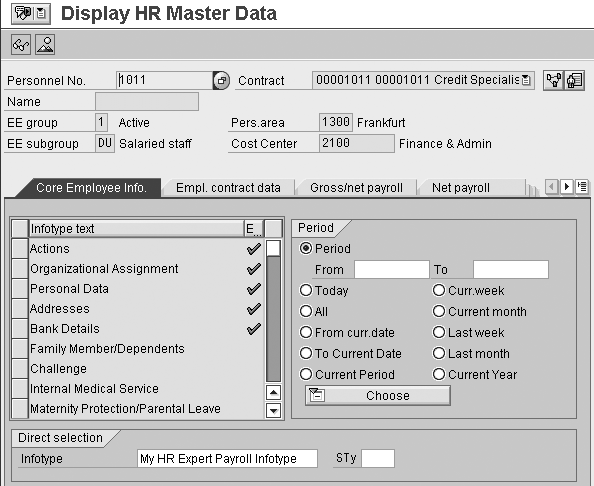
Figure 10
Display Payroll results using the HR display transaction code

Figure 11
Detailed overview screen of all entries for the infotype 9976
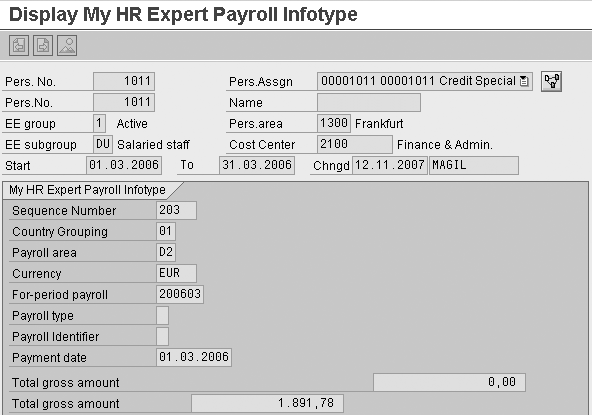
Figure 12
Focus on one Payroll result entry within infotype 9976
Option 2: Add Payroll infotypes to InfoSets (transaction code SQ02). As your Payroll infotypes are now in the standard environment, you can easily add them to an InfoSet using logical database PNP (Personnel and Time master data). You then can easily report on them. Figure 13 shows the insertion of the Payroll infotypes into an InfoSet.

Figure 13
Add Payroll infotype into the InfoSet
Figure 14 illustrates a sample payroll InfoSet that now contains the Payroll infotype 9976 (My HR Expert Payroll I). The following SAP Notes will help you deploy payroll infotypes: 31500, 125921, 377344, 782240, 857379, and 850697.

Figure 14
A dedicated Payroll InfoSet with a Payroll infotype
Martin Gillet
Martin Gillet is an SAP-certified HR consultant (ECC 6.0, SAP R/3 Enterprise, and 4.0B) who works freelance on international projects. He graduated with honors in Human Resources Management from Belgian Haute Ecole Namuroise Catholique (HENaC). Martin has worked with SAP R/3 since 1997 in the chemical, catering, pharmaceuticals, telecommunications, food, banking, and oil industries. He has focused on SAP HR since 1998 and has other SAP expertise including XSS, LSO, E-Recruiting, CATS, Reporting, Authorizations, and SAP NetWeaver Portal. Martin is the author of Configuring and Customizing Employee and Manager Self-Services in SAP ERP HCM. The book explores the options for customizing ESS and MSS to meet specific business needs.
You may contact the author at mgillet@yahoo.com.
If you have comments about this article or publication, or would like to submit an article idea, please contact the editor.


