Learn how to configure SAP Audit Management to harness the benefits of risk-based auditing while integrating the system with SAP Process Control and SAP Risk Management.
Key Concept
SAP Audit Management is part of SAP Assurance and Compliance Software (powered by SAP HANA) that provides enterprises with an end-to-end audit management solution. The product is designed to help audit departments build audit plans, prepare audits, analyze relevant information, document results, form an audit opinion, communicate results, and follow up. A risk-based approach to audit planning and execution helps the internal audit department focus on risks that are critical to the enterprise.
SAP Audit Management enables organizations to standardize audit practices by enforcing process control in audit documentation, reporting, and test procedures. It controls the routing of working papers with workflow capability. This is designed to bring process efficiency to the internal audit department.
You can access the audit system via the back end and the Fiori-based front end. I focus on the configuration in the back end (accessed via the SAP GUI) which invariably drives the operational activities performed in the front end. The system administrator typically logs on to the back-end system to set up audit management customization settings, which form the basis for the use of the system by the audit team. The front end represents the interface for end users of the system to perform day-to-day internal audit functions.
The audit life cycle is made up of the phases shown in Figure 1.

Figure 1
Audit phases
This article is based on the latest release, which is SAP Audit Management 1.2 Support Package 1. I discuss the back-end system configuration as it relates to the following:
- Maintenance of currency
- Maintenance of an audit group
- Maintenance of an audit schema
- Maintenance of field attributes
- Maintenance of an identity provider
- Maintenance of application users and roles
- Definition of a number range for business objects
- Definition of an organization group
- Maintenance of dimension types
- Risk register settings
- Maintenance of control attributes
- Maintenance of control effectiveness
- Maintenance of views for risk and controls
- Import of master data
- Maintenance of audit types
- Definition of audit categories
- Resource management setting
- Maintenance of scope schema for work programs
- Setup of findings, recommendations, and actions
- Maintenance of a report category and rating
- Maintenance of a working paper category
In upcoming follow-on articles, I will discuss the operational use of this product from an end-user perspective.
Note
I do not discuss the technical setup of the system, which is a
prerequisite for following the instructions in this article. I have
adopted the standard definition as much as possible, while also
explaining how to add custom entries where applicable. For details about
how to set up the SAP Audit Management system, consult the article “
Get
Your SAP System Landscape Technically Ready for SAP Assurance and
Compliance.”
Maintenance of Currency
This configuration activity allows you to define the currency for monetary value entries in the SAP Audit Management system. You can only define a single currency for SAP Audit Management. Figure 2 shows the screen of a typical configuration for this setting that depicts the currency for SAP Audit Management set as US dollars (USD). If you attempt to add another entry, you get the error message An entry already exists with the same key. This configuration setting can be accessed by following menu path transaction GRCAUD_IMG > SAP Audit Management > Basic Settings > Maintain Audit Currency.
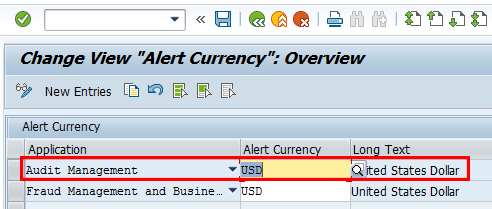
Figure 2
Definition of currency for SAP Audit Management
Maintenance of an Audit Group
This customizing activity allows you to define audit groups. An audit group is a mandatory definition for auditable items and audit. It is a field that must be filled with values when creating auditable items and an audit, which is why values must be maintained in customizing first.
An audit group allows you to build a flexible authorization concept as it relates to who can see what (and do what) in the SAP Audit Management system. The system comes standard with some audit groups as seen in Figure 3, which can be accessed via menu path transaction GRCAUD_IMG > SAP Audit Management > Basic Settings > Define Audit Groups. Examples of the standard audit group are a compliance and forensic audit and an information technology and security audit. You can create your own audit groups to reflect the organization’s business process by clicking the New Entries button. Enter values for the group and a description and save your entry by clicking the save icon.

Figure 3
Definition of audit groups
Maintenance of an Audit Schema
This configuration activity allows you to maintain the audit schema. The configuration of the audit schema is central to the flow of business objects in the SAP Audit Management system. The customization node contains two main folders. The first is the Status folder, which shows the assignment of business objects to a status. For example, Actions (an example of a business object) can assume statuses such as 01 (In Process), 02 (Completed), and 03 (Obsolete) as shown in Figure 4. You access it via menu path transaction GRCAUD_IMG > SAP Audit Management > Basic Settings > Define Audit Status Schema. The system comes standard with these entries and SAP recommends that the status names be used as delivered.

Figure 4
Status definition in the audit schema
The second main folder in this customization node is Schema. Basically, the audit schema allows you to define:
- The initial status of a business object when it is created.
- The business rules that drive the transition of objects from one status to the other.
- The actions that trigger the transitioning from status to status.
- Application roles that are allowed to perform specific actions.
Figure 5, which can be accessed by choosing the schema folder, shows the pre-delivered SAP Audit schema and the associated business objects. SAP recommends that you make a copy of the audit schema into a customer namespace and not use the standard schema as is. You can make a copy of the standard schema by clicking the copy icon, maintaining the configuration as desired, and clicking the save icon.

Figure 5
Schema definition for different business objects
To review or maintain how the system manages an object’s change from one status to another, click a schema entry associated with a business object (for example, DEFAULT schema for AUDIT business object) as shown in Figure 6.

Figure 6
A standard schema for different objects
Double-click the Status Transition folder. Figure 7 displays with the status transition change entries.
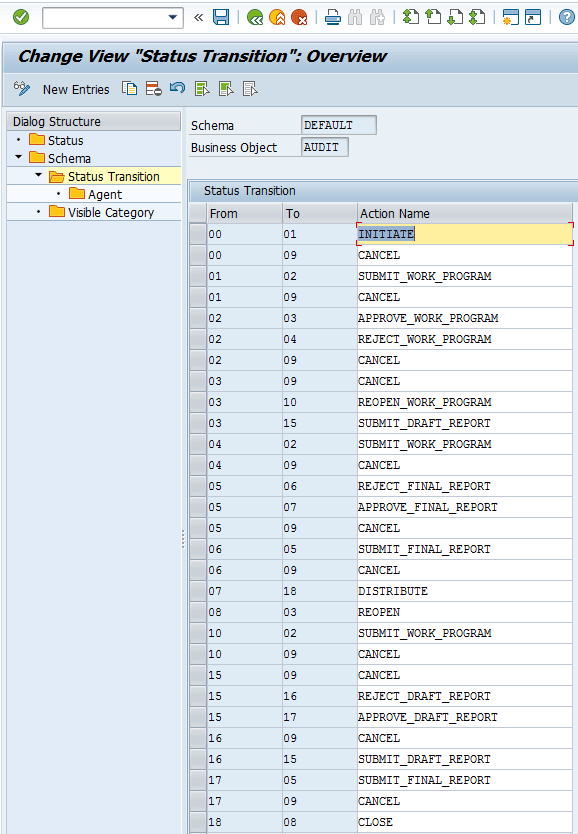
Figure 7
Status transition entries for an audit schema
As seen in the details of the status transition definition, every change in status is associated with an action. For example, if the audit business object moves from draft to initiate, the corresponding action is labelled INITIATE, which depicts the action initiating the change of status. Furthermore, the figure shows all possible status changes that can be associated with a business object for a particular schema. For example, status draft (00) can have a destination status of 01 (INITIATE) and 09 (CANCEL).
As part of the audit schema definition, the agent folder allows you to define the responsible application roles associated with the action. To review the definition of the application roles for a status transition entry, highlight an item as shown in Figure 8.

Figure 8
Highlighted entry in the status transition window
Double-click the Agent folder. Figure 9 displays with the corresponding application roles.

Figure 9
Application role assignment to status transition entry
If a business object has a parent object, you need to specify the parent object type in the business object type (Bus. Obj) column. The Level column typically contains numeric values that are used to define multiple level approvers for actions such as approving work programs and audit reports.
The Visible Category folder (Figure 10) allows you to define a relationship between audit papers and working paper categories. For example, categories A (planning) and B (preparation) are displayed on the Working Paper tab for all audits in execution (03).
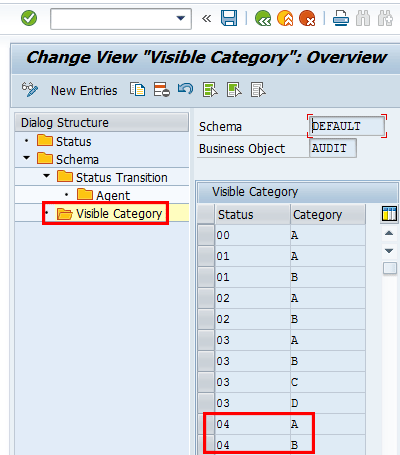
Figure 10
Visible category definition for audit business objects
Maintenance of Field Attributes
This customization activity allows you to define the attribute (optional, hidden, or mandatory) for business objects, specifically auditable items and findings. The following attribute definitions are supported for auditable items: impact level, likelihood level, requested level, and risk level. These attribute definitions are supported for findings: cause description, condition description, consequence description, and criteria. This configuration activity can be accessed via menu path transaction GRCAUD_IMG > SAP Audit Management > Basic Settings > Maintain Field Attributes (Figure 11). It depicts the impact level and cause description fields for auditable items and findings, which are optional and required respectively when you create the corresponding business objects.

Figure 11
Definition of field attributes for business objects
You can add new entries for supported entries by clicking the New Entries button, providing the values as desired, and clicking the save icon.
Note
After you change the attribute of a field, transactions
/IWFND/CACHE_CLEANUP and /IWBEP/CACHE_CLEANUP should be executed to
clear the cache.
Maintenance of an Identity Provider
This customization setting allows you to define the identity provider setting for users. This definition acts as the data source and drives the information for a user’s details. The system supports Lightweight Directory Access Protocol (LDAP) and SAP NetWeaver (SAP Audit Management) identity providers by default, as seen via menu path transaction GRCAUD_IMG > SAP Audit Management > Basic Settings > Application User and Role Settings > Maintain Identity Provider Settings (Figure 12).

Figure 12
Definition of an identity provider
You can add a new identity provider by choosing the New Entries button, providing the required information, and clicking the save icon.
Note
If you want to add a custom identity provider, you need to write
explicit code using the ABAP class interface
IF_GRCAUD_IDENTITY_PROVIDER.
Checking the cache option improves performance as it allows the system to load user information faster in the front end. If you use LDAP as the identity provider, you need to maintain the mapping relationships between the fields of users in SAP Audit Management and the fields from the LDAP server via the Fields folder, as shown in the example in Figure 13.

Figure 13
Field mapping definition for LDAP identity provider
Note
If you define LDAP as the identity provider, the configuration must have
been properly set up via transaction LDAP as detailed in this help page
https://help.sap.com/saphelp_nwes72/helpdata/en/48/75bec8bc27055ee10000000a42189b/content.htm.
The LDAP user information stored in SAP Audit Management is not
automatically updated. Therefore, if the source information changes, you
need to execute program GRCAUD_SYNC_USER_CACHE to update the
information. You can schedule this to run at defined intervals via
transaction SM36.
Maintenance of Application Users and Roles
SAP Audit Management supports two types of roles: application roles and PFCG roles. Application roles are the roles you see on the user interface—for example, audit manager, audit lead, and auditor. You can assign these roles to users when you create audit business objects. PFCG roles, on the other hand, can function as the back-end roles that give authorization to access menu items to users. They can be mapped to application roles to identify specific audit actors such as audit manager, audit lead, or auditors. This customization setting allows you to define role mapping and the identity provider to use for specific application roles in the system. You access the setting via menu path transaction GRCAUD_IMG > SAP Audit Management > Basic Settings > Application User and Role Settings > Maintain Application User and Role Settings (Figure 14). The initial screen shows the standard application roles in the system.
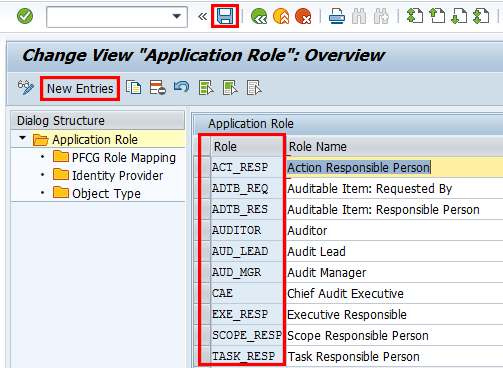
Figure 14
Application roles for audit management
You can create custom application roles by clicking the New Entries button and providing the required details, that is, the role identifier and role description. Then click the save icon.
The PFCG Role Mapping folder allows you to associate a role defined in PFCG with the application role as shown in Figure 15, which is accessible by choosing the PFCG Role Mapping folder after highlighting an application role (AUDITOR in this case). In this example, the PFCG role Z:AUDITOR is associated with the auditor application role. This means that anyone assigned the role in the back-end system is a potential auditor who can effectively be selected as an audit protagonist in the front end.

Figure 15
Assignment of PFCG role to an application role
The Identity Provider folder allows you to specify the identity provider for an application role as shown in Figure 16. You access Figure 16 by double-clicking the Identity Provider folder. As seen in this example, the identity provider is set to NW (NetWeaver) which means detail about the application role is fetched from the SAP Audit Management system.
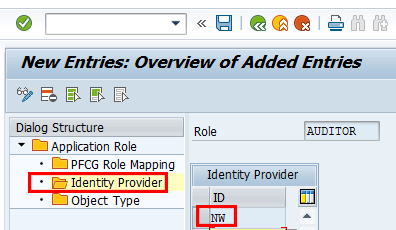
Figure 16
Identity provider definition for an audit role
The Object Type folder allows you to define specific attributes for business objects. Access it by double-clicking the Object Type folder (Figure 17). This definition influences the display and attribute of an audit role entry in the front end for the applicable business object. In this example, the audit business object has the Auditor application role as an audit team member (Team check box) and allows the definition of multiple auditors as team members (Multiple check box). An actor is not automatically assigned to an audit (Auto Asgn. check box). The sequence column allows you to define the order in which the application role is listed in the definition of team members screen in the front end.
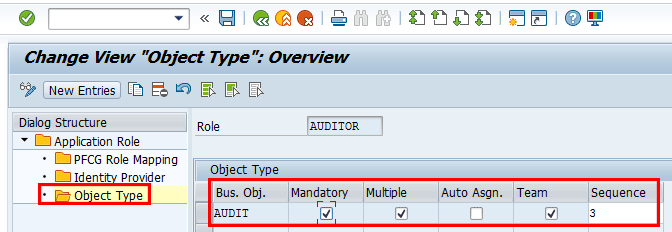
Figure 17
Definition of attributes for an object type
Definition of a Number Range for Business Objects
Definition of a number range is an important customization activity in the SAP Audit Management system because you cannot create most business objects without first setting up the corresponding number range, which invariably drives the number assignment. The following number ranges need to be defined in order to use the SAP Audit Management system: organization, dimension, risks, controls, auditable items, audit plans, and audit. I only discuss the setup of a number range for an organization and then provide the customization path to perform the setup for other business objects.
To be able to define an organization entry in the front end, a number must be assigned that uniquely identifies an organization entry. The definition of a number range for an organization can be done via menu path transaction GRCAUD_IMG > SAP Audit Management > Master Data > Organizations > Maintain Number Range for Organizational Units (Figure 18). When an organizational unit is created or imported, the next free number in the current number range interval is assigned. When the end of the current interval is reached, the next interval becomes the new current interval.

Figure 18
Initial screen for the maintenance of a number range for an organization
Click the change intervals icon to review the defined entry and Figure 19 displays.

Figure 19
Number range definition for an organization
You can add entries as desired by clicking the add entry icon and providing values for the different fields as desired. Then click the save icon.
You can adopt the same approach to maintaining number ranges for the other business objects as detailed below:
- Number range definition for dimension via menu path transaction GRCAUD_IMG > SAP Audit Management > Master Data > Dimensions > Maintain Number Range for Dimensions
- Number range definition for risk via menu path transaction GRCAUD_IMG > SAP Audit Management > Master Data > Risk Register > Maintain Number Range for Risks.
- Number range definition for controls via menu path transaction GRCAUD_IMG > SAP Audit Management > Master Data > Risk Register > Maintain Number Range for Controls
- Maintain number range definition for auditable items via meu path transaction GRCAUD_IMG > SAP Audit Management > Audit Planning > Audit Universe > Maintain Number Range for Auditable Items
- Maintain number range definition for audit plans via menu path transaction GRCAUD_IMG > SAP Audit Management > Audit Planning > Audit Plan > Maintain Number Range for Audit Plans
- Maintain number range for audit via menu path transaction GRCAUD_IMG > SAP Audit Management > Audit Planning > Audit > Maintain Number Range for Audits
Note
For number range definition in the SAP Audit Management system, the Ext
check box should not be marked to avoid errors, as the objects should be
associated with an internal number range definition.
Definition of an Organization Group
Organization groups are used to categorize organization entries in the system. They offer an approach to enforce security and an authorization concept on business objects. An organization group can be defined via menu path transaction GRCAUD_IMG > SAP Audit Management > Master Data > Organizations > Define Organization Groups (Figure 20). The assignment of an organization group to an organization is a mandatory definition in the front end. That is why it should be maintained first in the back end.

Figure 20
Definition of an organization group
To define an organization group, you typically click the New Entries button, enter values in the Org. Group column, provide a description, and save your entry.
Maintenance of Dimension Types
A dimension allows you to define attributes of an audit that can drive risk-based auditing by assigning a risk scope to the dimension in the front end. Dimensions are housed in dimension types. Examples of dimension types can be line of business or region. The definition of a dimension can be reviewed or maintained in customization via menu path transaction GRCAUD_IMG > SAP Audit Management > Master Data > Dimensions > Maintain Dimension Types (Figure 21). Click the New Entries button, enter values, and click the save icon.

Figure 21
Definition of dimension types
After the dimension entries have been created in the back end, you need to perform the follow-on setup in the front end. Access the SAP Audit Management user interface (UI) by following menu path Audit Management, powered by SAP HANA > Start Audit Management WebUI (Figure 22).

Figure 22
Home screen of the SAP Audit Management UI
Click the Dimensions tile. Figure 23 displays.

Figure 23
Initial screen for the setup of dimensions
In the upper part of the screen, click the dimension you want to maintain, which is Region in this example. Click the Create button. In the screen that displays, enter values for the title and description as shown in Figure 24.

Figure 24
Definition of dimension for a dimension type
Click the Save button. Figure 25 displays.
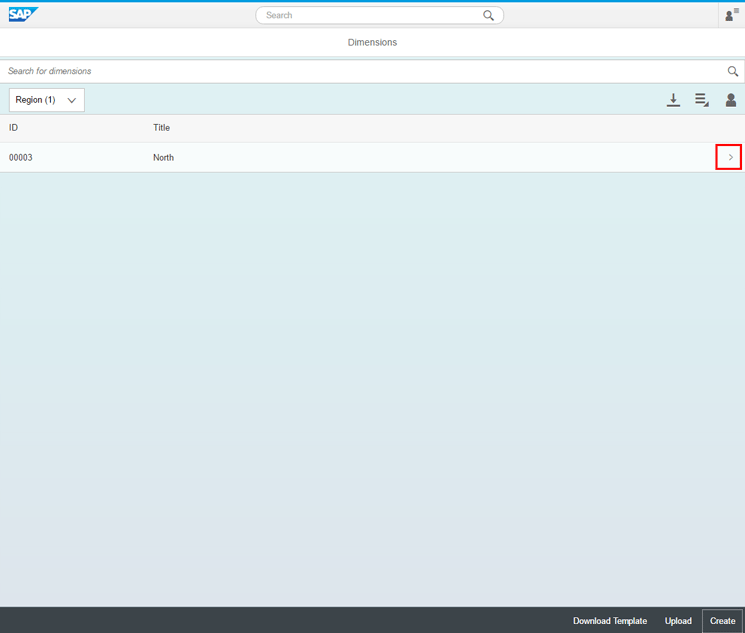
Figure 25
Newly created dimension
Click the front arrow icon and in the screen that displays, click the KRIs (Key Risk Indicators) tab and Figure 26 displays.
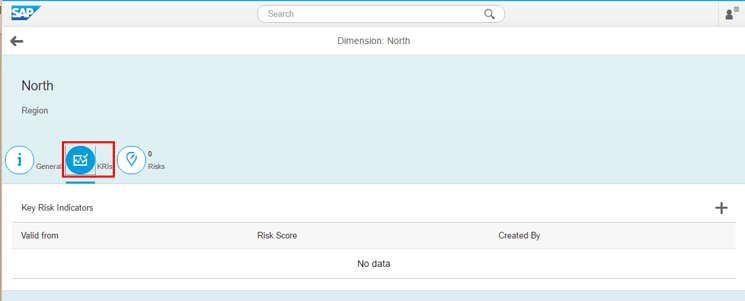
Figure 26
Initial screen for the definition of a KRI for a dimension
Click the add icon (+) and in the screen that displays (with default risk score of 50), use the slide cursor to set the risk score by moving it to the right (increase) or left (decrease). You see Figure 27 if you move the cursor to the right (at 60).

Figure 27
Setting of a risk score for a dimension
Click the OK button and Figure 28 displays.

Figure 28
Defined risk score for a dimension
Click the Risks tab and Figure 29 displays.

Figure 29
Risk tab of a dimension
Click the add (+) icon to add a risk from the risk library. In the screen that displays, click a risk as shown in Figure 30.

Figure 30
Risk selection for addition to a dimension
Click the OK button. Figure 31 displays with the confirmation of the assignment of a risk to the dimension.

Figure 31
Confirmation of assignment of a risk to a dimension
Risk Register Settings
The SAP Audit Management system is designed to support a risk-based audit. Therefore, risk attributes such as risk level, impact level, likelihood level, and risk types need to be defined to capture the details of associated risks.
Risk Level: The risk level allows you to define the aggregated measure that reflects both the impact and the likelihood of possible irregularities associated with a risk or auditable item in an enterprise. To maintain risk attributes, follow menu path transaction GRCAUD_IMG > SAP Audit Management > Master Data > Risk Register > Maintain Risk Levels (Figure 32).

Figure 32
Definition of risk levels
To add a new entry, click the New Entries button and provide values for the risk level and description fields. Save your entry by choosing the save icon.
Impact level: The impact level allows you to define the effect of specific irregularities on an identified risk or auditable item. To maintain risk attributes, follow menu path transaction GRCAUD_IMG > SAP Audit Management > Master Data > Risk Register > Maintain Impact Levels (Figure 33).
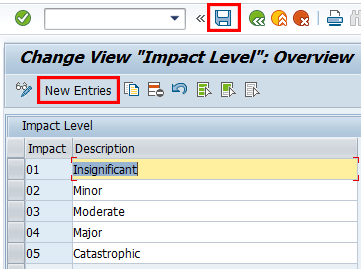
Figure 33
Definition of an impact level
To add a new entry, click the New Entries button and provide values for the impact and description fields and save your entry by clicking the save icon.
Likelihood Levels: This indicates the probability that irregularities exist in a risk or an auditable item. To maintain risk attributes, follow menu path transaction GRCAUD_IMG > SAP Audit Management > Master Data > Risk Register > Maintain Likelihood Levels (Figure 34).
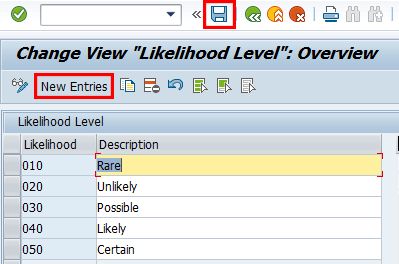
Figure 34
Definition of a likelihood level
To add a new entry, click the New Entries button and provide values for the likelihood and description fields. Save your entry by clicking the save icon.
Define Risk Types: This configuration activity allows you to group the risks defined in the risk library. Follow menu path transaction GRCAUD_IMG > SAP Audit Management > Master Data > Risk Register > Define Risk Types (Figure 35).

Figure 35
Risk type definition
To add a new entry, click the New Entries button and provide values for the risk type and description fields. Save your entry by clicking the save icon.
Maintenance of Control Attributes
Controls are an integral part of a risk-based audit. The system allows you to associate controls with risk and an auditable item. Therefore, controls need to be set up properly to take advantage of this offering. In this section I discuss the definition of control attributes and control effectiveness settings. The menu path to go to the customization node is transaction GRCAUD_IMG > SAP Audit Management > Master Data > Controls > Maintain Control Attribute Values. You can define a control category, control nature, and control significance. The entries in the screenprint are provided as standard. If you need to add additional values, click the New Entries button, enter the values, and click the save icon.
Control categories are used to group controls according to their area or certain attributes—for example, IT controls or financial controls. To maintain control categories, follow menu path transaction GRCAUD_IMG > SAP Audit Management > Master Data > Controls > Maintain Control Attribute Values > Control Category folder (Figure 36).

Figure 36
Definition of a control category
To add a new entry, click the New Entries button and provide values for the category and category text fields. Save your entry by clicking the save icon.
Control nature is an attribute used to define the use case of the control, for example, reconciliation or segregation of duties. To maintain the control nature, follow menu path transaction GRCAUD_IMG > SAP Audit Management > Master Data > Controls > Maintain Control Attribute Values > Control Nature folder (Figure 37).
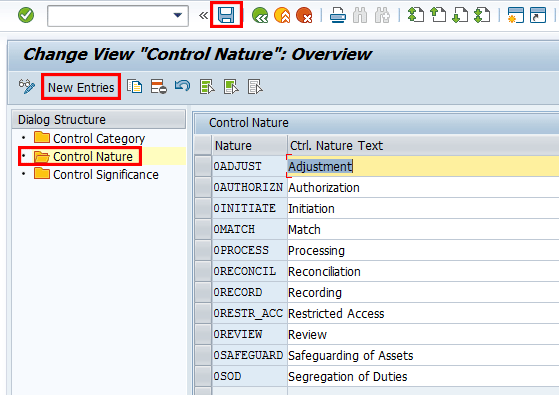
Figure 37
Definition of the control nature
To add a new entry, click the New Entries button and provide values for Nature and Ctrl. Nature Text fields. Save your entry by clicking the save icon.
Control significance indicates the importance of the control to a process or an enterprise—for example, a standard control or a key control. To maintain control significance, follow menu path transaction GRCAUD_IMG > SAP Audit Management > Master Data > Controls > Maintain Control Attribute Values > Control Significance folder (Figure 38).

Figure 38
Definition of control significance
To add a new entry, click the New Entries button and provide values for the Ctrl. Sig. Text fields. Save your entry by clicking the save icon.
Maintenance of the Control Effectiveness Setting
The control effectiveness customization activity allows you to define how an internal auditor rates control effectiveness following a control testing exercise—for example, is the control effective or not effective? To review or maintain possible settings for rating control effectiveness, follow menu path transaction GRCAUD_IMG > SAP Audit Management > Master Data > Controls > Maintain Control Effectiveness Settings (Figure 39).
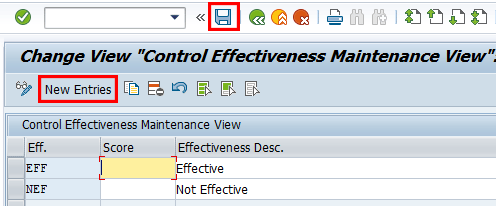
Figure 39
Definition of control effectiveness values
To add a new entry, click the New Entries button and provide values for the Eff. And Effectiveness Desc. fields. Save your entry by clicking the save icon. If you like, you can assign a score to each definition to provide a weighting for the assignment or quantification of the effectiveness. To assign a score you add a number in the Score column.
Maintenance of Views for Risk and Controls
The system allows you to define target views for risks and controls in the system. The definition of view can be used to drive the authorization concept in terms of who can see what. More importantly, it is a value that needs to be provided when attempting to import risk and controls into the SAP Audit Management system from the back-end system. Views can be maintained via menu path transaction GRCAUD_IMG > SAP Audit Management > Master Data > Importing Master Data > Maintain Views for Risks and Controls (Figure 40).

Figure 40
Definition of views
To add a new entry, click the New Entries button and provide values for the View ID and Name fields. Save your entry by clicking the save icon.
To associate risks and controls to auditable items or items, the objects must be associated with the Internal Audit view. If during the initial import, you associate the risks and controls with any other view, you need to import the risk into the internal audit view using the other view as the source based on CL_GRCAUD_LOCAL_CONNECTOR implementation class.
Import of Master Data
The SAP Audit Management system supports the import of objects from the legacy and back-end systems. For example, it is possible to import risk, controls, and organization from the SAP Process Control/Risk Management system into the SAP Audit Management system. The connector type setting defined in this customizing activity depends on the source system. The standard connector types provided by the SAP Audit Management system include:
- FILE for upload from a file.
- LOCAL for import within the application itself.
- SAP_RM for scenarios in which SAP Process Control and Risk Management is the source system.
The following implementation classes are delivered by SAP Audit Management based on the connection type as shown in Figure 41, which can be accessed by following menu path transaction GRCAUD_IMG > SAP Audit Management > Master Data > Importing Master Data > Set Up Connectors.
- CL_GRCAUD_FILECONN_DISPATCHER: This implementation class is used to upload master data stored in a local file to the SAP Audit Management system.
- CL_GRCAUD_LOCAL_CONNECTOR: This implementation class is used to import risks between different views within the SAP Audit Management system.
- CL_GRCAUD_EGRC_CONNECTOR: This sample implementation class is used to import master data from SAP Risk Management and SAP Process Control to SAP Audit Management.

Figure 41
Setup of connector types
If you want to create a new connector type, click the New Entries button, provide the required information as desired, and click the save icon.
Note
If you create a custom connector type, you need to develop your own
implementation class to satisfy your specific business requirement.
To configure the actual target, which is known as the connector, highlight a connector type, for example, SAP_RM. and click the Connector folder. In the screen that displays, click the New Entries button. Enter values as desired and save the entry as shown in Figure 42 by clicking the save icon. The Active check box needs to be ticked to make the definition useable for import purposes.

Figure 42
Definition of a connector for master data import
The connector value (ACS2GRC in this case) needs to be set up in transaction code SM59 before it is defined as a connector entry in this customization setting. The connector value is predefined in transaction code SM59 and points to a particular back-end system. In this example, the RFC destination is pointing to the back-end SAP Risk Management/Process Control system.
The organization structure defined in the back-end system can be seamlessly imported into the SAP Audit Management system. To import the organization into the SAP Audit Management system, execute program GRCAUD_IMPORT_ORG via transaction code SE38 (not shown). In Figure 43 that displays, enter values for the connector and the default group.

Figure 43
Initial screen for the import of an organization
Click the execute icon and Figure 44 should display when the import has finished, showing the details of the organizations imported into the system.
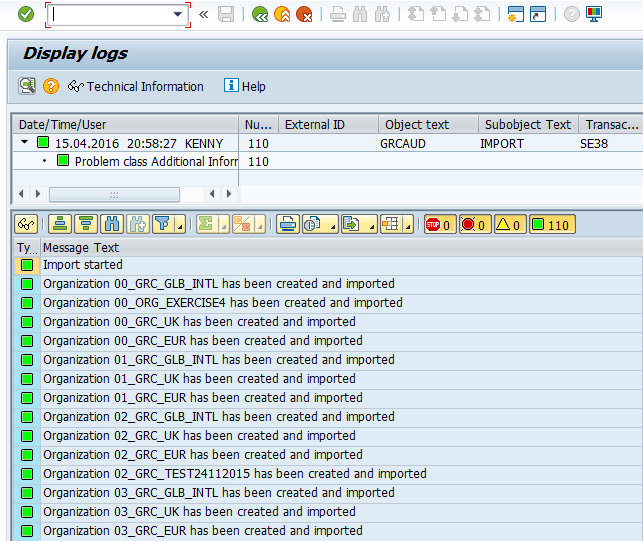
Figure 44
Import log for an organization
To see the imported organization in the front end, log on the SAP Audit Management UI (Figure 45) by following menu path Audit Management, powered by SAP HANA > Start Audit Management WebUI.

Figure 45
Home page of the SAP Audit Management UI
Click the Organizations tile, and the imported organization displays as shown in Figure 46.

Figure 46
Imported organizations in the front end
Risk is another important master data that can be imported into the SAP Audit Management system from the back-end system. To import risk, execute program GRCAUD_IMPORT_RISK and in the screen that displays, enter a value in the Connector field as shown in Figure 47.

Figure 47
Connection definition in the program to import risk
Click the execute icon and in the screen that displays, enter values as desired or as shown in Figure 48 to import all risks into the internal audit view (Target View). The risk level field allows you to limit the risk to be imported by the risk level.

Figure 48
Definition of the option for the import of risk
Click the execute icon and the logs of the import display when the import is finished, as shown in Figure 49.
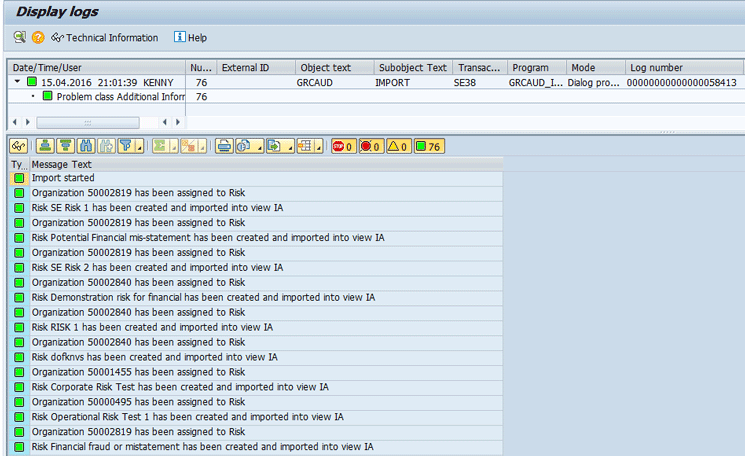
Figure 49
Log of the import of risk into the SAP Audit Management system

Figure 50
Imported risks in the SAP Audit Management UI
Controls can be imported from the back-end system into the SAP Audit Management system by executing program GRCAUD_IMPORT_CONTROL via transaction code SE38. In the screen that displays, enter a value for the Connector field as shown in Figure 51.

Figure 51
Value definition for connector in the initial screen for import of controls
Click the execute icon, and in the screen that displays, enter values to restrict the controls to be imported based on attributes such as category, control significance, and control automation as desired, or as shown in Figure 52. I have not defined any restriction so all controls will be imported into the internal audit (IA) view.

Figure 52
Criteria definition for the import of controls into the SAP Audit Management system
Click the execute icon and Figure 53 should display with the logs of the imported controls after the import has finished.
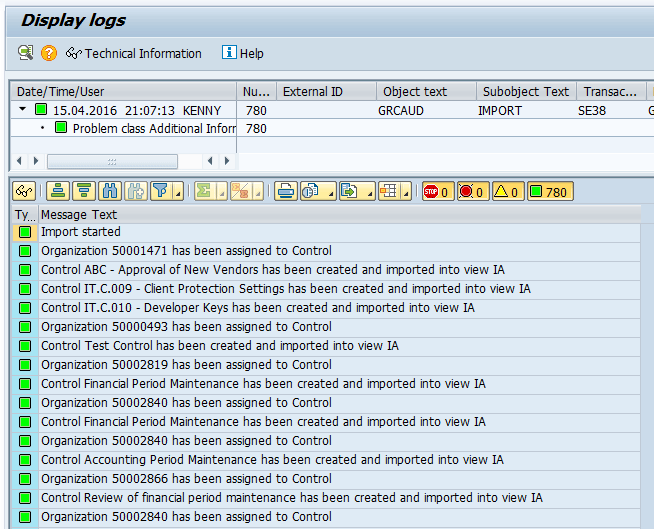
Figure 53
Log of imported controls into the SAP Audit Management system
To review the imported controls, click the Controls tile in the SAP Audit Management system user interface in Figure 45 and Figure 54 should display.
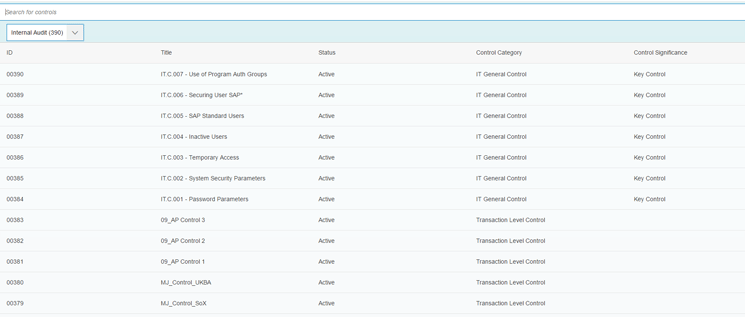
Figure 54
Imported controls into the SAP Audit Management system
The logs of the import of these objects can also be reviewed via transaction code SLG1 (Figure 55).

Figure 55
Initial screen for application logs
Define the restriction criteria as desired and click the execute icon. Figure 56 should display with the relevant logs.

Figure 56
Log of import operation in the application log tool
To successfully import master data from the SAP Process Control/SAP Risk Management system into the SAP Audit Management, the back-end system must be at a specific minimum Support Package level and the applicable SAP Notes should be implemented as detailed in Table 1.
| Master data |
Minimum Support Package level |
Corresponding SAP Note |
| Risks |
SAP Risk Management 10.1 SP06 |
SAP Note 2028714 |
Controls and risk-control matrix |
SAP Process Control 10.1 SP06 |
SAP Note 2004563 |
Control test history |
SAP Process Control 10.1 SP08 |
SAP Note 2086212 |
Control test history |
SAP Process Control 10.1 SP09 |
SAP Note 2135045 |
Organizations |
SAP Risk Management 10.1 SP11 |
SAP Note 2189968 |
Table 1
Minimum Support Package or SAP Note level required in the source system to import master data
Maintenance of Audit Types
Audit type definition is mandatory during the creation of an audit business object as it offers a way to group different audit activities. This customizing activity allows you to maintain audit types for different audits and assign scope schemas and audit status schemas to different audit types. The audit type can be maintained by following menu path transaction GRCAUD_IMG > SAP Audit Management > Audit Planning > Audit > Define Audit Types (Figure 57).
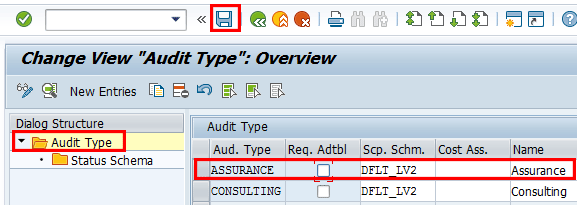
Figure 57
Attribute definition for an audit type
To add a new entry, click the New Entries button and enter values as desired. Save the entry by clicking the save icon.
The Req. Adtbl column check box allows you to determine whether it is mandatory to assign auditable items during creation of an audit or not. To review or maintain the status schema for different business objects for a specific audit type, highlight the audit type and double-click the status schema folder. Figure 58 displays.

Figure 58
Assignment of a status schema to business objects
To add a new entry, click the New Entries button and enter values as desired. Save the entry by clicking the save icon.
Definition of Audit Categories
Audit categories drive the sorting of an audit. When you create an audit, you assign an audit category to it. Examples of standard audit categories include corporate audit, financial audit, and operation audit. To review or maintain audit categories, follow menu path transaction GRCAUD_IMG > SAP Audit Management > Audit Planning > Audit > Define Audit Categories (Figure 59).
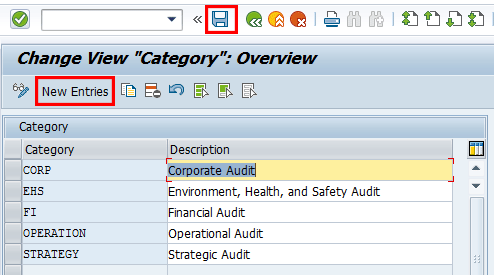
Figure 59
Definition of audit categories
To add a new audit category, click the New Entries button and provide values in the Category field and a Description as desired. Click the save icon.
Resource Management Setting
The background job GRCAUD_SYNC_USER, which can be executed via transaction code SE38, is used to synchronize audit team information. The program finds all users associated with an application role and creates a record for each user in the SAP Audit Management system. Users are consequently available for selection as part of the audit staff in the front end. In the initial screen that displays, enter a value for the application role—for example, AUDITOR, as shown in Figure 60.
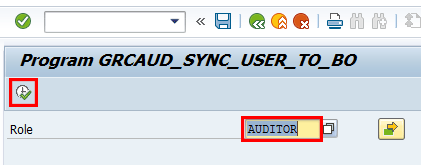
Figure 60
Initial screen of the user synchronization job
Click the execute icon. Figure 61 displays with the logs of the synchronization run. In this example, JOHN_AUDITOR1 and JOHN_AUDITOR2 are both synced in the SAP Audit Management system from the identity provider system.

Figure 61
Synchronization of the audit staff with the users from the identity provider
Definition of a Skill Set and Skills
This customizing setting allows you to define skill sets and skills for internal auditors. This customizing setting influences which skill sets and skills can be entered for each auditor in the My Profile tile in the front end. To review or maintain a skill set and skills, follow menu path transaction GRCAUD_IMG > SAP Audit Management > Audit Planning > Resource Management > Maintain Skills for Audit Staff. Click the Skill Set folder (Figure 62), which shows the standard entries. To add entries, click the New Entries button and provide an identifier for the skill set and corresponding description. Save your entry by clicking the save icon.
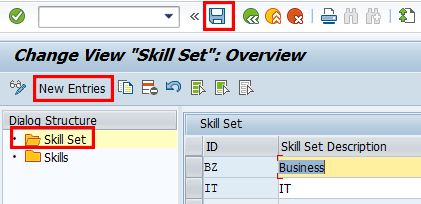
Figure 62
Skill set definition
To review or maintain skills, double-click the Skills folder (Figure 63), which shows the standard entries. To add entries, click the New Entries button and provide an identifier for the skill set and corresponding description. Save your entry by clicking the save icon.

Figure 63
Skills definition
Maintenance of Scope Schema for Work Programs
This customizing activity allows you to define how many scope levels you want to have in an audit work program, and the name of the scopes. It also allows you to define if the scope schema is active or not and if you have the ability to specify a default scope schema.
To review or maintain this configuration setting, follow menu path transaction GRCAUD_IMG > SAP Audit Management > Audit Preparation > Define Scope Schema for Work Programs (Figure 64).

Figure 64
Schema definition for work programs
To add a new entry, click the New Entries button and enter values as desired. Save the entry by clicking the save icon.
To review or maintain the number of levels associated with a scope schema, highlight an entry and double-click the Schema Level folder. Figure 65 displays. The level allows you to structure the work program consistently based on the audit type. It is just like a table of contents with headings and sub-headings.
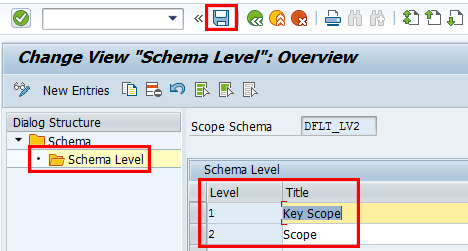
Figure 65
Schema level (two levels) definition for a scope schema
To add a new entry, click the New Entries button and enter values as desired. Save the entry by clicking the save icon.
Setup of Findings, Recommendations, and Actions
The Finding Type field is a mandatory field that needs to be maintained when a finding is created. This customizing activity allows you to classify a risk for findings based on the risk area impacted by the findings.
To review or maintain finding types, follow menu path transaction GRCAUD_IMG > SAP Audit Management > Audit Execution > Findings, Recommendations, and Actions > Define Finding Types (Figure 66). Examples of standard finding types in the system include compliance, fraud, and market risk.

Figure 66
Definition of finding types
To add entries, click the New Entries button and provide an identifier for the finding type and corresponding description. Save your entry by clicking the save icon.
The Finding Category allows you to sort and organize findings for reporting purposes. To review or maintain a finding category, follow menu path transaction GRCAUD_IMG > SAP Audit Management > Audit Execution > Findings, Recommendations, and Actions > Maintain Finding Category (Figure 67). Examples of standard finding categories provided by the system include Board Relevant or Non Board Relevant.

Figure 67
Maintenance of a finding category
To add entries, click the New Entries button and provide an identifier for the finding category and corresponding description. Save your entry by clicking the save icon.
Finding Ranking is used to classify the risk in values to allow the prioritization of possible actions to undertake for the mitigation of an identified risk. Examples of the values that can be defined include high, medium, and low. The definition of a finding ranking is mandatory when creating findings. To review or maintain a finding raking, follow menu path transaction GRCAUD_IMG > SAP Audit Management > Audit Execution > Findings, Recommendations, and Actions > Maintain Finding Ranking (Figure 68).
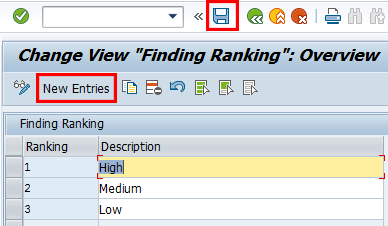
Figure 68
Definition of the finding ranking
To add entries, click the New Entries button and provide an identifier for the finding ranking and corresponding description. Save your entry by clicking the save icon.
An Action Type is used to group actions under an action plan. An examples of an action type is a milestone. It is mandatory to assign an action type to an action when it is created. To review or maintain action types, follow menu path transaction GRCAUD_IMG > SAP Audit Management > Audit Execution > Findings, Recommendations, and Actions > Define Action Types (Figure 69).

Figure 69
Definition of action types
To add entries, click the New Entries button and provide an identifier for the action type and corresponding description. Save your entry by clicking the save icon.
Maintenance of the Report Category and Rating
A Report Category indicates the form of the report. You can use it to classify and sort reports. The standard report categories defined in the system are memo and report. You can review or maintain report categories via transaction GRCAUD_IMG > SAP Audit Management > Audit Reporting > Define Report Categories (Figure 70).

Figure 70
Definition of the report category
To add entries, click the New Entries button and provide an identifier for the report category and corresponding description. Save your entry by choosing the save icon.
Report Rating reflects the state of the control environment in an organization following an audit. As a mandatory definition when you submit an audit report, it serves as a benchmark against which management can measure improvements. Examples of standard report ratings in the system are satisfactory, needs improvement, or unsatisfactory. You can review or maintain the report rating via menu path transaction GRCAUD_IMG > SAP Audit Management > Audit Execution > Audit Reporting > Define Report Ratings (Figure 71).
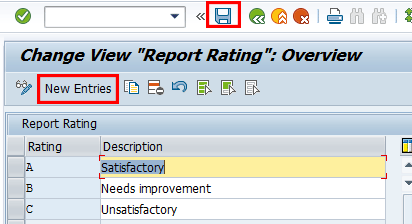
Figure 71
Definition of report rating
To add entries, click the New Entries button and provide an identifier for the report ranking and corresponding description. Save your entry by clicking the save icon.
Maintenance of Working Paper Category
In this customizing activity, you can maintain the categories for managing working papers and associate a file generation scenario to each category for the generation of working papers.
Working papers can be created, generated, and managed during different phases of the audit life cycle. They are organized in different categories. You can review or maintain the working paper category via menu path transaction GRCAUD_IMG > SAP Audit Management > Working Paper Management > Maintain Working Paper Categories (Figure 72).

Figure 72
Definition of a work paper category
To add entries, click the New Entries button and provide an identifier for the Working Paper Category, report ranking, and corresponding description. You enter a value for the Cat. field and consequently a value in Scn. field. Associate the entry with a file generation scenario and save your entry by clicking the save icon.
Note
SAP recommends that you not make changes to default categories. Instead,
create custom working paper categories to meet your business
requirements.
Kehinde Eseyin
Kehinde Eseyin is a security architect. He holds a bachelor’s degree in computer science. He has about 12 years of IT security, governance framework, IS risk, and compliance experience gained by working in numerous global organizations. Over the years, he has demonstrated competencies in security design, information assurance, cyber security, data privacy, threat and vulnerability management, penetration testing, business architecture, project management, IT audit, IS controls framework, and identity and access management.
You may contact the author at eseyinok@gmail.com.
If you have comments about this article or publication, or would like to submit an article idea, please contact the editor.


