Learn how to develop a customized workflow when a travel request needs to be approved from all cost center owners involved in that travel request. The cost center owners are usually the persons responsible for their respective department in an organization.
Key Concept
Travel Management is a submodule of SAP ERP Human Capital Management. It allows companies to process and categorize all employee travel to ensure expenses are done properly.
SAP ERP Human Capital Management (SAP ERP HCM) Travel Management allows you to use a travel request workflow. An employee creates a travel request in the SAP system using transaction code TRIP. Usually, the system distributes 100 percent of the cost to the master cost center of the employee.
Sometimes a situation requires that you distribute the travel cost to more than one cost center. For example, imagine a person is traveling for multiple purposes for his company. His travel cost should then be distributed and approved across the various cost centers.
In this scenario, the traveler needs the approval of all cost center owners (e.g., departments) to distribute the cost. This type of approval is not available in a standard SAP travel workflow. To remedy this problem, I have developed a dynamic approval-level workflow, which I describe later. I develop a customized business object, new methods, and two workflows to deal with this situation. This article is intended for ABAP and workflow developers.
Approve Travel Request Process Flow
Start with transaction TRIP and record the details of the travel request, including trip start and end date, and destination. After saving the travel request, a workflow triggers for approval of the request by the supervisor. The supervisor either sends it back for correction or accepts the request. When the request is accepted an email is sent by the workflow to the traveler for his approval. When the supervisor rejects his travel request a notification of rejection is sent to the requester. A process flow is shown in Figure 1.

Figure 1
Standard flow of a travel request
The Solution
Now I move forward to cover the whole scenario as described above. In my example, I’m creating a travel request using transaction code TRIP for employee 100055. Enter the start and end date of the trip and the destination system shows the 100 percent cost distribution to the master cost center of the traveler as shown in Figure 2.

Figure 2
Travel request screen and cost distribution icon
Click the open cost distribution screen icon indicated in Figure 2 to bring up the screen in Figure 3. The cost is typically distributed 100 percent to the master cost center, but in my example I’m splitting it into more than one cost center to meet the needs of the example company.

Figure 3
Cost distribution screen
Workflow Development
I am assuming you have basic knowledge of workflow development. First, start the workflow designer by transaction SWDD and click the header icon. Enter an abbreviation and description of workflow and save it (Figure 4). Leave the Release status and SAPphone options alone.
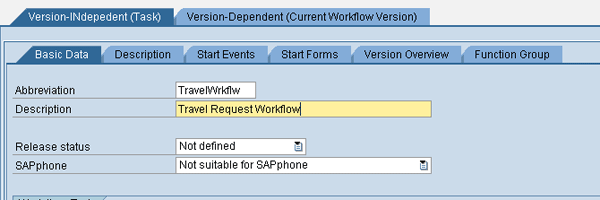
Figure 4
Workflow definition screen
Figure 5Figure 5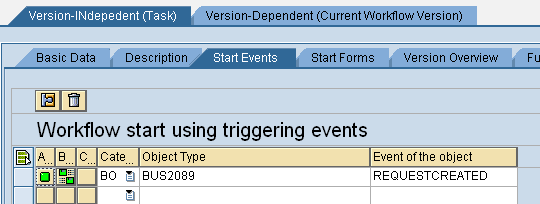
Figure 5
Business object and workflow link
Figure 6
Figure 6
Workflow container
Figure 7
Figure 7
Element window
Figure 8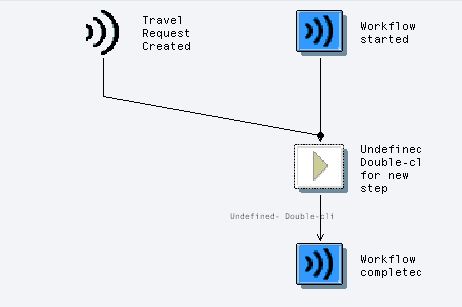
Figure 8
Workflow designer
Table 1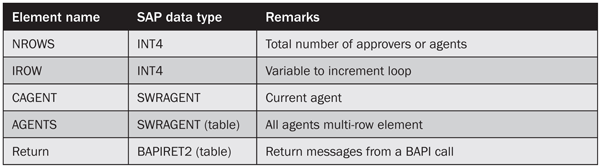
Table 1
Create container elements
Figure 9Figure 10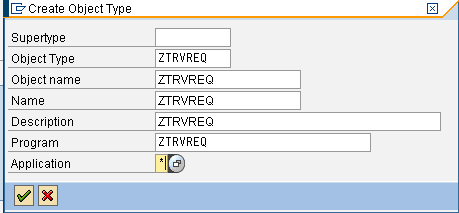
Figure 9
Business object creation

Figure 10
Business object created
Figure 11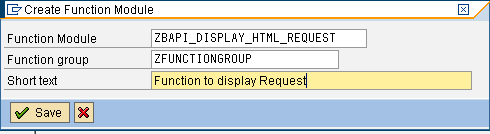
Figure 11
Function module creation screen
Figure 12Figure 13Figure 14
Figure 12
Function module development screen

Figure 13
Table type parameters

Figure 14
Source code. You can download this at the bottom of the article.
Figure 15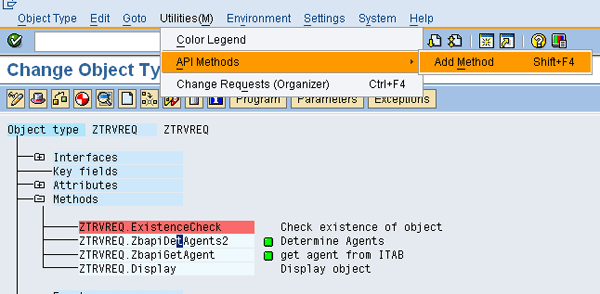
Figure 15
Click Add Method
Figure 16Figure 17Figure 18
Figure 16
Add method screen
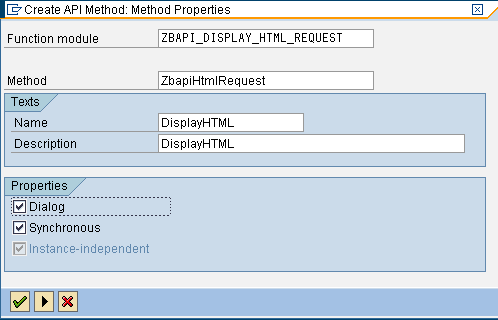
Figure 17
Insert the new method in the business object

Figure 18
All import and export parameters
Figure 19Figure 20
Figure 19
Last screen to create a method

Figure 20
The new method in the business object
- IMPORT: Employee_NO Type PSKEY-PERNR and Trip_No Type BAPITRIP-TRIPNO
- EXPORT: NROWS TYPE ADACACHE-CA_HIT
- TABLES: RETURN LIKE BAPIRET2 and CAGENTS LIKE SWRAGENT.
Copy the source code for this function module, which I’ve provided in Figure 21, in the Source code tab.

Figure 21
Source code. You can download this at the bottom of the article.
Next, the function module needs to get the current agent from this table of agents. Create function module ZBAPI_HRTR_GET_AGENT with the following parameters:
- IMPORT: IROW TYPE ADACACHE-CA_HIT
- EXPORT: CAGENT TYPE SWRAGENT
- TABLES: RETURN LIKE BAPIRET2 and CAGENTS LIKE SWRAGENT
The source code is shown in Figure 22.

Figure 22
Source code. You can download this at the bottom of the article.
Figure 23
Figure 23
All methods created in the business object
Workflow Development
First, add the step type activity to determine the agents in your workflow. Click the task menu icon and select Create task from the context menu (Figure 24). Enter getAllAgents and a description of the step (Figure 25). Enter ZTRVREQ as the Object Type and ZBAPIDETAGENTS as the Method.

Figure 24
Select Create task from the context menu

Figure 25
Standard task screen
Figure 25Figure 26
Figure 26
Binding between task and method
Figure 27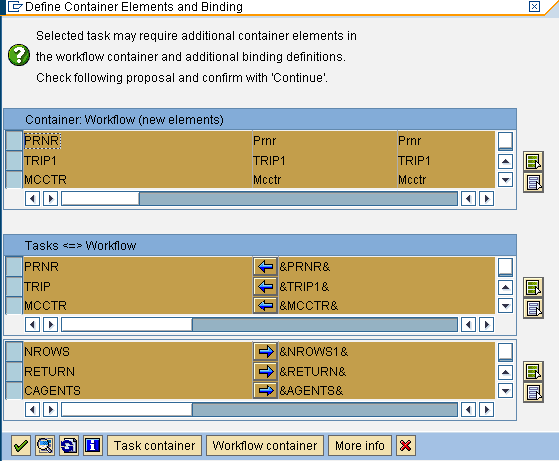
Figure 27
The system suggests you create elements in workflow
Figure 28Figure 29
Figure 28
Binding between workflow and task

Figure 29
Binding between workflow and task
Now insert the step loop in the workflow. This loop is used to go through all agents in the return table. Name it LoopCheck and set the conditions as shown in Figure 30.
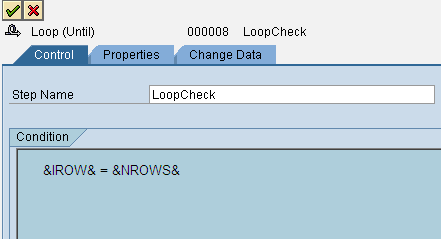
Figure 30
Loop through until value of IROW = NROWS
Insert a step task activity inside this loop. Create a task as already shown to bring up the screen in Figure 31.
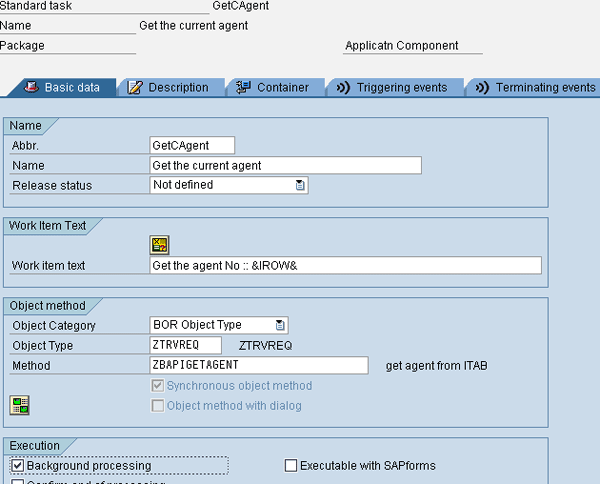
Figure 31
Next standard task screen
Figure 32
Figure 32
Binding between method and task
Figure 33
Figure 33
Workflow as developed so far
Table 2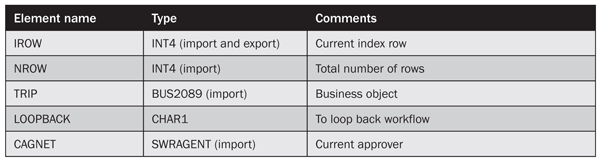
Table 2
Create container elements
Figure 34
Figure 34
Loop condition until the container element takes value X
Figure 35
Figure 35
User decision step in workflow
Figure 36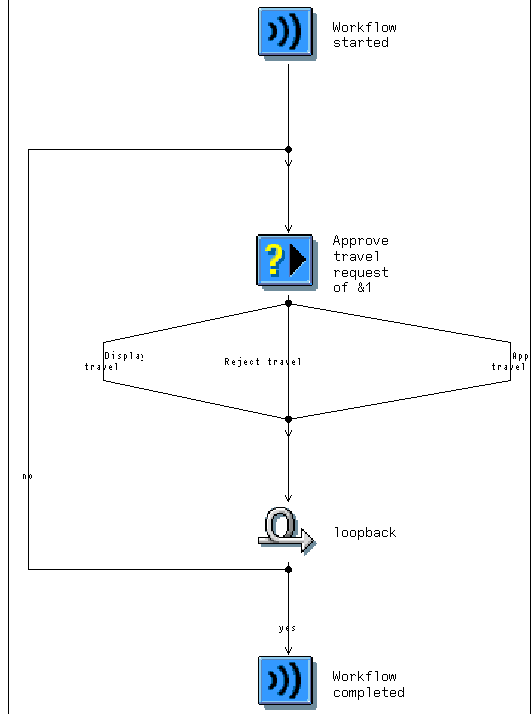
Figure 36
Workflow developed so far
Figure 37Figure 38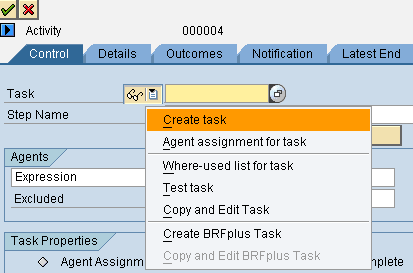
Figure 37
Create a task

Figure 38
Display activity task
Figure 39
Figure 39
Binding between method and task
&TRIP.EMPLOYEENUMBER& <=> &EMPLOYEENO&
Next is &TRIP.TRIPNUMBER& <=> TRIPNO
On the approve travel request node of the user decision, insert the container operation and set the element LOOPBACK value X to exit from loop(until) as shown in Figure 40.

Figure 40
Set loop back element value X
Figure 41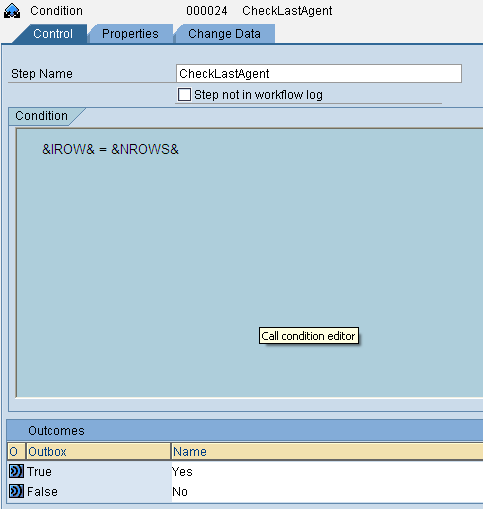
Figure 41
Condition task set condition IROW to NROWS
Figure 42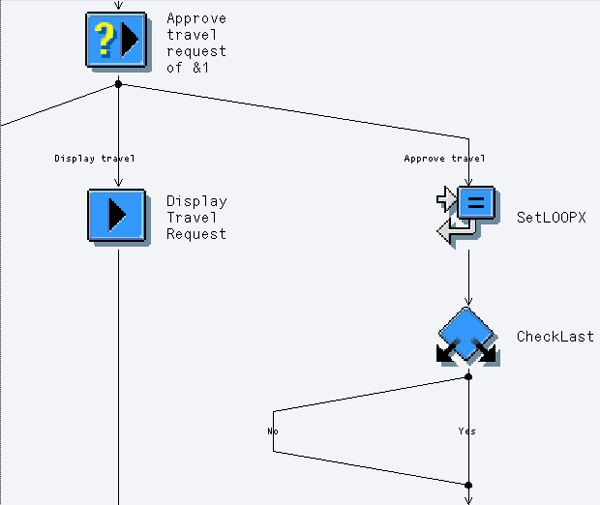
Figure 42
The Yes and No nodes of the condition step
Figure 43Figure 44
Figure 43
Create a task

Figure 44
Task to change the status of the request to approve
In agent assignment, set this task as a general task. Save the task and create binding between the task and workflow as:
&TRIP& <==> &_WI_OBJECT_ID&
Now come toward the reject option of the decision task node that is the rejection of travel workflow at any stage. Use two container operations and set the LOOPBACK container value X and set IROW = NROW to exit from all loops and levels of this workflow. For this purpose, you need to insert two container operations. In the first container operation step, set LOOPBACK X. In the second operation step, set IROW = NROW and send a rejection mail to the workflow creator. Figure 45 shows the subworkflow.
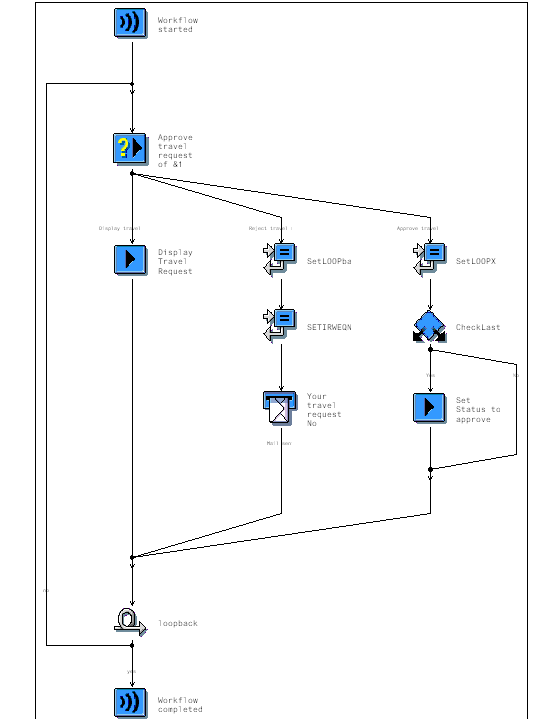
Figure 45
Subworkflow developed so far
Figure 46Figure 47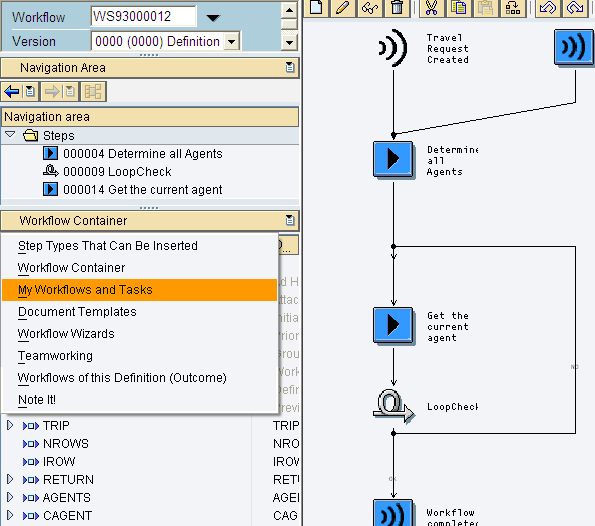
Figure 46
Main workflow designer windows insert subworkflow
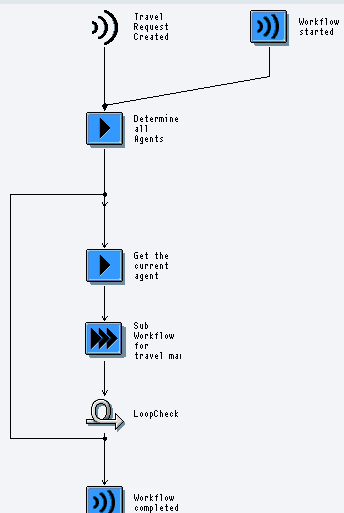
Figure 47
Main workflow layout
Figure 48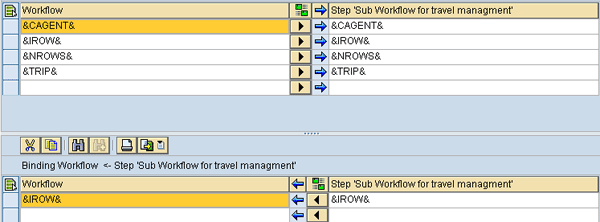
Figure 48
Main and subworkflow bindings
Figure 49
Figure 49
Step container operation increase value of IROW by one
Summary of Development
When a user creates a travel request in the SAP system the event RequestCreated is fired, the workflow is called, and all data from BUS2089 is passed to the workflow. The first activity is to call the method and determine all cost centers in your travel request. Then all cost center owners are determined and returned back to workflow with the number of agents in element NROWS. Start a loop and get the first agent on index 1. Then the main workflow calls the subworkflow and passes on the current agent row index and other information to send an approval request to the first agent.
If the first agent rejects the approval, set the IROW value equal to NROWS so that the workflow ends and a rejection notification is passed to the workflow creator. If the first approver approves the request then you increase index IROW by 1. Now workflow goes to the second approver. If this approver rejects, you set the IROW value equal to NORWS to exit from workflow. When the last approver approves the request, set the travel request status to Approved. The full image of the main workflow is as shown in Figure 50.

Figure 50
Main workflow
Fahim Ahmad
Fahim Ahmad is a senior ABAP consultant for Descon Engineering Ltd. He has master’s degrees in statistics and computer science from the University of Punjab in Lahore, Pakistan. He has 10 years of experience as a software engineer. Fahim specializes in ABAP enhancements and reports, workflow, RFC programming, interfacing, OLE, and SAP Web services configuration and development.
You may contact the author at fahim119@gmail.com.
If you have comments about this article or publication, or would like to submit an article idea, please contact the editor.