Failure mode and effects analysis (FMEA) and Control Plan (CP) enable companies to improve their products, processes, and services to ensure greater customer loyalty and minimize customer returns. These also help to minimize or eliminate product failures and help with business processes optimization.
Key Concept
The Risk Priority Number (RPN) quantifies the overall risk of failure on a scale of 1 to 1,000. It is calculated based on the likelihood, detectability, and severity of potential product or process failures.
Companies are constantly in search of new ways to improve their products, processes, and services. Failure mode and effects analysis (FMEA) is an analytical method for early detection of problems that could lead to the failure of a product or process. FMEA is available in SAP ERP from enhancement package 3.0 and above, and in the inspection planning node of the Quality Management (QM) component.
I cover the factors involved in calculating the Risk Priority Number (RPN), which identifies the amount of risk of failure, and show the FMEA components in the SAP ERP system. I also cover how to integrate FMEA with a control plan (CP) to ensure closed-loop inspection planning as an integrated approach to quality management.
The 10 Steps of FMEA
A company can take the following 10 steps to chart a step-by-step approach to developing an action plan using FMEA. Except for step 1, all steps are performed within the FMEA component.
1. Review existing business processes. Examine how each component of the process functions and its relation to the other elements. For example, what process is currently in place to receive hazardous material from a vendor, or which packing material does the company use to pack its fragile products? Use a detailed flowchart of each business process to review the chain of processes. When you review each component of the process with your team members, everyone gains a greater understanding of the entire process and how the various components are interlinked. Using the process flowchart, you can assign applicable components to the relevant process owners who are performing specific functions in different departments of the company. Assigning applicable components to relevant process owners ensures accountability and visibility by clearly segregating and identifying their roles and responsibilities in the FMEA initiative.
2. List potential failure modes. List all the possible ways a product or process can fail to perform its function. You may refer to previous documentation and other records to gain insight into the nature of previous problems and how these were handled.
3. List potential effects of failure. Make detailed notes of the potential effects of failure. The effect directly relates to the failure of the specific process or component to perform its function. While noting details, record how the failure would affect other interconnected processes and functions.
4. Assign severity rankings to each effect. Rank each effect based on how it would impact the entire value chain. This value chain can be a customer, dependent subsequent operations, or people involved in operating the process. The severity ranking is based on a relative scale ranging from 1 to 10, with 1 being extremely low to 10 being the highest severity. When assigning severity to each effect, you can begin with a standard and general scale and then work closely with other team members to define specific and relevant severity ranking to each effect.
5. Assign occurrence rankings to each cause. The occurrence ranking reflects the frequency or the likelihood that a cause or the failure mechanism will occur. Just like severity ranking, the occurrence ranking is also based on a scale of 1 to 10. Review the occurrence frequency by referring to the data and reports, such as the equipment failure record, customer complaints, or even the repair and rework reports.
6. Assign rankings to failure detection. Identify each process or product-related control in place, evaluate the process of detecting failure, and assign a detection ranking to a failure on a scale of 1 to 10. A detection ranking of 1 indicates that detecting failure is certain, and a detection ranking of 10 means that detection of a failure is not possible or no checks or controls are in place to detect the failure.
7. Calculate the RPN. As directed by the user, the system automatically calculates the RPN, which quantifies the amount of risk of failure and helps prioritize improvement efforts. The RPN is determined by multiplying severity, occurrence, and detection. It is always in the range of 1 to 1,000. The higher the RPN, the greater the risk.
8. Develop an action plan to reduce RPN. Lowering the RPN is possible by focusing on lowering one or more of the three factors (severity, occurrence, or detection). For example, a reduction in detection ranking is accomplished by adding fail-safe processes in shut-downs, installing alarms or sensors, or ensuring timely preventive maintenance.
9. Implement the action plan. Assign people to each action and finalize a timeline for the completion of actions. A practical approach to adopt is the who, what, and when approach to implement the action plan.
10. Recalculate the resulting RPN. Recalculate the RPN after implementing the action plan to determine whether the desired RPN has been achieved. If it has not, it may be necessary to repeat this series of steps or perhaps develop a new action plan.
FMEA Cockpit
The FMEA cockpit in the SAP ERP system is intuitive and offers features and functions to perform several activities related to FMEA. To access FMEA use transaction code QM_FMEA or follow menu path Logistics > Quality Management > Quality Planning > Failure Mode and Effects Analysis > Cockpit (Figure 1).
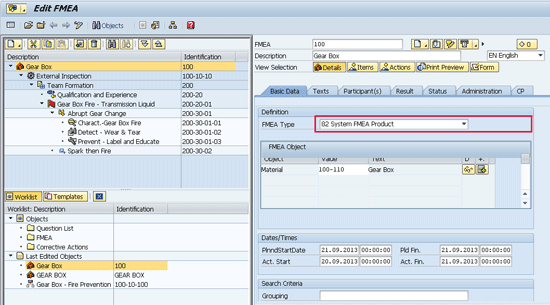
Figure 1
The FMEA cockpit in which you enter information that governs the FMEA
In Figure 1, I use an already created FMEA named Gear Box. The upper left side of the screen, below the Gear Box, contains various elements of FMEA, such as functions, function list, prerequisites, preventive actions, defects, causes, and characteristics. The icons that represent these elements are defined in Table 1. Use the tabs on the right side of the FMEA cockpit to incorporate greater details of each element of activity. In the Basic Data tab, you can use the FMEA Type pull-down menu to categorize the FMEA as either a Product or Process. You can use the FMEA Object window to incorporate the objects that you want to be part of FMEA. Use the Dates/Times window to enter the planned and actual start and end dates of the FMEA. Information entered in the Basic Data tab applies to the entire FMEA, but each element, such as characteristic, preventive, or detection actions, contains several associated tabs in which you can enter details that apply only to that element.

Table 1
Icons used in FMEA for various functions
In the FMEA cockpit, click the Participant(s) tab to list all the participants and their roles during the FMEA process (Figure 2). The icons at the top of Figure 2 enable you to enter additional notes on the FMEA or incorporate attachments that you can refer to later. At any time, you can click the save icon to ensure that the system saves the entered information up to that point.
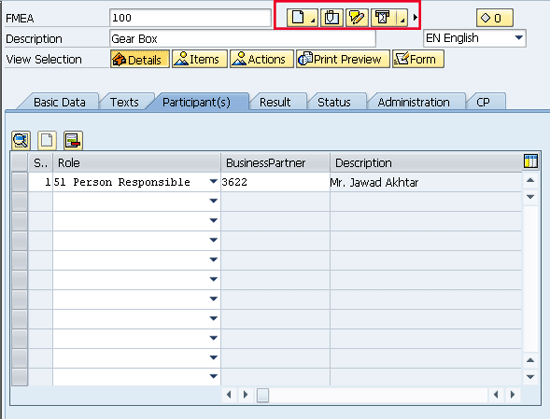
Figure 2
Use the Participant(s) tab to create a list of the participants and their roles in the FMEA
Click the Result tab in Figure 2. In the next screen, click the Valuate button to see the system-calculated result of FMEA (Figure 3). Notice that the system expresses the result of FMEA as an RPN. The system automatically calculates the FMEA results, but you have the option to correct the results manually, if necessary. For example, you may want to correct the results manually when you are very close to achieving your desired RPN, and based on the mutual agreement of all stakeholders, you no longer wish to reduce RPN any further.

Figure 3
The Result tab in FMEA in which the system-calculated result of FMEA is displayed as an RPN
Now click the Status tab in Figure 3. In the next screen, use the Status tab to maintain system and user statuses for FMEA. For example, you can use menu options to set the system status to In Process when you start the FMEA activity and, on its completion, set the status as complete (Figure 4).
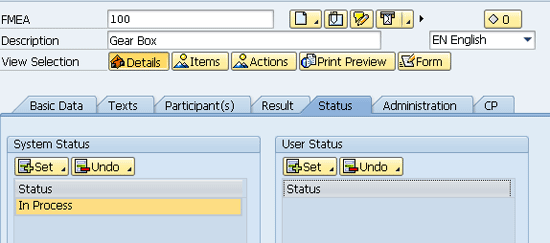
Figure 4
The Status tab in FMEA
Click External Inspection on the left side of the FMEA cockpit (Figure 1) and then the Administration tab of the Functions list. The system takes you to the screen shown in Figure 5. Each element of FMEA has its own Administration tab and shows the position of an element within the FMEA hierarchy. Click the Gear Box on the left side of Figure 5.
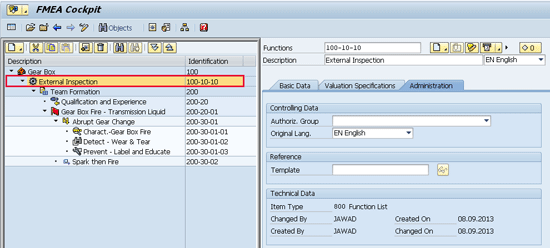
Figure 5
Administration tab of the Functions list
In the next screen, click the Form button (Figure 6). The system brings up a simulated version of FMEA in which all the important FMEA elements, such as effects, defects, and preventive and detective actions are listed. If the system has calculated an RPN of FMEA, this also appears in the relevant RPN column, in Figure 6.

Figure 6
Print Preview of FMEA
Control Plan
A CP is a basic working document in the manufacturing or services industries used to ensure that the quality of the critical components of the product is closely monitored over time. A CP consists of identification of control factors, their specifications and tolerances, the measurement system in place, the sample size, and the sample frequency. It also contains the control method and the reaction plan in place. Most of the information on a CP is preprinted, such as which control factor to monitor, its specifications, and tolerance. The process operator uses the CP to determine whether the predefined set of standards and specifications for product or process quality are being met. If they are not, then the CP tells the process operator what must be done to rectify the problem.
For example, consider a subassembly of a component, such as a gear box, for which it is critically important that two side support screws (control factor) are tightened (specifications) within a defined torque limit (tolerances). All support screw tightening for every subassembly must be monitored (sample size and sample frequency). If the screws are loose, an alarm (detection method) is set off. When this happens, the process operator must immediately stop the production line (reaction step) and contact the engineering and maintenance departments (reaction plan) to rectify the problem. A CP contains all the above information in a logical and sequential order.
Modify an Existing CP
To modify an existing CP, use transaction code QPCP or follow menu path Logistics > Quality Management > Quality Planning > Control Plan > Cockpit (Figure 7). Enter the number of a CP you would like to modify in the Control Plan field and click the change icon, which leads to the screen shown in Figure 8.
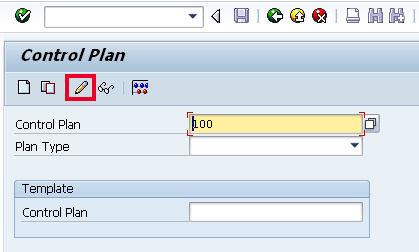
Figure 7
Modify an existing CP
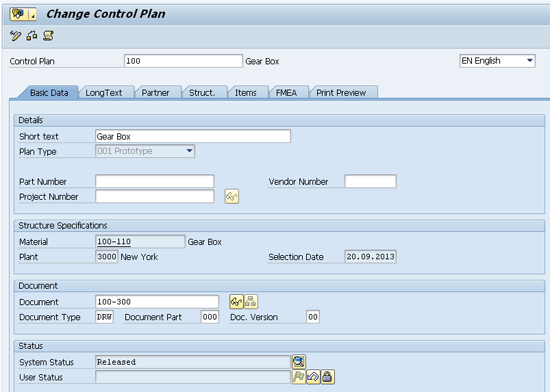
Figure 8
The Basic Data tab of the CP
Figure 8 is the Basic Data tab of CP 100. As this is a previously created CP, this screen contains information about the CP, which you can modify as necessary. In the Short text field, you can enter the name of the CP to denote what the CP does or is about, which helps in identification and to find it quickly using the search function. Other information that can be modified on this tab includes the Material and Plant information in the Structure Specifications area, and the Document number, Document Type, Document Part, and Doc. Version in the Document area. Click the save icon (not shown) to save your changes to the CP.
Create a New CP
To create a new CP, enter a CP number, which can be any external number, in the Control Plan field of the screen shown in Figure 7. In the Plan Type field, select a type, such as prototype, prelaunch, or production, from the drop-down menu. Click the create icon in the initial screen of the CP (Figure 9). The system now returns you to the Basic Data tab of the CP in which you can enter the relevant details about the new CP (Figure 8).
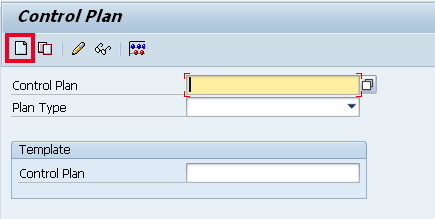
Figure 9
Create a new CP
You can simulate a CP before its creation to identify and resolve any errors or issues before creating it by clicking the simulate icon  . You can use a previously created CP as a template to create a new CP by entering the previously created CP in the template area of Figure 9. This option enables the system to copy previously entered information into the new CP, saving you time and effort with data entry.
When you create a new CP, the system shows the system status as In Process in the Status area of Figure 8. You can release this CP at a later stage by clicking the release icon  located next to User Status field. Figure 8 shows a released CP.
Assigning a CP to FMEA
Click the FMEA tab in Figure 8. In the FMEA column of the screen that appears (Figure 10), type the name of the FMEA that you want to integrate with the CP. Click the save icon (not shown) or press Ctrl and S to save the CP. The CP 100 appears in the CP tab of the FMEA Gear Box.

Figure 10
Link the FMEA Gear Box to CP 100
In Figure 1, click the FMEA Gear Box on the left of the FMEA cockpit and the CP tab on the right of the screen. Because the FMEA Gear Box was assigned to CP 100, the system can display that FMEA-CP relationship (Figure 11).

Figure 11
CP 100 assigned to the FMEA Gear Box
To view an expanded structure of the CP, click the Struct. (Structure) tab in Figure 10. In this tab you can expand and view the entire FMEA structure within the CP screen to verify that the CP is assigned to the FMEA and which characteristics are used in the FMEA in my example, the characteristic is Charct.-Gear Box). In other words, you do not have to open up a separate session to view the FMEA. All details of the FMEA are available in the CP screen.
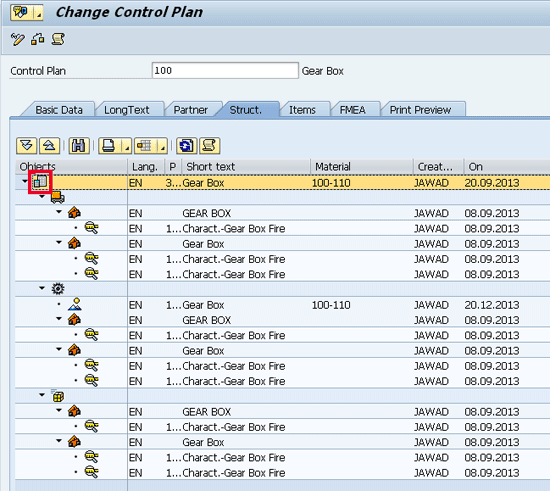
Figure 12
The Structure of the CP

Jawad Akhtar
Jawad Akhtar earned his chemical engineering degree from Missouri University of Science and Technology. He has 17 years of professional experience, of which nine years are in SAP. He has completed eight end-to-end SAP project implementation lifecycles in the areas of PP, QM, MM, PM, and DMS in the steel, automobile, chemical, fertilizer, FMCG, and building products industries. He also has worked as an SAP integration manager and an SAP project manager. He has been proactively involved in a business development and solution architect role for seven years. He is the author of Production Planning and Control with SAP ERP, it's filled with in-depth infomation on discrete, process, and repetitive manufacturing types. His profile on LinkedIn is at https://pk.linkedin.com/in/jawadakhtar. You may follow Jawad on Twitter @jawadahl. Currently, he is associated with AbacusConsulting as Head of SAP Delivery.
You may contact the author at jawad.akhtar@live.com.
If you have comments about this article or publication, or would like to submit an article idea, please contact the editor.


