Learn how to customize the functionality required to simultaneously create multiple assets and still be able to maintain specific data for each individual asset.
Key Concept
Within Asset Accounting (FI-AA), you can create one asset at a time or multiple assets simultaneously.
Since the release of R/3 4.0A, SAP supports simultaneous creation of multiple assets. This functionality is part of the create asset master record transaction (transaction code AS01). The disadvantage of this functionality has always been that all the data of the assets must be exactly the same except for some fixed fields. Consequently, if you require a specific field to be maintained that doesn’t belong to the fixed list of updatable fields, the assets have to be post-processed one by one in order to maintain that data. An example of such data is the serial number. Since SAP ERP Central Component (ECC) 6.0, it is possible to create multiple assets and at the same time give them asset-specific characteristics.
In the SAP system, you can create fixed assets one by one or create multiple assets at the same time. When you create multiple assets, the data for all created assets is the same; only the asset number is different. This is very useful when you acquire 10 of the exact same assets, such as 10 assets for laptops bought with the same purchase order. Creating assets simultaneously saves a lot of time compared with creating them one by one.
To create an asset, execute transaction code AS01. In the initial screen (Figure 1), when you enter a number of similar assets larger than one, then multiple assets are created. In the example shown in Figure 1, 10 assets are created.
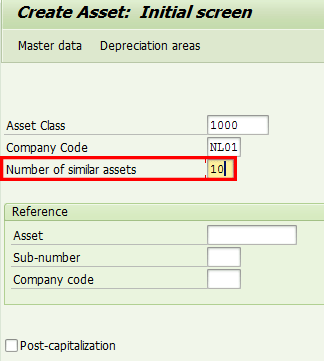
Figure 1
Create 10 assets
If you want to identify each asset not only by its number but also by its description and serial number, the original functionality for creating multiple assets is not the most efficient way. If you create multiple assets in this way, you need to update each asset individually after you create it. Since the introduction of SAP ERP Central Component (ECC) 6.0, it is also possible during the creation of multiple assets to maintain selected fields for each individual asset. When you use this functionality, you do not need to complete an update afterward. This makes it a very user-friendly option.
Before I explain how the new functionality works, I walk you through the steps to configure this functionality. First, let me explain customizing.
Currently, a limited number of fields can be maintained when saving the data for multiple assets. Until now, this limited number of fields couldn’t be modified. Figure 2 shows the fields available for maintenance when saving multiple assets.
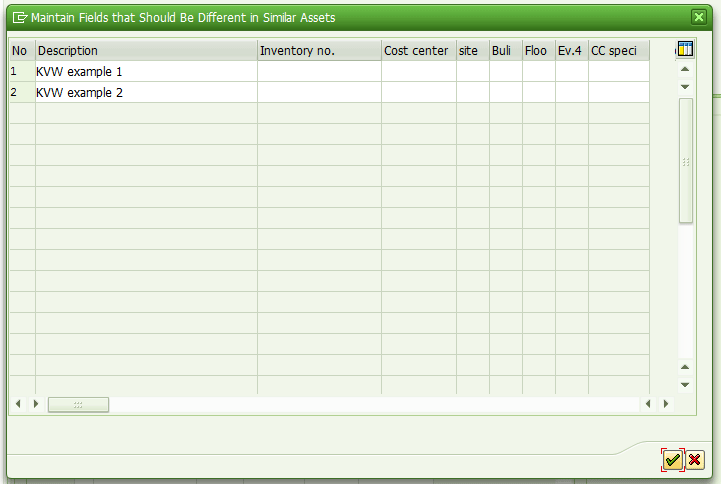
Figure 2
Current editable fields for multiple assets
Configuration
The first step of the configuration is to activate an additional screen when creating multiple assets. To complete this step, in customizing, follow menu path Financial Accounting > Asset Accounting > Master Data > Screen Layout > Define Screen Layout for Asset Master Data > Configurable Entry Screen for Creating Multiple Assets. In the screen shown in Figure 3, select the Config. Entry Screen for Creating Multiple Assets check box.

Figure 3
Activate an additional entry screen when creating multiple assets
After you click the save icon to save the settings, the customizing screen for the actual asset screen layout is slightly changed. The customizing transaction for screen layout maintenance can be started by following the customizing menu path Financial Accounting > Asset Accounting > Master Data > Screen Layout > Define Screen Layout for Asset Master Data > Define Screen Layout for Asset Master Data. This path displays the screen shown in Figure 4.
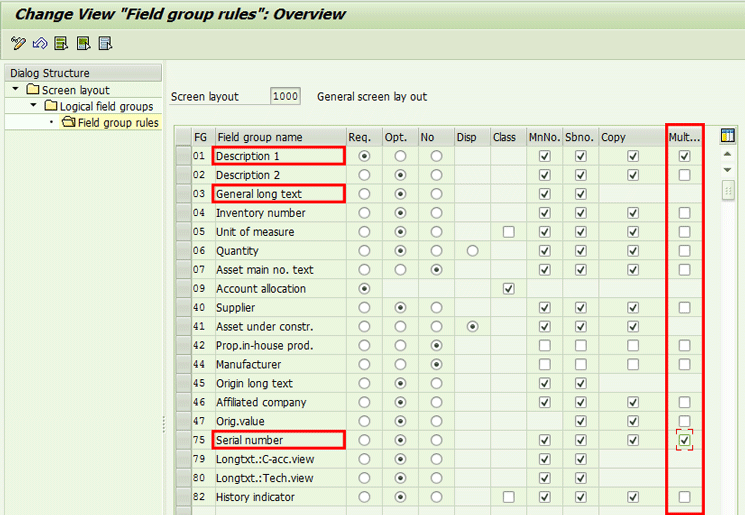
Figure 4
Configuration for the asset master screen layout
When you set up the screen layout for the fixed asset screen layout, an additional column is visible: Multi…. (Multiple). Figure 4 shows the settings for the screen layout with the additional column visible on the right. If you press F1 while your cursor is in on one of the check boxes under the Mult… column in Figure 4, a message appears like the one shown in Figure 5.
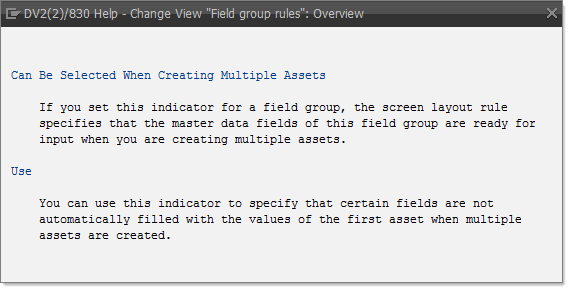
Figure 5
Change View Field group rules help
With this customizing transaction you can configure the layout of the fixed asset master and the copy rules when creating assets. This step is standard asset-related customization, so I do not explain it here.
By selecting check boxes in the Multi…. column, you can indicate which fields can be entered during the creation of multiple assets. In the example shown in Figure 4, the fields Description 1 and Serial number are set and ready for input during creation of multiple assets. Because Description 1 is a mandatory field, it will be mandatory in all assets. In this case, Serial number is optional, so it will also be an optional field for the multiple assets.
In Figure 4 you can also see that not all fields can be selected for changes during creation of multiple assets. For example, the field General long text cannot be selected.
Once the settings are complete, click the save icon to save the data. No further customizing steps are required. In the next section, I explain how to use the additional screen.
Creating Multiple Assets
Execute transaction code AS01 to create the assets. In the initial screen (Figure 6) in this example, create three assets (enter 3 in the Number of similar assets field) belonging to asset class 3000 (enter this code in the Asset Class field).
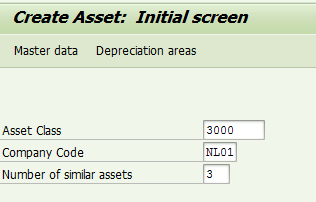
Figure 6
Create multiple assets
Fill in all the data for the asset master and then save it. (The maintenance of the asset data is not further explained as this is standard SAP.) After you click the save icon, instead of creating the assets, the transaction sends an information message as shown in Figure 7.
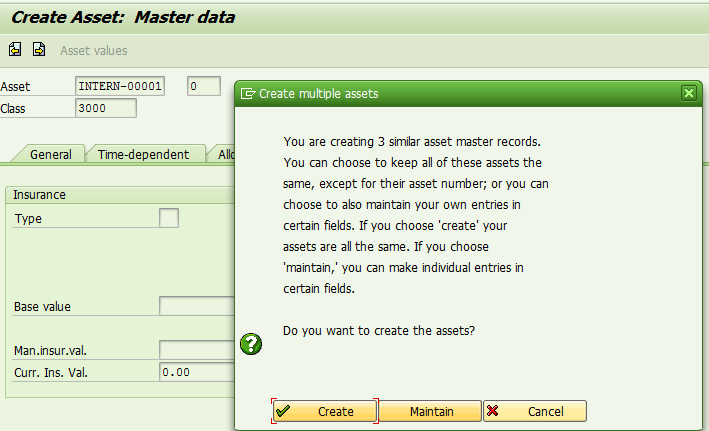
Figure 7
Information message received when you are creating multiple assets
The information message gives you the option to immediately create the assets (the Create button) or to maintain the fields of the individual asset (the Maintain button).
After you click the Maintain button, the screen for individual field maintenance appears (Figure 8). Note that the status buttons are initially yellow, not green.
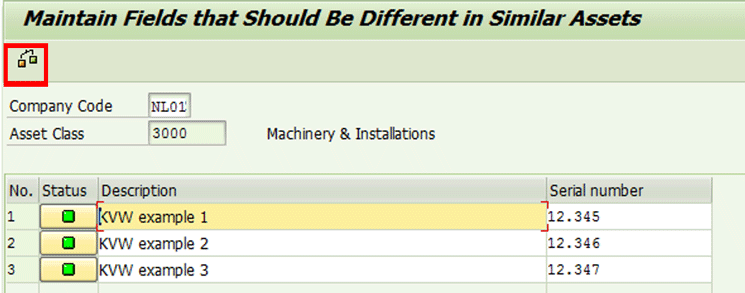
Figure 8
Entry screen for individual fields
In this example, the Descriptions and the Serial numbers have been changed. Select the check icon at the top left of the screen, and the status changes to green.
By default, the fields are filled with the values entered in the asset master data. If the original field is mandatory, then a value must be entered for all assets to be created. Otherwise, you can leave a field blank.
Tips!
Here are a few tips to remember when you create multiple assets:
- Multiple assets can be created only when the asset numbering is done internally; this means the numbering is determined by the system. This also applies to the creation of multiple subnumbers for an asset.
- In the create asset subnumber transaction (transaction code AS11) or group asset transaction (transaction code As21), the same functionality is available.
- Not all fields can be used for individual updates. For example, depreciation area fields, insurance fields, and additional asset fields cannot be used. (Only fields from tables ALNA and ANLZ can be used.)
- Depending on the implemented enhancement package, more fields may be available.
- Substitution is not incorporated in this process. Also validations were not carried out until release 4.70. For more information see SAP Note 389370.
- More information on this topic can be found in SAP Note 1712247.
Kees van Westerop
Kees van Westerop has been working as an SAP consultant for more than 25 years. He has an MBA degree in mathematics and a degree in finance. Kees has been concentrating on the financial modules, especially in general ledger accounting, cost center accounting, and consolidation. He also has a great deal of experience with rollouts of kernel systems and integrating finance and logistics.
You may contact the author at keesvanwesterop@hotmail.com.
If you have comments about this article or publication, or would like to submit an article idea, please contact the editor.


