The instructional texts that SAP provides with its workflow templates for purchase requisition and purchase order releases can be a little confusing. In addition, you might want to add information specific to your situation. Fortunately, modifying this text requires only the simple configuration steps described here.
Key Concept
Keep in mind that your workflow texts must accommodate two types of users or agents: experienced and inexperienced. The experienced users often need no more than the subject text to know what to do with the work, while an inexperienced user probably needs the instructions in the long text before proceeding. Your subject text, then, needs to accurately label the work, and the long text must provide clear directions.
Some of the most commonly used workflow templates that SAP provides are the purchase requisition (PR) and
purchase order (PO) release workflows. With minimal configuration, the workflow lets you both control and accelerate the
release strategy process, pushing requisitions and orders requiring release to the relevant approvers. You can often use
the original workflow definition unchanged. However, both of these workflows have one little problem: The instructional
texts sent along with the work are annoyingly uninformative. This is an easy problem to fix — if you know how.
One of the nicer benefits of workflow is the ability to send instructions along with the work. Good
instructions help the agents — the people sent work by the workflow — to quickly assess what work needs to be
done and its urgency. They also provide reminders of good business practice and reduce the training required when
introducing new agents to the workflow. The standard programs to send email reminders to agents that work is sitting in
their workflow inbox can also echo this text in the message.
Even if the SAP-provided instruction texts were more informative, you might still want to change them to,
for example, include reminders of company policy or provide the help desk number the agent should call if they have any
problems completing the work. So, it's handy to know how to change these texts. Let me show you how.
Changing the Text
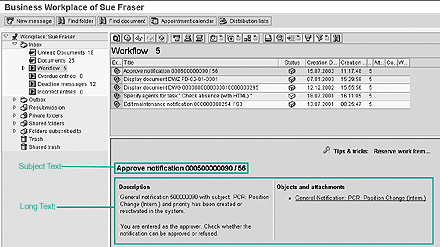
Every piece of work, a "work item" in workflow terms, has at least two texts: a subject text and a long
text. The subject text is the one-line title shown when looking in a workflow inbox at the list of all work to be done, as
shown in Figure 1 (transaction SBWP). The long text may have as many lines as you like,
and you can see it in the work item preview or when you view the work item details. Viewing the details of the work item
is optional. Experienced agents do not have to reread the instructions every time, while inexperienced agents can refer to
the texts as needed.

Figure 1
The work item subject text and long text in the inbox (Click on image to enlarge in new window)
Both the subject and long text are defined in the matching workflow task. The workflow task designs how
the work item looks and works. Each time a work item such as "release purchase requisition 5555" is created, the workflow
task determines how this work is performed and what it looks like. The texts use variables called "expressions" to pick up
the
requisition number. For example, the expression for the requisition number of a PR is
&_WI_OBJECT_ID.Number&. Fortunately, you never have to remember the technical format of an
expression. You just select the variable Purchase requisition number, as you'll see shortly.
The easiest way to find and change the correct workflow tasks is to access the tasks via the workflow
itself. For instance, you could use the Business Workflow Explorer (transaction SWDM) to find the
workflow and then double-click on the workflow ID to see a list of all tasks used within it. Or you could use Workflow
Builder (transaction SWDD) to view the workflow flowchart and drill down through the relevant workflow
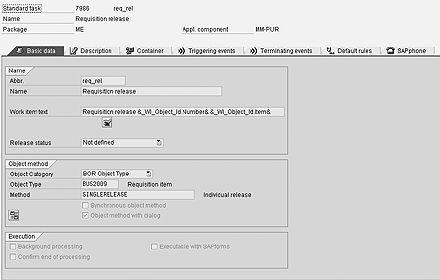
steps until you reach the task itself. You know you are at the task level when you see a screen similar to Figure
2.

Figure 2
The workflow task (Click on image to enlarge in new window)
The task is linked directly to the workflow step as part of the workflow design. So, you don't want to
copy every task just to change texts, because then you would have to change the workflow itself to create a new link to
your new task. To avoid this unnecessary work, the best way to replace the provided SAP texts with your own texts is to
use the Redefine Text options in the workflow task.
The redefine icon for the subject text appears just below the SAP-provided work item text. Selecting it
brings up a window showing the SAP-standard text versus your own text, the Customer definition text
(Figure 3). If you want to enter or change your own text, use the display/expand icon to open the
customer definition text. You can then type in your text.

Figure 3
The customer definition text
Tip!
It's a good idea to standardize the texts throughout your workflows to help agents assimilate the information as quickly as possible. For example, you might decide that all subject texts start with the primary activity to be performed in capital letters followed by the main object being changed — e.g., "RELEASE: Purchase requisition 5555 from Joe Brown," "RELEASE: Purchase order 1234 from Sue Foster," or "CORRECT: Rejected Purchase
requisition 5555."
Tip!
Sometimes you want to put the same common block of text in multiple tasks to, for example, tell agents how to contact the help desk or to state your security policy. The easiest way to do this is to create a standard text using transaction SO10. You can include the standard text in the long text of the task by using the menu option Insert>Text>Standard... and selecting the text ID and language. As long as you use the same text ID, you can have a different text in each system/ client/language. For example, you may want to add a "*** This work item is for testing purposes only ***" line to the standard text in your user-acceptance testing system to avoid confusion with production work items.
To bring in variables, position your cursor where you want the variable to go and click on the insert
expression icon. This shows you all variables available to this particular task (Figure 4). Find your
variable and double-click on it to bring it into your text. If you have difficulty finding a suitable variable, you may
need help from a workflow developer or to ask him or her to create a new variable for you.

Figure 4
The expression list of variables available to this task
To change the long text, go to the Description tab of the task (Figure
5) and click on the change text icon. Use the Insert> Expression menu to add variables in the
same way you inserted expressions into the subject text. Figure 6 shows the long-text entry screen.

Figure 5
Click on the change text icon under the Description tab

Figure 6
The long-text entry screen
The next time a work item is created based on the task, your new texts will be used instead of the standard
SAP texts. Using the same techniques, you can adjust the texts for any SAP-provided workflow task.
You can change the texts for any tasks created specifically for you by your workflow developer in a
similar manner. Of course, you don't need to "redefine" the texts on your own tasks as there's no SAP-provided texts. You
just change the work item text and long text directly using transaction PFTC_CHG.
Jocelyn Dart
Jocelyn Dart is a senior solution consultant at SAP Consulting working in Australia/New Zealand. She currently specializes in workflow and Supplier Relationship Management (SRM). As well as speaking at various SAPPHIREs and at ASUG, Jocelyn is a co-author of the book, Practical Workflow for SAP.
You may contact the author at jocelyn.dart@sap.com.
If you have comments about this article or publication, or would like to submit an article idea, please contact the editor.


