Discover how you can leverage the goods receipt capacity check business function to enable the smooth inbound flow of materials and avoid costs incurred due to trailers waiting for unloading in the company premises. Learn step-by-step configuration to realize a real-life business requirement and the process to activate a business function.
Key Concept
SAP introduced the goods receipt capacity check functionality with enterprise business function LOG_MM_CI_1, which is available from SAP ERP Central Component (ECC) 6.0 enhancement package 2.
Optimizing every node of the supply chain will ultimately lead to overall supply chain optimization. Today, organizations endeavor to maximize their return on assets by exploring all possible avenues. Imagine a situation in which goods are shipped on a priority basis from the supplier as per the agreed-upon timeline. However, the trailer must wait to unload the stock as there is no place in the goods receipt staging areas, or the staging area is busy but another staging area is free. The truck could have been directly scheduled for unloading if the schedule delivery in that staging area was known well in advance.
Clearly, the process can be streamlined by providing visibility to the available time slots in a goods receipt staging area or warehouse door, and then blocking the slot for a delivery from the supplier.
SAP offers a couple of solutions such as dock appointment scheduling and transportation management to address this business challenge. Dock Appointment Scheduling is part of SAP Extended Warehouse Management (SAP EWM) 9.2. It allows the planning of the loading and unloading of the delivery collaboratively with a logistics partner. SAP Transportation Management enables freight planning and transportation demand planning along with logistics partners. These are very prolific functionalities, but sometimes business requirements cannot justify the use of such a detailed full-range solution and a simple lightweight rough-cut planning functionality is sufficient to meet the business requirement. Goods receipt capacity check and scheduling business functions enable planning for and blocking of warehouse staging areas or doors for unloading an inbound planned goods receipt.
Consider a business scenario in which an inbound delivery manager would like to check up front whether there will be sufficient bandwidth available in the goods receipt area when goods are scheduled to be delivered. If the staging area is not free, then the manager should be able to look for a free available slot and reserve it for the planned delivery to ensure the incoming stock moves straight away to an unloading area without waiting.
Now that you understand the business case let me take you through the step-by-step configuration required. Further, I walk you through a real-life scenario to illustrate the way the goods receipt capacity check helps to realize the business need.
Activate Business Function LOG_MM_CI_1
The first step is to activate business function LOG_MM_CI_1. To activate this enterprise business function, execute transaction code SFW5. This action opens the screen in
Figure 1. To complete this step, follow the instructions in the sidebar “How to Activate Business Functions.”

Figure 1
Business function selected for activation
How to Activate Business Functions
You can view the list of available enterprise business functions by executing transaction code SFW5 directly or by executing transaction code SPRO and clicking the configuration node Activate Business Functions as shown in
Figure A.

Figure A
The configuration node for activating enterprise business functions
That takes you to the disclaimer pop-up shown in the
Figure B.

Figure B
Business function activation pop-up warning message
Click the Continue button to view the list of available business functions (
Figure C). Click the Exit Transaction button to terminate the transaction.
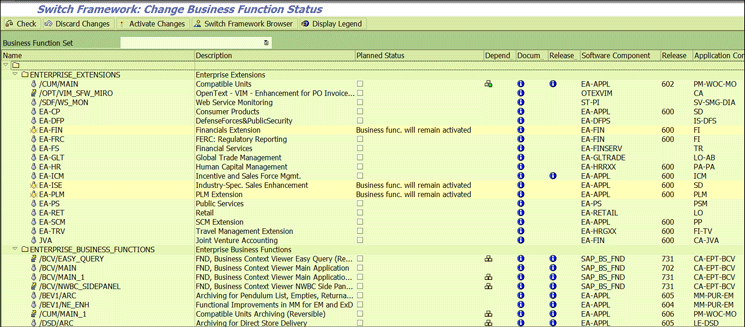
Figure C
The business function list
The icon before the business function name depicts its status (i.e., activate, deactivate, reversible [can be deactivated post activation] or non-reversible [once activated cannot be deactivated]).
Figure D shows the legends relevant from an activation perspective.

Figure D
Legends depicting the categories of enterprise business functions
Another key legend is related to dependency. It suggests whether a business function requires any other business function to be activated as a prerequisite and whether all the dependencies are met.
Figure E shows the dependency legends with descriptions.

Figure E
Business function dependencies legend
To activate a business function select it and then click the Activate Changes button (
Figure F).
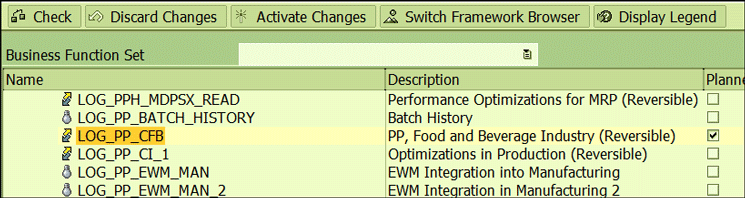
Figure F
A business function selected for activation
This opens a pop-up screen showing the business function that will be activated. Click the Activate Changes button as shown in
Figure G.

Figure G
The activate business function pop-up screen
Activating a business function triggers several changes in the screen layout such as the addition of new fields and the activation of new source code. Therefore, a job is scheduled in background mode (the batch job name shown in
Figure H) to perform the changes related to a business function.

Figure H
Background job to activate a business function
(Tip: You can view the batch job status using transaction code SM37 to see whether it has finished and executed successfully.)
The business function is active after the batch job is completed with the Status of Finished as shown in
Figure I.
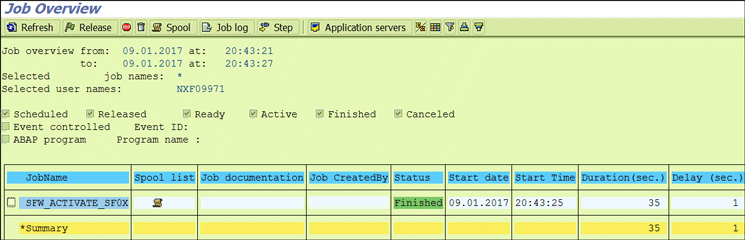
Figure I
Business function activation background job status
Once the business function is activated, the icon changes to a lightbulb and the planned status is updated as shown in
Figure J.

Figure J
Business function status and legend after activation
(Tip: SAP recommends that you set up a separate test (sandbox) environment for evaluating the non-reversible business function before activating it in the development client.)
Figure 2

Figure 2
Business function activated
Activating the business function introduces an additional configuration node, Goods Receiving Capacity Check, under the Purchase Order configuration (
Figure 3).

Figure 3
The Goods Receiving Capacity Check node
Standard Configurations in the SAP System
In this section I help you understand the available configurations and their significance in the overall design. Click the Goods Receiving Capacity Check configuration node shown in
Figure 3 to expand the list of the configurations that are available under the Goods Receiving Capacity Check (
Figure 4). In the following section, I go through each of them.

Figure 4
Capacity check configuration nodes
Control Parameters for Goods Receipt Capacity Check
As the name suggests, checking the Goods Receipt Capacity Check Active check box activates the capacity check functionality (
Figure 5).
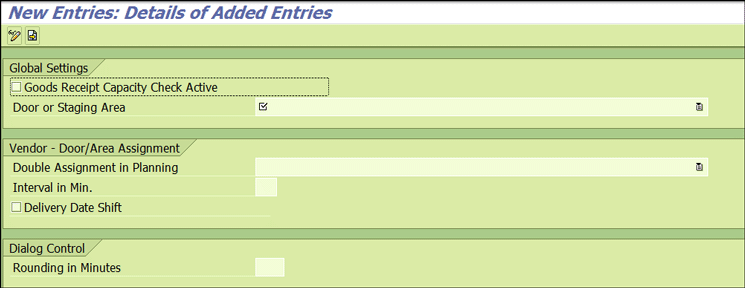
Figure 5
Capacity check control parameter configuration
In the future if you need to deactivate this capacity check functionality, then uncheck this check box.
Define Doors and Define Staging Area
The next step is to maintain the level in which goods receipt capacity check is required. It can either be set on the staging area or on the warehouse docking door or gate level, as shown in
Figure 6.

Figure 6
Set the level for the capacity check
As shown in
Figure 7, you can determine whether more than one vendor can be assigned to the same staging area or door at a time.

Figure 7
Parallel appointments
The Delivery Date Shift check box (
Figure 8) enables the delivery to be rescheduled based on the slots available inside the goods receipt capacity check functionality.
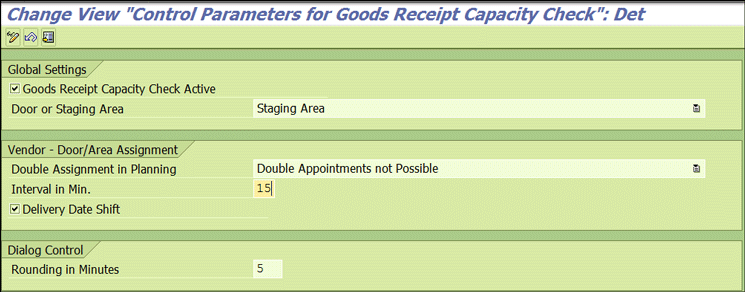
Figure 8
Capacity interval and rounding
The slot for unloading the delivery is rounded up to the multiple of the number maintained in the Rounding in Minutes. For example, if the required time slot mathematically comes out to be 11:00 to 11:27, then it is rounded to 11:30 (in a multiple of five minutes).
Process Unit-of-Measure Load Category
In this configuration activity, you define the sizes of load, such as small, medium, or large, from the perspective of the time it will take to unload it.
For example, in the
Figure 9 code A denotes a small load.
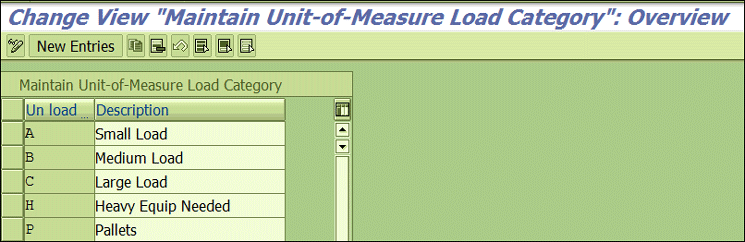
Figure 9
Unit of measure load category maintenance
To define a new Unit-of-Measure Load Category click the New Entries button (
Figure 9), and then maintain the code with a description as shown in
Figure 10. Click the save icon to save your data.
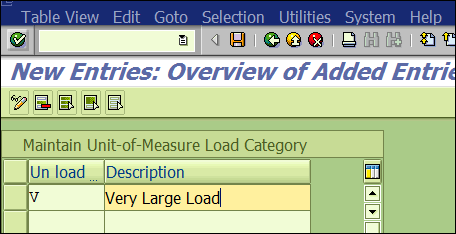
Figure 10
New unit of measure load category maintained
SAP introduced this configuration object to group together units of measure with similar characteristics from a loading and unloading activity perspective. Later I explain how to associate this Unit-of-Measure Load Category with the unit of measure (BUOM) of the material.
Maintain Logistics Handling Group
The next step is to define the categories under which different materials can be classified from the unloading perspective such as bulky, fragile, or dangerous, as shown in
Figure 11.

Figure 11
Logistics handling group maintenance
To define a new logistics handling group, click the New Entries button (
Figure 11) and then maintain the code with a description (
Figure 12). Click the save icon to save your entries.

Figure 12
New logistics handling group maintained
Assign Units of Measure to the Unit-of-Measure Load Category
In this step, the Unit-of-Measure Load Category defined earlier is associated with the unit of measure that is assigned to the material. For example,
Figure 13 defines the units of measure EA and ST as small loads (Process Unit-of-Measure Load Category A).

Figure 13
Assign a unit of measure to the unit-of-measure load category
Processing Utilization
In this step, the time taken for unloading is defined for the combination of warehouse, logistics handling group, and unit of measure load category. Time is maintained in seconds under two categories—fixed time and per unit pieces.
For example, in
Figure 14, it is maintained that in the warehouse 010 for a small load (i.e., materials with the units of measure ST, LB, PAI, or ST) and logistics handling group NORM (which is maintained for a material in the material master plant data/stor.2 view), it takes 1,600 seconds irrespective of the number of quantiles to unload (fixed time), plus 10 seconds for each quantity.

Figure 14
Maintain the time (in seconds) for unloading in the staging area
If there are 50 pieces of logistics in handling group NORM to be unloaded, then it will take 2,100 seconds total time—1,600 seconds plus 500 seconds (10* 50).
To maintain the constant and variable time for the different combination of the logistics handling group and Unit-of-Measure Load Category, click the New Entries button in
Figure 15.

Figure 15
New entry for process utilization
Maintain the values shown in
Figure 16 and click the save icon.

Figure 16
Time (in seconds) maintained for unloading category and logistic group combination
This concludes the main configuration that is required. Further, I explain the master data requirements and how to set up master data.
Assignment of a Supplier to a Staging Area and the Planned Delivery Slot
The default door or staging area for a supplier to unload the delivery and planned delivery time slot needs to be maintained. Execute transaction code WGRC1 to get to the selection screen shown in
Figure 17 or use SAP menu path Logistics > Material management > Purchasing > Environment > Order Optimizing > Goods Receipt Capacity Check > Vendor Assignment.
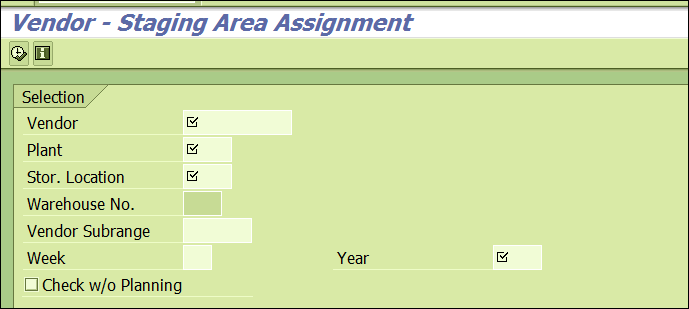
Figure 17
Assignment of the staging area to a supplier
Enter the vendor, plant, storage location, and other details as shown in
Figure 17. Press F8 to execute the transaction. Click the create icon as shown in
Figure 18 to maintain the planned time slot.
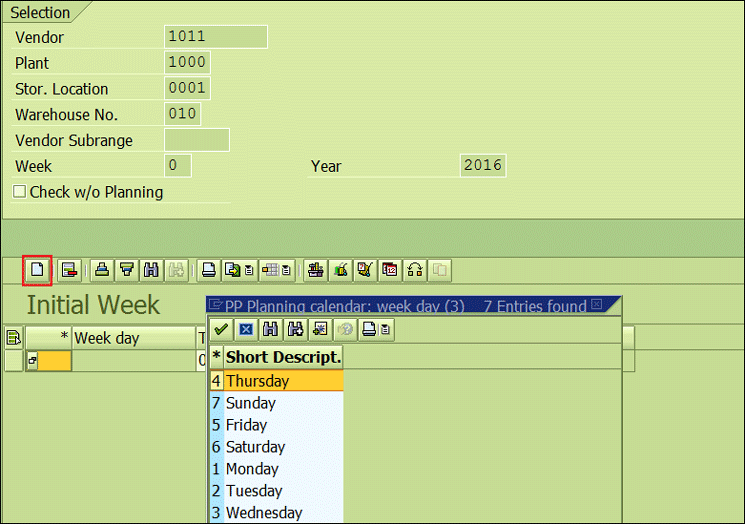
Figure 18
Weekdays planned delivery from a supplier
Select the Week day and enter the Time slot (
Figure 19).

Figure 19
Planned delivery time slot and staging area assignment for a supplier
Finally, click the save icon
Figure 20.

Figure 20
Save the supplier staging area assignment
In
Figure 21, it is maintained that the planned schedule delivery in plant 1000, staging area 001, for vendor 1011 is 10:00 on Monday and 13:00 on Tuesday.

Figure 21
Planned delivery time slot and staging area assignment for a supplier
To change the staging area assignment to a different area, click the swap icon highlighted in
Figure 22.

Figure 22
Change the staging area
Select an alternate staging area from the available list (
Figure 23).
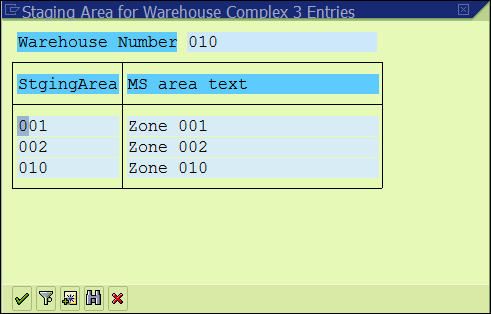
Figure 23
List of the staging areas for a warehouse
The next step is to define the time slot in which the door or staging area is operational. To maintain this information, execute transaction code WGRC2. Input the plant, storage location, staging area, and week as shown in
Figure 24, and then click the execute icon or press F8.
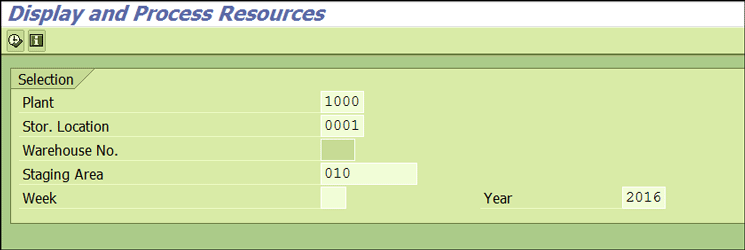
Figure 24
Operational time maintenance for the staging area
This action opens the screen shown in
Figure 25 where you can specify the time slot in which the staging area/door is operating. For example, here it is maintained that it is operating for 30 minutes on Monday between 10:00 and 11:00 and 11:00 and 12:00. On Tuesday, it is operating for the full hour from 09:00 to 10:00 HRS, for 30 minutes between 13:00 and 14:00, and for 45 minutes between 15:00 to 16:00.

Figure 25
Staging area operational time in minutes
Maintain the Logistics Handling Group for the Material
One last step from a master data perspective is to assign the logistics handling group to the material in the material master. To maintain this information, execute transaction code MM02 and enter the material number. In the plant data/Storage location view1 maintain the logistics handling group as shown in
Figure 26.
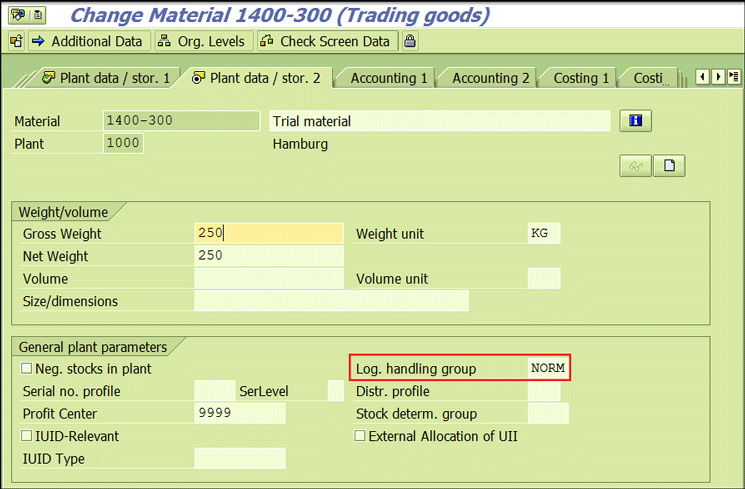
Figure 26
Logistics handling group assignment in the material master
You have learned the configuration and master data needed for setting up the capacity check business function. Now with an end-to-end business flow, let’s see how this business function works and how it addresses the business requirement.
End-to-End Business Process Flow
I explain the process from creating a purchase order to doing a capacity check to assigning the delivery slot based on the available time slots.
Purchase Order Creation
Input the purchase organization data details, material, quantity, and delivery date to create the purchase order as shown in
Figure 27.

Figure 27
Create a purchase order
Once the vendor, material, delivery date, quantity, and other key information is entered in the purchase order (
Figure 27), press Enter. The system then shows the warning message in
Figure 28 noting that no time window for the goods delivery has been assigned.
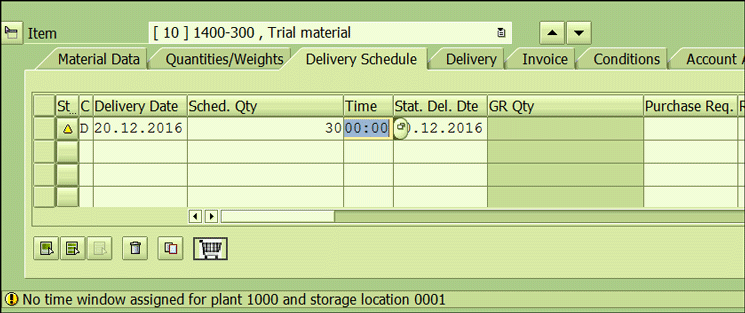
Figure 28
Delivery time slot assignment in the purchase order
Capacity Check
To schedule the delivery at an available time slot, click the GR: Capacity Check icon shown in
Figure 29.

Figure 29
Capacity check to find a delivery slot
This action opens a pop-up window (
Figure 30) that shows the time slots that are available or already booked. This window also shows the time it will take to complete the goods receipt for the quantity in the purchase order—for example in
Figure 30 it is 32 capacity units.

Figure 30
Staging area capacity load overview
Before I go further, let’s understand the goods receipt time calculation.
Quantity independent goods receipt fixed time = 1,600 seconds
Goods receipt time per quantity = 10 seconds
Quantity to be goods receipted = 30
Total goods receipt time = Quantity independent goods receipt fixed time + (Goods receipt time per quantity * Number of Quantity)
Total goods receipt time = 1,600 + (10*30)
Total goods receipt time = 1,900 seconds ~ 31.66 minutes
Delivery Slot Assignment
To select a time slot, bring the cursor over the preferred time window and then click the Select TB Profile icon (
Figure 31). In the example in
Figure 31, the required goods receipt time is 32 minutes and the selected time slot has 30 minutes of available time.
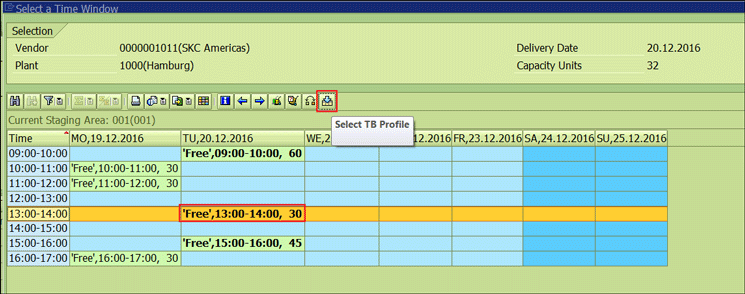
Figure 31
Time slots selected for delivery
As the selected time slot is smaller than the goods receipt calculated time, a message pops up saying that that there is insufficient capacity (
Figure 32).

Figure 32
Pop-up message due to insufficient capacity available in the selected time slot
When the time lot selected is greater than the required goods receipt time (
Figure 33), then the system assigns the slot with a pop-up message as shown in the
Figure 34.

Figure 33
Time slots selected for delivery
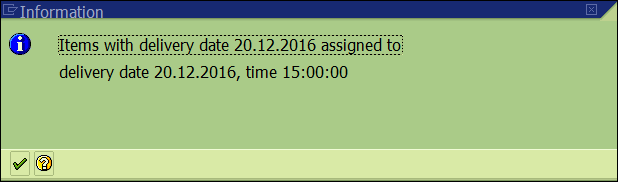
Figure 34
Pop-up message with information about the delivery time slot assigned
This also updates the delivery time in the purchase order item level as shown in
Figure 35.

Figure 35
Delivery time slot updated in the purchase order
Note
To view the slots available in another staging area or door, click the swap icon shown in Figure 36.
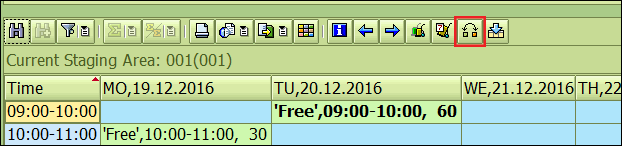
Figure 36
Change the staging area
This action opens a pop-up box to input the staging area. You can either view an available staging area list by pressing F4 (
Figure 37) or enter it (
Figure 38).
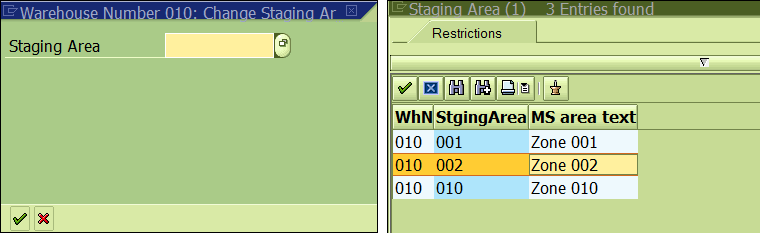
Figure 37
Other staging area list
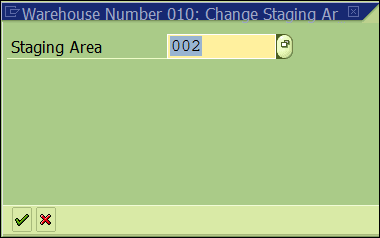
Figure 38
Enter a staging area
Press Enter or click the green checkmark icon to see the slots available in other staging areas (
Figure 39).

Figure 39
Planned loads in other staging areas
Planned and Unplanned Load Overview in the Staging Area
At any point of time, the current available free slots and occupied time slots can be viewed by executing transaction WGRC3. Input the plant, storage location, staging area, week number in which the booking slot status is to be viewed, and the year (
Figure 40).

Figure 40
Planned and unplanned loads in the staging area
Press F8 or click the execute icon shown in the selection screen. This action brings up the Load Overview in the Staging Area (
Figure 41). It shows that Tuesday from 15:00 to 15:45 staging area 001 is booked for unloading the goods supplied from vendor 1011.

Figure 41
Weekly view of the staging area load
You have learned the way the enterprise business function goods receipt capacity check can help a business to manage its inbound logistics by scheduling the delivery from suppliers. Definitely it is not an alternative to a full-fledged transportation management or dock appointment scheduling solution, but as mentioned earlier, many times a business is looking for a high-level, rough-cut planning, and lightweight business function. I have covered the step-by-step configuration and master data required for the business function and followed the business flow.
Kaushik Choudhury
Kaushik Choudhury is a senior consultant in the supply chain management field with more than a decade of experience in supply chain consulting in principal positions for leading brands across the globe. His focus is on business transformation, business reengineering, proof of concept and solution design, and end-to-end implementation. He has a proven track record of delivering in alignment with business expectations and possesses a unique combination of profound business process understanding, consulting skills, hands-on SAP system experience, and effective management capabilities. Kaushik has operated seamlessly in highly agile and iterative environments in which solutions are implemented incrementally with ongoing design changes. He has extensive experience in Agile and Waterfall delivery methodologies in large SAP supply chain implementation programs.
You may contact the author at
Kaushik.choudhury@outlook.com.
If you have comments about this article or publication, or would like to submit an article idea, please contact the
editor.