Starting with SAP NetWeaver Process Orchestration 7.31, the new Process Integration Designer perspective within SAP NetWeaver Developer Studio was introduced for configuring integration scenarios in the Integration Directory. Learn how to configure and run integration flows connecting two systems with each other. Walk through a complete scenario built from scratch.
Key Concept
The new Process Integration Designer perspective in SAP NetWeaver Developer Studio is used to configure integration flows representing the message handling within the integration engine of the Advanced Adapter Engine Extended, the Java-only deployment option of SAP NetWeaver Process Orchestration. Over time, it will take over the functionality you know from the Integration Builder, the Swing client for maintaining development artifacts in the Integration Directory.
SAP is moving to the pure Java world for SAP NetWeaver Process Integration (SAP NetWeaver PI). This means that design time tools will be replaced eventually by respective perspectives in SAP NetWeaver Developer Studio. Consequently, you can now build integration scenarios within SAP NetWeaver Developer Studio, including the Enterprise Services Repository (ESR) perspective and the Process Integration Designer (PI Designer) perspective.
I covered the former in my previous article
“Build Integration Scenarios Entirely within SAP NetWeaver Developer Studio: The Enterprise Services Repository Perspective.” In this article I take a closer look at the PI Designer perspective, which will take over the functionality of Integration Builder. The perspective is available with SAP NetWeaver Process Orchestration 7.31 — a combined installation of SAP NetWeaver PI, SAP NetWeaver Business Process Management (SAP NetWeaver BPM), and SAP NetWeaver Business Rules Management (SAP NetWeaver BRM). It allows you to configure integration flows (iFlows), which I cover later in this article.
Note
SAP NetWeaver Process Orchestration 7.31 is currently in Ramp-Up and will probably be generally available at the end of Q2 2012. Expect slight changes in the user interfaces (UIs) once the software is released. In addition, you can download the solution for the exercise described in this article at the bottom of this article. You have to import the TPZ file into the PI Designer perspective of SAP NetWeaver Developer Studio. Go to Process Integration > Transport Integration Flows > Import and navigate to the downloaded file to import it. Once the file has been imported you have to maintain the settings of the file adapter, activate, and deploy the iFlow as described in this article.
In my other article, I introduced a sample scenario that helps guide you through the implementation project.
Figure 1 shows the associated process model.
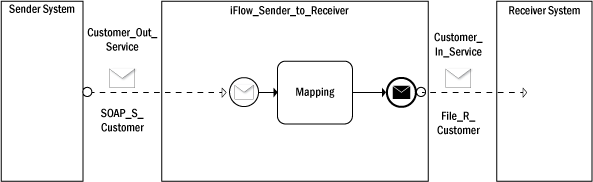
Figure 1
Implementation scenario
Figure 1 shows the communication between a sender system on the left and a receiver system on the right. The sender sends a Customer_Out_Service message, which contains data about a customer, via a SOAP adapter to the integration engine. The iFlow named iFlow_Sender_to_Receiver represents the message handling within the integration engine. Obviously, only a mapping to the target interface Customer_In_Service is being executed before the engine forwards the message via a file adapter to the receiving system.
To implement the scenario, follow these six steps:
- Model the outbound service interface Customer_Out_Service in the ESR
- Model the inbound service interface Customer_In_Service in the ESR
- Model the mapping between the two interfaces in the ESR
- Model the iFlow in the Integration Directory
- Configure the complete scenario in the Integration Directory
- Run the integration scenario
Steps 1, 2, and 3 cover the development of the necessary data types, message types, service interfaces, and message mappings. The operation mappings have already been finished and are explained in detail in my other article,
“Build Integration Scenarios Entirely within SAP NetWeaver Developer Studio: The Enterprise Services Repository Perspective.” This article covers the final three steps.
Step 4. Model the iFlow in the Integration Directory
Start SAP NetWeaver Developer Studio and open the PI Designer perspective by choosing Window > Open Perspective > Other… from the main menu. In the Open Perspective dialog choose SAP Process Integration Designer and click OK. After the perspective has been opened, you have to connect to the Integration Directory on the server side. Here the PI Designer perspective is comparable to the ESR perspective. With the PI Designer, you provide just a new UI to the server-side Integration Directory. With the PI Designer, you maintain the Integrated Configuration Objects (ICOs) within the Integration Directory that has been available even in older SAP NetWeaver PI releases. Hence, the behavior of the Integration Directory itself did not change too much with the new perspective. Later, I show you what was actually created in the Integration Directory using the old Swing client Integration Builder.
Keep in mind that the new PI Designer is only available with the SAP NetWeaver Process Integration and SAP NetWeaver Process Orchestration 7.31 release (Java-only installation option) and that it cannot be used to maintain ICOs created with the old Integration Builder. No tool is available yet (as of February 2012) to help you migrate existing ICOs so that they can be further maintained with the new PI Designer. Click the connect icon

to initiate the connection to the Integration Directory (
Figure 2).
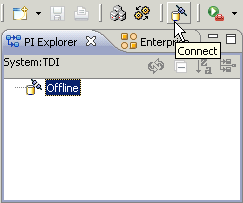
Figure 2
Connect to the Integration Directory
Similar to the ESR perspective, you can connect to any Integration Directory that is reachable from SAP NetWeaver Developer Studio via your network. You just have to maintain the appropriate Integration Directory settings on the Preferences page of SAP NetWeaver Developer Studio. Follow Window > Preferences to open it and choose PI Tools Configuration > Connections to adjust the details of the Integration Directory connection.
Figure 3 shows a typical configuration.
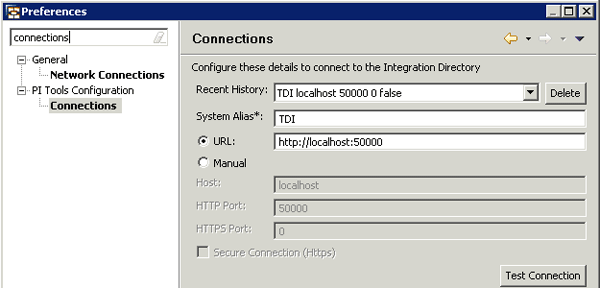
Figure 3
Settings for connecting to the Integration Directory
You can use the Test Connection button to verify your settings. Once you have established a connection to the Integration Directory, you are asked for credentials to log in. Provide the appropriate data, and after a successful login, the available iFlows are listed (
Figure 4).

Figure 4
The list of available iFlows in the Integration Directory
There are two icons for available iFlows: one with a plus sign

and one without

. The iFlows with a plus sign have been changed, but are not yet activated, whereas the iFlows without the sign have been activated.
To create a new iFlow that fulfills your integration requirements, you can either follow File > New > Integration Flow from the main menu or click the new icon

available in the button bar of SAP NetWeaver Developer Studio and select Integration Flow. In addition, a dedicated icon for creating iFlows was added to the button bar. You can click the new integration flow icon

to create an iFlow. The New Integration Flow dialog opens (
Figure 5).
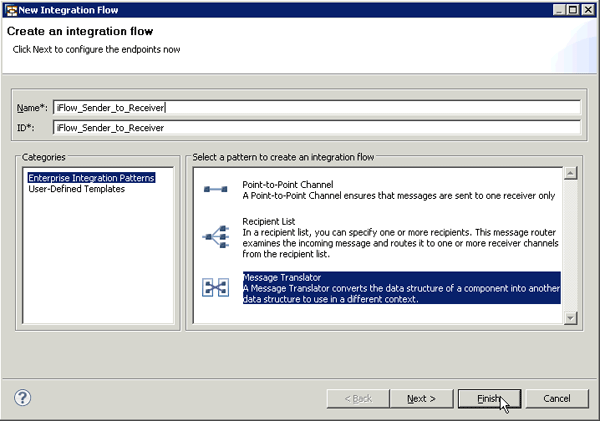
Figure 5
Create a new iFlow
Enter the name iFlow_Sender_to_Receiver in the Name field. The ID field, which uniquely identifies your iFlow later during runtime, is automatically filled. To speed up your development, SAP provides predefined integration patterns containing flows that you only have to configure. The patterns are from Gregor Hohpe and Bobby Woolf’s book titled
Enterprise Integration Patterns: Designing, Building, and Deploying Messaging Solutions, published by Addison Wesley.
The simplest pattern is the Point-to-Point Channel that forwards an incoming message straight to the receiver without any modifications. This pattern is only useful if both sides use the identical message structure for sending and receiving. In case of different message structures, a mapping is necessary. The appropriate pattern to cover this use case is the Message Translator, which I use in this scenario. It connects the sender and receiver via a mapping step that is executed during message handling within the integration server.
If you have several receivers to which you want to send a message and the decision depends on the contents of the message, use the Recipient List pattern. It forwards the message to the appropriate receiver depending on the message’s payload. You can even define your own iFlow templates and reuse them in the New Integration Flow dialog. Select User-defined Templates in the Categories box and choose one template that you have created before.
Close the dialog by clicking Finish. You can click the Next button instead if you have already defined the sender and receiver systems and assigned the interfaces to those systems. This action allows you to configure parts of the iFlow already during its creation. However, in my example no systems with their sending receiving interfaces have been defined, so I let the development environment create an empty iFlow that is not configured and that contains only the mapping activity. In the forthcoming steps I add technical details to the model so that it can be executed.
As a result of finalizing the dialog, you create the model in
Figure 6. You can enlarge or reduce the process model to your particular needs by either clicking the zoom-in

or zoom-out icon

or picking an appropriate resolution (e.g., 100 percent) from the sizing drop-down list. These options are located in SAP NetWeaver Developer Studio’s button bar.

Figure 6
Initial model after its creation
The diagram in
Figure 6 looks very similar to the initial model shown in
Figure 1 and differs significantly from what you know from the Integration Builder user interface. The basic idea of the model-driven approach is to provide an overview of the communication that allows the reader of the model to immediately identify the sender system, sender interface, receiver systems and their interfaces, the channels being used to connect the systems, and the way the message is handled while it is passing the integration engine.
The model is based on the business process model and notation (BPMN) standard, a graphical modeling notation. Readers who already have worked with SAP NetWeaver BPM are probably familiar with this model. In SAP NetWeaver BPM, the BPMN standard is used to model executable business processes. However, BPMN offers so many useful graphical shapes and interesting approaches to model sequence flows, that it makes sense to use that standard for integration purposes as well. In addition, the use of one notation for all kinds of processes (e.g., human-centric business process, integration-centric process, or iFlow) makes the models easier to understand across different tools. SAP has decided to make BPMN the strategic foundation of all process-related diagrams.
Now I discuss the model in more detail:
- The three rectangles labeled Sender 1, Non-Specific Operation, and Receiver 1 are called pools in BPMN
- The Sender 1 pool represents the sending system and contains the interface it is sending
- The Receiver 1 pool represents the receiving system and contains the interface it can receive
- The pool in the middle represents the message-handling flow. It consists of the message start event (
 ), the mapping activity (the rounded rectangle), and the message end event (
 ).
).
- The solid connections between the shapes are called sequence flows in BPMN. Events in general are depicted in BPMN using circles, and activities in general are depicted using rounded rectangles. A third shape, called a gateway, splits and joins sequence flows. It is represented by a diamond (
 ) in BPMN. Events, activities, and gateways are the core shapes of BPMN sequence diagrams.
- The pools are connected via dashed arrows representing a message flow. In this diagram they are attached with a Channel name indicating the technical connectivity between the sender system and the integration server.
With this background knowledge, you can interpret the model as follows: Sender 1 sends a message of type Interface via the Channel to the integration server. The incoming message triggers the iFlow. After applying the Mapping to the message, the transformed message Interface is forwarded to Receiver 1 by using the Channel. Obviously, the model is currently an empty skeleton. You have to fill each of these variables with concrete systems, interfaces, mappings, and channels.
First assign the systems and interfaces. Right-click in the header area of the sender system and choose New Business Component from the context menu (
Figure 7).
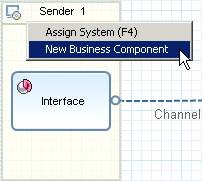
Figure 7
Create a new business component
The context menu offers a second choice called Assign System. You would have to choose that entry if you had already created a business system or if you want to select a system that you have defined in the System Landscape Directory (SLD). All the effort you’ve put in maintaining your IT landscape within the SLD is not lost and can be reused in the PI Designer as well. To create business systems, select the New Business Component menu item. The dialog that opens is used only to assign a name to your new system. Enter SenderSystem into the Name field and click Finish. The Business Component editor opens in a new tab in SAP NetWeaver Developer Studio’s main area (
Figure 8). You use the editor to assign the interfaces that the system can send or receive. In this example, the new system can send only one message of type Customer_Out_Service (
Figure 1).
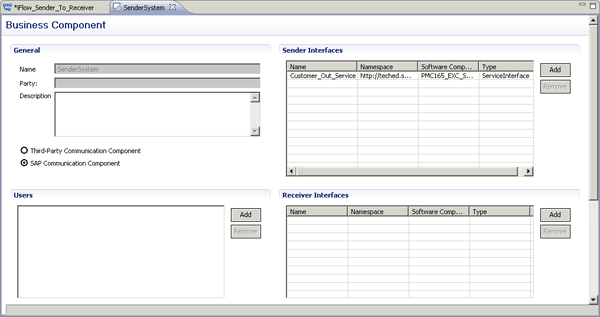
Figure 8
Assign the sender interface in the Business Component editor
Therefore, click the Add button in the Sender Interfaces section so you can add the other message types. A new dialog opens displaying all the outbound interfaces of the ESR. Select the Customer_Out_Service interface and confirm your selection by clicking OK. The chosen interface is listed in the Sender Interfaces table (
Figure 8). Save your changes and close the Business Component Editor.
Now that you have assigned the sender interface to the business component, you can use it in the PI Designer. Right-click the Interface activity (the rounded rectangle in the SenderSystem pool on the left, which contains the interface icon

in its upper-left corner), and select Assign Interface from the context menu (
Figure 9).
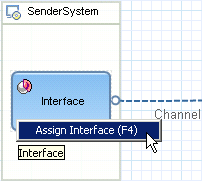
Figure 9
Assign the sending interface to the sender system
The Choose Interface dialog opens listing only those interfaces that have been assigned to the respective system in the Business Component editor. Because you have assigned only the Customer_Out_Service interface to the SenderSystem, you can choose only that interface. Select it and click OK. The sending pool should look like the one depicted in
Figure 10.
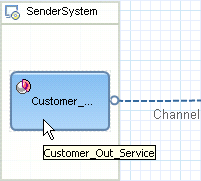
Figure 10
A completely configured sender system
Now repeat the steps for the receiving system:
- Create a new business component for the receiving side and call it ReceiverSystem.
- Add the interface Customer_In_Service to the list of interfaces that the newly created business component can receive. This time you have to add the interface in the Receiver Interfaces section of the Business Component editor (Figure 8). Save your changes and close the editor once you are done with your assignment.
- Set the newly added interface for the Interface activity of the receiver system. The final result of the receiver pool is shown in Figure 11.
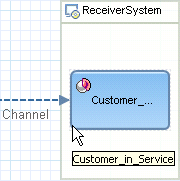
Figure 11
A completely configured receiver system
Next you need to assign the mapping. This is a rather straightforward step as the system automatically filters all available mappings to the ones that fit the participating interfaces. Right-click the mapping activity in the iFlow and choose Assign Mapping from the context menu (
Figure 12).
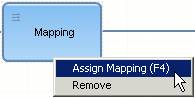
Figure 12
Assign a mapping to the mapping activity
A new dialog opens listing all possible operation mappings that fit the input and output service interfaces. You have defined only one operation mapping, so select the entry and click OK to finish your assignment. The selected mapping also appears as a string inside the mapping activity (
Figure 13).
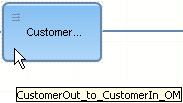
Figure 13
Mapping activity with assigned operation mapping
Save your changes in the PI Designer. You see error markers (

) close to the channels as you haven’t defined their details yet. The consistency check, which is always invoked while saving the flow, detects them. Move the mouse pointer over the error marker and you receive a more detailed error message. You can also trigger a consistency check of your current model without saving the flow by right-clicking somewhere in the modeling area (not moving your mouse pointer over any of the shapes) and choosing Check Consistency from the context menu. Any errors are listed in a dedicated Problems tab beneath your iFlow model. Finally, to remove all error markers again, choose Clear Error Markers from the context menu I just mentioned.
Now you are ready to learn some more features of the PI Designer. The integration engine typically handles messages in the following sequence:
- Receiver determination
- Interface determination
- Mapping
Each of the steps is optional. However, the sequence order is important. For example, you cannot place an interface determination step after a mapping step. In this current model, you only apply a mapping to the message. If you want to add a receiver determination in front of the mapping step, right-click the connection from the start event to the mapping activity and choose Add Recipient List from the context menu. The model is then enhanced by an appropriate activity and a gateway (
Figure 14).
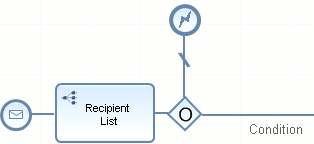
Figure 14
Add a recipient list to the model
Now try to add a receiver determination after the mapping step by right-clicking the connection from the mapping step to the end event. There is no context menu because you cannot place any activity after a mapping step. This exercise already showed you how to basically work with the PI Designer perspective: Right-click the places where you want to add, configure, or model something and choose the appropriate option from the context menu. The right-click is context sensitive. If a certain action is not allowed, no context menu is available, so you cannot make any mistakes. In this regard, unlike the Process Composer, the PI Designer is not a freestyle modeling environment. You are guided through the modeling and configuration steps leading to increased productivity. Practice with the PI Designer and explore all the options the perspective offers you. The editor is more or less self explanatory.
Let’s bring this example to an end. If you have added the recipient list to your model, as suggested earlier, remove it now by right-clicking it and choosing Remove from the context menu. You now have to define the channels. Double-click the line connecting the SenderSystem pool with the start event to open the Channel editor. You need to execute just two steps:
- Provide an appropriate name for your channel
- Select the adapter and configure its properties
For the name, enter SOAP_S_Customer in the Channel Name field to indicate a sending SOAP adapter. To select the right adapter, click the Browse… button behind the Adapter Type fields. The Choose Adapter dialog opens (
Figure 15).
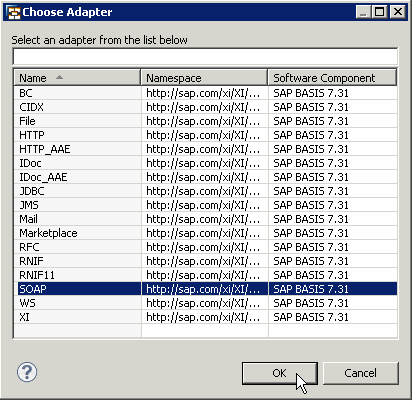
Figure 15
Choose an adapter
Select the SOAP adapter and click OK. The initial configuration of your adapter should look like the example shown in
Figure 16.
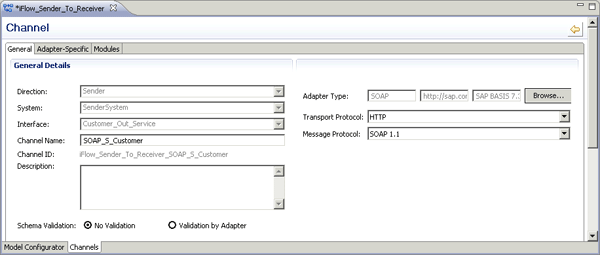
Figure 16
The initial configuration of the SOAP adapter
Because you want to configure an asynchronous scenario, switch the quality of service to Exactly Once. You can adjust the appropriate setting on the Adapter-Specific tab located at the top of the Channel editor. Click it and select the Exactly Once option from the Quality of Service drop-down list (
Figure 17).
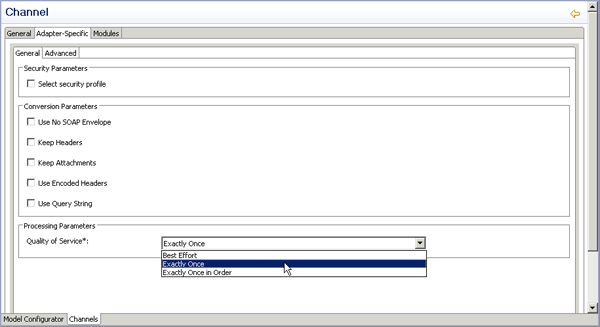
Figure 17
Change the quality of service to Exactly Once
Notice the Channels and Model Configurator tabs at the bottom of
Figure 17. You can easily jump back and forth between your model and the channel configuration by selecting the respective tab. Now jump back to your iFlow model by clicking the Model Configurator tab. Once you are back on your model, double-click the connection from the end event to the receiver system. Again, the Channel editor opens. Type File_R_Customer in the Channel Name field to indicate a receiving File adapter. As Adapter Type choose the file adapter from the list of available adapters (the third entry in
Figure 15). So far your settings for the receiving adapter should be similar to the ones shown in
Figure 18.
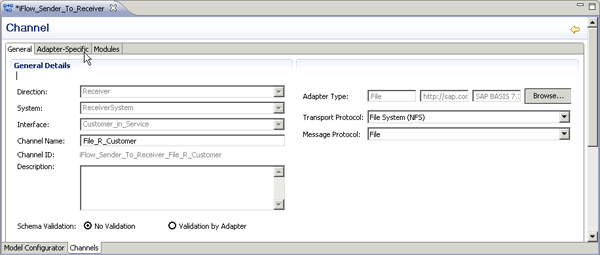
Figure 18
Configured file adapter
You also have to adjust some adapter-specific parameters for the file adapter. Therefore, click the Adapter-Specific tab of the Channel editor as you did when selecting the SOAP adapter. The editor shown in
Figure 19 is displayed. It looks different compared with the SOAP adapter as you have to maintain file adapter-specific settings now.
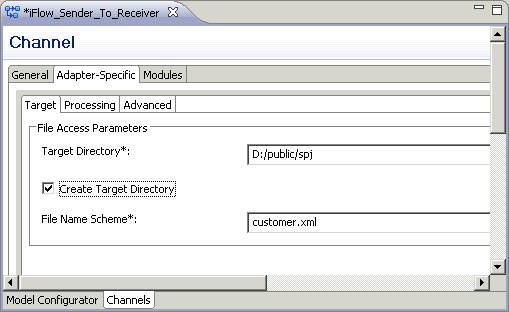
Figure 19
Adapter-specific settings for the file adapter
You have to define the path to the target directory in which the received file should be stored. Take any directory that fits your needs. Just consider that even systems working on the Windows operating system have to use the slash to separate the parts of your path. Leave the Create Target Directory check box selected and provide a File Name Scheme. I have chosen to name the received files customer.xml. With these final changes, you are done. Save all your changes. Switch back to your iFlow model by clicking Model Configurator and verify that all error markers are gone. Your final iFlow should now look like the one in
Figure 20.
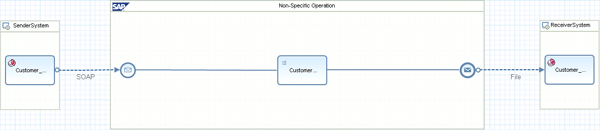
Figure 20
Completely configured iFlow
Now you are ready to activate and deploy the iFlow. Right-click the iFlow_Sender_to_Receiver entry in the PI Explorer and choose Activate from the context menu. During activation all locks that have been set in the Integration Directory to prevent others from working on the iFlow in parallel are removed. Finally, right-click a second time on the iFlow_Sender_to_Receiver entry and choose Deploy from the context menu. This time the iFlow is pushed to the server and is now ready for handling messages. You receive a notification indicating the result of your deployment on the Deployment Status tab beneath your flow model. If you want to activate and deploy your iFlow in one step, you have to maintain a setting in the Preferences of SAP NetWeaver Developer Studio. Open the Preferences dialog via the main menu Window > Preferences. In the tree on the left, select the node PI Tools Configuration > Personalize and select the check box for the option Trigger deployment of integration flows automatically on activation.
You have successfully deployed the flow. Let’s look into the Integration Directory to find out what was created behind the scenes for you. Start the Integration Builder (the Swing client for the Integration Directory). Once the Integration Builder is up and running, you can find the following information in the Integration Directory (
Figure 21):
- A new node named Integration Flow contains all deployed iFlows. One entry beneath this node is named iFlow_Sender_to_Receiver and represents the iFlow you’ve just created.
- Beneath the Integrated Configuration node you find the entry |SenderSystem|Customer_Out_Service|| reflecting the ICO that was created based on the configurations made in the PI Designer. You can find details about this ICO in the main area of the Integration Builder.
- Beneath the Business Component node, you find two new entries representing the sender and receiver system. They are named SenderSystem and ReceiverSystem and contain the two Communication Channels that were created for them. The channel’s names are iFlow_Sender_to_Receiver_SOAP_S_Customer and iFlow_Sender_to_Receiver_File_R_Customer, respectively. Obviously, the names are derived by concatenating the iFlow name and the channel name.
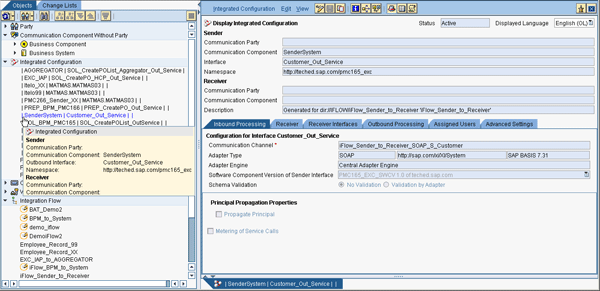
Figure 21
iFlow and integrated configuration in the Integration Directory
Now that you have revealed all the secrets about the relationship between iFlows and their associated counterparts in the Integration Directory, you can test the newly created flow. Recall from the flow model that the message should arrive via the SOAP adapter. You can easily provide an incoming message by calling the SOAP adapter’s Web service. To complete this step you have to get the address of the associated Web Services Description Language (WSDL) information. You can get the address from the ICO in the Integration Builder. Right-click the ICO named iFlow_Sender_to_Receiver and select Display WSDL… from the context menu. If you receive an error message telling you that the cache status is inconsistent, you can ignore it for now and confirm the error dialog by clicking Ignore. The Display WSDL dialog pops up (
Figure 22).

Figure 22
Display and copy the WSDL URL
Copy the URL into the clipboard by clicking the copy WSDL-URL to buffer icon

. Next, start the Web Services Navigator (typical reachable in your browser using the URL https://<server>:<port>/wsnavigator). Once the navigator has started, a wizard UI comprising four steps shows up. In the first step named Service paste the copied URL into the WSDL URL field (
Figure 23).
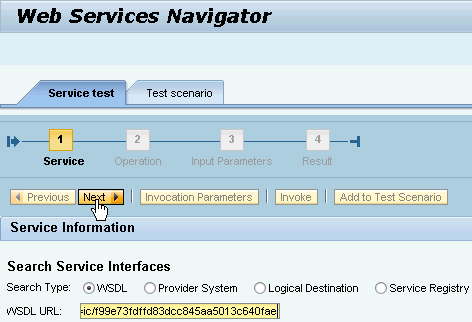
Figure 23
Provide the URL to the WSDL information in the Web Services Navigator
Click Next twice to reach the Input Parameters step of the wizard. (The second step just lists the operations of the interface. You have defined only one operation, so there is nothing to select.) Enter the relevant data for the Firstname and Lastname fields (
Figure 24).
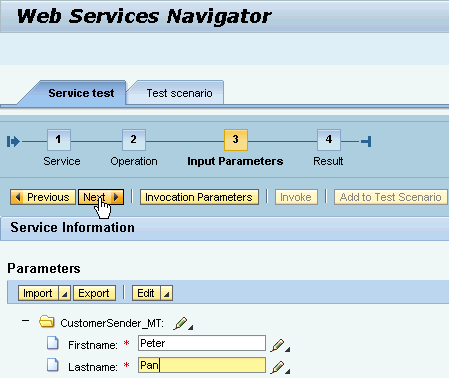
Figure 24
Filled form comprising the message to be sent
Click Next again to send the message to the SOAP adapter. The Web Services Navigator shows you the successful delivery of the message to the integration server in its status line (
Figure 25).
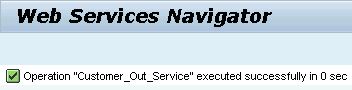
Figure 25
Successful message delivery
Verify the successful message transfer by opening the target directory that you have defined during the configuration of the file adapter. In this case, the file should appear in the folder d:/public/spj.
Figure 26 shows the received file in the file system.
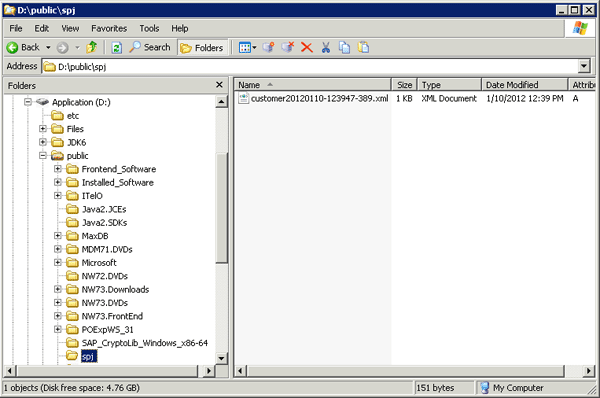
Figure 26
Verify the message transfer
Double-click the file to view its contents. It shows the concatenated name proving the correct execution of the mapping and should look similar to the code shown in
Figure 27.

Figure 27
Verification of the file's contents
The monitoring tool of SAP NetWeaver PI can verify the message transfer in the integration engine itself. From SAP NetWeaver PI’s homepage reachable via the URL https://<server>:<port>/dir, click Configuration and Monitoring Home. The Monitoring Homepage opens in a new browser window. Click Monitoring > Adapter Engine > Message Monitor and you are guided to the Message Status Overview screen of the Message Monitor listing all the messages that have passed the engine during a certain period of time. A typical monitoring page is shown in
Figure 28.
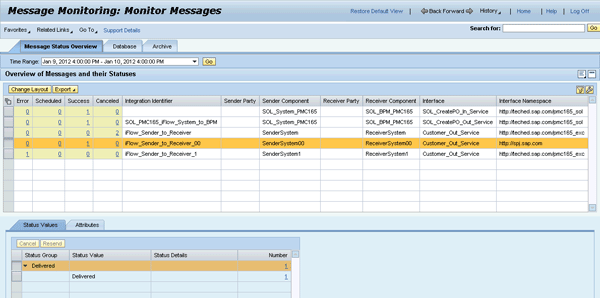
Figure 28
Monitor the status of the message
You can even drill down into each of the messages to analyze the details of the message handling. For example, if you click your successful delivered message you receive a detailed trace of your message (
Figure 29).

Figure 29
Details about the message handling in the integration engine
You’ve now completed the development of a complete integration scenario within SAP NetWeaver Developer Studio. This article, combined with my other article, provides you with insights into how the developer’s experience changes with the forthcoming releases of SAP NetWeaver Process Integration and SAP NetWeaver Process Orchestration. You are now well prepared for the Java-only future of the two products.

Dr. Volker Stiehl
Prof. Dr. Volker Stiehl studied computer science at the Friedrich-Alexander-University of Erlangen-Nuremberg. After 12 years as a developer and senior system architect at Siemens, he joined SAP in 2004. As chief product expert, Volker was responsible for the success of the products SAP Process Orchestration, SAP Process Integration, and SAP HANA Cloud Integration (now SAP HANA Cloud Platform, integration service). He left SAP in 2016 and accepted a position as professor at the Ingolstadt Technical University of Applied Sciences where he is currently teaching business information systems. In September 2011, Volker received his Ph.D. degree from the University of Technology Darmstadt. His thesis was on the systematic design and implementation of applications using BPMN. Volker is also the author of Process-Driven Applications with BPMN as well as the co-author of SAP HANA Cloud Integration and a regular speaker at various national and international conferences.
You may contact the author at
editor@SAPpro.com.
If you have comments about this article or publication, or would like to submit an article idea, please contact the
editor.