The agent inbox in SAP CRM Interaction Center can be a centralized location to receive customer and supplier emails. An incoming email triggers a standard workflow, which routes the workflow object to your agent inbox. Find out the client-independent and client-dependent settings you need to make this work.
Key Concept
The Interaction Center agent inbox receives emails from your customers and suppliers. It allows your interaction center staff to search, filter, and interact with inbound emails from within SAP CRM. The agent inbox also enables you to track and store all incoming email communications.
When implementing SAP CRM Interaction Center (IC), a common piece of functionality to implement is the IC agent inbox. The agent inbox, like any email inbox such as Lotus Notes or Microsoft Outlook, receives incoming communication from your external parties (e.g., customers and suppliers). These inbound communications may take the form of faxes, emails, or workflow tasks. Within the agent inbox, your call center staff has a centralized management tool to track, allocate, and act on inbound communications. The agent can select an incoming communication, read the contents, and then perform follow-up activities.
Although the process is relatively simple, many steps are involved in the setup. You need to remember quite a few things in the initial setup, as well as any subsequent setups when you create new environments over the project’s life cycle. I will take you through a step-by-step guide to implementing a single IC agent inbox to receive your customer and supplier queries via email into IC. This article applies to SAP CRM 2007.
The assumption with the following configuration is that you have already routed your email into SAP CRM. Your Basis team normally performs this work, which involves routing your customer service email from your email server into SAP CRM. The Basis team should also configure SAPConnect to have a node for receiving inbound emails. This is usually referred to as the SMTP node. After this is finished, you need to perform transportable configuration tasks and client-specific master data settings.
Client-Independent Configuration Tasks
The following steps involve client-independent configuration that you will need to transport to subsequent environments. Later in the article I will take you through the client-specific configuration tasks that you need carry out each time you set up a new client.
Step 1. Configure inbound distribution. In this step you define the incoming email address for the agent inbox. This is the email address that is used to forward your incoming emails into SAP CRM from your mail exchange server. Use transaction SPRO and follow menu path CRM > Interaction Center WebClient > Agent Inbox > Settings for Asynchronous Inbound Processing > Define Receiving E-mail Addresses/Fax numbers. Click the New Entries button and then enter the email address and email address description (Figure 1).
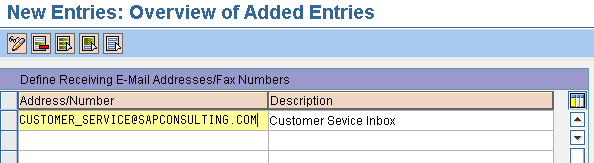
Figure 1
Set up the inbound email address
Step 2. Define the email settings that control the incoming email workflow, how soon items are escalated, what calendar the escalation uses to identify working times for your contact center, and whether or not an automatic reply is sent. Use transaction SPRO and follow menu path CRM > Interaction Center WebClient > Agent Inbox > Settings for Asynchronous Inbound Processing > Define Email/Fax Settings. Click the New Entries button. In the Address/ Fax No field, select the email address you entered in the previous step and enter the rest of the settings shown in Figure 2.
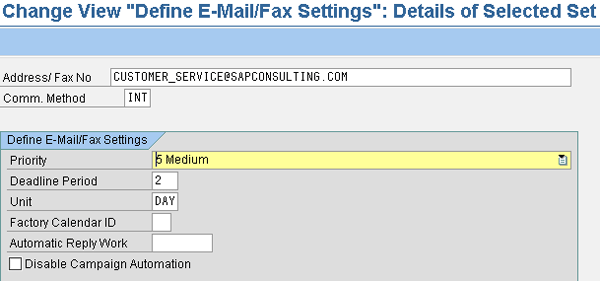
Figure 2
Define the Deadline Period and Unit
I used the communication method INT, which is the standard communication method for incoming emails into the agent inbox. You use the Deadline Period and Unit fields to monitor the deadline for action on the email and consequent escalation. If no action is taken on the email within this period, the agent’s manager receives a work item. For example, setting the Deadline Period to 2 and the Unit to DAY turns the email workflow red in the agent inbox when the email is two days old.
Automatic Reply Work defines if an automatic email is mailed back to the sender confirming receipt. You can use the standard workflow task 1400792 for this field, or you can create a custom workflow task if you need a variation on the standard task. For example, you may not want to send an auto-reply to the sender, but rather notify somebody else of the incoming email.
Step 3. Define the agent inbox profile. Use transaction SPRO and follow menu path CRM > Interaction Center WebClient > Agent Inbox > Define Inbox Profiles. The inbox profile in Figure 3 defines which entries are displayed in the drop-down menus for inbox search. For this, configure the following functional settings:
- Categories: The transaction category by which the agent can search. It is important that you include category INT as specified in the Comm. Method field in Figure 2. This is the inbound email category setting for the agent inbox. You may also choose to include other transactions, such as activities you have configured that assign work tasks to your call center agents.
- Time Period: Defines the time frames the agent can use to search the IC inbox. The time frames for search depend on your business requirements. For example, if there are low numbers of inbound emails and extended lead time for processing inbound communications, you may want to set up search criteria with a longer search time frame. The time frames are standard, so you only need to select which ones are relevant for searching in the agent inbox.
- Quick Searches: Create quick search types, such as New Inbound Emails. These quick searches just need a unique identifier and a name at this point. The IC manager assigns the search criteria in the client because this is client specific.

Figure 3
Assign the main categories, quick searches, and time periods
Save your settings on each screen before exiting.
Step 4. Assign the agent inbox profile to your agent business role. Use transaction SPRO and follow menu path Customer Relationship Management > Business Roles > Define Business Role. Double-click Assign Function Profile (Figure 4).

Figure 4
Assign function profile IDs to the call center agent business role
Select the business role you have assigned to your agent position in the organizational structure and then navigate to Assign Function Profiles for that business role. For this example, you need to assign your new agent inbox profile to the function profile ID IC_INBOX in the Profile Value field. The business role ZLP_AU_EMAIL has the agent inbox profile ZLP_AU_EMAIL assigned to the IC_INBOX. This links your new profile to all users who log in using the business role ZLP_AU_EMAIL.
Step 5. Define the email profiles. Use transaction SPRO and follow menu path CRM > Interaction Center WebClient > Basic Functions > Communication Channels > Define Email Profiles.
The email profile applies the technical settings to the agent inbox. You may choose to use the default email profile or copy it and create your own email profile. For the purposes of this example, you can use the default. The most important setting is the E-Mail Provider field, which is the channel used to process the incoming email. You must set this to Agent Inbox (Figure 5).
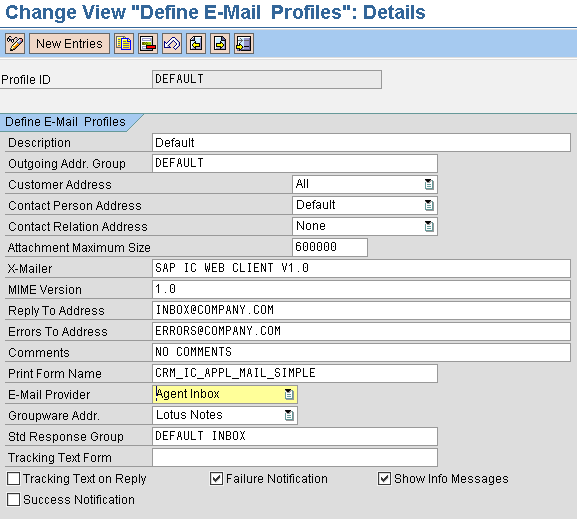
Figure 5
Email profile settings
Tip!
For special cases you can vary adjust the default email profile. For example, if you have two different agent inboxes running, you can use two different reply email addresses — SERVICE@SAP.COM for one inbox and CUSTOMER_SUPPORT@SAP.COM for another inbox.
Note
The email profile provides a significant amount of functionality that is beyond the scope of this article. However, the online help is descriptive for each of the available settings. To see the online help, click the documentation icon to the left of the IMG activity.
As with the agent inbox profile, you need to assign the email profile to your call center agent business role. Follow the same process you did for the agent inbox profile, but instead of using the function profile ID IC_INBOX, use the function profile ID EMAIL, as shown in Figure 4.
Client-Specific Settings
After you have completed the configuration in the previous section, you need to address the client-specific settings. You need to carry out this configuration each time you set up a new client.
Step 1. Activate event linkages. In this task you turn on the standard inbound email workflow and assign your IC agents. This activates the workflow used to handle the inbound email event for the agent inbox. From the main SAP CRM menu select Interaction Center > Interaction Center WebClient > Administration > Agent Inbox > Assign Agent for Email Handling. In the resulting screen, click Activate event linking (Figure 6).

Figure 6
Click Activate event linking
In the screen that appears, you see that the workflow for inbound email has now been activated. Click the details icon to view the activation details (Figure 7). This confirms that the activation has successfully occurred (i.e., the Event linkage activated check box is selected).

Figure 7
Check the event linkage details
Step 2. Assign agents to the agent inbox configured for this workflow activation. Return to the screen in Figure 6 and click Assign Agents. Click IC: Mail Inbox Handling, and then click the create agent assignment icon located in the top left of the menu bar (Figure 8).

Figure 8
Set up the IC agent assignment
Select Position from the next pop-up screen, which then takes you to a screen in which you can search your organizational structure (as defined in transaction PPOMA_CRM). Navigate to the position you created for your agent in IC and click the green check mark icon (Figure 9). You can assign more than one position if needed. In this example, I selected the position Call Centre Agent.
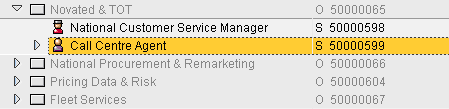
Figure 9
Assign the IC agent position to the workflow if you want a subset of users to see the inbound emails
If you want the inbound emails to be visible to all users that have access to IC, then you do not need to assign any positions. Instead, ensure that the workflow is set up as a general task. To do this, click IC: Mail Inbox Handling in Figure 8 and then click the Attributes button. In the next screen, make sure General Task is selected then click the Transfer button (Figure 10).
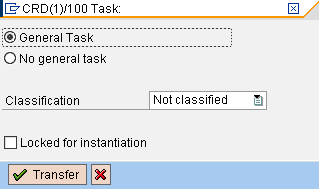
Figure 10
Set the workflow task as a General Task if all positions should be able to view the inbound emails
Finally, generate this configuration by clicking IC: Mail Inbox Handling in Figure 8 and then clicking the regenerate index icon.
Step 3. Set up the recipient distribution. From the main SAP CRM menu select Interaction Center > Interaction Center WebClient > Administration > Agent Inbox > Maintain Recipient Distribution.
Click the Insert Line button. In the Recipient field, enter the name of the inbound email address, which should be the email address that your Basis team uses to route the email into SAP CRM (this may not be the email address that your customers use). The Basis team may have to change the email address to an internal email format, so it is best to check with them to find out the exact address.
In the New recipient field, click the drop-down box in the field area. Select SAP object instance and click the green check mark icon (Figure 11). This option enables the system to carry out searches for objects in the Business Object Repository.

Figure 11
Add a new email recipient
Tip!
If you cannot see the SAP object instance option in Figure 11, go to transaction SO16, click the Addressing tab, and ensure that the SAP Business Objects check box is selected.
In the next screen, select AUI: Support object (Figure 12). Click the green check mark icon to continue. In the next screen, select the email address you set up in step 1 of the previous section by choosing it from the drop-down menu. Complete the step by clicking the green check mark icon.
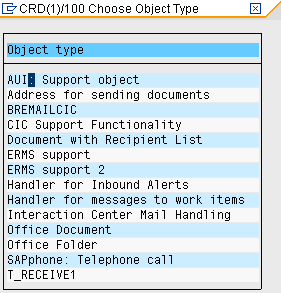
Figure 12
Select AUI: Support object
Note
The recipient email address in Figure 11 is the Basis email address used to route the email server email into SAP CRM. The receiver email address CUSTOMER_SERVICE@SAPCONSULTING.COM is the email address customers use when sending emails. The recipient email address does not have to be the actual email address the customer uses. However, it is easier to use this convention if you have several emails for inbound communication.
If you send an email to the new customer service email address you have configured, you should now be able to see the email in the agent inbox when you perform the search for category INT: Inbound email. If this does not happen immediately, check the following two items:
- Did the email actually make it to SAP CRM? Use transaction SOST to check. This transaction reports on inbound and outbound communication. Using the menu path Utilities > Inbox Overview, select you inbound email by date. If there are entries in the resulting list, the sent email successfully routed into SAP CRM.
- Was the workflow triggered? Use transaction SWI1 to check. This transaction reports on any workflow tasks that have been triggered. You need to search using task TS14008030, which represents the workflow task triggered by your inbound email.
If both of these look correct, you may not have correctly assigned agents to the workflow or your agent inbox profile may not be correct. You should then go back and check your event linkages activation, agent assignment, and agent inbox profile to ensure all the settings are as specified in this step-by-step process.
Katrina Burke
Is a senior CRM consultant at SAP Australia. Working as an SAP consultant for 13 years, initially Katrina was entrenched in ABAP and SAPScript. In later projects in both Asia and Europe, Katrina worked as a development manager and HR Payroll consultant. Most recently Katrina has been working at SAP as a CRM consultant specializing in business partner, marketing, and opportunity management. In her current CRM consulting role, she has been working with SAP CRM 2006s.
You may contact the author at katrina.burke@sap.com.
If you have comments about this article or publication, or would like to submit an article idea, please contact the editor.