Manager
IBM's D. Russell Sloan walks you through how custom attributes can help you better organize, plan, manage, and monitor work activities during a project.
Key Concept
Document attributes (e.g., person responsible, document status) provide a way to describe not only the content and ownership of documents, but also help you manage the design, development, testing, and delivery of your SAP solution.
Custom attributes allow you to work better in global environments by collaborating on and monitoring work throughout projects. Attributes such as team, release, and planned start and end dates are often used to manage work and are not delivered standard in Solution Manager. I’ll show you how to use custom attributes across a few different areas, including planning, monitoring, and organizing. I’ll also show you how to maintain and report on these attributes, as well as explain some rules of thumb for using custom attributes. First, let’s look at the concept of controlling documents.
Note
This article is based on a Solution Manager 7.1 system with Service Pack 05. However, these techniques work for Solution Manager 7.0 SP18 and higher.
The Controlling Document Concept
Because Solution Manager has many features for managing documents, it is advantageous to use certain documents as controlling documents.
These documents, and their attributes, represent work beyond just the scope of authoring and approving the document. Some of these include configuration documents and functional design documents. The attributes of these documents apply not only to the activities associated with creating and approving the documents themselves, but also the related work.
For example, a configuration document cannot be said to be complete until all the configuration and testing related to the document have been performed. In this way, the status and planning information related to the document is for the entire scope of work related to doing that part of the configuration. The configuration document for factory calendars would have its planning and status data used to reflect the configuration, testing, and documenting of the configuration for the factory calendars.
Recommended Approach Attributes
Based on my experience, I’ve come to a short list of attributes I like to recommend for my projects. This list provides good information for project and work management without putting an undue maintenance burden on the team.
Planning Attributes
For planning, I recommend three attributes: person responsible, start and end dates, and team and subteam.
Person Responsible
Project managers and team leads all need to manage and assign work. Solution Manager comes standard with the Person Responsible attribute that you can use to represent the person assigned to complete the document. This attribute is perfect for monitoring who is charged with getting the work done, regardless of who needs to be involved in the collaborative effort to complete the work.
Start and End Dates
These are custom attributes that I set up for my projects. They are used to identify when work is to begin and end for a given document. I like to set them up with data type DATS so they follow the standard SAP edits for date fields.
For controlling documents, be sure to populate these with the entire scope of related work in mind, not just the time needed to complete the document.
Team and Subteam
These attributes allow you to quickly identify the owning group for the document. Regardless of who must be involved to get the work done, the documents (and the associated work) should be owned by a single team.
Many large projects find it useful to divide into subteams within the team. For example, your project might have a finance team and a sales team. Within these teams, you may wish to subdivide the groups into smaller groups.
For the finance team, you might have subteams for general ledger, fixed assets, budgeting and reporting, and so on. For the sales team, you might divide into opportunities, order management, logistics, and invoicing. These are just some examples. The beauty of creating these as custom attributes is you can define them freely to meet your needs. This approach tends to be more flexible and provides for easier reporting than burying team and subteam information in document titles.
Work Monitoring
For monitoring work, I recommend using the standard Status attribute. This attribute is customizable. By that I mean that there’s more to it than a simple drop-down list. It is supported by a Status Schema configuration in the Solution Manager IMG, and even enables digital signatures. For details, see
"Demystify Digital Signature Configuration for Faster Approvals."
I use the Status attribute for two purposes: to help coordinate work between teams and to understand how far a piece of work has progressed toward completion. The process model in
Figure 1 helps to illustrate this concept.
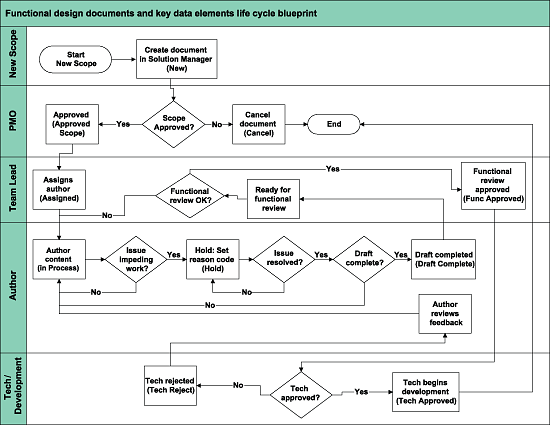
Figure 1
Process flow for functional design documents and key data elements
The flow in
Figure 1 describes how the status attribute helps everyone understand where the document is in its life cycle, and whose turn it is to work on the document. This flow was set up for controlling functional design documents, which are the detailed requirements for custom development, and for the key data element document that is used to describe project-specific information about standard SAP data.
The value of the Status attribute is in parentheses on the flow diagram. At the different major stages of the life cycle of completing the documents, the status value is changed to show it has reached an interim milestone in the life cycle. As you can see by the swim lanes, many different people and teams must coordinate to complete these documents. The status helps the different teams know when it is their turn to work on the document.
The process shown in
Figure 1 illustrates the handoffs among the project management office that oversees scope, the team lead who assigns work and performs quality assurance checks, the author who develops the content, and the technical team that builds the solution based on the detailed requirements in the documents.
Each of the teams or roles can see what work they have in their queue by running a report filtered by the status that is the trigger for them to take over. As you can see, the status attribute is valuable, so you should take your time when designing the life cycle of your project documents so you can develop the status schema to support that life cycle.
Organizing and Grouping Attributes
For organizing attributes, it is best to focus on ones by region and release.
Region
Large SAP projects are often global in nature. Therefore, I find it useful to have a Region attribute defined. I use the term region instead of country because it provides the project with more flexibility when grouping deployments.
For example, your project may be doing a global rollout with the original intent of implementing Canada first, then Mexico, and then the United States. During the project, you discover that there might be advantages to taking all three countries live at the same time. Should this occur, you can then change the value of the Region field from CAN (Canada), MEX (Mexico), and USA (United States) to NA for North America and the label of the attribute still makes sense.
Release
As projects progress, it is common to plan for a series of releases rather than take a broad functionality scope live all at once. This is where organizing work by release becomes advantageous.
Note
If you wish to control the input values of these attributes, you need to create a custom table and fields and set up the value range values in the domains assigned to the fields. This is covered in my article
"Create Custom Tables and Fields for Attributes."
Maintenance and Reporting of Custom Attributes
In transactions SOLAR01 and SOLAR02, you can access the documents for your project and maintain the attributes. You can also access the documents from some of the Solution Manager standard reports accessible in transaction SOLAR_EVAL. The next section of this article explores some of the options available to you for maintaining and reporting on custom attributes.
Maintain Attributes via Transactions SOLAR01 and SOLAR02
Figure 2 shows a sample of a Business Process Hierarchy (BPH) structure as displayed in transaction SOLAR01.
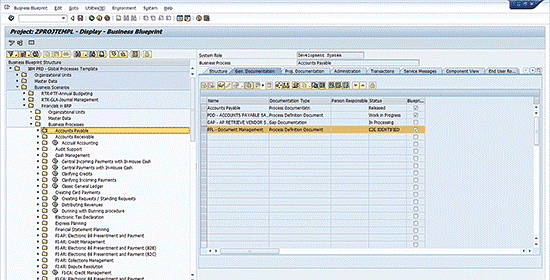
Figure 2
A BPH displayed in transaction SOLAR01
To maintain the attributes of a document, select the document and click the attributes icon

. When the Maintain Attributes window pops up, click the Other Attributes tab to maintain the custom attributes (
Figure 3).
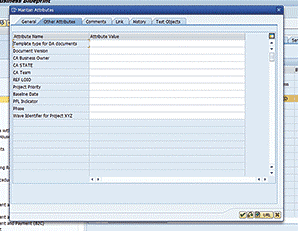
Figure 3
Maintain other attributes
Maintain the values, click the green check mark icon, and save. Repeat this process for all documents you wish to maintain.
Maintain Attributes via Transaction SOLAR_EVAL Reports
Transaction SOLAR_EVAL is similar to a portal. Running this transaction presents you with a collection of reports arranged in a hierarchy. You can save variants for these reports and later access them from the hierarchy (
Figure 4).
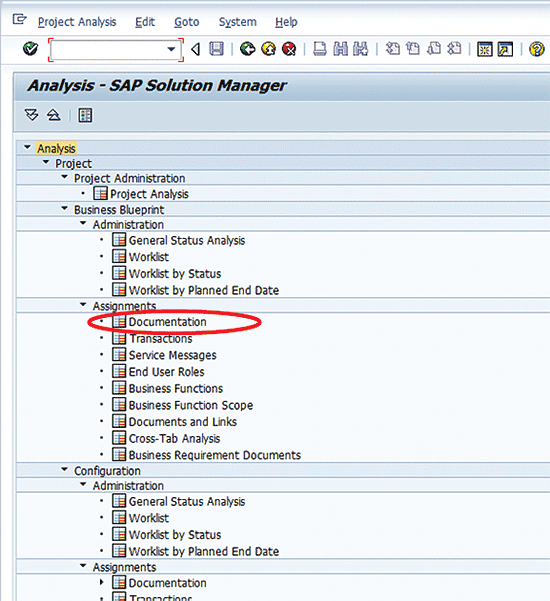
Figure 4
Transaction SOLAR_EVAL report hierarchy
While there are myriad reports available, I’ll focus on the document reports in the blueprint phase. See the circled line item, Documentation, in
Figure 4.
The Document Assignments report has numerous selection options to narrow your search for documents assigned to your project. For this example, I’ll narrow the selection to PFL* as the document name (
Figure 5).

Figure 5
Selecting documents starting with PFL* in the Business Blueprint Documents report
When you first execute the report, Solution Manager defaults to presenting the content in the Hierarchy display. This allows you to open up the BPH structure elements in much the same way you would in transaction SOLAR01 (
Figure 6).

Figure 6
Blueprint documentation in hierarchy mode
Click the tabular view icon

and you get a grid that looks more like a spreadsheet. This might be easier for you to navigate as you can sort and filter the list using standard ALV techniques (
Figure 7).
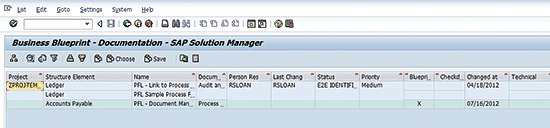
Figure 7
Document report in tabular view
From either view, you can double-click the document name and Solution Manager opens transaction SOLAR01 and navigates you directly to the node in the BPH structure in which the document is stored. Use the same process described above to select and edit the attributes on the document.
Figure 8 shows the BPH structure opened up at the location for the PFL – Link to Process document that is listed in the first row in
Figure 7.
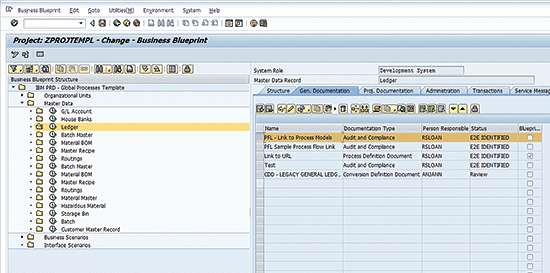
Figure 8
BPH displayed for the selected document
Once here, you can perform all the activities that you can when you access the document in transaction SOLAR01. Meanwhile, your document report is still available in the background. When you’ve completed your work with the document, click the back icon to return to your list display (
Figure 7).
Reporting on the Attributes
Using the same report described above, you can select and sort your document lists by the custom attributes you’ve defined. First, you may wish to use the values of the attributes to narrow your selection. Click the Other Attributes button to use your custom attributes as selection criteria (
Figure 9).

Figure 9
Selection screen for the Blueprint Documentation report scrolled to the bottom half of the screen
Once you enter your selection criteria, execute the report and switch to tabular view. Next, you need to add your custom attributes to the ALV display. Click the current display variant icon

to open the window to add your custom attributes to the list. In
Figure 10, I select Baseline Date to add to the list view. Click the show selected field icon

to add the attribute to the list display. Likewise, you can remove attributes from your list display by selecting the attribute in the right side of the Change Layout pop-up screen and clicking the hide selected attribute icon

.

Figure 10
Change Layout pop-up with Baseline Date selected for addition to the ALV list display
You can also use the up


and


down icons to change the order of the columns of the attributes on the list.
Once the list is redisplayed, you can download the report to Excel for further analysis using the local file icon

.
Figure 11 shows your options for the type of local file you’d like to create. I usually use Spreadsheet for Excel.

Figure 11
Local file options selection
After you select your desired format and click the green check mark icon, Solution Manager prompts you for a location to store your report (
Figure 12).

Figure 12
Local file location and name
Click the prompt icon

on the Directory field to open the Save As pop-up. This allows you to use the Windows Explorer-like features to find the location for your file (
Figure 13).

Figure 13
Save As pop-up screen
Once your file is saved, you can open it in Excel to do further analysis. Keep in mind that the file on your local drive is a copy of the data from Solution Manager. Any changes you make in Excel are not reflected in Solution Manager.
Rules of Thumb
While these custom attributes can be powerful, it’s important that you don’t go overboard. I recently experienced a project that ended up with 84 attributes in the Solution Manager system, and keeping them properly maintained consumed enormous amounts of time. The lesson here is to understand when you hit diminishing returns when adding new attributes. When adding a new attribute, you should keep in mind a few rules of thumb:
- Try to avoid creating attributes that apply to only one team or group on the project. While it is tempting to create attributes that are special just for the development team or the finance team, keep in mind that attributes apply to all document types for all projects in Solution Manager.
- Think near term and long term when evaluating whether to add a new attribute. Attributes that make great sense during a project can be confusing for support teams or future projects looking to take advantage of the content produced during your project.
- Avoid creating multiple entry attributes, such as the standard Keywords attribute. These are difficult to maintain and are problematic in reporting. To get a feel for this, assign some keywords to one of your existing documents and then try to report on it using SOLAR_EVAL reports.
- Assign your custom attributes to the instance attributes of the PHIO classes in the DMWB if you want to have Solution Manager keep a history of the attribute values assigned to your documents.
- Avoid using the Required setting on the instance attribute assignment in the DMWB. This can make it more difficult to create new documents or maintain existing ones if you add a new attribute after documents have already been created.
D. Russell Sloan
D. Russell Sloan is a specialist in project and program governance for IBM. He focuses on the use of SAP Solution Manager for global rollout projects for IBM’s largest customers, having worked with SAP software since 1996. Russell has degrees in accounting and information systems and has been a team and project leader for SAP projects for more than 14 years. He has been developing and deploying software systems for over 30 years.
You may contact the author at
solmanruss@gmail.com.
If you have comments about this article or publication, or would like to submit an article idea, please contact the
editor.