To implement an external facing portal, you first need to configure the server side of the portal. Learn how to prepare the necessary portal components and develop light top-level navigation with interactive hover functionality, configure master rules and a URL alias, and implement security for this single point of access for your external portal users.
Key Concept
NATing is a process of network address translation. Because of the limited number of IP addresses with the form X.X.X.X, private networks with large numbers of computers and devices need addresses that do not conflict with Internet addresses. Certain addresses (10.X.X.X and 192.168.X.X) have been designated for use on these private networks, which are not part of the Internet. No computer on the Internet is allowed to have these addresses. When such a network wants to communicate with the Internet, it does so through a NAT gateway.
IT and business groups are both putting forth enormous efforts to make products, services, and business-related processes available to all of their external users — suppliers, vendors, company shareholders, and customers — through a single external facing portal (EFP). But often they fail to address some very important concerns, which can result in the following issues:
- Portal navigation issues
- Portal speed (if light content for the portal is missing, the portal page load time is increases and causes delays for users)
- Proxy URL issues due to a URL alias not being set in a master rule
- Public content requires login, missing anonymous user setup and content
- Customers are not in a corporate LDAP, which indicates inaccurate identity management
- Portal availability issues over Internet, because the NATing and Secure Socket Lays (SSL) configuration are incorrect or missing
The EFP aims to solve these problems by presenting a single gateway to the information and services a company wants to share with its external portal users. An EFP is a collaborative platform that extends the capabilities of the SAP NetWeaver Portal by allowing a company to provide information, services, and applications to users from a single, secure point of access. The model for an EFP integrates technologies that allow quick access to information in a role-based manner.
The EFP creates one system for accessing organizational information and updates, eliminating the need for multiple applications. An EFP bridges the gap between your organization and your external portal users, making it easier to do business with you.
To help your IT and business groups address these issues, I recommend six important, yet often forgotten, tasks for running an external-facing portal (EFP) in your SAP landscape:
- Configuring portal navigation
- Configuring light content
- Modifying the master rule for a URL alias
- Configuring anonymous user access and content
- Configuring multiple LDAP for seamless identity management
- NATing and configuring the SSL
Note
Not all of these steps are not mandatory for implementing an EFP, but they are strongly recommended by SAP.
Prerequisite
To implement an EFP, you must have already implemented SAP NetWeaver Application Server Java (SAP NetWeaver AS Java) 6.40 or higher, SPS 14 for SAP NetWeaver 2004 and SPS06 for SAP NetWeaver 7.0. This article assumes you know how to implement a portal and create portal content.
Issues to Consider Before Implementing an EFP
Before you begin implementing an EFP, you should understand these issues:
- How to launch a portal on the Internet
- Why organizations often falter in implementing an EFP
- What is light content and why use it?
Launching an EFP on the Internet
There are two options for an EFP over the Internet:
- Portal as an independent domain
- Portal as a sub-domain of your current corporate domain
The first option can increase cost and time spent on configurations because it requires you to buy a domain and host your portal. This approach is desirable only when the information you are going to present on the portal is not related to your internal operations.
The second option is necessary if you are extending the intranet portal to employees as well as customers over the Web. This scenario requires a portal to be added as a sub-domain to your existing corporate Web site. Adding a sub-domain involves adding a folder to your Web site where you can maintain all the portal’s installations. The IT infrastructure team typically completes this task so you can focus on the actual implementation.
Why Organizations Often Falter on the Implementation
Before you start with the implementation, you should understand the pitfalls. These are the reasons many organization falter when implementing an external-facing portal:
- Failure to align the implementation strategy with organizational goals for solving business problems
- Using HTMLB tags that make the framework heavy
- Mismanaging the access, security, and content issues that come with an EFP
- Misunderstanding the steps involved in an EFP implementation
- Assigning an inexperienced person to handle network security, Web security, and authorizations
- Not planning the customizations according to organizational needs and network bandwidth limitations, thus increasing the portal’s loading time and causing unnecessary delays for users
What Is Light Content and Why Use It?
An important feature of a good Web site is quick page loading. EFP makes this possible through the use of light content. Light content can include a light framework page, a light desktop, light top-level navigation (TLN), and masthead components.
But what makes these components light?
You can develop portal components and render them using JavaScript Pages (JSP) or Java DynPages. These pages can include tag libraries of HTML for Business Java (HTMLB). The tags are similar to standard HTML tags, but the difference lies in the syntax and the resources they consume when rendering the portal components. Your portal consumes more resources when using HTMLB libraries because the user interface (UI) rendering is done on the server as well as on the client. Typical resource consumption of these heavy tag libraries is about 300KB. This results in slow loading of the page because the UI rendering is also carried out on the client.
To improve network traffic and make your portal implementation more effective, you should replace these HTMLB components with normal HTML tags. When the HTMLB tags on a default portal framework page are replaced by normal HTML tags, these are called light components. SAP NetWeaver Portal delivers a default framework page and also a default light framework page.
Note
Light content has a few limitations. For example, Knowledge Management is HTMLB-dependent in earlier versions of SAP NetWeaver. Therefore, your SAP NetWeaver Portal must run on SAP NetWeaver Application Server 7.0 SP 10 or higher.
Configuring Portal Navigation
To make the information and services you want to share with your users accessible, you need to configure portal navigation to make moving around the portal fast and easy. There are three recommended tasks for configuring portal navigation:
- Enable navigation cache and cache lifetime
- Use short URLs
- Change the portal URL for easy navigation
Enable Navigation Cache and Cache Lifetime
Navigation cache is a runtime memory that your browser sets in order to save what you accessed. Simply put, it saves the history of portal user activity. This reduces the time required for accessing the same content on the portal a number of times.
The cache lifetime refers to the time over which the cache is maintained. There is no default value to it, so you can set this property (in minutes) as per your requirement. For example, if you want the cache lifetime of the navigation cache to be more than 100 minutes, then you can set this value to satisfy this need. As you will see, I set this property to 100, assuming a session wouldn’t go beyond 100 minutes. Users can set it to any value. There is no restriction on this property.
To enable the navigation cache and set the cache lifetime, log in as an administrator to the Visual Administrator SAPGUI at usrsapJ2EJC00j2eeadmingo.bat
. Follow menu path Global Configuration > Server > Services > com.sap.portal.prt.sapj2ee. This is the path to use regardless of portal version and support package level. Next, locate the portal.navigation.cache.enable property, enter True in the Value field and set the portal.navigation.cache.lifetime property to 100 (
Figure 1). Click the Update button to save the settings, and then restart the server for changes to take place.
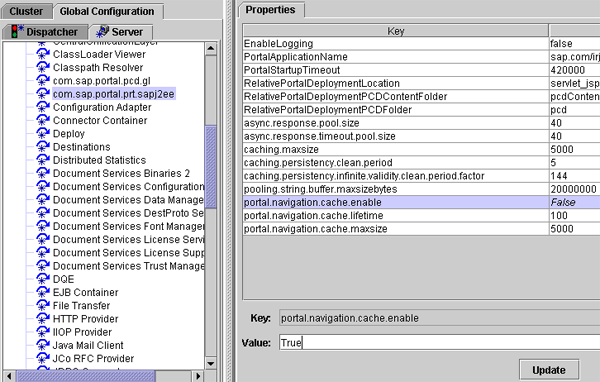
Figure 1
Enable the navigation cache and set up cache lifetime
Note
You must be logged in as administrator to complete each of tasks in this article.
Use Short URLs
Another way to ensure easy navigation and quicker page loading on the EFP is by using what is called a “short” URL. When you try to access a portal component by its URL, by default you use a URL like https://myportal.mycompany.com/show/portal content/folder/aboutusiviewt=153779&page=3. If the component is located deep in the folder structure, it takes more time to access and display the iView, which causes delays in the execution. The alternative to a long URL is an abbreviated version of the URL — that is, a short URL. A short URL assigns an ID to each portal component and refers to it by the ID, not by its folder location. This “shortcut” saves time and makes the EFP (or any portal) easier to use.
The first step is to enable the short URL setting and then you specify the short URL you want to use. Then you need to configure the short URL to replace the default one.
To enable short URLs, log in as the administrator and then follow menu path System Administration > Navigation. Click the Short URLs link and then set the Use Short URLs property to True (
Figure 2).

Figure 2
Activate the use of short URLs
When you install an SAP NetWeaver Portal, the default URL is https://<
hostname>:<
port number>/irj/portal. This URL is not user friendly: You must remember the portal number and also append /irj/portal. As a result, navigation is difficult for non-technical users. You can change the portal URL to make this URL user friendly. You also need to ensure that a user cannot append /irj/portal to the URL by configuring the startup page.
Change the Portal URL for Easy Navigation
To configure a short URL, log in as administrator, and follow menu path Cluster > Dispatcher > Services > HTTP Provider (
Figure 3). Change the Ports property to 80 for http and 81 for SSL. Port 80 is the browser default port for unsecured access. For HTTPS, the port to be configured is 81. You can also use the SSL port, which is 443; however, it is not a browser default port. You need to ask IT infrastructure team to open port 443 for communication.
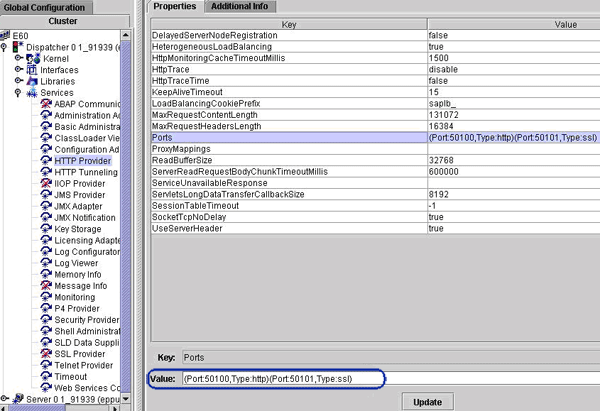
Figure 3
Change the portal port
To eliminate forcing users to remember to append /irj/portal to the URL, set the default start page field so the /irj/portal is automatically appended. Follow menu path Cluster > Server > Services > HTTP Provider
, and enter /irj/portal in the Start Page field. Save the settings and restart the server.
Configuring Light Content
Making use of light content on your EFP will ensure fast and easy access for your users. SAP recommends that you add light navigation components to the light framework page and the light framework page to the light desktop.
The framework page holds all the iViews used to display contents on a portal page. You cannot display the contents without making use of the framework page. For an EFP, you use a default light framework page. The portal desktop is responsible for the look and feel of the portal page. This includes your portal’s theme. It also holds the framework page and assigns the theme to the framework components so that all the iViews inside your framework page render the same theme.
Light content makes the EFP configuration possible. The portal provides an additional framework page for displaying light content for an external-facing portal. Light content uses fewer resources than standard content because it does not use HTMLB or client-side eventing JavaScript. The light framework page differs from the default framework page in the following ways:
- The light framework page renders contents in one single frame and thereby avoids the client-side JavaScript that would enable different frames to communicate with each other. When your contents are rendered in a single frame, there is no need for JavaScript to communicate with this page.
- The light framework page uses light iViews for the masthead, TLN, content area, and detail navigation, so client-side eventing JavaScript and HTMLB libraries are not necessary.
Add Light Navigation Components to the Light Framework Page
A typical SAP NetWeaver Portal installation provides standard light content components that you can use to configure the EFP quickly. To access these SAP-supplied components, switch to the Content Administration role and follow menu path Portal Content > contents provided by SAP > Portal Users > Standard Portal Users > Light Framework Page.
Figure 4 shows the standard light framework page provided by SAP. The light portal framework contains Light Masthead iView, Light Top-Level Navigation, Page Titlebar for Light Portal, and Light Desktop Innerpage. The Light Desktop Innerpage contains iViews for detail navigation and portal side bar and content area. The contents that will be displayed are rendered through this Desktop Innerpage.
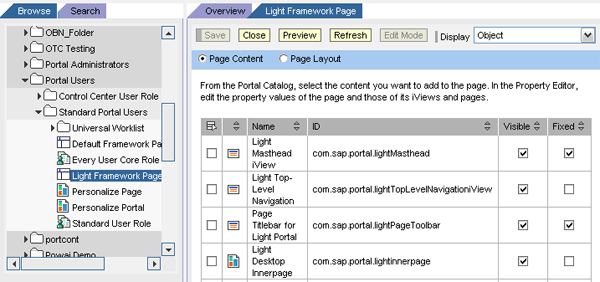
Figure 4
Standard light framework provided by SAP
Note
The icons in the second column represent the particular item type. For example, the icon that appears in the first three rows indicates an iView. The icon in the last row indicates a portal page. The portal page is the object that holds multiple iViews.
Click the Visible check box for each component you want enable for the EFP framework page. The corresponding iView is made visible at runtime. The Fixed option determines the position of the corresponding iVew at runtime.
Add the Light Framework Page to the Light Desktop
Once you have selected the light content for your light portal framework, you need to assign this page to a light portal desktop. The light portal desktop defines the rendering of the portal page at runtime. The desktop also contains the SAP NetWeaver Portal theme, which you may want to use.
Switch to the System Administrator role and then follow menu path Portal Display > Desktop & Display Rules > Portal Contents > Contents Provided by SAP > End User Contents > Standard Portal Users > Light Portal Desktop. You enter the name of the portal desktop and the portal desktop ID.
Figure 5 shows the default light portal desktop and the framework it uses. You modify the default settings using the Portal Desktop Editor.

Figure 5
Standard light portal desktop provided by SAP
The framework page (com.sap.portal.lightframeworkpage) contains iViews used for rendering the actual contents on the EFP. Here you can apply to the framework page. Try selecting the different radio buttons to switch between themes until you find the one you want to use.
Modifying the Master Rule for a URL Alias
SAP provides a master rule collection that determines what contents to display and to whom. These rules are nothing more than simple if-then statements (if user = administrator, then = Admin contents).
The main reason for modifying the master rule for a URL alias is that you want the portal to determine the contents to be displayed by verifying the URL and not the user. If a user is accessing the URL
https://myportal.mycompany.com, the portal verifies this URL before displaying the light contents. Your internal portal might contain thousands of users, and if you start configuring the master rule for all of them, this configuration will never end, increasing the load on the system. Instead, you can modify the master rules for URL alias instead of the user.
To access the master rule collection, follow menu path Portal Content > Portal Administrators > Super Administrators > Master Rule Collection. (For more details on the master rule collection and its configurations, go to the SAP Help Portal at
https://help.sap.com.)
Configuring Anonymous User Access
Many public Web sites and portals allow users to access content anonymously. Anonymous users can use up server resources or access sensitive information if you are not careful while designing a permission schema for your EFP. Depending on your business requirements, you may choose not to allow anonymous access to your portal — anyone accessing the EFP would need to register first. However, if your business needs require that all users have some kind of access to the EFP, you need to configure the portal for anonymous users and define anonymous content.
The process of configuring the anonymous access includes three major tasks:
- Enabling anonymous users and defining anonymous content
- Providing self-registration
- Creating and deploying a TLN hover menu
Enabling Anonymous Users and Defining Anonymous Content
If you want to offer content to unregistered users, you need to enable anonymous user access and define contents.
To enable anonymous user access and contents, you need to change the ume.login.anonymous_user.mode property from the default value set to 1 (which means that the portal doesn’t allow anonymous access by users) to 0. You make this change in the Config tool. Log in as administrator to the Config tool, and then follow menu path Cluster Data > Global server configuration > services > com.sap.security.core.ume.service.
Once you enable anonymous user access and contents, users can access the portal in anonymous mode using a URL similar to
https://myportal:50100/irj/portal/anonymous.
Note
For more details on anonymous user access and anonymous contents, search the SAP Help Portal at
https://help.sap.com or SDN for related information (you must have logon credentials for SDN).
Providing Self-Registration
After accessing the contents on your public portal, the user may want to register on the portal. You can provide users with the option of self-registration. In the Config tool, click the edit icon and follow menu path Cluster data > dispatcher > Server > cfg > Services > Propertysheetcom.security.core.ume.service. Set the ume.logon.selfreg property to TRUE (
Figure 6) and restart the server. This enables anonymous users to register.
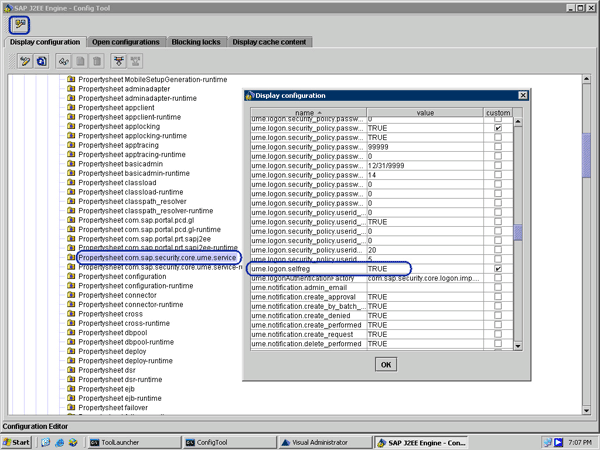
Figure 6
Enable self-registration for anonymous users on EFP
Creating and Deploying the TLN Hover Menu
To help you with this component of your EFP implementation, I’ve created the TLN hover menu as an Enterprise Portal Archive (PAR) file that you can import into your EFP. The PAR file contains two JSP files. One is LightTopLevelNavigation.JSP, which contains the logic for rendering the hover menu on TLN. The second is the header_style.JSP, which is a styling file that applies the theme, style, and colors to the developed menu. I have written CSS code in this file that renders the height and width of the menu. You can choose not to create a JSP file and simply create a CSS file and include it in LightTopLevelNavigation.JSP.
To use this menu, first you need to download the PAR file at the end of this article, which contains two JSP files. One is LightTopLevelNavigation.JSP, which contains the logic for rendering the hover menu on TLN. The second is the header_style.JSP, which is a styling file that applies the theme, style, and colors to the developed menu. The CSS code in this file renders the height and width of the menu.. Then import the file into SAP NetWeaver Developer Studio and create a new project of type EP. Once the file is imported, deploy the project. After deploying, log in into your EFP as an administrator and create an iView. Assign this iView to the framework page so that a hover menu can be displayed. Do not forget to remove the visibility of default TLN iView when you are using the hover menu iView.
Configure Multiple LDAP for Seamless Identity Management
Configuration of LDAP servers with EFPs increases flexibility in Identity Management. This is important when you are planning to use the same SAP NetWeaver Pportal for Internet and intranet users. LDAP integration with the SAP NetWeaver Portal improves system performance because there is no extra load for managing the user database in the SAP NetWeaver Portal itself. LDAP can seamlessly integrate users directly with your corporate portal. LDAP configuration is done with a database file, which could either be read-only or a writable format. If a database file is read-only, the SAP NetWeaver Portal cannot modify any attribute for the specified user. If a database file is writable it allows the portal to write back some of the information or to change attributes in the LDAP directory. This directory can connect with User Management Engine (UME) where the user management is done. Since the number of data sources directly impacts the time for search operations inside the UME, it is not recommended to have more than five data sources.
Note
For information on how to integrate the LDAP directory server with your SAP NetWeaver Portal, search the SAP Help Portal at
https://help.sap.com or search SDN for related information (you must have logon credentials for SDN).
NATing and Configuring the SSL
This task makes your EFP accessible over the Internet. It involves reverse proxy mapping and configuring SSL.
Enable Reverse Proxy Mapping
Reverse proxy mapping is required to support NATing so that no one can access your company intranet from the Internet via telnet/ftp/ssh/sftp.
As mentioned at the beginning of this article, your EFP must be configured as a sub-domain. NATing is done as part of this configuration, and once the configuration is complete, your Internet Provider (IP) provides a public IP address that your remote portal users need to access the EFP over the Internet. Once you get the public IP, you should configure the reverse proxy mapping for your portal.
To enable reverse proxy mapping, log in as administrator and follow menu path Instance > Dispatcher > Services > HTTP Provider (
Figure 7).
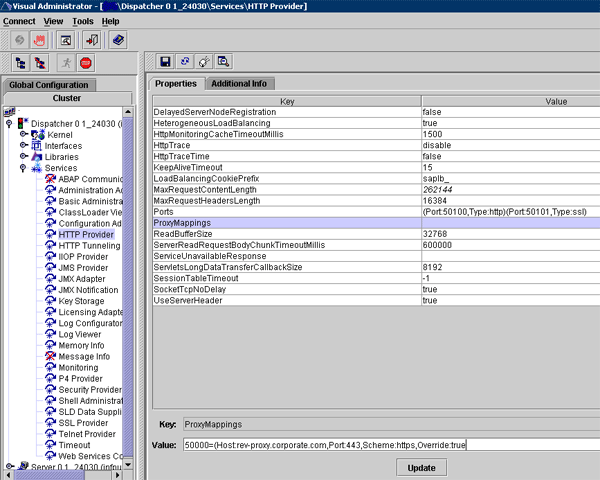
Figure 7
Enable reverse proxy mapping
Select ProxyMappings and then enter <
portal port to be mapped>=Host<
proxy host>:<
proxy server>,Port:<
port number>,Scheme:<scheme>,Override:<true/false>) in the Value field. An example of a proxy mapping might look like 50000=(Host:rev-proxy.corporate.com,Port:443,Scheme:https,Override:true. Click the Update button, and then click the Save button. For changes to take place, a cluster restart is required.
Install the SSL Certificate
SSL certificates are perhaps the most common way to protect information from being transmitted between a Web browser and your Web site. SSL provides encryption for information flowing between systems and can protect Web traffic, email, instant messages, and other kinds of data transmissions.
Note
I won’t cover the inner workings of SSL, except to say that it is a critical infrastructure component for any organization that wants to protect customer or other confidential information. SSL is widely used by banks, e-commerce companies, and other Web entities that require transmission of sensitive information, such as passwords or Social Security numbers.
Before you install a SSL certificate, you need to obtain one from a vendor. For the purpose of this article, you will obtain and install a third-party SSL certificate into Microsoft Internet Information Server 6.0 (IIS 6.0) running on Windows Server 2003. See the sidebar “Certificates” for information on the types of certificates available.
Certificates
There are four types of certificates of SSL implementation:
- Self-signed certificate
- Third-party certificate
- Intermediate certificate
- Trusted root certificate
You can use self-signed certificates to encrypt information passing between a client and your server. These certificates allow you to encrypt data, but since they are created on site, they are not verified by a third-party entity, so the site can't necessarily be trusted.
A third-party SSL certificate provides the same encryption capabilities as a self-signed certificate. However, the certificate is more trustworthy because it is issued by a third party.
To be fully trusted, a certificate must be linked to a root certificate that is trusted by your Web browser. However, not all vendors’ SSL certificates are trusted by root certificates. You need to complete the SSL trust chain by installing an intermediate certificate between a root certificate and your new SSL certificate.
Generating a Certificate Signing Request
The first step in installing any security certificate is generating a certificate signing request (CSR), which is sent to the certificate vendor of your choice. The CSR is a Base-64 encoded message that contains all the information necessary to identify the person or company applying for the certificate.
The CSR also includes the applicant's public key. The public key is the part of a public key/private key that is able to secure and encrypt information. To generate the CSR, follow menu path Start > Administrative Tools > Internet Information Services (IIS) Manager. In the IIS Manager, expand Server (Local Computer) > Web Sites. Right-click the Web site on which you want to install the new certificate, and then select Properties on the context menu to open the SSLsandbox Properties window
Switch to the Directory Security tab (
Figure 8), and then click the Server Certificate button to start the Web Server Certificate Wizard. Note that if the button marked View Certificate is enabled, you already have a security certificate installed.

Figure 8
Start the Web Server Certificate Wizard
Next, click the Server Certificate button and select Create New Certificate. Click the Next option to prepare a request now, but send it later. Once you finish this step, a request is generated (
Figure 9).
| -----BEGIN NEW CERTIFICATE REQUEST-----
MJIDdDCCBt0CAQAwgZgxCzAJBgNVBAYTAlVTMRFwDwYDVQQIEwhNaXNzb3VyaTEP
MA0GA1UEBxMGRnVsdG9uMRwwGgYDVQQKExNXZXN0bWluc3RlciBDb2xsZWdlMR8w
...
HQADVQQLEyZJbmZvcm1hdGlvbiBUZWNobm9sb2d5MSYwJAYDVQQDEx1zc2xzYW5k
Ym94Lndlc3RtaW5zdGVyLW1vLmVkdTCBnzANBgkqhkiG9w0BAQEFAAOBjQAwgYkC
-----END NEW CERTIFICATE REQUEST----- |
| Figure 9 |
New certificate request issued |
Request a Certificate from the Vendor
Once you have generated the CSR, you need to send it to the certificate vendor to request a new certificate that can be installed to protect your EFP.
During the registration process, you will need to provide the information that validates your company's identity. The certificate request process varies depending on the certificate provider, but at some point you will need to copy and paste the certificate request in the appropriate field on the order form.
Once you complete the vendor's certificate request form and provide payment, a certificate will be delivered to your inbox in a day or two.
Save the Certificate
The vendor sends you the certificate in the form of a text file, which looks like the certificate request (
Figure 9). The only difference is that the file starts with --BEGIN CERTIFICATE-- and ends with --END CERTIFICATE--. Save this file to your portal server. When you save the file, make sure that it has a .CER extension.
Install the Certificate
After saving the certificate to your server, you need to install it. Open the SSLsandbox Properties window (as you did when you generated the CSR). On the Directory Security tab (
Figure 8), click the Server Certificate button to start the Web Server Certificate wizard. Click the Process the pending request and install the certificate option, as shown in
Figure 10.

Figure 10
Process the pending CSR
Next, enter the path for the server on which you want to save the certificate. Specify the secured port to be used for accessing the portal (or use the default port of 443). Once the steps are complete, the certificate installation summary is displayed, as shown in
Figure 11.
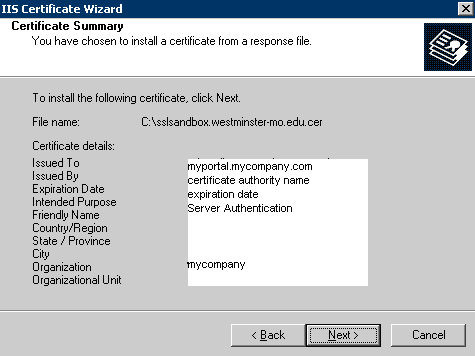
Figure 11
Summary of the certificate saved to the server
This completes only part of the process of securing your portal. You now need to complete the chain of trust to the root certificate. To complete this step, you have to download the intermediate root certificate from the vendor that provided the certificate. This certificate plays a pivotal role between the root certificate and the certificate you installed.
Go to Start > Run and type mmc to launch the Microsoft Management Console (MMC. From) the MMC, follow menu path File > Add/Remove Snap In. In the Add/Remove Snap-In window, click the Add button (
Figure 12).
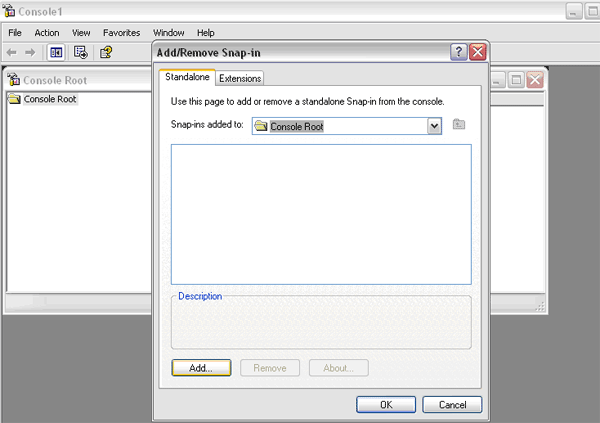
Figure 12
Add the intermediate root certificate
In the Add Standalone Snap-in window, select Certificates and then click the Add button. Select Computer Account and then click the Next button. In the MMC, make sure the Local computer option is selected, and then click the Finish button. Close the Add Standalone Snap-in window, and then click the OK button in the Add/Remove Snap-in dialogue to return to the MMC.
Expand the Certificates option (click the + icon) until you see Intermediate Certification Authorities. Right-click Intermediate Certification Authorities, select All Tasks on the context menu, and then select Import to launch the Certificate Import Wizard. Click the Browse button and locate the intermediate certificate file that you downloaded from the certificate provider (
Figure 13). Click the Next button, and then provide the path to the location where you want to store the certificate.
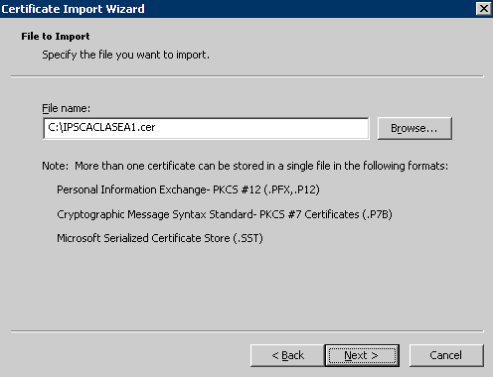
Figure 13
Specify the certification that you want to import
After importing the intermediate certificate, you will see a message indicating that the certificate is trusted and that, indirectly, the portal is trusted (
Figure 14). With this, all the information will be protected from intruders.

Figure 14
Valid certificate information
Ameya Pimpalgaonkar
Ameya Pimpalgaonkar is a senior SAP architect. He specializes in SAP Netweaver Portal, SAP BPM, BRM, MDM, and SAP Mobile. His interests include UI and front-end technologies, SAPUI5, Responsive Design, and integration of modern technologies with SAP UI. He has also worked on HTML5, CSS3, and jQuery. Ameya is also a certified usability analyst from HFI, USA.
You may contact the author at
ameya85@gmail.com.
If you have comments about this article or publication, or would like to submit an article idea, please contact the
editor.


