Learn how to implement inbound interfaces using the Business Integration Builder configuration tool to populate additional infotypes from SAP SuccessFactors Employee Central to SAP ERP HCM.
Key Concept
The Business Integration Builder is used to replicate data between on-premise SAP ERP HCM and SAP SuccessFactors Employee Central. From the b1608 release, this tool can also be used for the inbound integration of Personnel Administration infotypes in SAP ERP HCM on premise. Using the Business Integration Builder configuration tool, you can avoid having to implement complex Business Add-In (BAdI) enhancements to create or modify infotype data.
In a core-hybrid deployment scenario of SAP HCM solution, employee master data is maintained and managed in the SAP SuccessFactors Employee Central system, and employee data is replicated from SAP SuccessFactors Employee Central to SAP ERP HCM on premise. SAP standard packaged integration is used to replicate the data into SAP ERP HCM on premise using SAP Cloud Platform Integration or Dell Boomi middleware. In this standard integration, only some of the infotypes are replicated, such as actions (infotype 0000), organizational assignment (infotype 0001), personal data (infotype 0002), and planned working time (infotype 0007).
However, there can be times when you need additional infotypes to be replicated—for example, personal ID (infotype 0185) and time sheet defaults (infotype 0315). Until the b1608 release, the only way to replicate such infotype data was through implementing the Business Add-In (BAdI) EX_PAOCF_Employee Central_PROCESS_EMPLOYEE. With the b1608 release, however, the replication of infotypes that are beyond the standard replication scope can now be done using the Business Integration Builder configuration tool. This tool is the SAP SuccessFactors design solution for building the interface logic that replaces ABAP development. Therefore, you don’t need ABAP work and you benefit from the reduced implementation effort, time, and cost.
I explain how the Business Integration Builder configuration tool can be used to replicate employee data from SAP SuccessFactors Employee Central into the SAP ERP HCM on-premise system that is beyond the scope of standard packaged integration. The Business Integration Builder configuration tool is compatible with two middleware technologies: SAP Cloud Platform Integration and Dell Boomi.
I show how to do this using the example of the personal ID infotype (infotype 0185). I also explain how to configure the Business Integration Builder configuration tool to replicate the data stored in the SAP SuccessFactors Employee Central National IDs portlet to the personal ID infotype in the SAP ERP HCM on-premise system.
Note
The middleware configuration steps and the code-value mapping for the infotype of the standard out-of-the box pre-packaged integration are out of the scope of this article.
Business Case
In my business case example, MediaCompany (a fictitious company) implemented SAP SuccessFactors Employee Central for employee master data maintenance and SAP ERP HCM on premise for payroll and time management. It used Dell Boomi as its middleware technology to implement the standard integration to replicate employee data.
The MediaCompany IT department already implemented the middleware configuration for standard packaged interfaces. It is successfully populating the infotypes, including actions, personal data, organizational assignment, planned working time, address, bank details, and basic pay.
Now there is a requirement to replicate the personal ID infotype in SAP ERP HCM on premise from the SAP SuccessFactors Employee Central National ID information portlet. The company does not want to use ABAP development and is looking for alternate methods as ABAP is more time-consuming and requires high maintenance to implement this replication.
The Integration Process
Figure 1 shows the replication of employee data from SAP SuccessFactors Employee Central to the SAP ERP HCM on-premise system via standard packaged integration. In the following sections, I show how to replicate additional infotypes that are beyond the scope of this standard packaged integration. The minimum system requirements for doing this are laid out in
Table 1.

Figure 1
The replication of employee data from SAP SuccessFactors Employee Central to SAP ERP HCM on premise
| System |
Software component |
| SAP ERP Central Component (ECC) 6.0 |
SAP NetWeaver release 7.00, Support Package 27
SAP NetWeaver release 7.01, Support Package 12
SAP NetWeaver release 7.02, Support Package 8
SAP NetWeaver release 7.10, Support Package 15
SAP NetWeaver release 7.11, Support Package 10
SAP NetWeaver release 7.30, Support Package 3
SAP NetWeaver release 7.31, Support Package 7
SAP NetWeaver release 7.40, Support Package 7
|
| Application component and add-on component |
SAP_APPL 600 Support Package 15 or higher
Message-based employee replication from Employee Central to SAP ERP HCM: PA_SE_IN 1002
|
Table 1
SAP ERP HCM on-premise requirements for implementing standard integration
I assume that the following implementation steps are already completed:
- SAP SuccessFactors Employee Central is already configured and employee master data maintenance is working.
- The SAP ERP HCM on-premise Payroll and Time Management solutions are already implemented and are up and running.
- SAP Cloud Platform Integration or Dell Boomi is being used as the middleware tools to configure the standard packaged integration between SAP SuccessFactors Employee Central and SAP ERP HCM on premise, and the required configuration is completed.
- Employee data is being replicated into the SAP ERP HCM on-premise system from SAP SuccessFactors Employee Central using standard packaged integration.
Configuration Steps to Replicate Additional Infotype Data
In this scenario, you need to replicate the personal ID infotype (infotype 0185) into the SAP ERP HCM on-premise system from the SAP SuccessFactors Employee Central National IDs information portlet. Following are the step-by-step instructions for achieving this replication.
Step 1. Configuration Setup in SAP ERP HCM On Premise to Specify the Employee Central Instance
In this step, you need to configure the replication of additional infotypes from Employee Central to SAP ERP HCM on premise. Therefore, you need to specify from which Employee Central instance the data is coming. Follow IMG menu path Personnel Management > Integration with SuccessFactors Employee Central > Business Integration Builder > Basic Settings > Specify Employee Central Instance. (The following steps are all for the configuration setup in an SAP ERP HCM on-premise system.)
This path takes you to a screen (not shown) in which you click the New Entries button. This action opens the screen in
Figure 2 in which you enter the SAP SuccessFactors Employee Central instance ID and a description.

Figure 2
Specify the Employee Central instance
Step 2. Import the Metadata
The Business Integration Builder needs to know the metadata of the web services; you use this metadata to do the field mapping. To import the metadata, follow IMG menu path Personnel Management > Integration with SuccessFactors Employee Central > Business Integration Builder > Basic Settings > Import Metadata from Employee Central > Import Metadata for Web Service-Based Data Transfer from Employee Central.
This path takes you to the screen in
Figure 3 in which you enter details in the following fields:
- EC Instance – Select the Employee Central instance you created in step 1 (Figure 2), in this example, SFSF_ECInstance
- EC Entity – Leave this field blank
- EC Metadata File – Browse and select the file to be imported (Figure 3). In a later section I explain how to download an EC metadata file from an SAP SuccessFactors instance. Refer to the section “Export the OData Metadata from the SAP SuccessFactors System.”
In the Action Type section of
Figure 3, uncheck the Test Run check box and select the Update Metadata radio button.
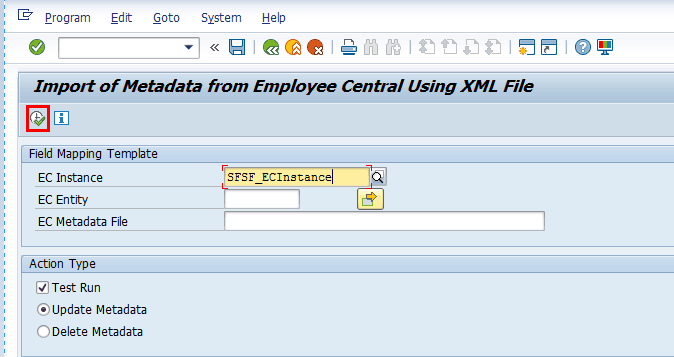
Figure 3
Import the metadata web service
Then click the execute icon in
Figure 3. This action creates the metadata entries of the SAP SuccessFactors web services in the SAP on-premise system (not shown).
Step 3. Map the Field Values
To map the field values from the SAP ERP HCM system to SAP SuccessFactors Employee Central, follow IMG menu path Personnel Management > Integration with SuccessFactors Employee Central > Business Integration Builder > Basic Settings > Define Value Mapping > Define Value Mapping Entities. This path takes you to the pop-up screen in
Figure 4. Select the Employee Central instance created in the earlier step (from in the EC Company ID field options) and click the green checkmark icon. This action opens the overview of the change view mapping entity screen (
Figure 5).
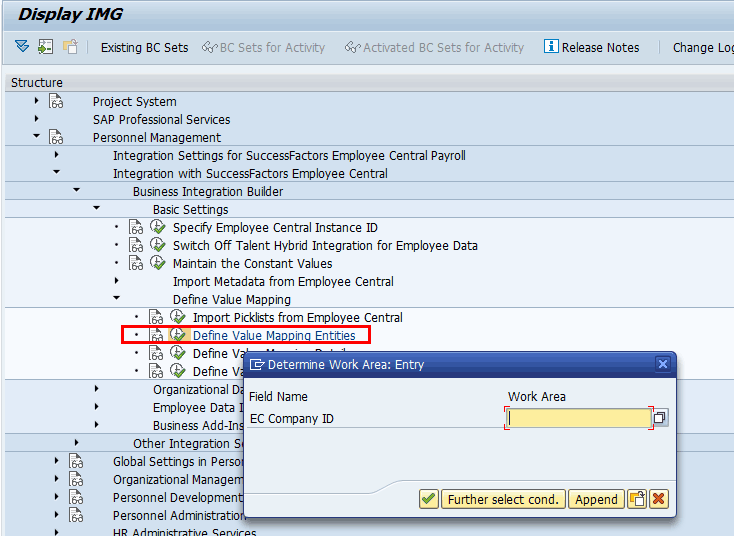
Figure 4
Define the field-value mapping entities

Figure 5
Change the value-mapping entity views
Click the New Entries button in
Figure 5 and the screen in
Figure 6 opens.

Figure 6
Create the mapping entity
Enter data in the fields under the following columns:
- Value Mapping Entity – Enter any value. In this example, I entered infotype 0185 (IT_0185).
- Description – Enter a description for the mapping entity
Note
Business Integration Builder can be used to configure custom infotypes as well.
Once you’re made your entries in
Figure 6, click the save

icon (shown in
Figure 5) to save them.
After you define the mapping entity, it’s time to enter the mapping values. Follow IMG menu path Personnel Management > Integration with SuccessFactors Employee Central > Business Integration Builder > Basic Settings > Define Value Mapping > Define Value Mapping Details.
This path takes you to the pop-up screen in
Figure 7. Select the Employee Central instance created earlier (SFSF_ECInstance) and select the Value Mapping Entity (in this case, IT_0185). Click the green checkmark icon and the screen in
Figure 8 opens to make the entries.

Figure 7
Enter the field-value mapping details

Figure 8
Enter the code values’ mapping details
Click the New Entries button and the screen at the bottom of
Figure 8 expands. Populate the fields in the following columns:
- Sequence No – Enter any number and it will be the primary unique key. In this example, enter 1.
- ERP Key – Enter the key field for the identification code as per the entries in configuration table V_T5R05
- EC Key – Enter the National ID code in the Employee Central National ID portlet. (This establishes the code mapping between the fields in the SAP ERP HCM on premise and SAP SuccessFactors Employee Central systems.)
Click the save icon to save your entries and maintain the entries for all the possible mappings.
Step 4. Define the Transformation Template Group
Now I show how to define the transformation template that contains the logic of transforming the data into SAP ERP HCM on-premise data structures. The next step is to define the transformation template group and transformation template to build logic to transform the SuccessFactors Employee Central data structures to SAP ERP HCM data structures. Follow IMG menu path Personnel Management > Integration with SuccessFactors Employee Central > Business Integration Builder > Employee Data Integration > Define Field Mapping for Employee data.
In the screen that opens (
Figure 9), click the New entries button. This action opens the screen in
Figure 10 in which you start creating the new transformation group.
Note
The transformation template contains the logic for transforming the data
into an SAP on-premise HCM infotype data structure. The transformation
template group is the grouping of such transformation templates.

Figure 9
Create a new entry for the new transformation template group
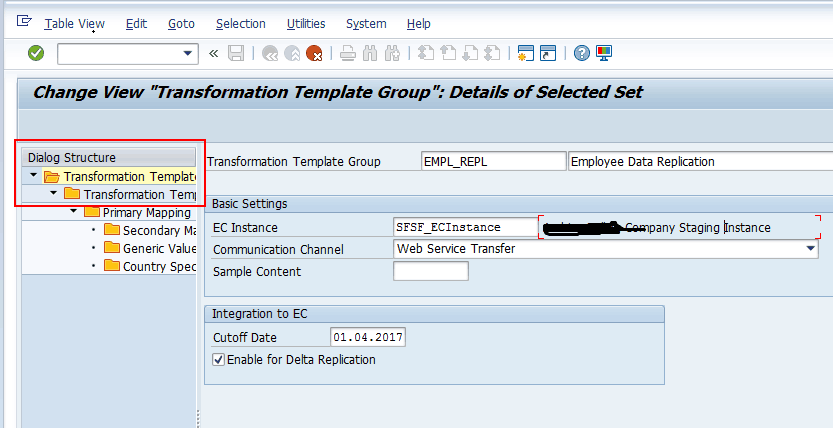
Figure 10
Create the new transformation template group
You create the transformation template group first. In the screen in
Figure 10, enter values in the following fields:
- Transformation Template Group – Enter the group name (in this example, EMPL_REPL)
- EC Instance – Select the Employee Central instance you created earlier
- Communication Channel – Choose the Web Service Transfer drop-down option
- Sample Content – Keep it blank
- Cutoff Date – Enter the cutoff date from when the data needs to be transferred
- In the Integration to ECC section, select the Enable for Delta Replication check box. Click the save icon to save the records.
Now, you need to create the transformation template. Under Dialog Structure (on the left of
Figure 10), select the record of the newly created transformation template group and then the Transformation Template folder. This action opens the screen in
Figure 11. Click the New Entries button to create the new transformation template and the screen in
Figure 12 opens.
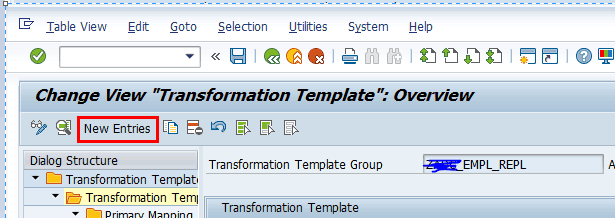
Figure 11
Click the New Entries button

Figure 12
Enter the values for the new transformation template
In the screen in
Figure 12, make the following entries:
- Transformation Template – Enter the template name (e.g., infotype_0185)
- Is Active – Select the check box
- Based on Hire Date – Select the check box
- EC Entity – Using Search help, choose WS_17
Note
WS_17 is the SAP SuccessFactors Employee Central web service for the National ID card.
Now select the newly created transformation template as shown in the
Figure 13. Double-click the Primary Mapping folder to create the field mapping between the IT_0185 fields and the SuccessFactors web service fields. Now click the New Entries button and the screen in
Figure 14 opens in which you can create the mapping entries.

Figure 13
Map the fields

Figure 14
Create the field mapping
In
Figure 14, maintain the following entries for the fields:
- EC Field – Choose the cardType from the search help, in this case 17, as 17 is the code for cardType
- Required in EC – Select the check box
- Mapping Mode – Choose Infotype Mapping from the drop-down options
- Infotype – Select 0185
- Subtype – Keep it blank. You map the subtype later.
- Infotype Field: Select ICTYP
- Repetitive Field – Keep the field blank
Scroll down further in the same screen (
Figure 15). In the Value Mapping Entity field choose the value mapping entity you created earlier in
Figure 7 (i.e., IT_0185). Once you’ve finished making your entries, click the save icon to save the data.
Note
When you click the Define Value Mapping Entries button, Figure 8
opens. You have already created the value mapping between SAP
SuccessFactors field values to SAP on-premise field values for the
National ID card type, and here you are linking value mapping
configuration to the field.

Figure 15
Continue creating the field mapping for additional fields
Now you create the mappings for the other fields. Click the New Entries button in
Figure 14 to create mapping entries for two more fields, Country code and National Id. Follow the steps as described and shown in
Figures 14 and
15. Make the entries on the screen as shown in
Figure 16 one after the other for the field mapping for those two fields.

Figure 16
Map the remaining fields for infotype 0185
For the Country code fields (in
Figure 16):
- EC Field ID – Enter the country code 18
- Field ID Description – Enter Country
- Mapping Mode – Choose the primary mapping from the drop-down options; in this case, Infotype Mapping
- Infotype – Select infotype (0185)
- Subtype – In this example, leave this blank
- Infotype Field – Select ISCOT
- Required Field – Select this check box to make this field required in Employee Central.
For the National Id fields (
Figure 16).
- EC Field ID – Enter 26
- Field ID Description – Enter National Id
- Mapping Mode – Choose the primary mapping from the drop-down options; in this case, Infotype Mapping.
- Infotype – Select infotype (0185)
- Subtype – In this example, leave this blank
- Infotype Field – Select ICNUM
- Required Field – Select this check box to make this field required in Employee Central.
Once you’ve made your entries click the save icon (not shown in the figure). Now you have mapped three fields of the SuccessFactors Employee Central National Id portlet to SAP on-premise HCM infotype 0185 (personal ID) fields.
Step 5. Define the Transformation Template Group to be Used in Employee Central
Follow IMG path Personnel Management > Integration with SuccessFactors Employee Central > Business Integration Builder > Employee Data Integration > Define Template Group to be Used for Employee Data Replication from Employee Central. This path takes you to the screen in
Figure 17 in which the new entry for the template group is displayed. Select the From EC check box for the from Employee Central field (EMPL_REPL). Once you’ve made this entry, click the save icon to save the records.

Figure 17
Define the Template Group for the employee data replication
Step 6. Clone the Transformation Templates
The next step is to clone the transformation templates you created previously. The purpose of this step is to specify that the same mapping logic be used for all the following subtypes. It means the field mapping that you define for a cloning infotype in the Primary Mapping (
Figure 16) is then used for all subtypes of this infotype that you enter in this Customizing activity.
Follow IMG menu path Personnel Management > Integration with SuccessFactors Employee Central > Business Integration Builder > Employee Data Integration > Clone Transformation Templates > Define Infotypes and Subtypes for Cloning Transformation Templates. This path takes you to the pop-up in
Figure 18. Browse and select the Transf. Template Group and Transformation Template created earlier and click the green checkmark icon.
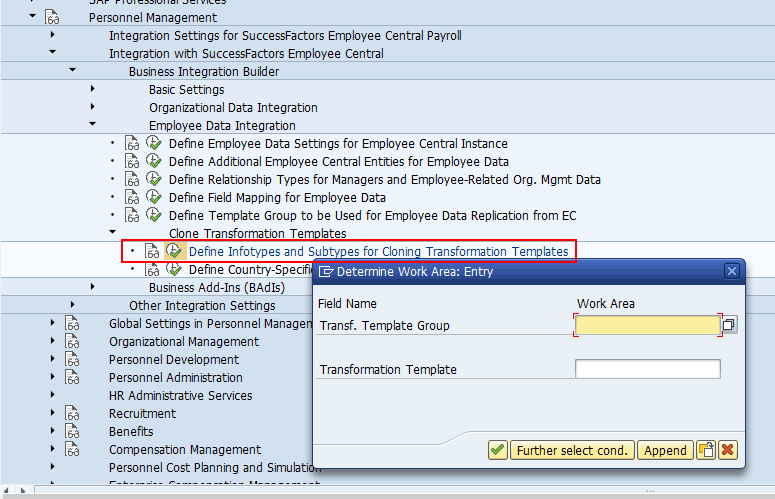
Figure 18
Determine the work area for the clone transformation templates
The screen in
Figure 19 opens in which you click the New Entries button to create the new cloning subtypes entries. This action opens the screen in
Figure 20.

Figure 19
Create new entries for the cloning subtype

Figure 20
The new cloned subtypes
Make the following entries in
Figure 20:
- Infotype – 0185
- Infotype Text – Personal IDs
- Subtype – Select the required subtype using Search Help, in this case, IC
Click the save icon (not shown) to save the entries maintained in
Figure 20. Now you maintain all the infotype subtypes that are applicable for the same mapping rules. Click the New Entries button in
Figure 21 and additional lines open. When additional lines open make the entries of all the subtypes for which the same mapping logic is applicable. In
Figure 21 I have maintained two additional entries for IQ and NI.

Figure 21
Create clones of infotypes and subtypes
Step 7. Export the OData Metadata from the SAP SuccessFactors System
In this step, you export the OData metadata from the SAP SuccessFactors system to the SAP ERP HCM on-premise system. Log in to your SAP SuccessFactors system with the proper credentials.
Follow menu path Admin Center > Company Processes and Cycles > Company Settings. This path takes you to the screen in
Figure 22. In the Tool Search field enter OData API Metadata Refresh and Export and the screen in
Figure 23 opens. Click the Refresh button next to the Refresh Metadata Cache option. Once the refresh is complete, click the Export button (next to Export Metadata to File in
Figure 23) to finish exporting the OData metadata from SAP SuccessFactors Employee Central. This file is used in your SAP ERP HCM on-premise system for import as explained in Step 2.

Figure 22
SAP SuccessFactors Admin Center
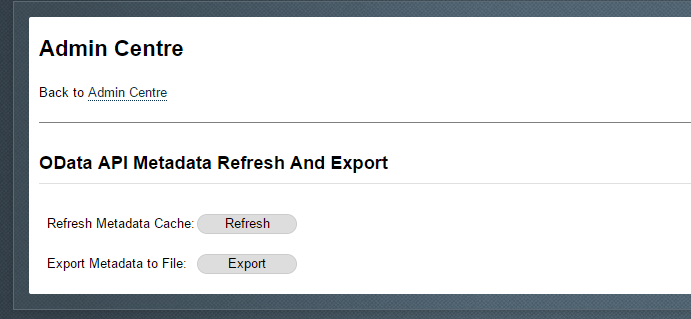
Figure 23
Export the metadata
This completes the configuration steps that are required to replicate SAP ERP HCM on-premise infotype data (personal ID - 0185) from SAP SuccessFactors Employee Central National Id portlet information. Now maintain the data for an employee in the National Id portlet of the Employee Central system. On successful triggering of the interface to replicate employee master data, the information maintained in the National Id is replicated to infotype 018 (personal ID).
Arun Kumar Timalapur
Arun Kumar Timalapur is a certified SAP ERP HCM Solution Consultant with more than 11 years of IT experience; currently, he is working with SAP Solution Delivery Center, India. He has done various end-to-end SAP HCM implementations at different countries in a variety of industries. Arun is trained in many SuccessFactors modules and has worked on talent-hybrid integration scenarios using SAP PI and SAP HCI as middleware.
You may contact the author at
arun.kumar.timalapur@sap.com.
If you have comments about this article or publication, or would like to submit an article idea, please contact the
editor.


