Obtain clarity on the steps to follow for applying a custom theme to any SAPUI5/HTML5-based applications both in the cloud and on premise. Learn some best practices for creating custom themes that are future ready and the multiple deployment options of the UI theme designer.
Key Concept
The UI theme designer is a browser-based tool for cross-theming scenarios. You can use it to build your corporate identity themes by modifying one of the theme templates provided by SAP. For example, you can change the color scheme or add your company’s logo. The tool is targeted at different user groups, including developers, visual designers, and administrators. Using the UI theme designer, you can create your own themes to adapt the visual appearance of applications using one single tool for theming and branding SAP’s key user interfaces. You can apply your corporate branding and look to applications built with SAP UI technologies. The UI theme designer supports only three deployment options (ABAP, SAP Enterprise Portal, and SAP Cloud Platform), but you can apply a custom theme that you have developed using the UI theme designer across various UI clients and technologies.
The SAP UI theme designer enables you to adapt the visual appearance of your SAP business applications in accordance with your needs and corporate identity. The UI theme designer supports theming across multiple UI technologies and on different platforms. Depending on your theming requirements and on your skills, you can use the web-based WYSIWYG to adapt theming on a Quick, Expert, and Cascading Style Sheet (CSS) level.
In this section, you will see:
- How to create a custom theme using UI theme designer for a deployed HTML5-based application
- How to apply the created custom theme to an SAPUI5/HTML5-based application using two methods: a URL parameter and bootstrap configuration
Step 1. Launch the UI theme designer in the same domain where your application exists. To complete this step, create a route in the neo.app.json file as shown in
Figure 1. Open the SAP Web Integrated Development Environment (Web IDE), expand your developed SAPUI5/HTML5-based application, and open up the neo.app.json file. Add the code in the route function of neo.app.json file and deploy your application back on SAP Cloud Platform.
{
"path": "/themedesigner",
"target": {
"type": "application",
"name": "themedesigner"
},
"description": "Route for theme designer"
}
Figure 1
Code snippet for launching the UI theme designer
Using the application descriptor file neo-app.json, you can configure the behavior of your SAPUI5 application. Expand your application from SAP Web IDE, open the neo-app.json file, and add the code snippet in
Figure 1.
Figure 2 shows how it is added to the app descriptor file.
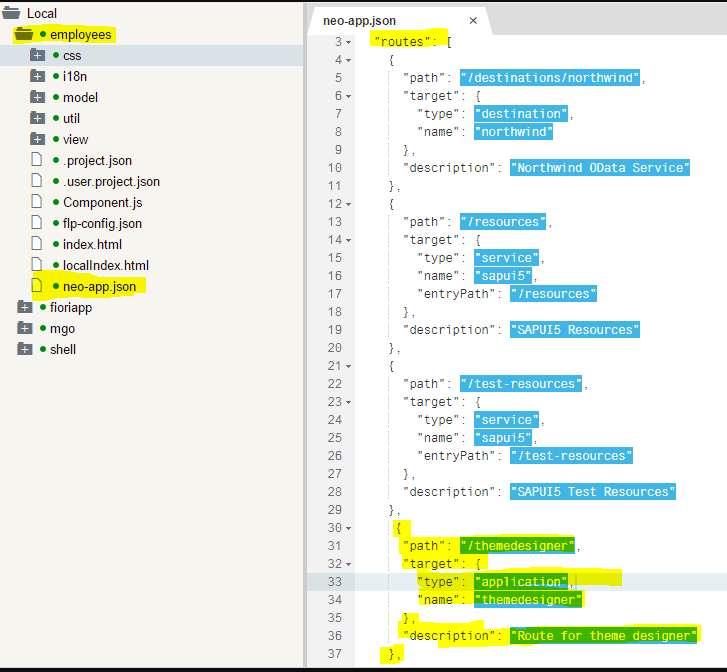
Figure 2
Add the UI theme designer route to the neo-app.json file
Deploy your application back to SAP Cloud Platform. Right-click your application in SAP Web ID and select the Deploy option, then click the Deploy to SAP Cloud Platform option as shown in
Figure 3. Click the Deploy button to deploy to SAP Cloud Platform.
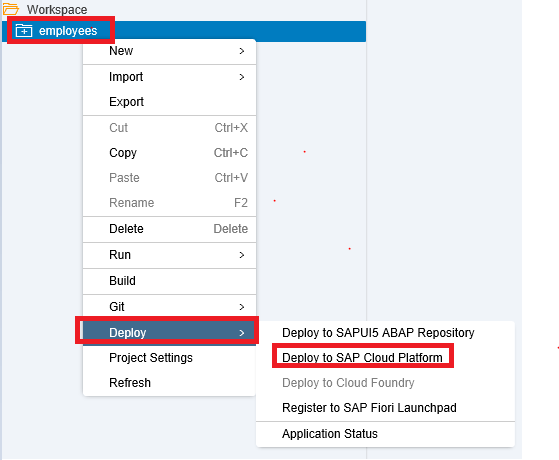
Figure 3
Deploy the application to SAP Cloud Platform
Step 2. Create a custom theme using the UI theme designer. Open the SAP Cloud Platform cockpit into the web browser. Click Applications and then click HTML5 Applications. Open the deployed app URL and append themedesigner in the URL. For example: [
https://employeesXXXXtrial.dispatcher.hanatrial.ondemand.com/themedesigner]
Step 3. To create a custom theme, click the Create a New Theme button as shown in Figure 4.
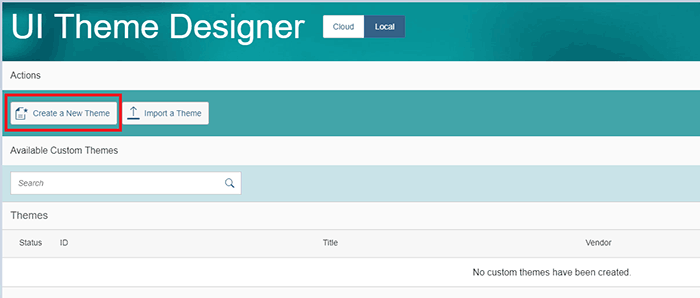
Figure 4
Create a new custom theme
Step 4. Choose the Base Theme: option and click the Create Theme button as shown in Figure 5.

Figure 5
Select a base theme
Step 5. Add the application URL to the Link to Application field. Add the application name to the Name of Application field and click the Add button to start designing the custom theme. Figure 6 shows how to add the application target to create a custom theme.
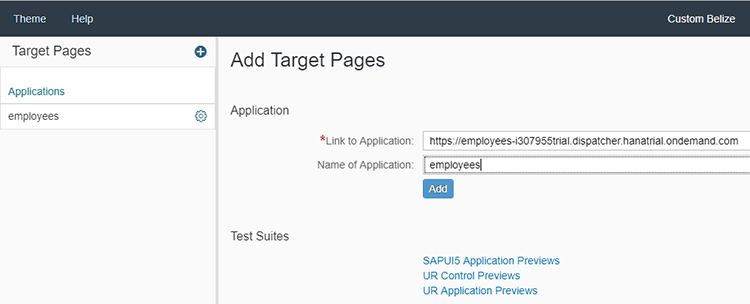
Figure 6
Add the application target to create a custom theme
Step 6. Design the custom theme. You can design the custom theme using Quick theming, Expert theming, or a custom CSS. For example, you can change the company logo and background image. Once you create custom theme as per your requirement, click the Theme button and then click the Export… button to export the custom theme into your local machine as shown in Figure 7.
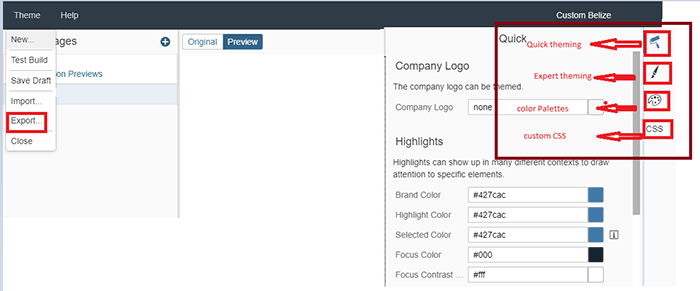
Figure 7
Create a custom theme and export it
Step 7. Import the exported theme to SAP Web IDE. SAP Web IDE is a web-based integrated development tool that simplifies end-to-end application development. Right-click Workspace in the SAP Web IDE tool and click the Import button. Then select the From File System option and browse for the exported theme?for example, shell.zip?from the local machine. Click the OK button. Figure 8 shows you how to import the project.
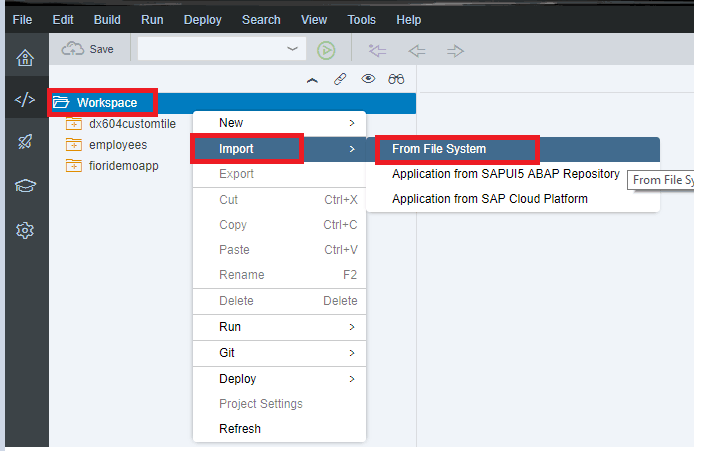
Figure 8
Import the custom theme to SAP Web IDE
Step 8. Right-click your application in SAP Web IDE and select the Deploy option. Select the Deploy to SAP Cloud Platform option shown in Figure 3 and click the Deploy button to deploy to SAP Cloud Platform. Click the shell folder in SAP Web IDE to expand it. When you expand the custom theme folder shell, the structure of the custom theme you have branded should look like the example shown in Figure 9.
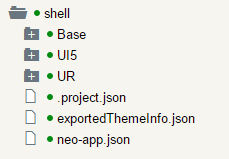
Figure 9
The custom theme structure in SAP Web IDE
Add the path and the name of your deployed custom theme (shell) in your application (SAPUI5/HTML5) neo.app.json file inside the routes function. Add the route entry for the created custom-theme (shell) in neo-app.json file in Figure 10.
Routes are used in the app descriptor to configure the behavior of your HTML5-based application. Routes have two configuration objects that contain a path, a target, and a description attribute with more configuration settings. The path and the entry path values point to the location on the server where the SAPUI5 resources are stored.
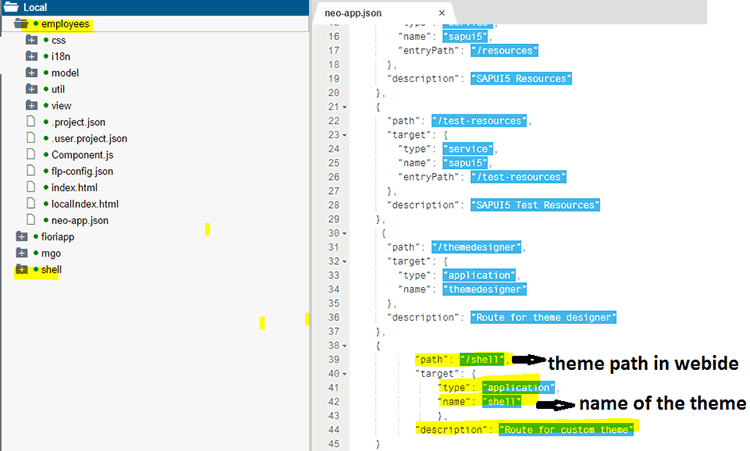
Figure 10
Add a route for the created custom theme to the neo-app.json file
Step 9. Redeploy the changes to SAP Cloud Platform. Right-click your application in SAP Web IDE and select the Deploy option and then click the Deploy to SAP Cloud Platform option in
Figure 3. Click the Deploy button to deploy to SAP Cloud Platform.
Step 10. Apply a custom theme via a URL parameter. To run SAPUI5/HTML5-based applications with a custom theme, you can use the URL parameter sap-theme to set or override the initial theme.
Verify your application with a custom theme. Launch your SAPUI5/HTML5-based application in the browser. In the address field of your browser, append the following to the application URL:
- sap-theme=<themeID>@<path>
- <themeID>: Enter the ID you have provided when you exported your theme from the UI theme designer to your local hard disk.
- <path>: Enter the application path you used for your mapping.
Figure 11 shows the UI before you apply the custom theme.
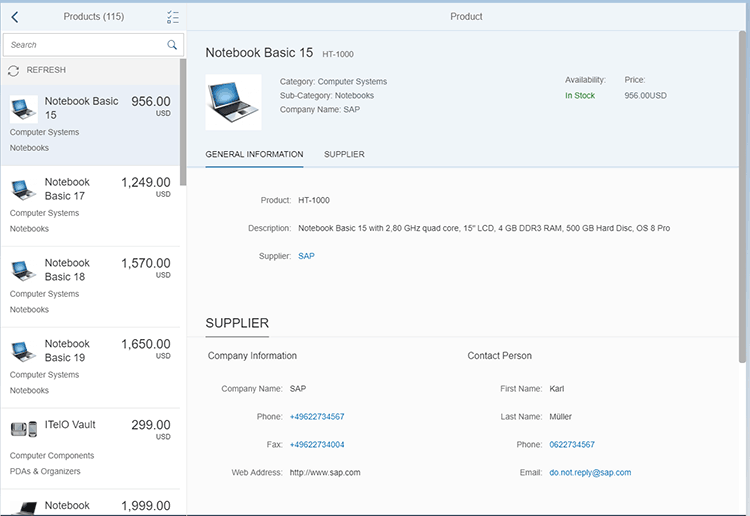
Figure 11
Add a route for the created custom theme to the neo-app.json file
Here is an example:
https://employees-XXXXtrial.dispatcher.hanatrial.ondemand.com/?sap-theme=shell@https://shell-XXXXtrial.dispatcher.hanatrial.ondemand.com/shell
Step 11. Check your application using the above link with the custom theme applied. Check
Figure 12 for the look and feel of the custom theme applied to your application. Note that the background is changed as compared with
Figure 11.
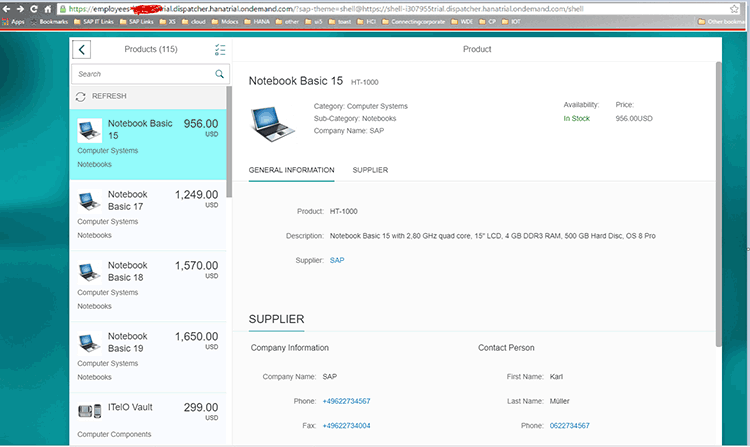
Figure 12
Application with the URL parameter custom theme applied
Step 12. Apply a theme via bootstrap configuration. Open the code for the target SAPUI5/HTML5-based application to which you want to assign your theme. Insert the following in the SAPUI5 bootstrap script tag:
data-sap-ui-theme: Enter the theme ID you have provided when you exported your theme from the UI theme designer to your local hard disk.
data-sap-ui-theme-roots: Enter the theme ID and the application path you used for your mapping in the following syntax:
{"<themeId>" : "/<applicationPath>/<themeName>/UI5/"}
<themeID>: The ID you have provided when you exported your theme from the UI theme designer to your local hard disk.
<application path>: The application path you used for your mapping in the application descriptor file of the application to which your custom theme should be applied.
<theme name>: The name of the application carrying your theming files.
Your code should be like the example shown in Figure 13.
<script id=”sap-ui-bootstrap”
src=”resources/sap-ui-core.js”
data-sap-ui-libs=”sap.m, sap.me, sap.ui.commons”
data-sap-ui-theme=”shell”
data-sap-ui-xx-bindingSyntax=”complex”
data-sap-ui-resourceroots='{“employees”: “./”}’
data-sap-ui-theme-roots='{“shell” : “/shell/UI5/”}’>
</script>
Figure 13
Sample code bootstrap tag
Step 13. Add the theme name and theme root path into the bootstrap tag. Right-click your application. Click index.html. Add the theme name and theme root path into the bootstrap tag as shown in Figure 14.
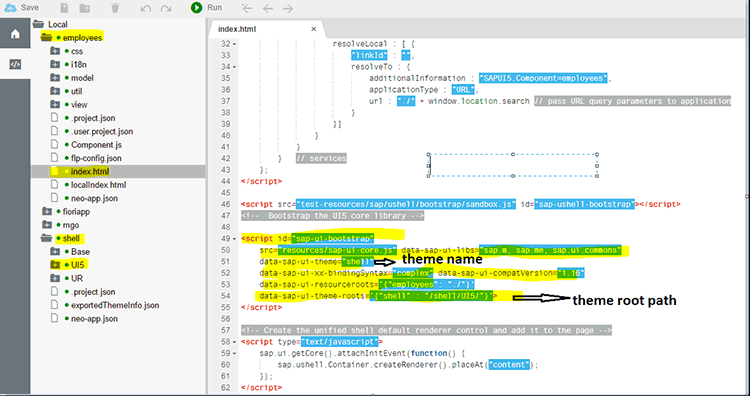
Figure 14
Add a theme name and theme root path to the bootstrap
Step 14. Redeploy the changes to SAP Cloud Platform. Right-click your application in SAP Web IDE, select the Deploy option, and then select the Deploy to SAP Cloud Platform option shown in
Figure 3. Click the Deploy button to deploy to SAP Cloud Platform.
Step 15. Verify your application with a custom theme. Launch your application URL via a browser. You may notice the custom theme that you designed was applied to your application directly using bootstrap configuration. Figure 15 shows the look and feel of the custom theme applied for your application. Note that the background is changed compared with Figure 12.
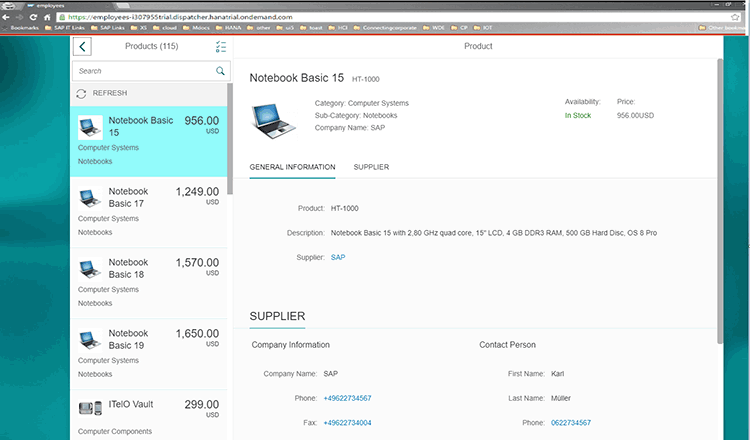
Figure 15
Application with the bootstrap custom theme applied
Create and Import Custom Themes for SAPUI5 Applications
You can create custom themes using the UI theme designer and import these themes into your SAP HANA system. In this section, I bring more clarity to the steps to apply a custom theme for an SAPUI5 application with SAP HANA as your back end. You must also take care for the SAPUI5 versions, which means that the theme version should be the same as the application version. Otherwise, the application is broken due to the change in the CSS for the newer SAPUI5 versions. Follow these steps to set a custom theme for applications based on SAP HANA Extended Application Services (XS).
Step 1. Create and import custom themes to your SAP HANA system. You can create custom themes using the UI theme designer and import these themes into your SAP HANA system. In the UI theme designer tool, create and export a custom theme that you want to use for your SAPUI5 application. A .zip file containing the exported theme is saved on your local machine.
Import the exported theme into your application under created themes folder in SAP HANA studio/SAP HANA Web IDE.
Step 2. Register the theme in the THEME database table using the table import (.hdbti and .csv) function.
Step 3. Create the table import file (ImportFioriThemes.hdbti) in your XS project. Right-click your application in SAP HANA studio or SAP HANA Web IDE. From the context menu select the New option and then select the Other… option (Figure 16).
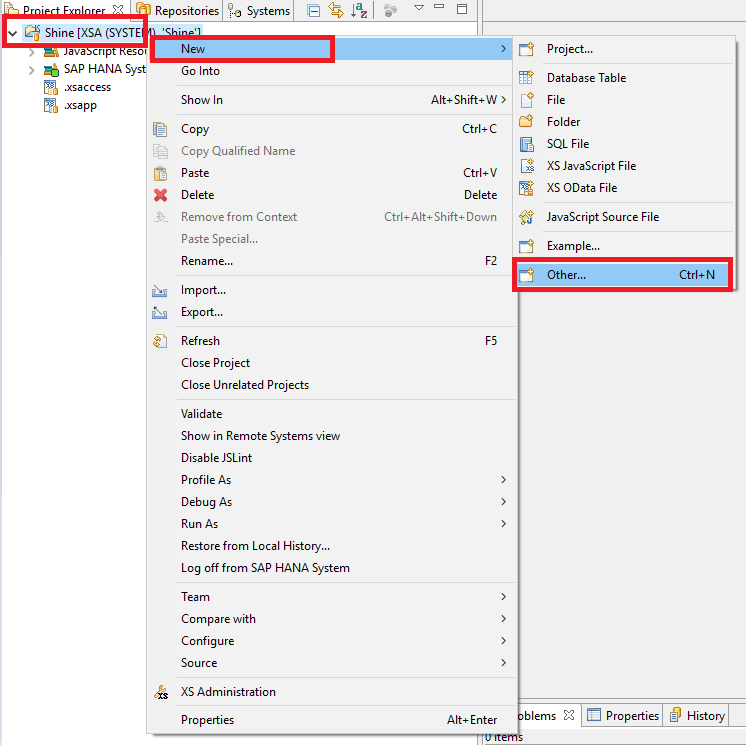
Figure 16
Open the context menu in SAP HANA studio
Step 4. Search the table import configuration. In the search field search with the keywords Table Import Configuration and then select the Table Import Configuration option. Click the Next button (Figure 17).

Figure 17
Search the table import configuration
Step 5. Create an .hdbti file. Enter the file name ImportFioriThemes.hdbti and click the Finish button (Figure 18).
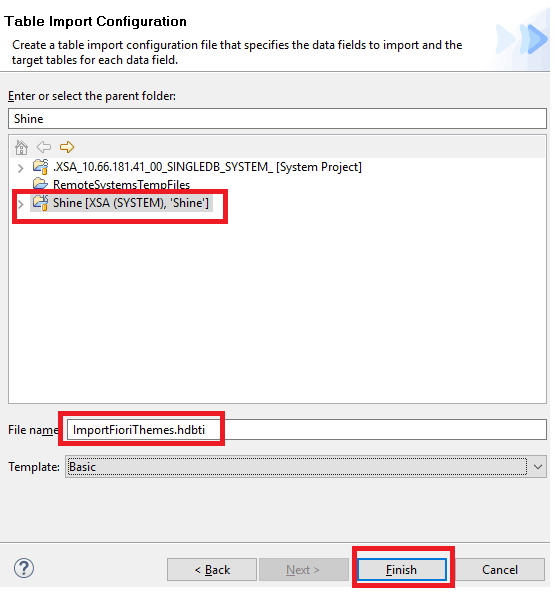
Figure 18
Create the hdbti file
Step 6. Create a comma-separated value (CSV) file named mytheme.csv to add the entry for your custom theme to use in ImportFioriThemes.hdbti. Right-click your application in SAP HANA studio or SAP HANA Web IDE. From the context menu select the New option and then click the File option. Enter the file name mytheme.csv and click the Finish button as shown in Figure 19.
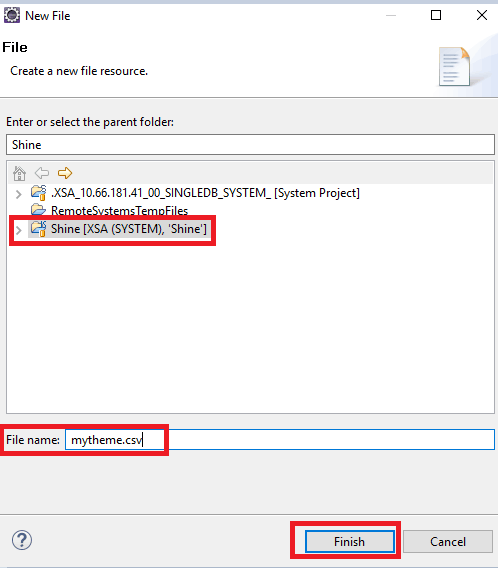
Figure 19
Create the mytheme.csv file
Step 7. Add the ID theme name and the path of the custom theme SAPUI5 resource to mytheme.csv. The content of your mytheme.csv file should be similar to the content shown in
Figure 20.

Figure 20
Content of mytheme.csv
Step 8. In the ImportFioriThemes.hdbti file add the path of the table, schema, CSV, header, and keys to target the correct table.
Table: In the table-import configuration, the table keyword enables you to specify the name of the target table into which the table-import operation must insert data.
Schema: You must also specify the name of the schema in which the target catalog table resides— for example, by using the schema keyword.
File: Use the file keyword in the table-import configuration to specify the source file containing the data that the table-import operation imports into the target table.
The source file must be a .csv file with the data values separated either by a comma (,) or a semi-colon (;). The file definition must also include the full package path in the SAP HANA repository.
Header: Use the header keyword in the table-import configuration to indicate if the data contained in the specified .csv file includes a header line. The header keyword is optional, and the possible values are true or false.
Keys: Use the keys keyword in the table-import configuration to specify the key range to be considered when importing the data from the .csv source file into the target table.
Figure 21 shows more details on the table-import function for your custom theme.

Figure 21
ImportFioriThemes.hdbti
Step 9. Save (Ctrl+S) ImportFioriThemes.hdbti and mytheme.csv files from your project. Now your project looks exactly as shown in
Figure 22.
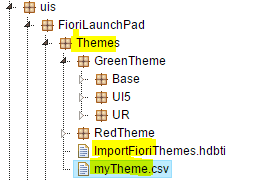
Figure 22
Project structure
Step 10. Verify under Catalog with schema UI5 that the table sap.hana.uis.db:THEMES contains the entry of the custom theme that you have defined.
Figure 23 illustrates the custom theme added to table you have defined.
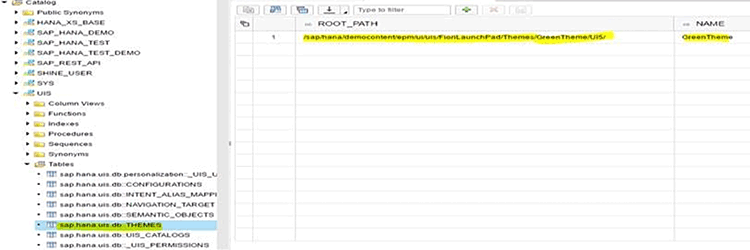
Figure 23
The sap.hana.uis.db:THEMES table
Step 11. Add the theme name and theme root path into the bootstrap tag. Right-click your application and select index.html. Add the theme name and theme root path into the bootstrap tag. Refer to
Figure 24 for the bootstrap configuration for a custom theme.

Figure 24
Bootstrap configuration
Step 12. Check your application by opening it in a web browser. You can see in
Figure 25 that the designed custom theme is applied (the background color is changed).
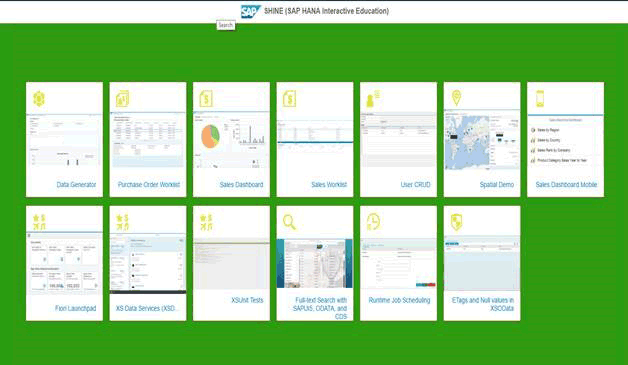
Figure 25
The custom theme is applied
Making Custom Themes Future Ready
The UI theme designer is the tool for applying your brand to SAP applications. This section explains how to avoid some common pitfalls, how to prepare your theme for upgrades of UI technologies, and how to address problems that may arise. Keep these lessons in mind when working on custom themes.
Lesson 1: Upgrade of Themes After a UI Technology Update
In general, a theme has a version of UI technology. The theme version should be the same as the application version. Otherwise, the application will be broken. Also, each patch of a UI technology must be considered as a new version.
SAP Cloud Platform has a service called Upgrade-as-a-Service to upgrade the theme automatically. However, custom themes created today might not be compatible with future versions of SAPUI5, in which case you may experience issues with launchpad availability. Therefore, you must upgrade all your custom themes by exporting them again from the UI theme designer and then update them in the Theme Manager. This is where Upgrade-as-a-Service makes your life easier for automatic theme upgrades to keep your theme version the same as the application version.
Open SAP Cloud Platform Cockpit and click the Services button. Search for the Portal in the field at the right of the screen in Figure 26 and then click the Portal button under User Experience.

Figure 26
Open the Portal Service
Once the portal is opened select the Site Directory option on the left. Now you can open any already existing sites that are available under the Site Directory by clicking the site tile highlighted in the Figure 27.

Figure 27
Open a Portal site
Create a new site by clicking the + icon and entering a name in the Site Name field shown in Figure 28. Select the template for SAP Fiori Launchpad and click the Create button.
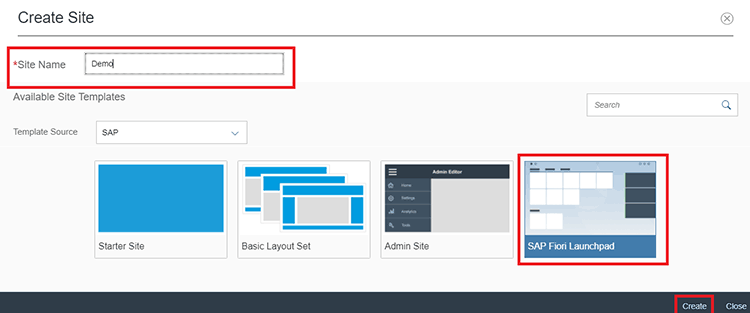
Figure 28
Click the Create button
Once you open the site select the Services and Tools option and then click the Theme Manager option shown in Figure 29.

Figure 29
Open the Theme Manager
Click the + icon to add a new theme. The plus icon appears on the screen after you click the Theme Manager option in Figure 29. The screen on the right section in Figure 30 appear after you click the plus icon. In the Theme Upgrade field (Figure 30), set the toggle button to YES to enable the theme to be upgraded. Click the Save button to save your selection.
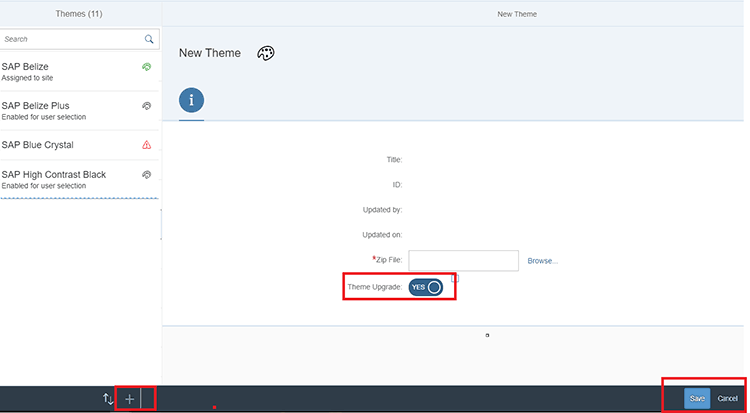
Figure 30
Enable the theme upgrade service
Once you enable the Theme Upgrade toggle button, you upgrade your theme UI5 version as per the application SAPUI5 version, which has been defined in settings under the System Settings SAPUI5 Version. To select the SAPUI5 version click the Edit button shown at the bottom of
Figure 31.
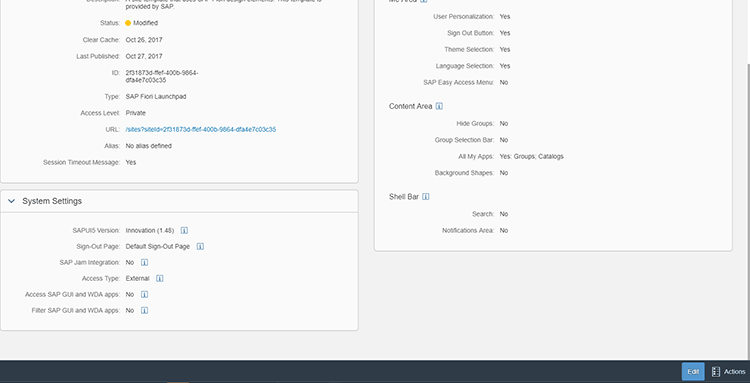
Figure 31
Edit button for selecting the SAPUI5 version
After you click the Edit button select the SAPUI5 version you need from the options provided under system settings. Select SAPUI5 version from dropdown as shown in
Figure 32.
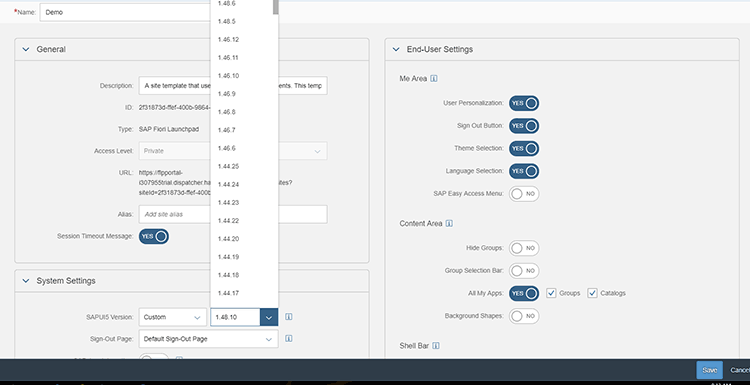
Figure 32
Select the SAPUI5 version
Version Interoperability: Each theme has a version of UI technology. The theme version should be the same as the application version. Otherwise, the application is broken due to a change in the CSS for the newer versions. Also, each patch of a UI technology must be considered as a new version.
SAPUI5: Share a theme only with systems with the same SAPUI5 version. The theme version should be the same as the application version, which leads your application to work smoothly without any issues.
Unified Rendering: Build a theme for the newest version of UR Rendering (a UI technology such as SAPUI5 for Web Dynpro applications) or use it with previous versions. The theme version should be greater than or equal to the application version, which leads your application to work smoothly without any issues.
When the theme version is less than the application version, your application breaks. When the theme version is greater than application version, your application runs smoothly, but there is no guarantee that it will run without any issues. With your own risk, you can use a theme version greater than the application version. It might not work due to CSS incompatibility.
Lesson 2: Custom CSS Use
Adding a custom CSS is difficult to maintain across upgrades and may result in additional maintenance being required. SAP cannot directly support the maintenance of a custom CSS, nor does it guarantee that it will produce the expected results after an upgrade. If a custom CSS must be added, you should document the expected results and other affected CSS rules prior to upgrading to make any necessary post-upgrade maintenance and testing easier. A custom CSS is only available for the UI technology to which it is added. You need to keep in mind these pointers:
- Avoid using a custom CSS because there is no compatibility on the HTML or CSS levels.
- When a newer version is available, there might be a fair chance that a new CSS rule is added, which will cause the application not to work. Use it only if you are prepared to fix it.
- During the update or upgrade due to a change in the CSS from the SAP side there might be a chance that your custom CSS will no longer work.
Lesson 3: Parameter Usage
Change the values of theming parameters and immediately see how these changes affect the visualization of the selected application in the preview page. Different levels of theming are available in the UI theme designer. Following are details about different levels of theming:
Quick theming (basic cross-technology theme settings): A theme consists of theming data of UI technology-specific parameters and their libraries and one central-less file for all technologies is called quick theming. Once you create a custom theme all your changes are stored in a less file. Each custom theme has its own less file. Less is a dynamic style sheet language that can be compiled into CSS and run on the client side or server side. Here are the characteristics of quick theming:
- It quickly changes the basic coloring using quick theming options.
- It affects multiple UI technologies (for example, SAPUI5 and Web Dynpro).
- Most parameters work for SAPUI5 and Unified Rendering starting with SAP Belize. (Belize is a standard theme from SAP shown in Figure 30.)
- Selected parameters are visible only in the Quick tab.
Expert theming (technology-specific theme settings): A theme consists of theming data of each UI technology specific parameters and their libraries. With expert theming, you can change the detailed control parameters to be technology specific. Here are the characteristics of expert theming:
- It affects only a specific technology (e.g., SAPUI5).
- It changes the control colors for Unified Rendering and SAPUI5 using base parameters offered in expert theming.
- Unified Rendering: Changes the detailed control parameters in Expert theming.
- Technology-specific parameters are visible in the Expert tab.
- Technology-specific parameters are only visible for the current preview’s technology.
Color palette for reuse: Specify a set of parameters with the main color values defining your corporate branding.
Lesson 4: Migration from Blue Crystal (SAP Fiori 1.0) to Belize (SAP Fiori 2.0)
SAP Blue Crystal is not supported starting from version 1.40. It is still included in version 1.40, but might not work as expected. SAPUI5 deprecated sap_bluecrystal in SAPUI5 version 1.40 and later. This means that the recommended SAP theme for SAPUI5 applications is sap_belize from 1.40 and higher. Keep in mind these pointers if you are migrating a theme from SAP Blue Crystal to SAP Belize:
- Manual migration is required parameter by parameter. You must create a new theme and transfer your changes parameter by parameter.
- Due to many changes in the SAP Fiori launchpad Fiori 2.0 and improved theming capabilities automatic migration is not possible
- Belize is a completely new theme in Web Dynpro and Web GUI
- A Belize theme is only supported in SAP S/4HANA 1610 and beyond
The improved theming with the Belize theme includes SAP Fiori launchpad-specific settings. A favorite icon, background, text and header color, and tile colors can be themed.
Current limitations for the Belize theme are that the footer bar cannot be themed and SAP Belize plus cannot be themed.
Deployment options of UI Theme Designer: UI theme designer is a browser-based tool for cross-theming scenarios. It is deployable on multiple platforms, such as SAP NetWeaver AS ABAP, SAP Cloud Platform, and SAP Enterprise Portal. Figure 33 shows the supported UI technologies and platforms.
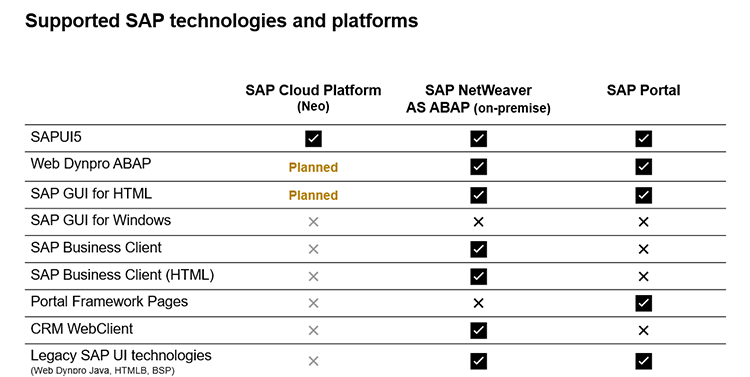
Figure 33
Supported SAP technologies and platforms
Gowrisankar M
Gowrisankar M is an SAP technical consultant specializing in SAP Enterprise Portal, SAP Fiori Launchpad, SAP HANA, SAP Cloud Platform, SAP UI theme designer, SAP Portal Service, and SAP Web IDE. Gowrisankar has more than five years of experience in SAP. He has a bachelor of engineering degree in electronics and communication.
You may contact the author at
gowrisankar.m01@sap.com.
If you have comments about this article or publication, or would like to submit an article idea, please contact the
editor.


