Ameya Pimpalgaonkar shows how SAP HANA Cloud Portal themes differ from traditional portal themes. HANA Cloud Portal themes are delivered as a Leaner Cascading Style Sheet (LESS) file.
Key Concept
Leaner Cascading Style Sheets (LESS) is a programmable stylesheet language that extends Cascading Style Sheets (CSS). It extends CSS by combining programming concepts of variables, operations, functions, and mixins.
Custom branding, customizations, and theming are some of the most important activities that every user considers before finalizing on a solution when it comes to organizational portals. SAP Enterprise Portal has strong theming and custom-branding capabilities about which users are all well aware. Recently, SAP has released its cloud-based portal, commonly knowns SAP HANA Cloud Portal or just Cloud Portal.
However, do not mistake SAP HANA Cloud Portal for a replacement for the traditional SAP Enterprise Portal. You should not expect the theming and branding processes to be similar. Unlike in SAP Enterprise Portal, themes are developed in a programmable stylesheet language called Leaner Cascading Style Sheets (LESS). I explain the process of customizing pre-delivered themes for the benefit of portal developers working on SAP HANA Cloud Portal. You can also take the learning further to develop a custom theme.
SAP HANA Cloud Portal provides out-of-the-box theming and customization support. At this moment, there are seven standard themes available for the SAP HANA Cloud Portal. However, no theme editor is available at the moment and you must therefore understand how Cascading Style Sheets (CSS) and LESS work. It is important to have a good understanding of CSS concepts, which, in turn, helps you understand LESS.
I first talk about LESS and its features including variables, operations, functions, and mixins, and then go on to explain how to use these in a LESS theme in SAP HANA Cloud Portal.
Prerequisites
- A basic understanding of CSS
- An SAP HANA Cloud Portal trial account
- A basic understanding of how to use Crunch or any other LESS editor
Introduction to LESS
LESS opens new avenues and extends the capabilities of CSS. With LESS, you can use global variables, which are similar to the constants used in programs. These variables can store values at a global level and can be applied to an entire file or just to a single property whenever required, thus reducing overhead efforts. For example, consider a theme customization activity that involves many color codes. Whenever you refer to a color property in CSS, you have to manually mention the color code. How easy life is if you instead can define the color once and then just refer to the variable name.
Working with a LESS Editor
For the purpose of this article, I am going to use Crunch. Crunch is a freely available software that runs with Adobe Air. You can download Crunch from here:
https://crunchapp.net. Crunch allows you to create and edit LESS files and compile them in static CSS.
Note that for SAP HANA Cloud Portal, you do not need LESS JavaScript library support. However, if you are going to replace CSS files in your portal application (such as a logon page or SAPUI5 application), then you need to specifically refer to the LESS JavaScript library. You can do this by using the piece of code shown in
Figure 1.
<script src="less-1.2.1.min.js" type="text/javascript"></script>
Figure 1
Code for referring to the LESS JavaScript library
This means you first need to download the JavaScript library and copy it in your project. This file can be downloaded here:
https://lesscss.org/.
Crunch Editor
Figure 2 shows a general overview of the Crunch editor. As you can see, you can either import an existing .less file and customize it to meet your branding requirements, or you can create a new file.

Figure 2
Crunch editor overview
Figure 3

Figure 3
Crunch minify settings
Now that the context is set, let’s begin with SAP HANA Cloud Portal. You first download an existing or standard theme file from SAP HANA Cloud Portal and then import this file into Crunch for customizations. I’ll explain variables, operations, functions, mixins, and other features offered by LESS. After customizations are complete, I’ll generate a LESS file from Crunch and upload the custom theme file into SAP HANA Cloud Portal. This will complete the theme-customization process for SAP HANA Cloud Portal.
Step 1. Download a Standard Theme from SAP HANA Cloud Portal
Irrespective of whether you are working with an SAP HANA Cloud Portal trial account or a full license account, the process remains the same. Log in to your SAP HANA Cloud Portal account and navigate to the Themes tab (
Figure 4).

Figure 4
Go to the Themes tab of the SAP HANA Cloud Portal
Figure 4Figure 5

Figure 5
Download a theme from SAP HANA Cloud Portal
Step 2. Import the LESS Theme File into the Crunch Editor
From the Crunch editor follow menu path File > Open File and then browse to select the downloaded file (
Figure 6).
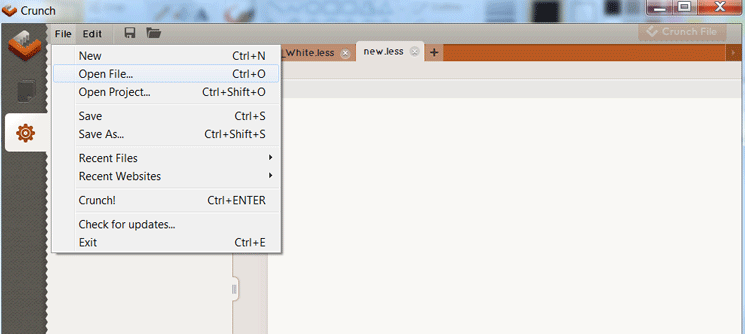
Figure 6
Import the LESS theme into the Crunch editor
Figure 7

Figure 7
Static CSS generated by importing a LESS theme into the Crunch editor
Note
Don’t forget to rename your file before importing it into the LESS
editor if you do not intend to overwrite the standard theme. Always save
the standard file with a different name for ease of maintenance.
If you have worked with CSS, you will find working with LESS is similar to working with generic CSS. However, there are some variables defined with @variable_name and its associated values that are displayed. For example, the site font color is applied to the entire text of the site. This is a global property, defined as @SiteFontColor: #f2f2f2. Therefore, whenever you want to refer to the site font color, refer to it with SiteFontColor instead of #f2f2f2. Similarly, there are some more variables that you can observe in the LESS file you just downloaded.
Variables in LESS
A closer look at variables shows that variables in LESS are similar to variables defined in programming languages. You can use variables in LESS to store a value and then use the variable instead of the value itself whenever required. Refer to the code in
Figure 8 to understand how to define a variable and use it.
@link-color: #333333;

a {

font-family: Georgia;

color: @link-color

}
Figure 8
Defining and using a variable
Similarly, you can also define the font family at a global level by using a variable. Although it has no effect on the speed at which a CSS or a LESS file is parsed while executing the application, variables provide ease when it comes to customization. Imagine you want to replace the existing color with some other color code. Instead of manually changing the color code everywhere in the file, all you have to do is change the value of @link-color and you are done.
Operations in LESS
With operations, you can get more control over generic CSS. You can multiply, add, or subtract values from variables to change something for a couple of properties. When change is not required at a global level, operations can work with global variables and still achieve the required effect.
For example, say you need a white color as the background color. However, there is a part of the page where you need blue as the background color. In this case, you can use operations and convert white to blue for just one time and at only one place in the page. You can do this by referring to the background color global variable and adding some hex color code value to arrive at the blue color. This way, you can still use global variable and its white value without changing the code anywhere else. The code in
Figure 9 defines a button that uses a variable called @button_values. You can manipulate the value of this variable to meet the required effect.
.submit {

@button_values: 2px; // used for border, padding, and margins

border: @button_values solid;

padding: @button_values * 2; // Achieves padding of 4px instead of 2px

margin: @button_values + 1; // Achieves margin of 3 px instead of 2px

}
Figure 9
Defining a button
Similarly, you can add or subtract two variables and even color codes.
Note
Use operations wisely and only when required. For example, use
operations for different colors for different buttons or different
colors for a hover state and so on.
Functions in LESS
There is a lot more you can do with functions in LESS. Especially when it comes to manipulating colors, you can lighten, darken, saturate, or fade-in/-out colors on the fly.
Figure 10 shows the code to darken the site background color.
@SiteBgColor: #3d82d1; // Site background color

.article_sectionA{

Background: darken(@color, 20%);

}
Figure 10
Defining functions in LESS

Here is the darker color:

Mixin in LESS
Apart from variables, operations, and functions,, there is one more feature that is especially useful when you work with a browser-specific prefix such as border-radius. The code in
Figure 11 is used to apply a border radius to a button.
@radius: 2px; // defines radius value

.button-radius(@radius) {

-webkit-border-top-left-radius: @radius;

    -webkit-border-top-right-radius: @radius;

    -moz-border-radius-topleft: @radius;

    -moz-border-radius-topright: @radius;

    border-top-left-radius: @radius;

    border-top-right-radius: @radius;


}
Figure 11
Apply a border radius
Now, imagine a situation in which there are many more buttons and you have to copy and paste the same code everywhere. Instead you can use the mixin code (
Figure 12).
.submit {
.button-radius(3px); // Applies radius of 3px instead of 2px.
}
.next {
.button-radius
.button-radius(1px); // Applies radius of 1 px instead of 2px.
}
Figure 12
Mixin code
Important Parameters for the SAP HANA Cloud Portal Theme
Now that you understand the features of LESS, I’ll take a look at the important parameters used for the SAP HANA Cloud Portal theme.
Basic Parameters
Figure 13 shows the basic site color and image parameters that are most commonly used to change the background or a logo image.
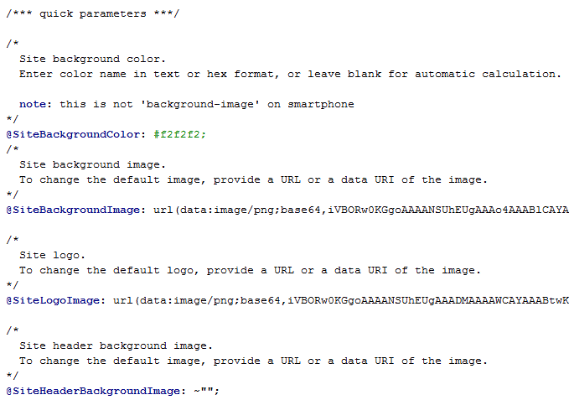
Figure 13
Basic site parameters of a typical SAP HANA Cloud Portal theme
Advanced Parameters
Figure 14 shows font, font-family, and stylistic parameters that are changed often. However, priority wise, the logo and background parameters are still the most commonly edited parameters.
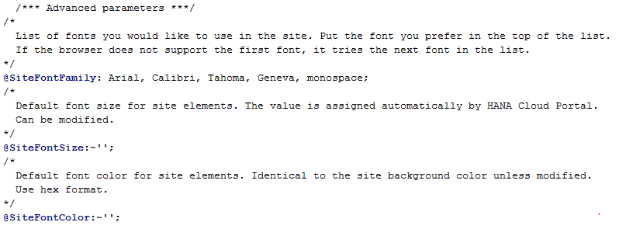
Figure 14
Advanced parameters such as font size and font color of a typical SAP HANA Cloud Portal theme
Widget Parameters
An SAP HANA Cloud site works on the basis of a widget. Every piece of content, including SAPUI5 applications, is loaded inside a widget. The parameters in
Figure 15 are especially handy when you want to customize a widget area.

Figure 15
Widget parameters of a typical SAP HANA Cloud Portal theme
User Interface (UI) Control Parameters
The parameters in
Figure 16 are handy when you want to customize the way SAPUI5 applications are rendered in the SAP HANA Cloud Portal site.
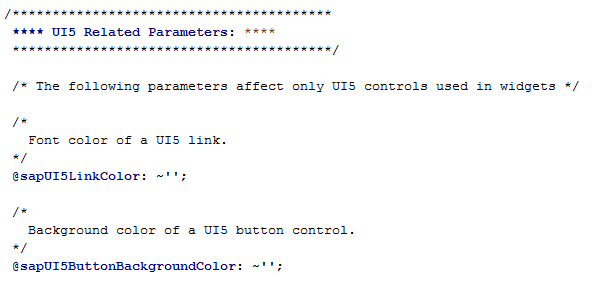
Figure 16
SAPUI5 parameters of a typical SAP HANA Cloud Portal theme
Smartphone Parameters
The parameters in
Figure 17 are used to control smartphone-related properties such as header borders and header title font sizes.

Figure 17
Smartphone parameters of a typical SAP HANA Cloud Portal theme
At this stage, I assume you have customized a logo image or a font color and ready to upload a customized theme onto the SAP HANA Cloud Portal.
Replacing Standard Images
It is important to understand how you can replace existing images with your organization’s logo, custom images, or icons. There are two ways to do so in a standard theme file. Either you upload the image or you convert it to a data URI and then use the URI instead of a physical image. A data URI is an alphanumerically converted image.
Upload Images to the SAP HANA Cloud Portal Document Repository
This is the SAP-recommended way of using custom images in SAP HANA Cloud Portal themes. Data URI is recommended if the primary use of SAP HANA Cloud Portal is on a desktop or a laptop. However, if the primary access point is a mobile device such as a tablet or a PDA, then uploading images is recommended.
You can upload images to the document repository on the SAP HANA Cloud Portal dashboard. You then refer to the custom image with an uploaded URL. Log on to the SAP HANA Cloud Portal and navigate to the Documents tab (
Figure 18).

Figure 18
The Documents repository on SAP HANA Cloud Portal
Figure 19

Figure 19
Create a new folder under the Public root folder
Start uploading your custom images in the folder that you just created. Once the files are uploaded, copy the image link by hovering over the Share Link button (
Figure 20). When you hover, you are given a popover that contains the hyperlink. You click the hyperlink in order to get the link or you can simply copy the link by selecting it with mouse button.

Figure 20
Hover on the Share Link button to obtain an image link to use in the theme
Convert the Image to a Data Uniform Resource Identifier (URI)
When page-loading speed is of utmost importance, you can convert the image to a data URI. A data URI is a long string of characters. The major advantage provided by a data URI is that it saves an HTTP request. This way, you can eliminate an HTTP request made to SAP HANA Cloud Portal to fetch the required image. This translates into an extremely fast page loading time. In addition, because there are fewer HTTP requests and fewer objects to be fetched from the server, the document size of your page is significantly reduced. This is one of the most ignored points when it comes to theme customizations.
Figure 21
data:image/jpeg;base64,/9j/4AAQSkZJRgABAQAAAQABAAD/2wCEAAkGBggGBQkIBwgKCQkKDRYODQwMDRoTFBAWHxwhIB8cHh4jJzIqIyUvJR4eKzssLzM1ODg4ITQ9QTQ2QTI3ODUBCQoKDQsNGQ4OGTUkHiQ1NTU1NTU1NSw1NTU1NTU1NTU1NTU1NTU1NTU2Myo1NTUsLCw0NTU1LDQpLDY1NiwtMv/AABEIABsAMgMBIgACEQEDEQH/xAAbAAACAwEBAQAAAAAAAAAAAAAABgMFBwQCAf/EADAQAAEDAwMCAwYHAQAAAAAAAAECAwQABREGEiExUQcUQRMXUlVhkiIyYnGxwfAV/8QAGAEBAQEBAQAAAAAAAAAAAAAAAQQFAwD/xAAgEQABBAEEAwAAAAAAAAAAAAABAAIDIRESEzFxMpGh/9oADAMBAAIRAxEAPwDuu8rXl41veIunJcrykWQWwcpS2jgHbkj61S6guniLpdKF3a4TGW3FbUuJW2tJOM4yB/sVoCNS2aVLvmmplyXaJnm14eQv2RVnBCgo8Z9CD6VSSvDq/P6qsjdxuzt6szLpd9o71bAG7B77sAA5rTZIBTwAOuaUbmk+JKW7zcvEbT9sbn3O4S2IzpSlK97auSMjIHSu9iJ4qyYjclmVKW06gOIIeZ5BGRTxqFxOtrLqiyBhSXIGAwpSSN6gncCM/qBFFyst7vGktPIsNyNtcYQ0t5e8pynYOMDr+xo3hgZaAek7d0SsnuWsdcWeaqJcbpPiyEclDiUg47jjkfWmbw9c1lrKcXpF9ms2tlWHXRtBcPwIOOvc+lMWsNKt6+1fbmGnAY1ubUmfJbxySQQ2D8XBJ7A/Wn2BAjWuAzDhMpYjsp2oQkcAUSzs2xho1H4lkbtVmlOBgAdcd6K+0VnKpYzeb7pCHqm9wNSWN2W951TnmUEFXKUgAcggAematI3jdY4Ufy0W1TG2GEBDAG3oB6/i49O9Os3Q+nLjMdlTLPFefdVuW4pHKj3NQ+7rSvyKF9lW7sLgA4H2p9EgNELOLN45T0T0/wDahsLi7CFCKjCyr0PJxjrVtOurHirGjtQUTbVbba77SXKXhKdu38idp5V/FOPu60r8ihfZVvEs8CBbfIRIjTMQAj2KE4Tz1odNEDqjbgrzY38ONLxYolvg2WNHtCEIhIRhsI7f2e9d9RsMNxmUtMoCEJ6JHpUlSE5OV3CKKKKEr//Z
Figure 21
Image converted to a data URI
Figure 22
<img width="50" height="27" title="" alt="" src="<copy paste data URI value here>”
Figure 22
Image tag and src attribute that hold the value of the data URI
Note
Data URIs don’t work in Internet Explorer (IE) 5–7, but are supported in IE 8.
Step 3. Export the Crunch File from the Crunch Editor
Now that you have made changes to the theme file, you export the custom theme from the Crunch editor. Click the Crunch File option to export a file in a LESS format that can directly be uploaded to SAP HANA Cloud Portal. You find it on the same screen you arrive at after uploading the file to Crunch. This is similar to
Figure 7. However,
Figure 7 was used to show the imported file.
Figure 23 shows how to export a file from Crunch. Note the blue rectangle highlighting the action at the top right.

Figure 23
Export the LESS file from the Crunch editor
Note
As mentioned earlier, although you can use Notepad to edit the LESS
file, the Crunch editor removes all unwanted white spaces and converts
the file into a precise format that is accepted by SAP HANA Cloud
Portal.
After you complete step 3, the Crunch editor saves a LESS file on your local system. You upload this file to the SAP HANA Cloud Portal.
Step 4. Upload the Custom LESS theme to the SAP HANA Cloud Portal
Log on to the SAP HANA Cloud Portal account and navigate to the Themes tab (
Figure 24). Click the Add Theme button.
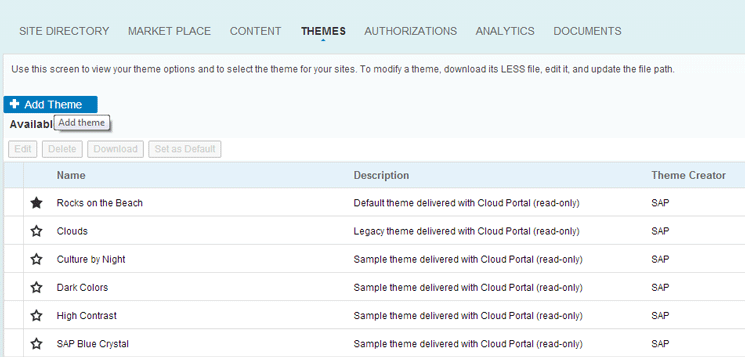
Figure 24
Upload a custom theme to SAP HANA Cloud Portal Themes
Figure 25

Figure 25
Enter the theme name and description and the name of the theme creator and browse to the locally saved LESS file
Step 5. Change the Site Theme
Now that you have uploaded the custom theme to the SAP HANA Cloud Portal site directory you can change the default theme and then take a look to see whether the changes are made.
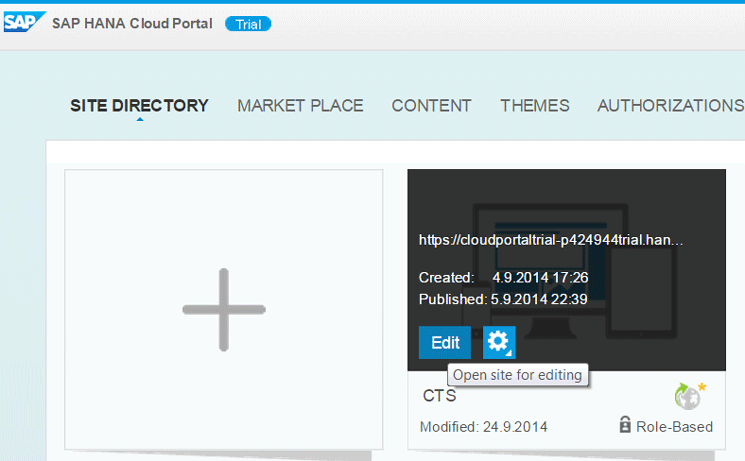
Navigate to site for which you want to change the theme (
Figure 26). Follow menu path Edit Site > Design Settings and select the newly uploaded file.
Fgure 26
Edit the site to change the default theme
Figure 27

Figure 27
Change the default theme from the Design Settings
Ameya Pimpalgaonkar
Ameya Pimpalgaonkar is a senior SAP architect. He specializes in SAP Netweaver Portal, SAP BPM, BRM, MDM, and SAP Mobile. His interests include UI and front-end technologies, SAPUI5, Responsive Design, and integration of modern technologies with SAP UI. He has also worked on HTML5, CSS3, and jQuery. Ameya is also a certified usability analyst from HFI, USA.
You may contact the author at
ameya85@gmail.com.
If you have comments about this article or publication, or would like to submit an article idea, please contact the
editor.


