Organizations often come across situations while implementing a solution using SAP Manufacturing Integration and Intelligence (SAP MII) in which they want to store the relevant data and persist it locally in the SAP MII system. One reason is that data comes from many systems, and you can save this combined data in SAP MII and then create relations or calculations using the data. Another advantage is performance enhancement. Performing calculations based on data stored locally is better than fetching the data from another system. Follow a use case to learn how to persist or store data in manufacturing data objects (MDOs) that come as an in-the-box feature of SAP MII. Find out how to define MDOs and how to consume them.
Key Concept
Manufacturing data objects (MDOs) are data objects that can hold data in local SAP Manufacturing Integration and Intelligence (SAP MII) storage. The data objects receive the data from various sources that are configured and integrated with SAP MII.
SAP Manufacturing Integration and Intelligence (SAP MII) can act as middleware that integrates shop floor data and data from enterprise systems such as SAP ERP. It provides integration capabilities to multiple shop floor systems, such as supervisory control and data acquisition (SCADA) systems and programmable logic controllers (PLCs). It also can integrate with data storage systems, such as relational databases using various built-in data connectors and SAP Plant Connectivity (SAP PCo).
However, on some occasions, it may not be permissible when using external database systems to store and retrieve the processed transactional data. This could be because of security reasons or tight coupling in the system landscape of the shop floor. In these cases, SAP MII’s data storage capabilities can be employed. They can store and retrieve the data that might be needed to build transactional user interfaces in applications built in SAP MII that would then consume this data coming from various sources.
I explore one of these data persistency options in SAP MII called manufacturing data objects (MDOs) and explain when to use this data storage concept. Most of the applications built in SAP MII integrate data from various systems such as enterprise systems (SAP ERP) and shop floor systems (SCADA or data historians). There often is a requirement to store or persist the data coming from various systems.
Note
In this article, the terms persist and store are synonymous.
• There is a need to store the metadata for applications and a persistence mechanism is required
Data Persistency Options in SAP MII Applications
SAP MII offers the following data persistency options:
• Shared properties
• External databases
• MDOs
Shared Properties
You can define shared properties in the Meta-INF tab in the SAP MII workbench inside the SharedProperties.mem file of any project. These properties are shared among all the transactions in the project where they are defined. This data persistence option is used when there are properties that are commonly and frequently used across the transactions inside a project and when the transactions need to share the information are held within that shared property.
For example, the server name is a property that might be common across all transactions inside a project. Hence, you can create a shared property such as ApplicationHostName and assign the string value of the hostname to this shared property. This way, if at any point in time, the application host is changed, then changing the value of this property alone takes care of changing it in all the transactions that use this shared property. Another use case of a shared property is defining an application server root location’s namespace.
The value of a shared property can also be changed from the SAP MII Admin menu, through the screen named Shared Memory under the category Data Services. The shared properties cannot hold a large set of data. They cannot be used to hold columnar data records that you find in a database table. In those cases, you need to seek more robust options for data storage.
External Databases
SAP MII has capabilities to connect with any Java Database Connectivity (JDBC)- or Open Database Connectivity (ODBC)-compliant external databases, such as the Microsoft SQL Server, Oracle Database, or Object Linking and Embedding Database (OLE DB) servers. You need to create a data connector in the Data Servers admin screen of SAP MII. The type of data connector to be configured depends on the type of database to which you want to connect. The configured database can be used to hold and store the data inside data tables. These relational databases can store normalized data and therefore are efficient.
The main drawback of using external databases in SAP MII composite applications is the dependency on the data used by the SAP MII application. If the application has a user interface that reads data from the external database tables, then applications might come to a standstill if the database server connectivity goes down. Also, during migration of one SAP MII system to another, the database server configuration needs to be migrated. This dependency factor can be avoided if you use the data persistency feature in SAP MII, the MDOs.
MDOs
From SAP MII 12.2 onward, a new data storage capability of storing data inside SAP MII was released. This feature of data persistency in SAP MII is called manufacturing data objects. As implied by its name, MDOs are data objects. You can create these data objects in the SAP MII workbench, and they are view based, which means that defining the data objects is fairly simple for the SAP MII application developers. By saying that MDOs are view based, we mean that by using SAP MII workbench under the Object tab, you can create MDOs just as you create any other file type (e.g., a Query Template or a Transaction). There also are a series of simple UI screens categorized per the various configurations that can be made to define an MDO.
In the sections to follow, I include examples of how to define MDOs. When any MDO is defined in the SAP MII workbench, a data object is created in SAP MII’s database. This data object points to a database table that is generated by SAP MII for the MDO. Any read, write, update, or delete operation on the MDO causes the dataset in the corresponding table to be modified, too. These MDOs are OpenSQL compliant.
Because the MDOs are defined on the SAP MII workbench, the inherent capability of SAP NetWeaver Development Infrastructure (NWDI) source control on SAP MII projects is applicable to the defined MDO objects as well. These MDO objects are tightly coupled with SAP MII infrastructure and use the SAP NetWeaver server database capability on which SAP MII is installed.
SAP MII provides three types of MDOs:
• Persistent
• On demand
• Joined
Persistent MDOs are like physical data tables in a database. When a persistent MDO is created, SAP MII internally generates a data table for the MDO in the same database on which the SAP MII is installed. It uses the same SAP NetWeaver database schema where other SAP MII tables are created.
On-demand MDOs are very similar to persistent MDOs except that no physical data tables are created when an on-demand MDO is defined. Therefore, data in these MDOs is not persisted in the database; rather, it is only acquired on demand. When you try to fetch the data from an on-demand MDO, its data provider is run in the background and the resulting output is returned as the output from this MDO. There is no data storage in the database for an on-demand MDO.
Joined MDOs are the joins of persistent MDOs existing on the SAP MII workbench. They can be used to join data in various MDOs. This concept of combining data using joined MDOs is very similar to how joins are performed in relational data tables. For each joined MDO, SAP MII internally creates a database view combining data from the source MDOs.
Use Case Scenario
In this section I use an example to show you how to persist data in MDOs. I also explain how to define MDOs and how to consume them. In my example, I fetch production order data from an ERP system and data corresponding to the production order from a SCADA system using SAP PCo. Then I combine the data and create a simple user interface (UI) in which a user can confirm a production order.
For my use case, I persist, or store, the production order data in two MDOs. This data is received from two source systems:
1. Data received from an SAP ERP Central Component (ECC) system
2. Data received from an SAP Manufacturing Execution System
Later, I generate (and persist, if required) a combined dataset from both these data sources into a common data model. This combined, or mashed-up, data can then be consumed as needed on the user interface of the application (
Figure 1).

Figure 1
A use case scenario for data received from two source systems
How to Persist Data in MDOs from Various Sources
In this section, I explain how to store SAP MII data using MDOs. My use case includes the creation of an MDO, its data source configuration, defining attributes and their properties, and then the life cycle creation for the data acquisition into this MDO.
To start with my use case, I create an MDO and store the data received from the first source system into it.
1. Data Received from an SAP ERP Central Component (ECC) System
As discussed earlier, for my use case I store the data received from an SAP ERP system. This data is stored in a persistent MDO. The data from the ECC system is fetched by a business logic transaction (BLS) that calls the relevant business application programming interface (BAPI) using SAP Java Connector (JCO) or SAP Java Resource Adapter (JRA) action blocks. The transaction then outputs the received data as its output parameters.
Note
To fetch data from the ECC system, you can also make use of MII’s message listener capability. The data received via the message listener can be read through a transaction using message listener action blocks. Action blocks are business logic services building blocks. Each functionality called or performed in the SAP MII Workbench is done using an action block.
First, you create a joined MDO. To create a joined MDO, go to the SAP MII workbench’s Object tab and right-click the folder under which you want to create the MDO object. Navigate to New File > Persistent MDO (
Figure 2).
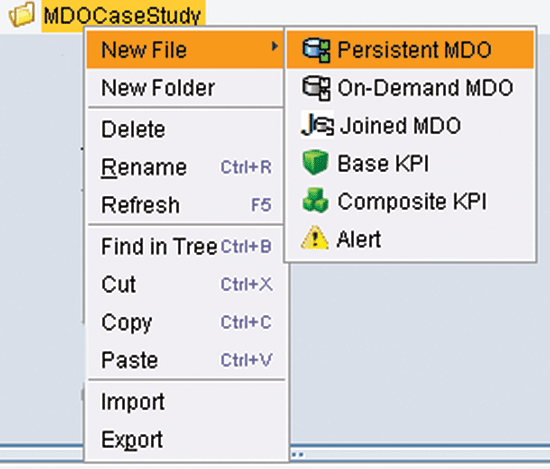
Figure 2
Create a persistent MDO
Figure 3
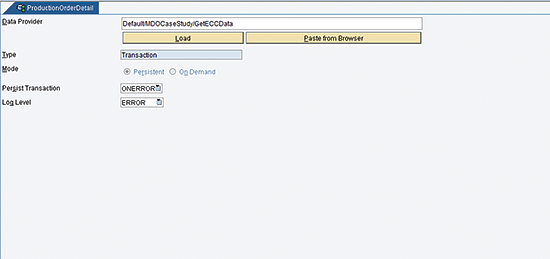
Figure 3
The Data Provider screen
You can either drag and drop any transaction or query object from the left side navigation tree or click the Load button, and in the next screen (
Figure 4), select the respective object in the Load pop-up screen. Click the OK button.
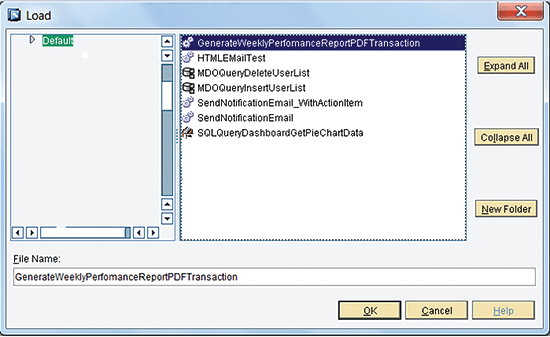
Figure 4
The load data provider pop-up screen
The Attributes screen lists all the output parameters of the transaction if the data source is a transaction. It lists all the columns in the result if the data source is a query object in the highlighted section, as shown in
Figure 5. Each of the resulting data columns can be mapped to the attributes of the MDO. You can also map all of them at the same time.
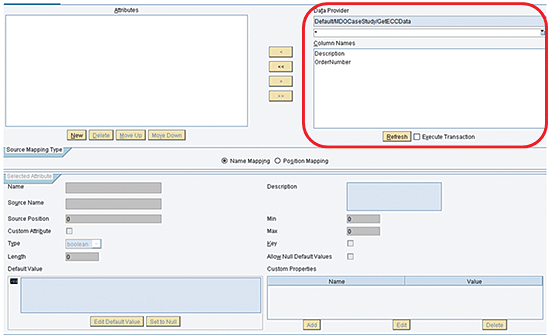
Figure 5
Available columns of the data provider
An attribute is marked as a custom attribute if the Custom Attribute check box is selected.
Mapping between the data attribute and data source columns can be of two types:
• Name mapping: Mapping done by name of the data source column
• Position mapping: Mapping by position of the column of the data source column
The selection options for these two types of mapping are shown in
Figure 6.
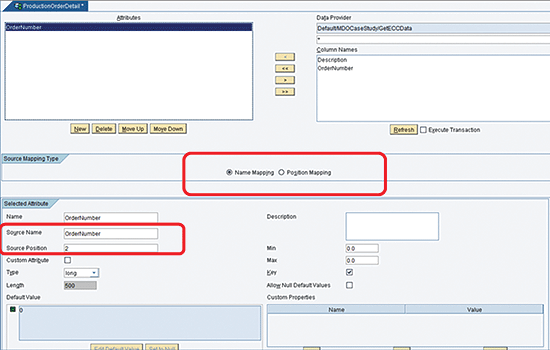
Figure 6
Mapping type for attributes
Note
Figures 5-8 are all sections of the same screen.
Now I explain how to add my use case attributes. To simplify my example, for my MDO, I define just two attributes: OrderNumber and OrderDescription.
First, define the OrderNumber attribute. By using the arrow keys on the top section of the Attributes panel on the MDO, you can add any columns from the data source as attributes for the MDO. In my example, I define this as the key attribute by selecting the Key check box in the Selected Attribute section of the panel (
Figure 7). The Selected Attribute section is the place in which all the properties of the attribute are displayed. You can define the data type, length, default value, description, minimum value, maximum value, and custom properties for the attribute.
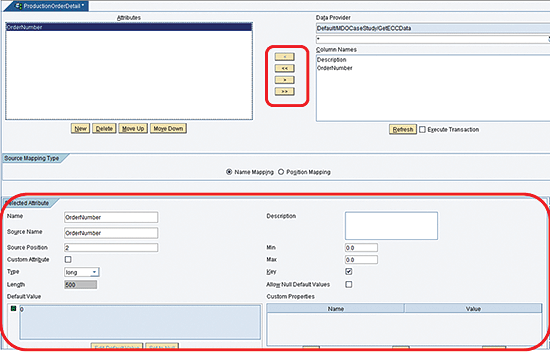
Figure 7
Attribute properties
If the Key check box is selected, the attribute behaves like a primary key in the MDO table. You would select this box if, for example, you want the attribute to be unique such as a primary key of a relational database table.
Now, define the second attribute called OrderDescription. The column name of the transaction’s output parameter is Description (
Figure 8). However, you want the MDO to store the information under the name OrderDescription. It is possible to change the name of the MDO attribute using the Name field in the Selected Attribute section of the panel. This new name is still mapped to the Description section as output by the transaction, only the display name of the data object is now changed to OrderDescription.

Figure 8
Change the name of the attribute
The next important step is to define the life cycle for this MDO. The life cycle of an MDO defines the data acquisition frequency for the MDO. When you define the attributes, you map the data source columns to the attributes of the MDO (i.e., you tell the system what data will go where or where the data coming from the data source will be stored in the MDO). In the Lifecycle screen you define the frequency of how often to get data from the source data provider and the mode of the storage.
To create a life cycle for the MDO, click the New button (refer back to
Figure 8). In the screen that appears (
Figure 9), enter data in the Name and Description fields for the life cycle and select the Enabled check box. In the Credential Alias field you enter credentials used while running the life cycle. In the Pattern field, you need to define the frequency for the life cycle. In the Mode field, select Replace, Update, or Delete from the list of options available after you click the icon at the end of the Mode field.
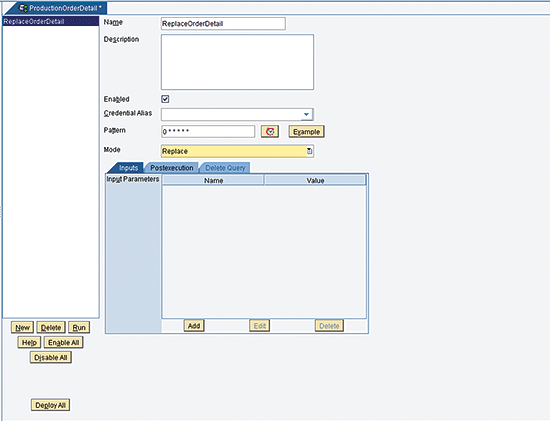
Figure 9
The life cycle of the MDO
Figure 9
Figure 10
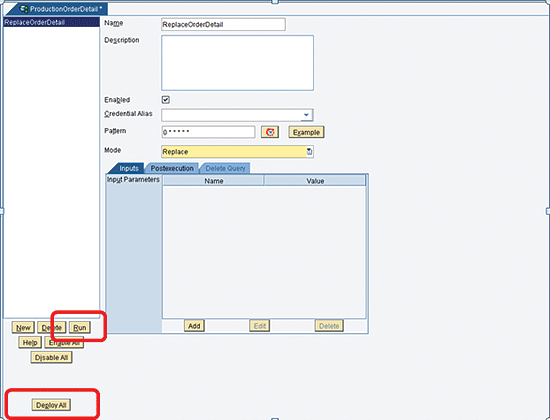
Figure 10
Deploy and run the life cycle
Note
Each life cycle defined in the Lifecycle screen is actually a scheduler that can also be viewed and edited in the Scheduler admin screen.
Some other screens are used in the MDO definition, but they are not mandatory and I do not use them in my use case.
In the Properties screen, you can define extra information for your MDO in the form of properties. Each property is like metadata for the MDO, and each property is a name value pair. You can enter a description for the MDO in the section at the top of the screen. You can also select the Debug Mode check box to enable the logging for the MDO (
Figure 11).
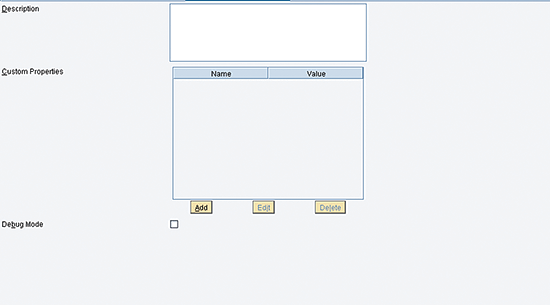
Figure 11
The Properties screen
In the Visualization screen (
Figure 12), you can define an MDO query object and a chart object to visualize the result of the MDO as a graphical display when the MDO is executed.
Figure 12
The Visualization screen
The Security screen (
Figure 13) is the standard screen for all SAP MII objects in which you define the reader and writer roles for the object.
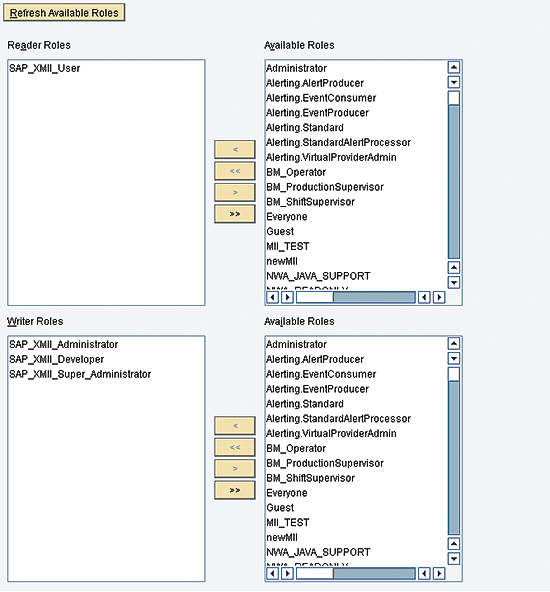
Figure 13
The Security screen
2. Data Received from an SAP Manufacturing Execution System
You need to follow the same steps as you did for creating the first MDO (refer back to
Figures 2 and
3). The only difference is that the data source type is a PCo query instead of a transaction. Therefore, in the Data Provider screen, you enter a different name (Default/MOD/CaseStudy/GetShopFloorData) in the Data Provider field and PCoQuery in the Type field instead of Transaction. Click the Load button (
Figure 14).
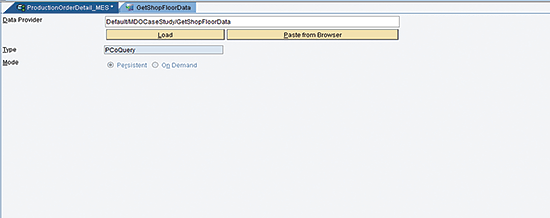
Figure 14
The Data Provider screen
The new name of the data provider appears in the Data Provider field of the Attributes screen (
Figure 15).
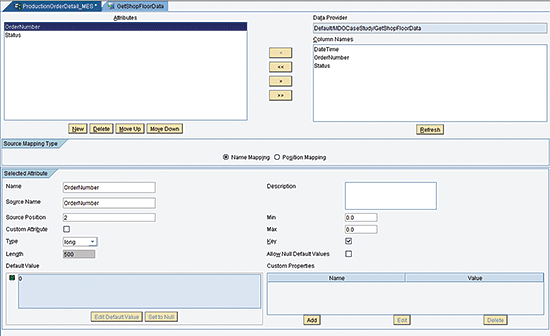
Figure 15
The Attributes screen
Now click the New button in the screen shown in
Figure 8. This action opens the ProductionOrderDetail screen for the life cycle of the MDO (refer back to
Figure 9). Note that in this screen a different name has been entered in the Name field and that Update has been selected for the Mode (
Figure 16).
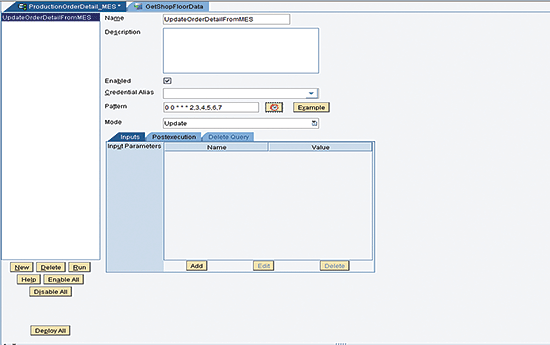
Figure 16
The Lifecycle screen
Create a Joined MDO and Select an MDO Query
For the joined MDO approach, you need to create a joined MDO object just as you created persistent MDOs earlier. Joined MDOs are design time joins that can join data only from persistent MDOs. This is because a joined MDO object creates a database view on top of MDO tables in the SAP MII database. The data is fetched using this view. Physical tables are needed to create a database view. This is possible only in the case of persistent MDOs and not in the case of on-demand MDOs. Data would be fetched from a joined MDO by creating an MDO query in select mode.
Note
Joined MDOs are design time joins that can join data only from persistent MDOs.
For my use case the steps for this joined MDO approach are outlined in the architectural diagram shown in
Figure 17.
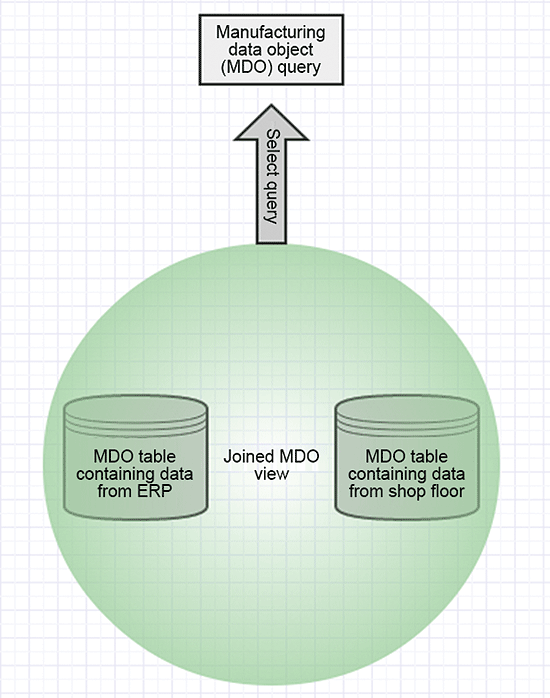
Figure 17
Joined MDO
Create a Joined MDO
To create a joined MDO, go to the SAP MII workbench’s Object tab and right-click the folder under which you want to create the MDO object. Navigate to New File >Joined MDO (
Figure 18).

Figure 18
Create a joined MDO
The first step for creating a joined MDO is to define the MDOs on top of which your joined MDO would be created (i.e., MDOs from which you need to mash or combine the data). In technical terms you are defining the tables on which the view would be created in the database. Therefore, for my use case, you select the two persistent MDOs created earlier (
Figure 19).
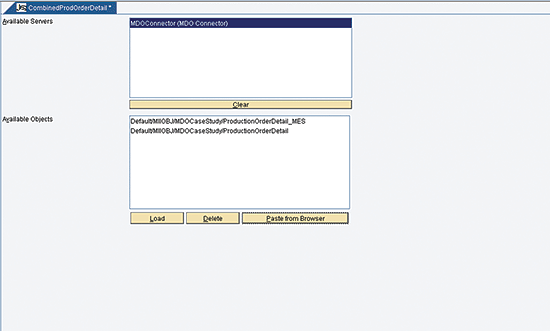
Figure 19
The Data Provider screen
You can either drag and drop the MDO object from the left side navigation tree or click the Load button and then select the respective MDOs in the Load pop-up screen (
Figure 20).

Figure 20
The Data Provider Load pop-up screen
1. You need to add all the attributes from the source MDOs that you want to appear in the resultant joined dataset. To complete this step, follow the instructions to access the Template Categories tab of the MII workbench (
Figure 18) and double-click Attributes. In the screen that appears (
Figure 21) select the available attributes from the different source MDOs by either dragging the attributes from the Available Attribute section to the Selected Attributes section or by selecting the attribute in the Available Attributes section and then clicking the Add or Add All buttons.

Figure 21
Add attributes
2. After adding the attributes you want, you need to select the MDOs on which the join has to be performed and also select the type of join to be performed — an inner join or left outer join. To complete this step, click the Add button in the Joins section of the Attribute screen (
Figure 21). For my example, you have two source MDOs, and therefore, you create one join. Click the icon in the field in the Join Type column and select INNER JOIN (
Figure 22). However, there can be cases in which multiple MDOs are joined and all the joins should be added here in the Joins section.
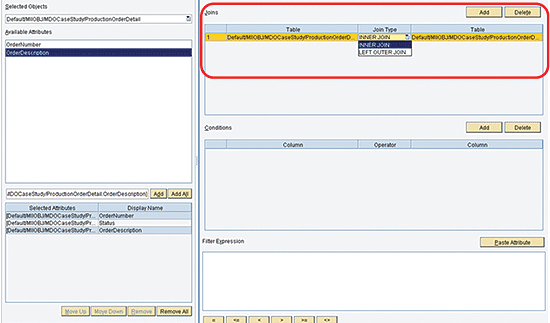
Figure 22
Add joins
3. The next step is to include the join condition on which the join of MDO data is performed. To complete this step, click the Add button in the Conditions section after selecting the join in the Joins section (
Figure 23). Conditions are defined based on joins. Therefore, for each join, you need to define one or more condition.

Figure 23
Add join conditions
Figure 24

Figure 24
Add filters for the joins
The layout screen is a view-only screen that displays the data source MDOs and their relation (i.e., the joins between them in a graphical way). In this screen you can visualize the joined MDO and its data source MDOs (
Figure 25).
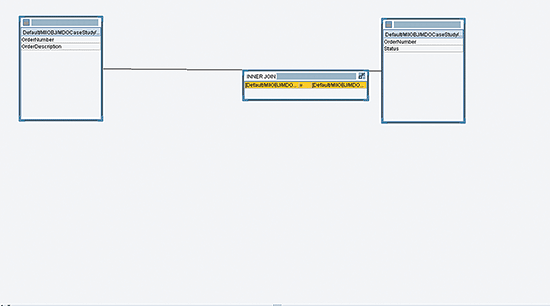
Figure 25
The layout screen
Create and Select an MDO Query
For my use case you use the MDO Query with Select mode as you need to fetch the data already joined in a joined MDO. Go to the SAP MII workbench’s Catalog tab and right-click the folder under which you want to create the MDO Query object. Navigate to New > MDO Query (
Figure 26).

Figure 26
Create an MDO query
The first step for creating an MDO query is to select the data source MDO for the query. This is done in the Data Source screen of the query (
Figure 27). You can either drag and drop the MDO object from the left side navigation tree or click the Load button and then select the respective MDOs in the Load pop-up screen.
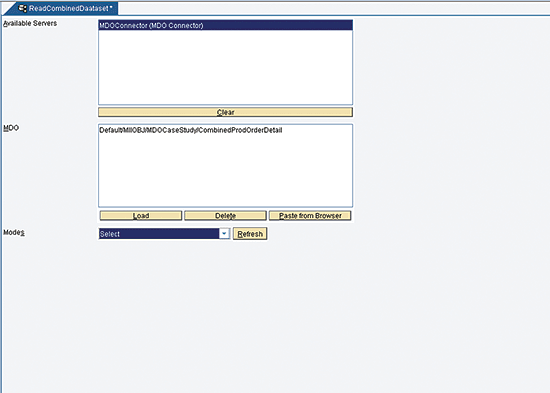
Figure 27
The Data Source screen
Note
Insert mode is only applicable for MDOs with only custom attributes and no data source. Update mode is only applicable for MDOs with custom attributes. Thus, data for attributes mapped from the data source cannot be inserted or updated by an MDO query. Only the data for custom attributes can be inserted or updated by an MDO query.
In the Select Query screen you need to select those attributes that you want to be available in the output of MDO query from the list of available attributes from the source MDO (
Figure 28). You can also provide a Filter, Sort, and Group Expression for the query, although this is not mandatory.
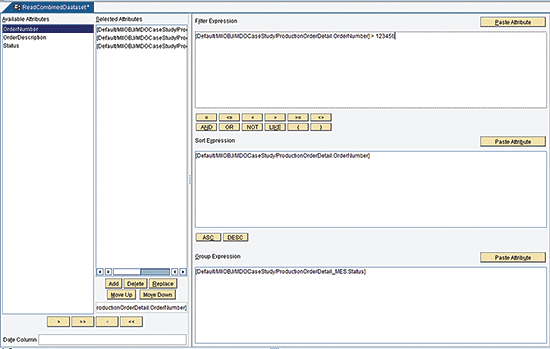
Figure 28
The Select Query screen
There are some more screens present in the MDO query that I do not use in my use case, but I describe them. The General screen is a standard screen present in all the query templates. In this screen you can set general properties for the query such as Row Count, Number format for the result, and buffering (
Figure 29).
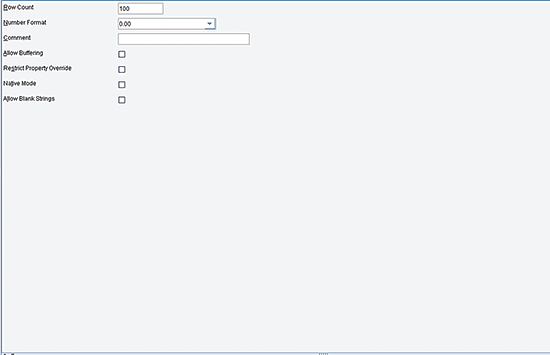
Figure 29
The General screen
In the Object Parameter screen, you can define the values for MDO parameters (
Figure 30).
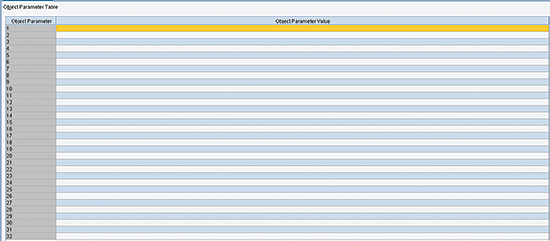
Figure 30
The Object Parameter screen
Figure 31
Figure 31
The Parameter screen
The Transformation screen is used to define in-line transformation of the result before it is rendered. In this screen you enter the path of the style sheet that you want to use and the result is transformed using this style sheet (
Figure 32).
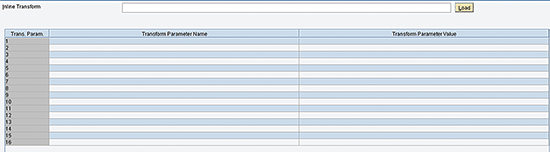
Figure 32
The Transformation screen
Joined MDO Query
The second approach for mashing the data is creating a joined MDO query using the persisted MDOs created earlier in the article. Go to the SAP MII workbench’s Catalog tab and right-click the folder under which you want to create the MDO Query object. Navigate to New > MDO Query.
This action opens the Data Source screen (
Figure 33). The first step for creating an MDO query is to select the data source MDO for the query. This is done in the Data Source screen of the query. Select the two persistent MDOs created earlier in the MDO section of the Data Source screen. Select the mode as Join in the drop-down menu in the Modes field.
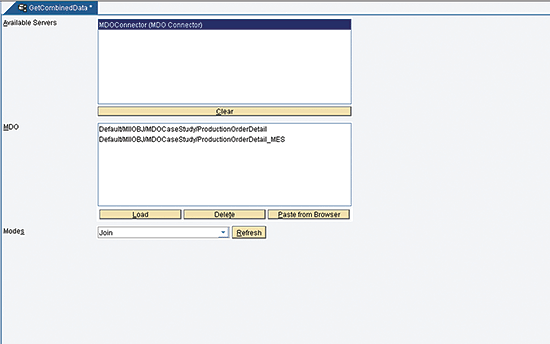
Figure 33
The Data Source screen
In the Join Query screen, you need to define the attributes, joins, join conditions, and filters for the query (
Figure 34). Steps to configure all these are the same as explained in the “Adding Attributes” section of the joined MDO.
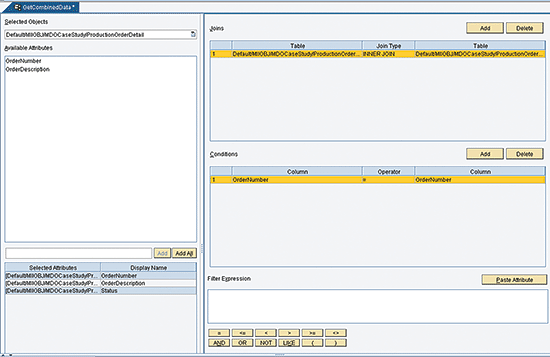
Figure 34
The Join Query screen
Consuming Mashed-Up Data in the User Interface
You have persisted the data from different systems into MDOs and also created mashing of data in the form of either a joined MDO or a join MDO Query. Now this data is ready to be used on the user interface (UI).
For my use case, consider an SAPUI5 application. The end user of the composite SAP MII application is required to send a production order confirmation from the application after checking the order number and the status (
Figure 35).

Figure 35
Data from the MDO shown in an SAPUI5 table
Batch Processing Support for MDO Data Acquisition
Rohit Negi
Rohit Negi is a senior consultant at Cibersites India with around seven years of experience in the IT industry. He is currently providing SAP MII-based solutions to clients. Rohit was a part of the SAP MII Product Development Team at SAP Labs Bangalore and has worked on 12.2, 14.0, and 15.0 releases of SAP MII as a senior developer.
You may contact the author at
rohit.negi.2003@gmail.com.
If you have comments about this article or publication, or would like to submit an article idea, please contact the
editor.