Learn step-by-step instructions for how to create a Business Intelligence Consumer Services (BICS) connection and then use it to connect three BusinessObjects reporting tools: Web Intelligence, Design Studio, and BusinessObjects Analysis, edition for Microsoft Office, to an SAP BW BEx Query.
Key Concept
A Universe is the Semantic Layer that resides between the database and the end user, providing business representation to the technical data structures. The Information Design Tool (IDT) is an SAP BusinessObjects metadata design tool that enables designers or developers to create and manipulate metadata from various data sources and to create Universes. Universes are manually created using the IDT and are saved in the SAP BusinessObjects repository with the file extension UNX. The Central Management Console (CMC) helps create and manage SAP BusinessObjects platform users and groups, and enables publishing, organizing, and defining security levels for all BusinessObjects platform content. The CMC also enables managing servers and creating server groups.
These detailed, step-by-step instructions show the process for setting-up connectivity between SAP BusinessObjects client tools (Web Intelligence, Design Studio, and BusinessObjects Analysis, edition for Microsoft Office—from here on, simply referred to as Analysis Office) and SAP BW Business Explorer (BEx) Queries. Using these connection steps will help you alleviate performance bottlenecks and, by learning design best practices for connecting SAP BW queries, you can avoid major performance challenges.
How to Create a BICS Connection
In this section, we show the steps for creating a BICS connection. BICS connections can be created by using either the SAP BusinessObjects Information Design Tool (IDT) or the Central Management Console (CMC).
Note
The IDT is an SAP BusinessObjects metadata design tool that enables designers to extract, define, and manipulate metadata from relational and OLAP sources to create a Universe. The CMC is a web-based tool that helps administrators manage the SAP BusinessObjects platform.
Step 1. Open the IDT by following menu path Start Menu > All Programs > SAP Business Intelligence> SAP BusinessObjects BI Platform 4 Client Tools > Information Design Tool.
In the screen that opens, you see two tabs: Local Projects and Repository Resources (
Figure 1). In this example, we are creating a connection in the repository, so select the Repository Resources tab. Select the green plus-sign (add) icon and then select Insert Session from the drop-down options that open. This opens the screen in
Figure 2.

Figure 1
Insert a new session in the Information Design Tool
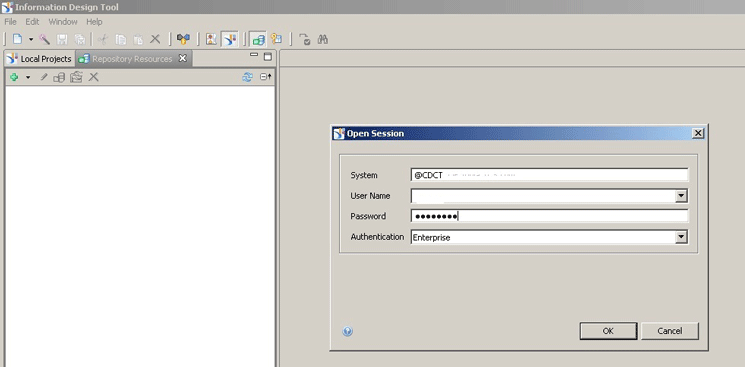
Figure 2
Add the session details in the Information Design Tool
Step 2. Enter the BusinessObjects system credentials (the system and user names, the password, and the type of authentication) and click the OK button to log in.
Step 3. Once logged in (
Figure 3), expand the Connections folder and select the folder where you need to create the connection—in this case, the SAP BICS folder. Right-click this folder and select Insert OLAP Connection from the context-menu options.

Figure 3
Insert the OLAP connection
Step 5. This opens the screen in
Figure 4 with a tree of options under New OLAP Connection. Select SAP BICS Client.

Figure 4
Select the connection
Step 6. A new screen opens (
Figure 5). Enter the configuration details of the SAP BW system to which you are connecting, using a BICS connection.

Figure 5
Enter the SAP BW system details
Step 7. Once you’ve made the required entries, click the Test Connection button to make sure the connection works. If it does, you see a success pop-up window like the one in
Figure 6. Once you’ve confirmed that it works, click the Close button.

Figure 6
Test the connection
Step 8. Click the Next button to proceed with the connection. If you want to specify a particular cube in the connection, select the Specify a cube in the connection radio button or select the Do not specify cube radio-button if you do not (
Figure 7). Then click the Finish button to complete the connection details.
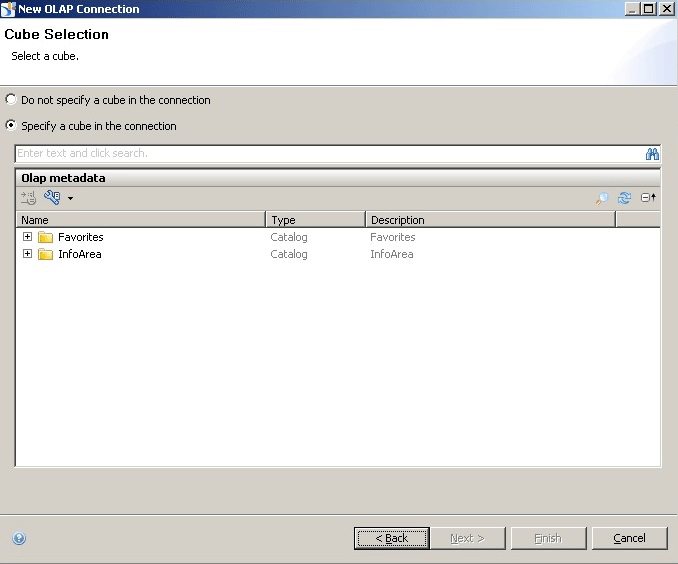
Figure 7
Pick an option to specify a cube, or not
Step 9. A new screen opens (
Figure 8) that shows that the new BICS connection is created in the BusinessObjects repository folder (in this case, the SAP BICS folder) and is now available for consumption by the SAP BusinessObjects client tools.
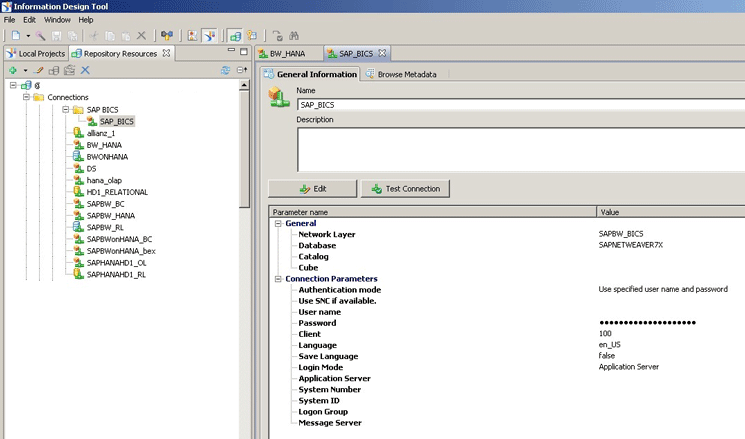
Figure 8
The new SAP BICS Client connection is successfully created
Once the BICS connection is successfully created and saved in the BusinessObjects repository, it can be used by SAP BusinessObjects client tools—Web Intelligence, Design Studio, and Analysis Office—to connect to SAP BW.
Connecting Web Intelligence to an SAP BW BEx Query Using a BICS Connection
Web Intelligence reports can be created using a Web Intelligence Rich Client desktop tool or via the SAP BI launch pad. In this example, we’re using the SAP BI launch pad to illustrate the procedure.
Note
SAP BusinessObjects BI launch pad: The SAP BusinessObjects platform includes the SAP BI launch pad, a web application that acts as a window to business information. It’s a central point of access for all BI documents and objects saved in the repository. It also enables users to access documents or objects (e.g., Web Intelligence documents, Design Studio, and so on) that are saved in the repository.Web Intelligence Rich Client: The Web Intelligence Rich Client tool is a desktop-based tool that is installed during an SAP BusinessObjects client installation. It enables users to open, edit, and modify Web Intelligence reports on a desktop and store them locally or offline before publishing on the server.
Step 1. Log in to the SAP BI launch pad URL with your user credentials.
Step 2. In the screen that opens (
Figure 9) you see a variety of available applications listed under the My Applications section (on the right), based on your access. In this example, select the Web Intelligence icon from the list to create a report.

Figure 9
Select an application to create reports
Step 3. In the screen that opens (
Figure 10), click the new icon to create a new Web Intelligence document (or press Ctrl N).

Figure 10
Create a new Web Intelligence document
Step 4. A pop-up window opens (
Figure 11) with different data-source options. Select the BEx option as your data source for creating Web Intelligence documents using a BICS connection. Then click the OK button.
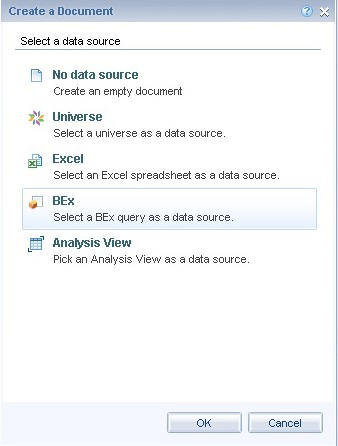
Figure 11
Select BEx Query as the data source
Step 5. A screen opens with list of available connections listed in the left Folders pane (
Figure 12). Expand the Connections folder and select the BICS connection (SAP_BICS) that you created earlier. This opens a list of available SAP BW InfoAreas. Open the InfoArea folder and a list of all the InfoProviders opens under it. Double-click the InfoProvider (Inventory, in the example in
Figure 12) and a list of all the BEx Queries associated with that InfoProvider are displayed in the right pane. These are available as data sources for the Web Intelligence report. Then select the required BEx Query from the list on the right and click the OK button.
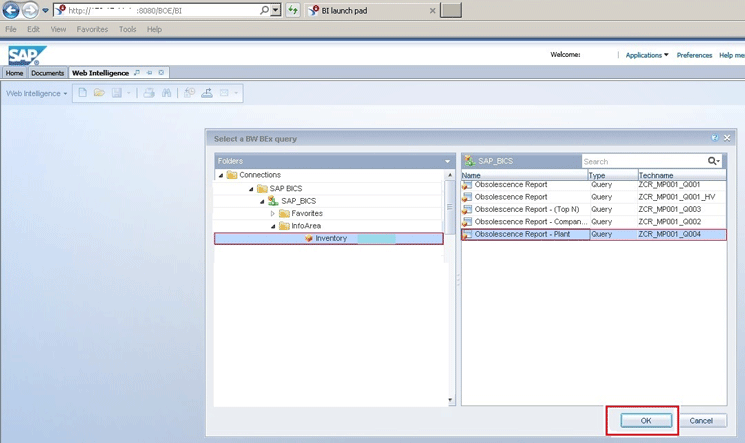
Figure 12
Select a BEx Query
Step 6. This opens a new screen (
Figure 13) where you can view the fields (i.e., characteristics and key figures) of the BEx Query on the left (in the Universe outline section of the Query Panel screen).

Figure 13
The structure of the selected query in the Query Panel
Drag and drop the fields from the Universe outline pane (on the left) to the Result Objects pane (on the right). Once you’ve moved over all the desired fields, click the Run Query button (highlighted in
Figure 13) to execute the desired report.
Step 9. Once the query is executed, you can view the Web Intelligence report based on the BICS connection (
Figure 14). Then save the report in a folder based on user access.
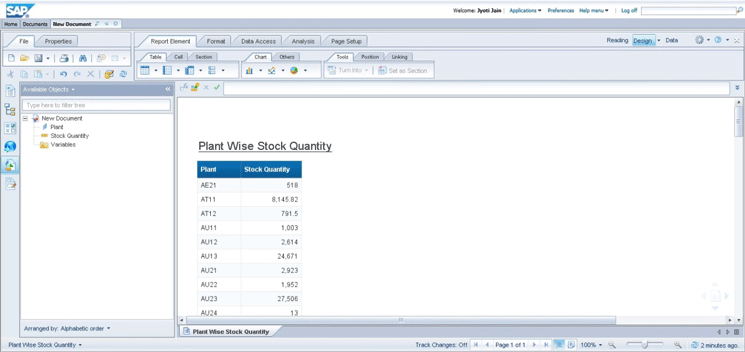
Figure 14
View the output of the executed report
We have successfully used BICS to connect Web Intelligence to an SAP BW BEx Query.
Connecting SAP BusinessObjects Design Studio to an SAP BW BEx Query Using a BICS Connection
SAP BusinessObjects Design Studio can be used either in a local or connected mode. Since we are accessing an SAP BICS connection saved in the BusinessObjects repository, we need to use the connected mode.
Step 1. Open Design Studio by following menu path Start Menu > All Programs > SAP Business Intelligence > SAP BusinessObjects Design studio > Design Studio. Log in to the SAP BusinessObjects platform with your user credentials and click the OK button.
Step 2. On successful login, a welcome screen opens. Select Goto Main Menu in the top and then click Application > New… or you can click the Create Analysis Application button (bottom left) to create a new analysis application (
Figure 15). (Note: Dashboards created using SAP BusinessObjects Design Studio are called analysis applications).
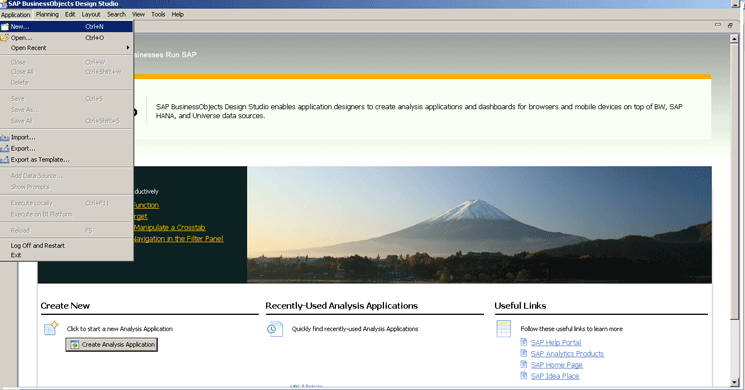
Figure 15
Create a new application (dashboard)
Step 3. This opens a New Application pop-up window with a list of the available analysis application templates (
Figure 16). Enter the Application Name (DS Application) and select the folder in which you would like to save your application (in this case, Favorites). Select a template from the available options (Basic Analysis Layout in this example) and click the Create button.
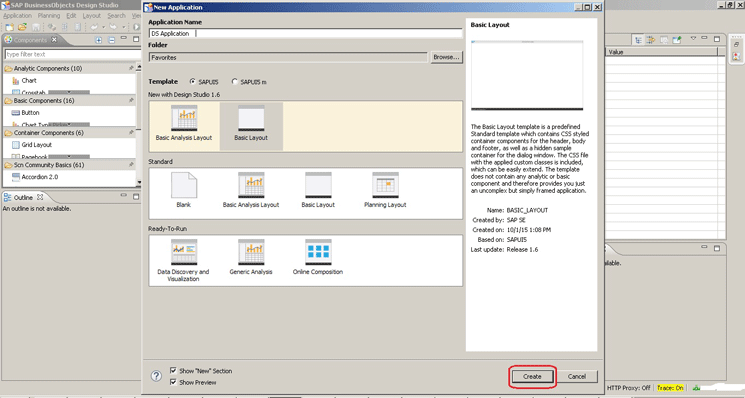
Figure 16
Select the analysis application template
Step 4. This opens the SAP BusinessObjects Design Studio editor with the selected application template (
Figure 17).
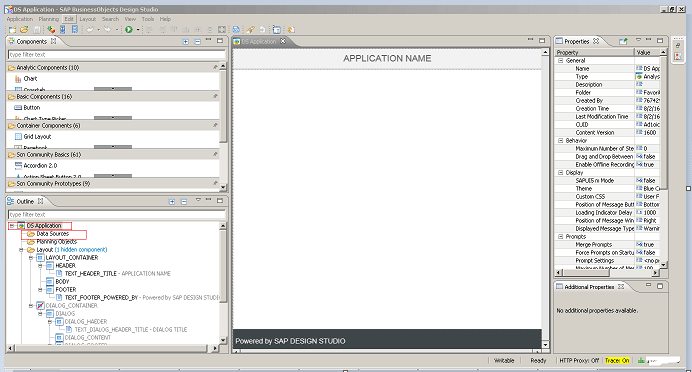
Figure 17
The new application is created (DS_Application)
Step 5. The next step is to add the data source to the application. On the left side, under the Outline tab, you see the DS Application with folders (i.e., Data Sources, Planning Objects, and Layout), as shown in
Figure 18. Right-click the Data Sources folder and select Add Data Source from the context menu.
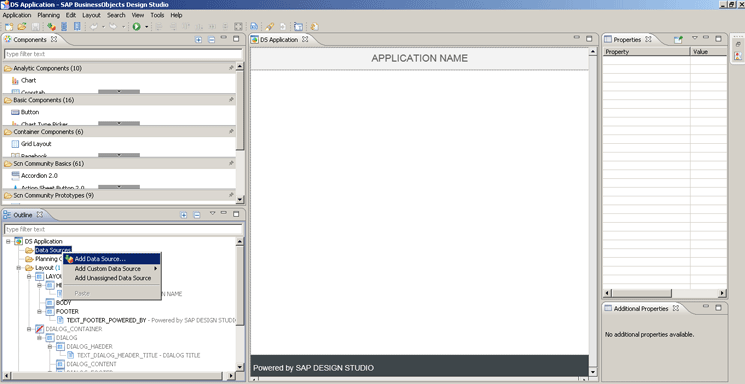
Figure 18
Add the data source to the analysis application
Step 6. A pop-up window opens with a list of all the connections saved in the SAP BusinessObjects repository (
Figure 19). Search your BICS connection by typing the connection name is the top text box. Connections matching the text entered will be filtered. Select the BICS connection created earlier (SAP_BICS) and click the OK button.

Figure 19
A list of matching BICS connections
Step 6. This opens an Add Data Source pop-up window with the connection selected (
Figure 20). A green indicator under the connection name (SAP_BICS) shows that the status of the connection is active. Click the Browse… button next to the Data Source field and another pop-up window opens with a list of BW InfoAreas within the selected BICS connection (
Figure 20). Expand the InfoAreas tree to select the required BEx Query and click the OK button.
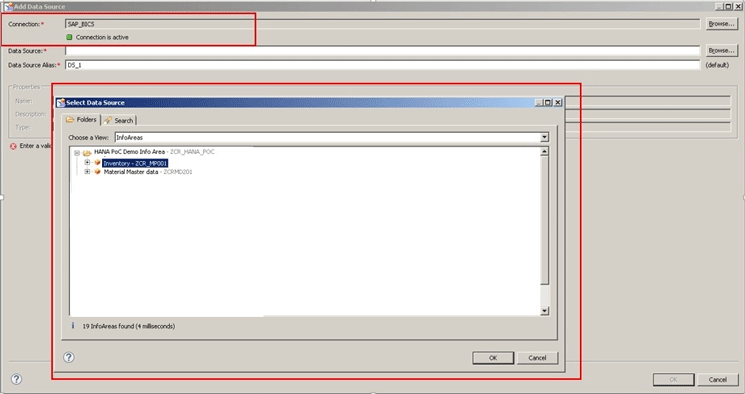
Figure 20
Select the InfoArea from the available SAP_BICS connection list and select a BEx Query
Step 7. The selected BEx Query name is populated in the Data Source text box and its Properties are displayed below it (
Figure 21). Enter a connection name in the Data Source Alias field and click the OK button. This assigns the BEx Query to the application and closes the pop-up window.
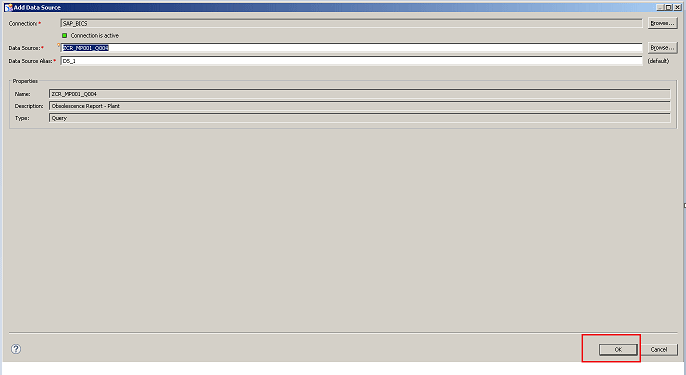
Figure 21
View the status of the connection
Step 8. The selected BEx Query now appears in the Data Sources folder in the Outline tab of the Design Studio editor (
Figure 22).

Figure 22
Query assigned as a data source to the analysis application
Step 9. In the Outline tab, under the Data Sources folder, right-click the BEx Query and select Edit Initial View… from the context menu (
Figure 23).
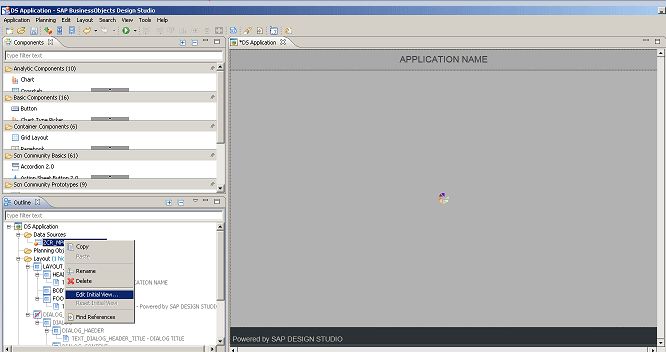
Figure 23
Select Edit Initial View…
Step 10. This opens the Edit Initial View pop-up window with the selected BEx Query output in the Live Preview pane (
Figure 24). Drag and drop the appropriate fields from the list on the left to the desired Columns, Rows, or Background Filter panes on the right. After selecting all the required fields, click the OK button to save your entries and close the pop-up.
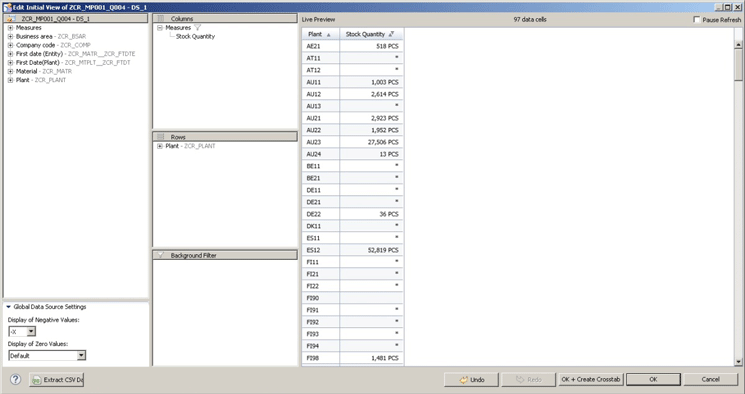
Figure 24
Select the columns, rows, and filter fields
Step 11. In the next screen that opens (
Figure 25), to use the selected fields of the data source, drag the CROSSTAB_1 component from the Analytic Components section (on the left) to the *DS Application editor pane in the center (the APPLICATION NAME pane). This displays an empty crosstab structure, indicated by the message box Assign a data source.

Figure 25
Add a crosstab component to the Application tab
Step 11. Select the crosstab component that you just dropped in the *DS Application tab. On the right, under the Properties tab, select Data Source (under the Data Binding section) to assign a data source. Once the data source is assigned to the component, the data is automatically displayed in the *DS Application tab. Save the analysis application by clicking the save icon in the ribbon. The SAP Design Studio analysis application is now saved in SAP BusinessObjects repository (
Figure 26).
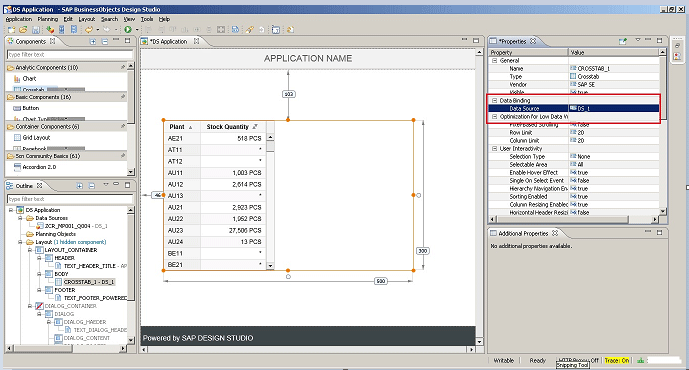
Figure 26
Data displayed in the *DS Application tab after assigning the data source to a component
We have successfully used BICS to connect SAP BusinessObjects Design Studio to an SAP BW BEx Query.
Connecting SAP BusinessObjects Analysis Office to an SAP BW BEx Query Using BICS Connection
Step 1. Open Analysis Office by following menu path Start Menu > All Programs > SAP Business Intelligence > SAP BusinessObjects Analysis > Analysis for MS Excel. This opens the window shown in
Figure 27. Under the ANALYSIS tab, click the Insert button on the left in the ribbon. Click Select Data Source… from the drop-down list. This opens a screen with the prompt for entering your SAP BusinessObjects login credentials (not shown).
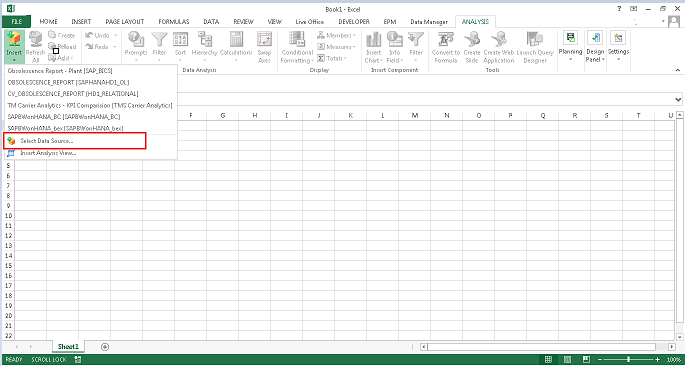
Figure 27
The Select Data Source… option in Analysis Office
Step 2. Enter the log-in details to access the BICS connection saved in the SAP BusinessObjects server.
Step 3. Once the log-in credentials are authenticated, a Select Data Source pop-up window opens with a list of the BICS connections that are saved in the repository (
Figure 28). Select the SAP BICs connection you published earlier (SAP_BICS) and click the OK button.
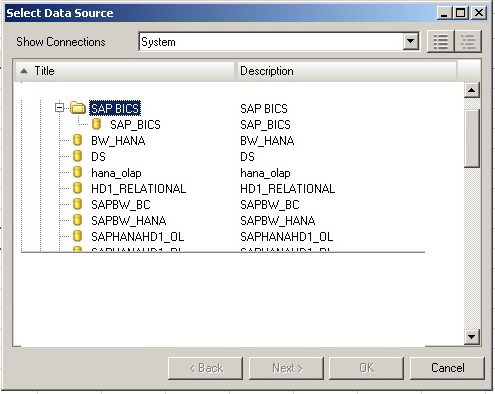
Figure 28
Select the SAP BICS connection created in Analysis Office
Step 5. A new Select Data Source pop-up window opens with a tree of InfoAreas associated with the selected BICS connection. Expand the InfoAreas folder to display the InfoProviders (the Inventory option in
Figure 29). This opens the list of SAP BEx Queries that are available in the BICS connection. Select the desired BEx Query and click the OK button to populate the data for the selected query.
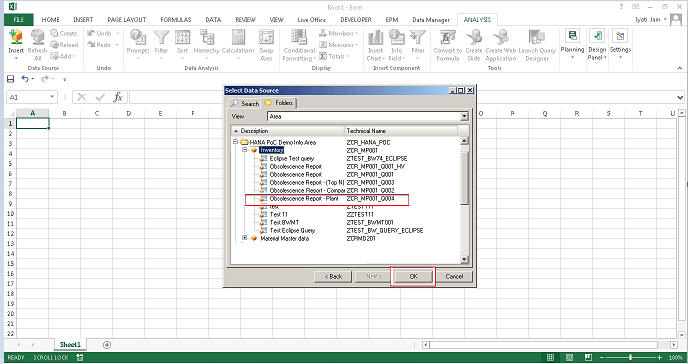
Figure 29
Select the InfoProvider and the BEX Query
Step 6. The Analysis Office screen now has an Analysis tab on the right with a list of all the available fields. The data is populated in the spreadsheet section (on the left of
Figure 30), as per the default view of the BEx Query selected.

Figure 30
View the output of the BEx Query in Analysis Office
Step 7. As shown by the arrows in
Figure 31, drag-and-drop the fields from the left side of the Analysis tab to the Columns, Rows, or Background Filter sections on the right, as desired. The output view in the spreadsheet changes immediately once the field objects are dragged and dropped.
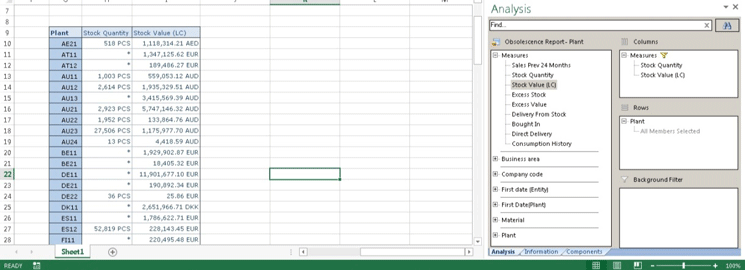
Figure 31
View the selected output of the BEx Query in Analysis Office
Step 8. To save the SAP BusinessObjects Analysis Office workbook in the SAP BusinessObjects repository, go to the main menu. Then click File > Analysis > Save Workbook to SAP BusinessObjects BI Platform (
Figure 32).

Figure 32
Save the workbook in the SAP BusinessObjects repository
We have successfully used BICS to connect SAP BusinessObjects Analysis Office to an SAP BW BEx Query.
Shreekant W. Shiralkar
Shreekant W. Shiralkar is a senior management professional with experience on leading and managing business functions as well as technology consulting. He has authored best selling books and published many white papers on technology. He also holds patents for innovations. Presently he is global head of the SAP Analytics Centre of Excellence at Tata Consultancy.
You may contact the author at
s-shiralkar@yahoo.com.
If you have comments about this article or publication, or would like to submit an article idea, please contact the
editor.

Deepak Sawant
Deepak Sawant is an SAP analytics professional with 16 years of experience designing, developing, and maintaining large and complex BI programs for a variety of Fortune 500 companies. He played a key role in the design, development, and deployment of business analytic solutions in financials, supply chain, product costing, production, and planning functions. Deepak has performed multiple roles in technology consulting, delivery management, pre-sales, and operations management for leading organizations, namely Tata Consultancy Services Ltd., IBM, Reliance Industries, and Wockhardt Group. Currently he is leading the SAP BW Center of Excellence at Tata Consultancy Services Ltd., where he has been instrumental in establishing innovative consulting service offerings.
You may contact the author at .
If you have comments about this article or publication, or would like to submit an article idea, please contact the
editor.

Jyoti Jain
Jyoti Jain is an associate at Tata Consultancy Services Ltd., with 10 years of experience in IT, primarily serving the banking, manufacturing, life-science, and travel and hospitality industries. She is part of Tata Consultancy Services’ SAP Center of Excellence and is engaged in architecting and designing solutions on the SAP BusinessObjects platform.
You may contact the author at .
If you have comments about this article or publication, or would like to submit an article idea, please contact the
editor.
