Learn the process flow and understand the various strategies you can use to carry out deployment of supply elements (receipts) in SAP Advanced Planning and Optimization (SAP APO) when the total supply is greater than the available demand.
Key Concept
Deployment basically determines which distribution requirements can be met by the supply (receipt elements). Deployment strategies to be used depend on the business requirement. Different strategies available within a push rule are used when demand is less than supply. A push rule is a set of strategies used by SAP to deploy excess receipts from a source location.
SAP Advanced Planning and Optimization (SAP APO) supply network planning (SNP) helps to provide medium- to long-term planning for procurement of products to meet customer demand. SNP heuristics help to plan the constant flow of products through the entire network of the supply chain.
Deployment comes into the picture after an SNP run has completed and has generated receipt elements. In an ideal scenario if there are no changes to demand and supply, then deployment is irrelevant. However, in a practical scenario, both demand and supply vary from planned quantities and therefore the deployment run is important. Deployment typically works on confirmed production orders or stocks at the source location. Deployment determines which requirements can be covered by the existing supply. If the produced quantities (supply and demand) match actual plans, then the result of deployment is a confirmation of the supply network plan. If the available quantities are insufficient to cover the demand, the system makes adjustments accordingly
The deployment run generates confirmed planned orders using best practice distribution planning processes. The basic idea of deployment is to convert planned stock transfers into confirmed stock transfers (confirmed distribution requirements and receipts) according to the available supplies, the demands, and the deployment strategy.
The deployment run takes into account four different deployment horizons:
- Pull deployment horizon: This horizon refers to the period of time over which deployment takes into account the planned distribution demand. The horizon starts from today’s date. During the deployment run, the system attempts to fulfill all distribution demands within this horizon. Distribution begins on the first day for which distribution demands exist in the system and ends on the last day of the pull deployment horizon.
- Push deployment horizon: This horizon refers to the period of time over which deployment takes into account the receipts defined in the ATD (Available-To-Deploy) receipt category group of the location master. The horizon starts from today’s date.
- Safety stock horizon: This horizon is only used during a specific push rule strategy and confirms planned issues that would have to be covered by safety stock at the source location if the difference between the demand and deploy date is smaller than the safety stock horizon. This is explained in more detail later in this article
- SNP checking horizon: Deployment uses this horizon to calculate the quantity available for distributing to demand locations. It puts a limitation on the quantity that is available within the push deployment horizon. Within the SNP checking horizon, deployment calculates the ATD quantity for a period by adding up the ATD receipts from the current and preceding periods, and subtracting all the ATD issues within the SNP checking horizon.
Figure 1 shows the important horizons that are available under the Demand and Supply Profile in SNP.
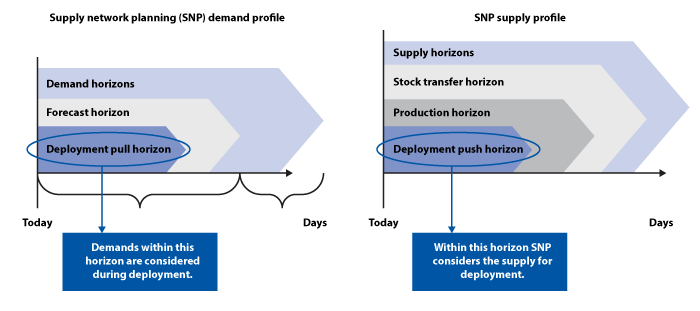
Figure 1
Overview of deployment horizons in SNP
Push rule strategies are deployment strategies that are used if the quantity to be deployed is more than the total demand. It means you have more than the required inventory available to fulfill demands of all the distribution centers. In that case, how the system would allocate quantities to different centers is based on different options available within the push rule.
Note
If demand is less than supply then one of the options available is to keep the excess stock within the warehouse storage. This is a possibility, but there could be other scenarios in which the business does not want to keep the stock within the warehouse but wants to push it out to the distribution and customer-facing centers (e.g., towards the end of a model year of a product, when inventory cost is high in the warehouse). In those scenarios, various push strategies within SAP APO could be used.
A Business Scenario
Consider my example of a simple supply chain network of a manufacturer consisting of a single plant and multiple distribution centers.
Figure 2 diagrams the supply chain network that is discussed in this article. Product (PROD-Z) is manufactured at PLANTZ and shipped to the distribution centers DCY and DCZ based on demand and corresponding supply.

Figure 2
An example of a supply chain network
Master Data Configuration in SAP APO
Before running the deployment, you need to have master data configured in the system for the following objects:
- Locations
- Products
- Transportation lane
- Resources
- Production Process Model (PPM) — PPM is not needed for deployment. This is more for the products at the source location (i.e., a plant to be used as the source of supply when creating a planned order)
Note
I assume readers know how master data is set up and configured in SAP APO. For this article I show only the screenprints of the master data used in the article.
Locations
To configure the master data for locations, execute transaction code /SAPAPO/LOC3. I have created Location PLANTZ of location type (1001) and DCY and DCZ of location type (1002) as shown in
Figures 3,
4, and
5.

Figure 3
Location PLANT Z
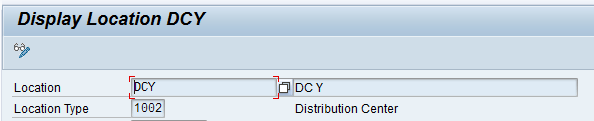
Figure 4
Location DCY

Figure 5
Location DCZ
Products
To configure master data for products, execute transaction code /SAPAPO/MAT1. For my example, create products PROD-Z at locations PLANTZ, DCY, and DCZ.
Figure 6 shows product PROD-Z at PLANTZ.
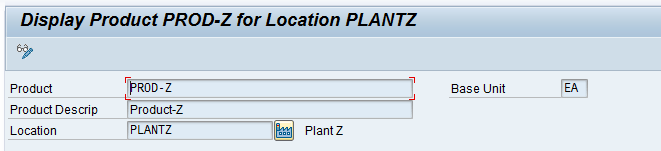
Figure 6
PROD-Z at PLANTZ
Transportation Lane
To configure master data for a transportation lane, execute transaction code /SAPAPO/SCC_TL1. I have created transportation lanes from PLANTZ to DCY and DCZ and assigned the product PROD-Z to each lane.
Figure 7 shows the transportation lane from PLANTZ to DCY.
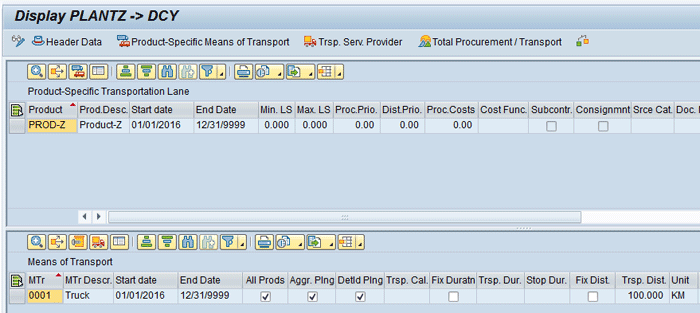
Figure 7
Transportation lane from PLANTZ to DCY
Note
A transportation lane can also be created using a special procurement key in the material master in SAP ERP Central Component (ECC).
Resources
To configure master data for resources, execute transaction code
/SAPAPO/RES01. Define RES-Z at location PLANTZ as shown in
Figure 8.
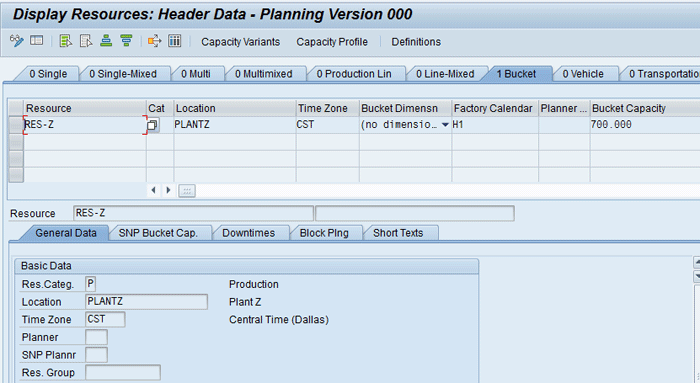
Figure 8
RES-Z header data
Production Process Model (PPM)
To configure master data for a PPM, execute transaction code /SAPAPO/SCC03.
Figure 9 shows the PPM for PROD-Z at PLANTZ.
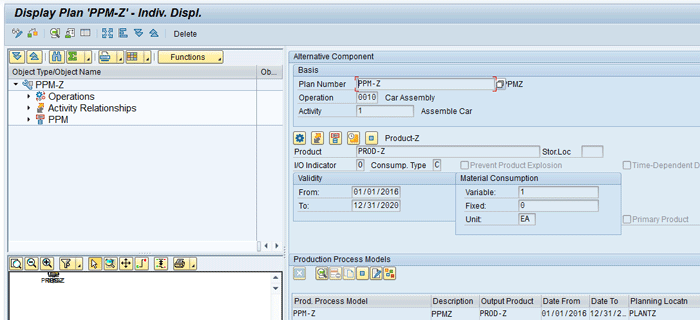
Figure 9
PPM for PROD-Z at PLANTZ
Note
SAP provides an alternative data structure in the form of Production Data Structure (PDS). You can use it as an alternative to PPM. It is generated via the Core Interface (CIF) from the ECC system. PDS provides slightly more advanced functionality in terms of supporting processes such as engineering change management, and variant configuration. Use of PPM or PDS depends on the business requirement and for this article, I have chosen PPM.
I have shown all the master data created manually in SAP APO and assigned it to Active Model 000. However, this master data can also be created in ECC and then transferred to SAP APO via CIF. The diagram in Figure 10 shows the mapping between master data objects between ECC and SAP APO.
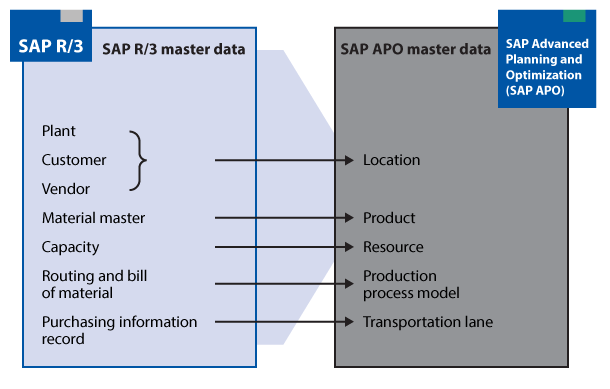
Figure 10
Master data mapping between ECC and SAP APO via CIF
Simulation of Push-Rule Strategies
In this section I describe the following push-rule strategies:
- Pull distribution
- Push rule P Demand within the pull horizon
- Push rule X – Push by demands
- Push rule S – Push taking safety stock horizon into account
- Push rule Q – Push by quota arrangement
Pull Distribution
With pull distribution (i.e., without a push rule), demands that are lying within the pull horizon are met through deployment. Stock is distributed as per the due dates specified at individual demand locations. It is important to note here that no supply is used to satisfy the demand prior to the demand date.
To maintain the settings for pull distribution, execute transaction code /SAPAPO/MAT1. In the main screen, enter the name of product (PROD-Z) and the location (PLANTZ) and then click the Change button as shown in
Figure 11.

Figure 11
Maintain settings for pull distribution in the Product Master screen
This action opens the screen shown in
Figure 12. In the SNP 2 tab, enter 12 in the Pull Depl. Hor. (pull deployment horizon) field and 10 in the Push Depl. Hor. (push deployment horizon) field. In the Push Distributn (push distribution) field no values are entered.
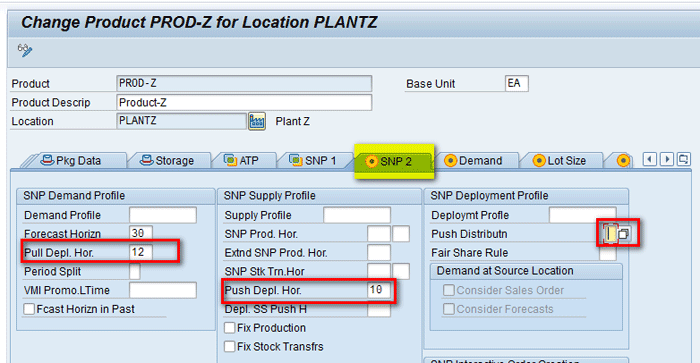
Figure 12
Enter horizons in the Product Master screen
To get a list of strategies in push distribution, click the Push Distrbutn field to display a pop-up screen with a list of strategies (
Figure 13). Note the first field is blank, denoting pull distribution. Select this field and click the save icon to save your data.
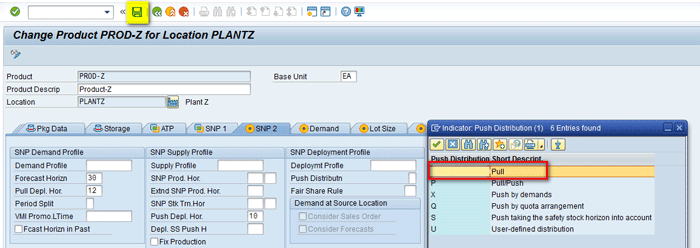
Figure 13
Select the pull strategy
To view the demands at distribution centers, execute transaction code /SAPAPO/RRP3. A demand quantity of 100 each is present at DCY and DCZ, respectively, for Product PROD-Z for five days as shown in
Figures 14 and
15.

Figure 14
Demands at DCY
Figure 15
Demands at DCZ
Load the data in the interactive planning book via transaction code /SAPAPO/SDP94 for location DCY as shown in
Figure 16.
Figure 16 shows demand of 100 for five days. Click the execute icon highlighted in
Figure 16 to run location heuristics.
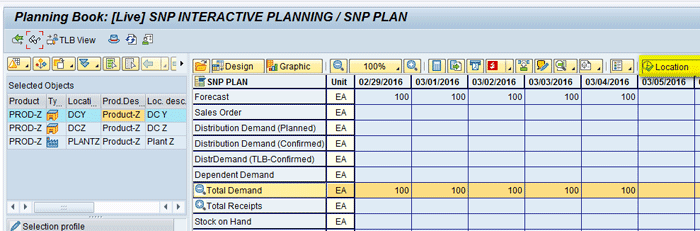
Figure 16
Run location heuristics at DCY
After you run the location heuristics, you can see that the Distribution Receipt (Planned) key figure is populated with receipts of quantities of 100 each for five days as per the demand. The location heuristics program also internally creates a purchase requisition with an amount of 100 to satisfy the demand with the source as PLANTZ as shown in
Figure 17.
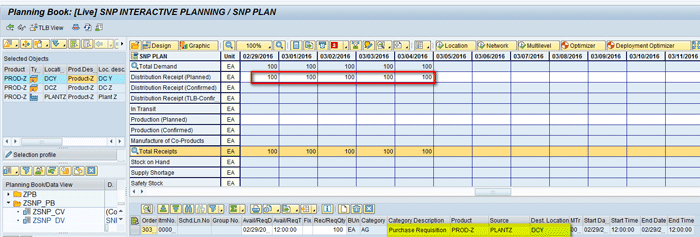
Figure 17
Location heuristics results at DCY
Similarly, you run location heuristics for PROD-Z at location DCZ. Select location DCZ and click the execute icon highlighted in
Figure 18 to run the location heuristics. The location heuristics program then creates purchase requisitions of 100 each to satisfy the demand as shown in
Figure 18.
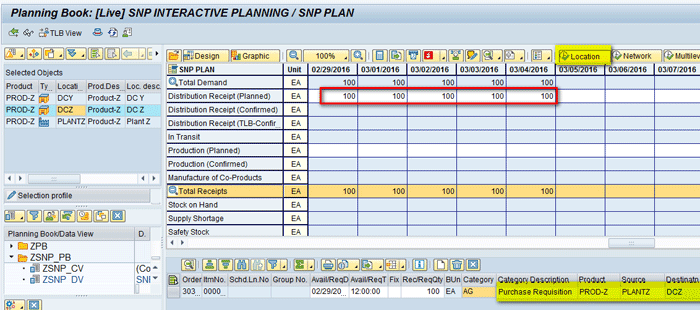
Figure 18
Location heuristics results at DCZ
Now data is automatically loaded for product PROD-Z at location PLANTZ.
Figure 19 shows the Distribution Demand (Planned) key figure is populated with a quantity of 200 for five days. These are the demands of quantities of 100 that are coming from the two distribution centers—DCY and DCZ—as shown in
Figures 17 and
18.
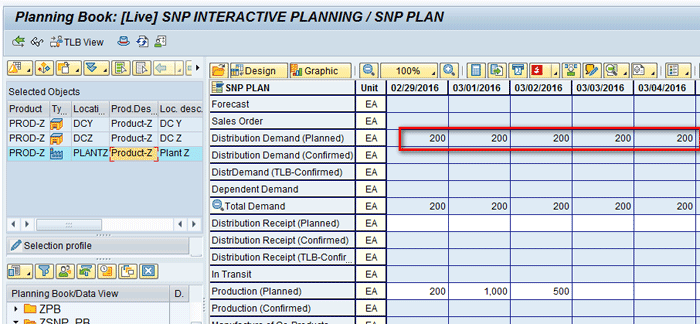
Figure 19
Demands at Plant Z
You also have receipts available in PLANTZ as shown in the Production (planned) key figure (
Figure 20).
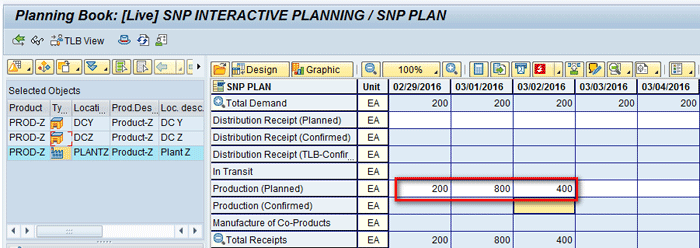
Figure 20
Available receipts at Plant Z
Note
In the Product Master screen, I maintained push and pull deployment horizons, so according to these settings, the push deployment horizon is until March 1 (10 days) and the pull deployment horizon is until March 3 (12 days). This situation is shown in Figure 21.
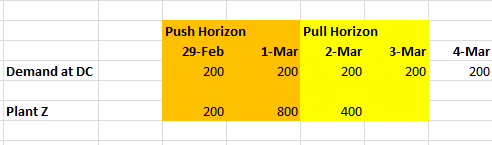
Figure 21
Simulation scenario
Before you run the deployment heuristic, notice that the Distribution Demand (Confirmed) key figure is empty and that the Distribution Demand (Planned) key figure shows a demand of 200 each day. To execute the deployment heuristic, click the Deployment button highlighted in
Figure 22.

Figure 22
The deployment run at Plant Z
After deployment is executed, notice that Distribution Demand (Confirmed) key figure is populated with a quantity of 200 each until March 3 as shown in
Figure 23.
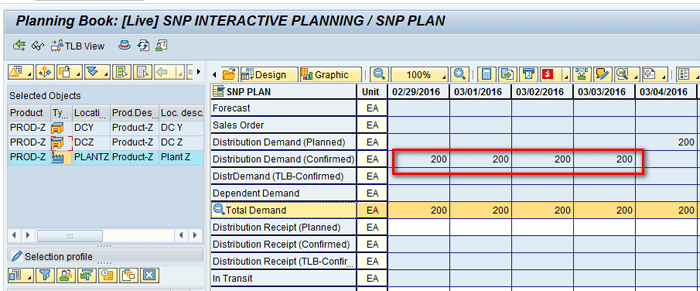
Figure 23
Deployment run results using a pull strategy at Plant Z
To get the details, right-click any of the quantities of 200 created in the Distribution Demand (confirmed) key figure. At the bottom of the screen, you can see that the quantity of 200 is used to confirm the demands of 100 at each of the distribution centers (DCY and DCZ) as shown in
Figure 24.

Figure 24
Deployment run result details using a pull strategy at Plant Z
Note
In the example discussed in this article, planned receipts are used as supply elements for the deployment run. Instead of planned receipts one could have confirmed production orders or stock elements as input to the deployment run. It varies as per business scenario. My focus is more on understanding and interpreting the results of a deployment run (i.e., why SAP created a given quantity of deployment proposal for a given period, what was the rationale behind it, and how the proposed quantities vary based on different strategies).
Results Interpretation
The reason why demand is only confirmed until March 3 and not until March 4 is that the pull deployment horizon was until March 3 (
Figure 21). So deployment only considered the demand until March 3 to confirm.
Since the pull strategy was used for deployment as per the configuration made in the Product Master screen in
Figure 13, the demands were satisfied as per the due date. This means that even though there were more receipts available in PLANTZ than the demands required by both distribution centers (DCY and DCZ), these demands were satisfied only on the due date. For example, the demand of 200 on February 29 was satisfied only on February 29 and not before that date.
Data is also automatically loaded for PROD-Z at DCY and DCZ.
Figures 25 and
26 show a confirmed quantity of 100 each for both the distribution centers until March 3.
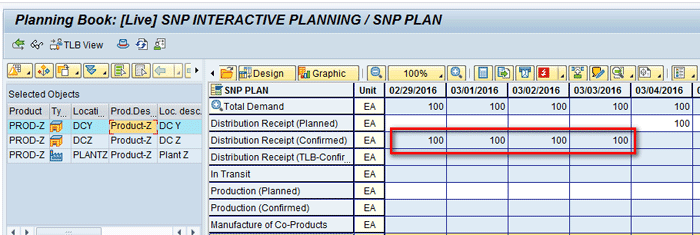
Figure 25
Deployment run results using pull strategy at DCY
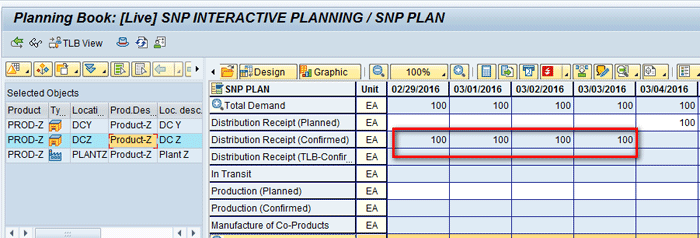
Figure 26
Deployment run results using pull strategy at DCZ
Push Rule P – Demand within the Pull Horizon
With push rule P all supply is distributed immediately to meet all demand lying within the pull horizon.
To maintain the settings for pull distribution, execute transaction code/SAPAPO/MAT1. In the main screen that appears, enter the name of product (PROD-Z) in the Product field and PLANTZ in the Location field. Click the Change button (
Figure 27).

Figure 27
Maintain settings for pull distribution in the Product Master screen
In the SNP 2 tab of the next screen (
Figure 28), enter 12 for the pull deployment horizon, 10 for the push deployment horizon, and a value of P in the Push Distributn (push distribution) field. After you enter these values, click the save icon to save your data.

Figure 28
Enter deployment horizons for push rule P
Demands of 100 each are present at DCY and DCZ, respectively, for five days as was the case earlier in
Figures 14 and
15.
Similar steps are carried out that are described in the above section on pull distribution (i.e., location heuristics are run at both DCY and DCZ to create purchase requisitions of 100 to satisfy the demands). These demands appear as a total of 200 each in PLANTZ. You have receipts available in PLANTZ as shown in the Production (planned) key figure (
Figure 29).

Figure 29
Demands and receipt situation at Plant Z
Note
The push deployment horizon is until March 1, 2016. The pull deployment horizon is until March 3, 2016.
To execute the deployment heuristic, click the Deployment button highlighted in
Figure 30.

Figure 30
Execute the deployment heuristic
After deployment is executed, notice that the Distribution Demand (Confirmed) key figure is populated with a quantity of 200 on February 29 and a quantity of 600 on March 1 as shown in
Figure 31.
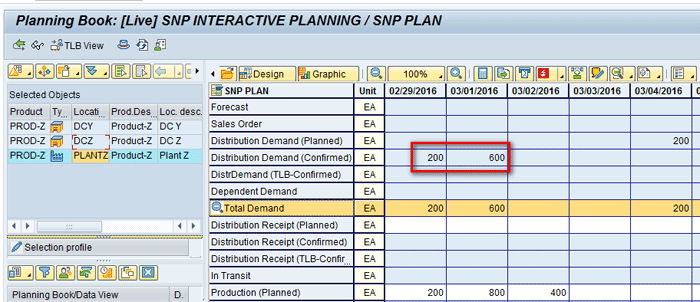
Figure 31
Deployment results using push strategy P at Plant Z
Results Interpretation
The reason why demand is only confirmed until March 3 and not until March 4 is because the pull deployment horizon was until March 3, as shown in
Figure 21. So deployment only considered the demand until March 3 to confirm.
Here are the reasons why the confirmed quantity is 600 on March 1:
- Note the pull horizon was until March 3
- On February 29 demand was 200 and supply was also 200, so a quantity of 200 was confirmed on February 29.
- The total remaining demand until the pull horizon was 600 (200 on March 1, 200 on March 2, and 200 on March 3).
- On March 1, demand was of 200, but available supply was 800. Since the total supply (800) is enough to satisfy all the remaining demands until the pull horizon (600), all 600 were confirmed on March 1 only.
- This behavior follows as per strategy P maintained in the Product Master screen in Figure 28. With this strategy all supply is distributed immediately to meet demand within the pull horizon and this is what happened in the above scenario.
Data is also automatically loaded for PROD-Z at DCY and DCZ.
Figures 32 and
33 show a confirmed quantity of 100 on February 29 and 300 on March 1 to satisfy demand until March 3.

Figure 32
Deployment run results using a push strategy P at DCY
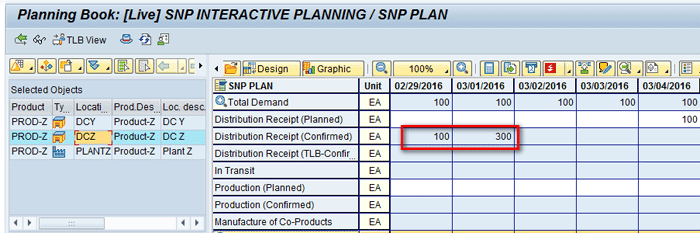
Figure 33
Deployment run results using push strategy P at DCZ
Push Rule X – Push By Demands
With push rule X all supply is distributed immediately to meet demand in the system (i.e., in this case the pull horizon is ignored).
To maintain the settings for pull distribution, execute transaction code /SAPAPO/MAT1. In the main screen that appears (
Figure 34), enter the name of the product (PROD-Z), enter the location (PLANTZ), and then click the Change button.

Figure 34
Maintain settings for pull distribution in the Product Master screen
This action opens the screen in
Figure 35. In the SNP 2 tab, enter the pull deployment horizon (12), the push deployment horizon (10), and the value X in the Push Distributn (push distribution) field as shown in
Figure 35. After you enter these values, click the save icon.
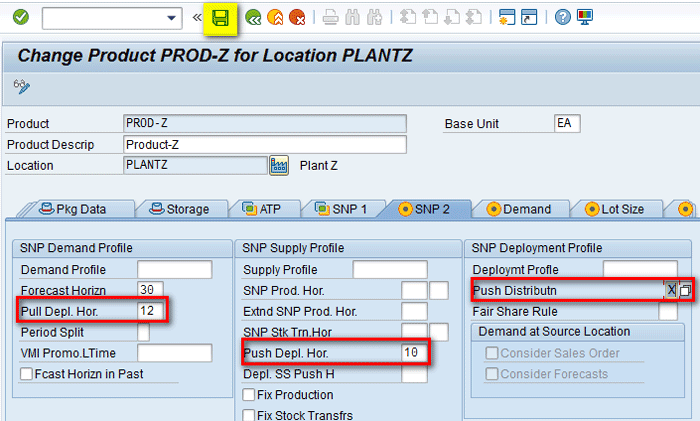
Figure 35
Populate fields in the Product Master screen for push strategy X
As per a similar scenario as the above section, demands of 100 each are present at DCY and DCZ, respectively, for five days as shown in
Figures 14 and
15.
Similar steps are carried out that are described in above sections (i.e., location heuristics are run at both DCY and DCZ to create purchase requisitions of 100 to satisfy the demands). These demands appear as a total of 200 each in PLANTZ. You have receipts available in PLANTZ as shown in the Production (planned) key figure (
Figure 36).

Figure 36
Demands and receipt situation at Plant Z
The push deployment horizon is until March 1. The pull deployment horizon is until March 3.
To execute the deployment heuristics, click the Deployment button shown in
Figure 37.
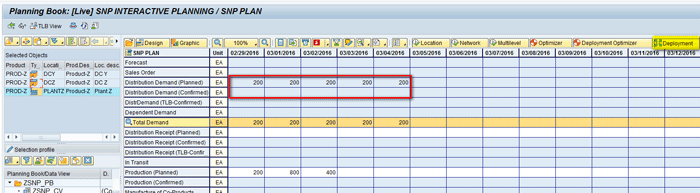
Figure 37
Execute the deployment run
After deployment is executed, notice that the Distribution Demand (Confirmed) key figure is populated with a quantity of 200 on February 29 and a quantity of 800 on March 1 as shown in
Figure 38.
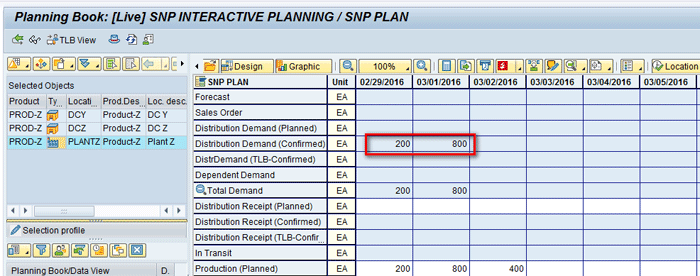
Figure 38
Deployment results using push strategy X at Plant Z
Results Interpretation
The reason why only demand until March 3 is confirmed and not until March 4 is because the pull deployment horizon was until March 3. So deployment only considered the demand until March 3 to confirm.
Here are the reasons why the confirmed quantity is 800 on March 1:
- Note the pull horizon was until March 3.
- On February 29 demand was of 200 and supply was also of 200, so a quantity of 200 was confirmed on February 29.
- The total remaining demand until the pull horizon was 600, and the total remaining demand in the system was 800 until March 4.
- On March 1, demand was of 200, but available supply was 800. Since the total supply (800) was enough to satisfy all the remaining demands in the system (800) all 800 were confirmed on March 1 only.
- This behavior follows as per strategy X maintained in the Product Master screen in Figure 35. With this strategy all supply is distributed immediately to meet demand and the pull horizon is ignored. This is what happened in the above scenario.
Data is also automatically loaded for PROD-Z at DCY and DCZ.
Figures 39 and
40 show a confirmed quantity of 100 on February 29 and 400 on March 1 to satisfy all demands until March 4.
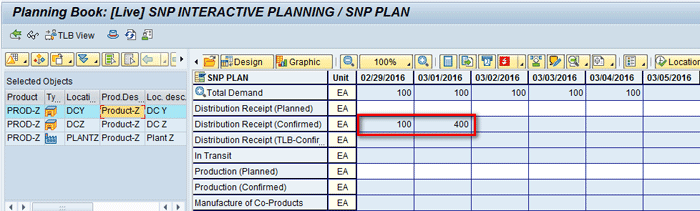
Figure 39
The deployment run result using push strategy X at DCY

Figure 40
The deployment run result using push strategy X at DCZ
The difference in the behavior and quantity created by each of the three strategies discussed above is shown in
Figure 41.
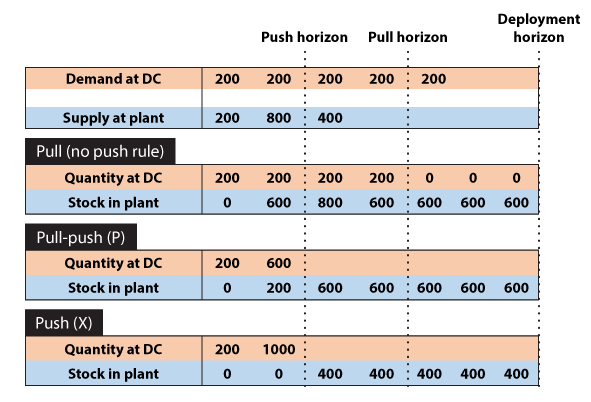
Figure 41
Comparisons of push rule strategies
Push Rule S – Push Taking Safety Stock Horizon into Account
With push rule S safety stock at the source location is used to fulfill only the demands within the corresponding safety stock horizon and no demands outside of this horizon.
To maintain the settings for push rule S distribution, execute transaction code /SAPAPO/MAT1. In the main screen that appears (
Figure 42), enter the name of product (PROD-Z), enter the location (PLANTZ) and then click the Change button.

Figure 42
Maintain the settings for push rule S distribution in the Product Master screen
In the SNP 2 tab of the next screen (
Figure 43), enter the pull deployment horizon (e.g., 12 days), the push deployment horizon (e.g., 10 days), SNP Stock Transfer Horizon (e.g., 10 days) and value S in the Push Distributn field. After entering these values, go to the Lot Size tab as shown in
Figure 43.
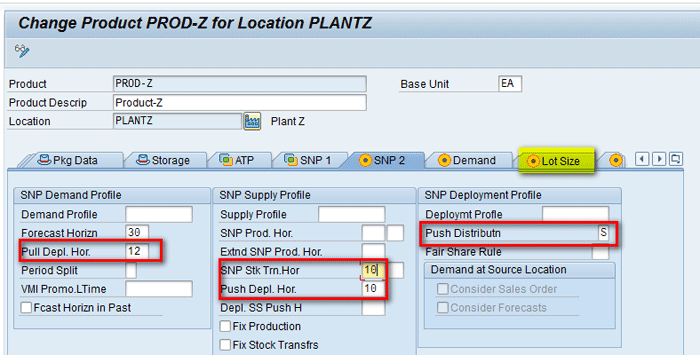
Figure 43
Product master settings for push rule S
In the Lot Size tab, enter the value of the safety stock (600) as shown in
Figure 44. Click the save icon (not shown) to save your entry.
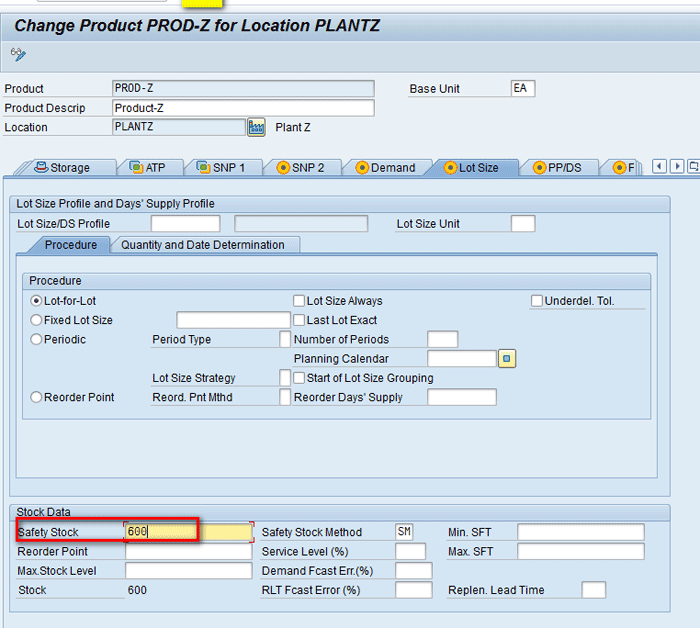
Figure 44
Safety stock in product Z at plant Z
As per a similar scenario as the above section, demands of 100 each is present at DCY and DCZ, respectively, for five days as shown in
Figures 14 and
15.
Similar steps are carried out that are described in above sections (i.e., location heuristics are run at both DCY and DCZ to create purchase requisitions of 100 to satisfy the demands). These demands appear as a total of 200 each in PLANTZ. Note that there are no receipts available in PLANTZ as the Production (planned) key figure is blank as shown in
Figure 45.
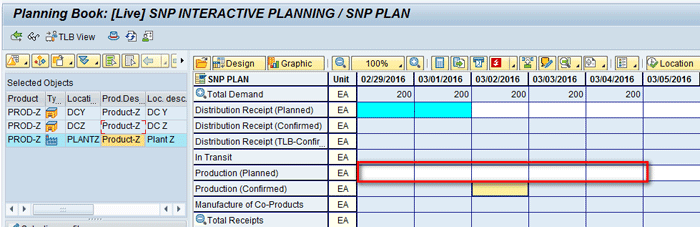
Figure 45
Demand receipt situation at plant Z
The push deployment horizon is until March 1. The pull deployment horizon is until March 3. The safety stock horizon is until March 1.
To execute deployment heuristics click the Deployment button shown in
Figure 46.
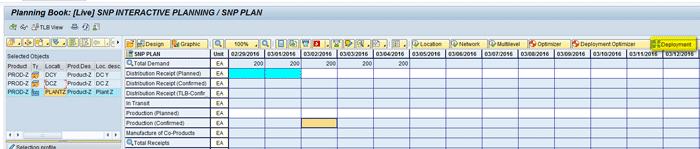
Figure 46
The deployment run at Plant Z
After the deployment is executed, notice that the Distribution Demand (Confirmed) key figure is populated with 400 quantities on February 21 as shown in
Figure 47.
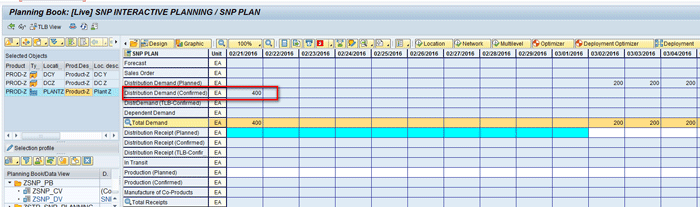
Figure 47
The deployment run results using push strategy S at Plant Z
Results Interpretation
Here are the reasons why the confirmed quantity is 400:
- Note the safety stock horizon was until March 1.
- There were no additional receipts available at PLANTZ other than the safety stock of 600.
- When deployment was executed, based on the push strategy S maintained in the Product Master screen in Figure 43, safety stock at PLANTZ was used to confirm the demands lying within the safety stock horizon.
- This means demands lying on February 29 and March 1 of 200 each were inside the safety stock horizon. So when deployment was run, total demands of 400 lying in these two days were confirmed.
- Even though safety stock of 600 was there, only 400 was confirmed as demand on March 2 was outside the safety stock horizon.
- On February 29 demand was of 200 and supply was also of 200, so a quantity of 200 was confirmed on February 29.
Push Rule Q – Push By Quota Arrangement
With push rule Q the entire supply is distributed immediately according to the set quota arrangements for the demand locations. The demand situation at the destination locations is ignored in this instance.
To maintain the settings for pull distribution, execute transaction code/SAPAPO/MAT1. In the main screen that appears (
Figure 48), enter the name of the product (PROD-Z) and the location (PLANTZ). Click the Change button.
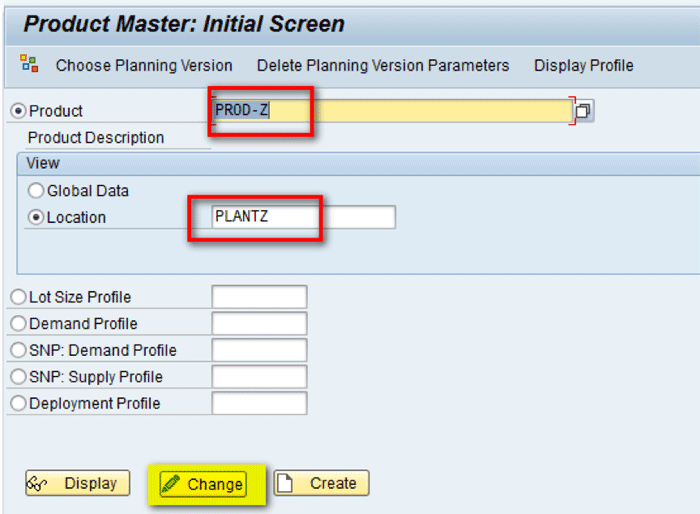
Figure 48
Maintain settings for pull distribution in the Product Master screen
In the SNP 2 tab of the next screen (
Figure 49), enter the pull deployment horizon (12), push deployment horizon (10) and the value Q in the Push Distributn field. After entering these values click the save icon.

Figure 49
Product Master values for push rule Q
To create the outbound quota arrangements, execute transaction /SAPAPO/SCC_TQ1. In the main screen that appears (
Figure 50), enter the name of the model (000) and the location (PLANTZ). In the Quota Arrangement Direction section, select the Outbound Quota Arrngmnts (outbound quota arrangements) radio button and then click the Change button.

Figure 50
Outbound quota arrangement
In the next screen (
Figure 51), click the create icon.
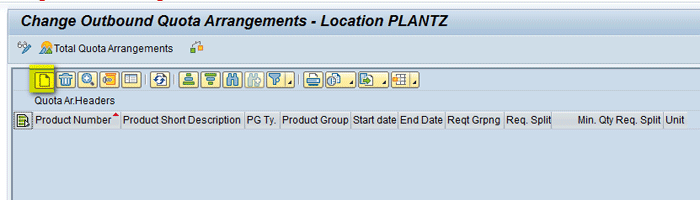
Figure 51
Create outbound quota arrangement header
In the same screen, enter the name of the product (PROD-Z) and the End Date (12/31/2016). Select the Allow Reqmt Splitting (allow requirement splitting) check box and then click the enter icon as shown in
Figure 52.

Figure 52
Enter parameters for the outbound quota
In the same screen, click the create icon (
Figure 53) to create the quota arrangement.
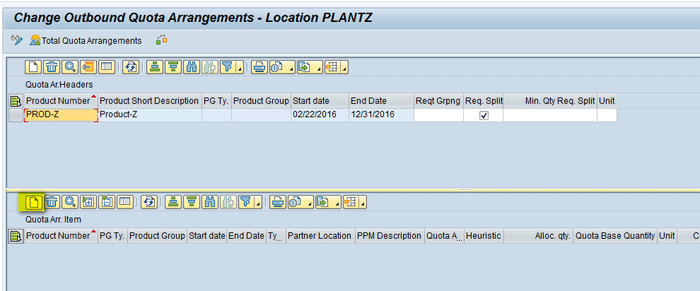
Figure 53
Create outbound quota arrangement items
In the same screen, enter the name of the Location (DCY), Quota Arrangement (60 [denotes 60 percent]) and then click the enter icon as shown in
Figure 54.

Figure 54
Outbound Quota Arrangements DCY
Similarly, create one more entry for location DCZ for 40 percent of the quota arrangement. Click the save icon to save the changes as shown in
Figure 55.
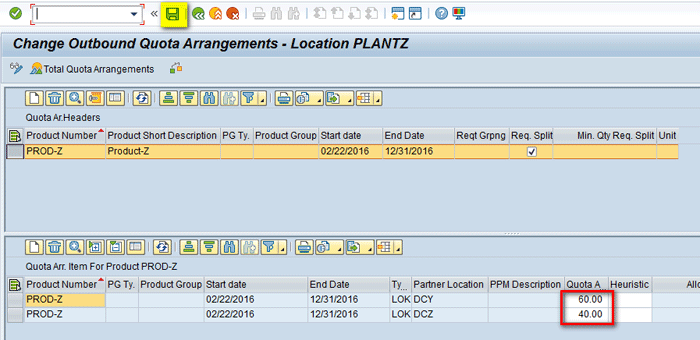
Figure 55
Outbound Quota Arrangements DCZ
Demands of 200 are present at DCY and 300 at DCZ as shown in
Figures 56 and
57.

Figure 56
Demands at DCY

Figure 57
Demands at DCZ
Similar steps are carried out that are described in above sections (i.e., location heuristics are run at both DCY and DCZ to create purchase requisitions of 200 and 300 to satisfy the demands at locations DCY and DCZ, respectively. These demands appear as a total of 500 in PLANTZ. Note that there are receipts of 1,000 available in PLANTZ as shown in the Production (planned) key figure. To execute deployment heuristics, click the Deployment button shown in
Figure 58.
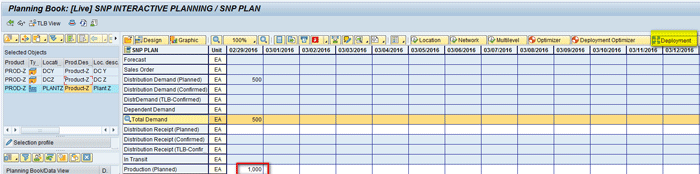
Figure 58
The deployment run
After deployment is executed, notice that the Distribution Demand (Confirmed) key figure is populated with 1,000 quantities. To get the details, right-click the 1000 quantity created in the Distribution Demand (confirmed) key figure. At the bottom of screen, you can see the quantity of 600 is sent to DCY and 400 to DCZ as shown in
Figure 59.
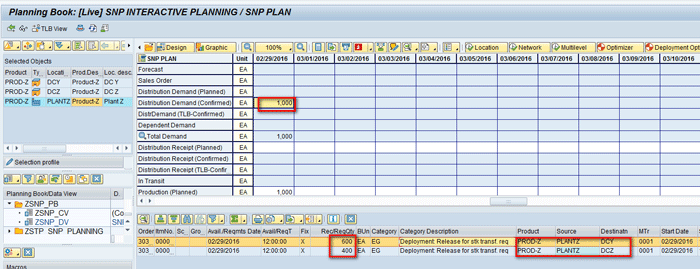
Figure 59
Deployment run results using push strategy Q at Plant Z
Results Interpretation
Even though demand from both the distribution centers (DCY and DCZ) together was 500, a quantity of 1,000 was deployed because I used push rule Q as one of the settings entered in the Product Master screen in
Figure 49. Therefore, supply was greater than the requested demand of 500.
Distribution of receipts happened to both the locations (DCY and DCZ) as per the quota arrangement. Since 60 percent was allocated to DCY and 40 percent to DCZ in
Figure 55, 60 percent of 1,000 (600) was sent to DCY and 40 percent of 1,000 (400) was sent to DCZ.
Data is also automatically loaded for PROD-Z at DCY and DCZ.
Figures 60 and
61 show a confirmed quantity of 600 and 400 on February 29.
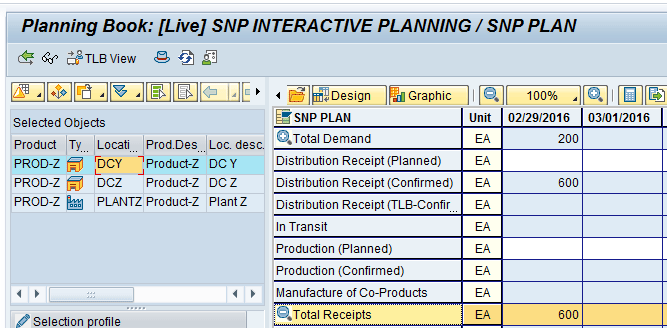
Figure 60
Deployment results using push strategy Q at DCY
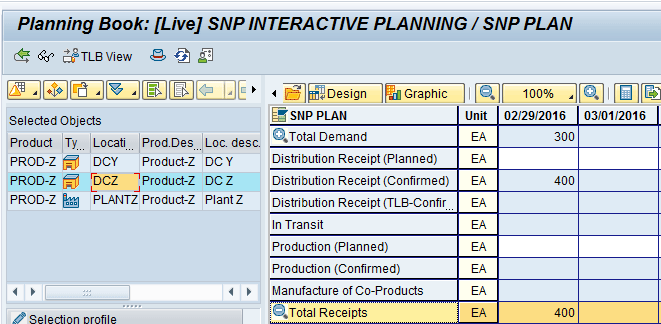
Figure 61
Deployment results using push strategy Q at DCZ
Alok Jaiswal
Alok Jaiswal is a consultant at Infosys Limited.
He has more than six years of experience in IT and ERP consulting and in supply chain management (SCM). He has worked on various SAP Advanced Planning and Optimization (APO) modules such as Demand Planning (DP), Production Planning/Detailed Scheduling (PP/DS), Supply Network Planning (SNP), and Core Interface (CIF) at various stages of the project life cycle.
He is also an APICS-certified CSCP (Certified Supply Chain Planner) consultant, with exposure in functional areas of demand planning, lean management, value stream mapping, and inventory management across manufacturing, healthcare, and textile sectors.
If you have comments about this article or publication, or would like to submit an article idea, please contact the
editor.