SAP NetWeaver Portal 7.3 Logon Page architecture has changed the method you use to customize the logon page. It no longer uses HTML tags for user interface (UI) element rendering. Instead, it uses SAP tags. SAP tags are classes packaged in a JAR file called tc~sec~ume~logon~logic_api.
Key Concept
SAP tags are SAP-flavored HTML tags that have runtime rendering in HTML but design time implementation is enclosed with <sap:name_of_the_element/>.
SAP NetWeaver Portal 7.3 Logon Page architecture has changed the method you use to customize the logon page. It no longer uses HTML tags for user interface (UI) element rendering. Instead, it uses SAP tags. SAP tags are classes packaged in a JAR file called tc~sec~ume~logon~logic_api.
Styling of SAP tags is a new feature in 7.3. In the 7.0 logon page, you can style with CSS classes assigned to HTML tags. In 7.3, you can continue to use Cascading Style Sheet (CSS) classes to style SAP tags but the difference is in the way classes are applied to normal HTML tags and SAP tags. I show how to do this later in the article.
The 7.3 logon page no longer uses HTML attributes to define a document object model (DOM) structure. A typical HTML page defines a DOM structure by defining tags such as BODY or HEAD. This is important especially when you want to raise an event or body load. However, this does not mean that there is no DOM structure in the 7.3 logon page. Instead of defining its own DOM structure, the logon page uses a framework DOM. It basically reuses the DOM defined by the 7.3 framework page.
You can write your own DOM markup on the 7.3 logon page so that you can have finer control over UI rendering. I explain how to do this by using a custom HTML form instead of an SAP form to design a logon page that is Web standard complaint. This custom form also provides you with the flexibility to use some of the HTML 5 elements in the design for a better user experience. This flexibility is especially important if you want to design a logon page that is similar to any modern-day Web site in terms of usability, user experience, and current Web technologies.
The Architecture
As I discussed in the article “
Moving 7.0 portal Logon Page Development Components to 7.3 - Without Migration,” the base of the 7.3 logon page is the same. It is still a Web archive file (WAR) wrapped in a different package. Earlier it was packed as a Portal Archive (PAR) file, and now it is packed as WAR. However, in 7.3, you cannot simply upload the WAR file as you used to upload the PAR file.
The process has changed and you will find that SAP has done away with configurations that were required in Visual Administrator 7.0. You do not have to change an authscheme.xml file any more and you do not need Basis support to upload a file at the right location. In 7.0, these procedures were huge overheads when you planned a transport. The change in 7.3 logon page architecture allows you to concentrate on design rather than on configuration.
The 7.3 logon page is a WAR that is deployed as a subcomponent of the Enterprise Archive (EAR). This is the major change in 7.3. You won’t be able to deploy your WAR project. Instead, you have to deploy an EAR project that is created automatically when you import the standard logon page WAR in SAP NetWeaver Developer Studio. An EAR project is responsible for deployment and availability of the WAR component at runtime. You define the WAR component as shown in
Figure 1.
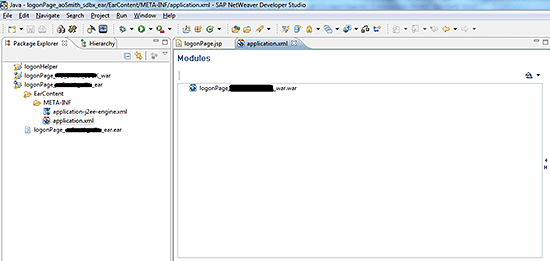
Figure 1
EAR modules in 7.3 logon page
Note that the WAR project is added into the application.xml file of the EAR project. Therefore, the WAR is deployed when an EAR is deployed. The center area titled Modules shows that a WAR file is added as a module to the EAR project. You can check this by opening the application.xml file. You expand the project structure of the EAR project and navigate to the META-INF folder.
Context root is the property that tells the logon application to render a specific WAR file at runtime. This process is similar to what was done previously by custom authscheme.xml files. All you have to do is work on customizations and then copy the property value of the Context Root property and replace the standard value in SAP NetWeaver Administrator. You access it by replacing /irj/portal with /nwa in the portal URL. When you click the module entry in the application.xml file,
Figure 2 is displayed.

Figure 2
The Context Root of the WAR
Logon Page Code
Once you import the standard WAR file into SAP NetWeaver Developer Studio, you find that the logon page is still maintained by a JSP file called logonPage.JSP.
Figure 3 shows the code in logonPage.JSP file. In this code the 7.3 logon page no longer uses the custom DOM structure. Therefore, you might have to define one of your own.
Figure 4 shows use of obsolete HTML coding practices such as in-line styling. I show you how to create a logon page that is free of these obsolete coding practices.
Figure 5 shows that UI rendering is now done with <sap> tags instead of the usual HTML tags. As you can see in
Figure 5, the INPUT field for both the user ID and password is not defined with HTML <INPUT> tags. Instead you use an <sap:input> tag to define an input field. Similarly, for the label and button you no longer use HTML tags. Now I explain in detail how to use SAP tags to manage UI rendering.

Figure 3
No BODY, HEAD tags defining the DOM

Figure 4
Use of TABLE, TD, TR, and in-line styling
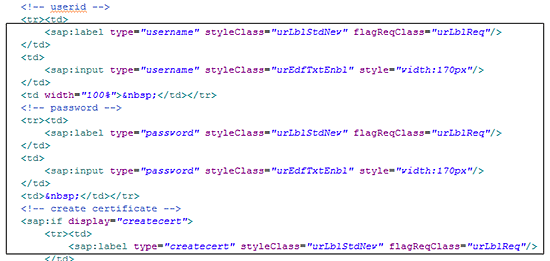
Figure 5
UI rendering with tags
In the next section I walk you through instructions on how to create a Web development standard compliant customization project. I also explain how a 7.3 logon page manages the display of error messages with SAP tags and how can you further customize that to suit your design. Later, I discuss how to use the Java Decompiler to decompile standard classes in a JAR file to understand how SAP tags work. This is especially important if you want to create custom JAR files with custom SAP tags.
Note
Before you decompile any standard JAR file, it is important to understand the JAR files and all classes within are the intellectual property of SAP. Users can still customize JAR files provided that they do not distribute them for commercial purposes, thus infringing on intellectual copyright laws. Customizing for a company’s own use is all right.
Develop a Web Standards Compliant Customization Project
Now I use all the information from earlier sections of this article to create a new customization project. You start with the import of the standard WAR into SAP NetWeaver Development Studio.
Import the standard logon page WAR file named tc~sec~ume~logon~ui.war. When you import this file, you are prompted to create an associated EAR project or add this WAR project to already existing EAR project. If you already have a separate EAR project created, then you can use that one. However, I recommend going forward with an EAR project that is newly created upon import of the standard WAR file. By choosing this option, you don’t have to add development component (DC)-level dependency in the development infrastructure. If the DC-level dependency is not added, the deployment of EAR leaves the WAR project out of the deployment. In the option I recommend, SAP NetWeaver Developer Studio automatically adds dependency at the DC level. Your project structure should look like what is shown in
Figure 6.
Figure 6
Logon page project structure in SAP NetWeaver Developer Studio
Note
When you create a new EAR project while importing a WAR file, do not forget to change the Java Enterprise Edition version from 5.0 to 1.4. The 7.3 logon page is still based on Java EE 1.4, not on 5.0. If you forget this step, you will not be able to file an application.xml file in the EAR project.
Working With logonPage.JSP
This section shows how to work on writing an altogether different version of the logon page JSP. Although I am not changing the rendering logic, the application is efficient, cross browser, and Web standards compliant.
Remove TABLE, TD, and TR Content to DIVISION
As you have already seen in
Figure 4, the standard logon page uses TABLE, TD, and TR to render content. Using the TABLE UI element to design a logon form is an inefficient way of programming. This method leaves you with very minimum customization flexibility. Therefore, the first task is to move content to DIV elements. Look at the to-be wireframe of the logon page in
Figure 7.

Figure 7
Wireframe of a DIVISION-based logon page
You first create the nested DIVISIONs shown in
Figure 7. The main DIV is the entire rectangular area of the logon page. The wrapper DIV is an empty wrapper that holds three sub-DIV elements. There are separate DIVs for the header area in which you can write a welcome message or instructions to the user. Content DIV is the DIV that contains input fields for the user ID and password. The footer DIV then has a logon button that enables you to log on to SAP Portal.
Figure 8 shows the code for this design.

Figure 8
Code for the design
Let’s go through some of the lines of the code. As you can see, I created my own DOM structure and defined the body of my own HTML for this structure.
Note
To improve the efficiency of the application and significantly improve rendering time of the page, always include all meta tags, references to external CSS files, and JavaScript in the HEAD section of your HTML.
An X-UA-Compatible meta tag enables or forces the rendering mode for some obsolete browsers, such as Internet Explorer (IE) 6 or 7. (An X-UA-Compatible meta tag is a meta tag implementation for browser mode rendering to a specific version of browser so that UI elements are rendered in a unified fashion.) This is especially important when you launch a logon page in an obsolete version of IE. This tag ensures that all elements are aligned appropriately.
I have also used a reference to HTML5 Shiv. HTML5 Shiv is a script that allows IE to recognize and style HTML5 elements. You can achieve similar functionality with Modernizr, but HTML5 Shiv is leaner and very small compared with Modernizr. Modernizr is more suitable when you want to do something with browser detection. The size of the file is important because it is always in the head of the HTML document and blocks the download of additional resources until fully executed. With Modernizr you can detect HTML5 features such as audio formats, CSS style rules, and local storage.
Note
HTML5 Shiv is also referred as HTML5 Shim. There is no difference between them.
You can also see that instead of using an <sap:form> tag to define a form, I used an HTML element to design a logon form. This HTML element allows me to style the form elements more easily compared with what the SAP form allows.
I moved the entire UI rendering into the DIV elements as shown in Figure 7. The major advantage of doing this is that I can define as many CSS classes as I want. This way, you can remove the in-line styling and create a custom CSS. Note that there is no in-line styling used anymore in this application. This is yet another area of improvement that affects execution and rendering time of the application.
Working with External CSS
There is just one more step left before the logon page application is compliant with Web development standards. You have to separate styling from the rendering logic of the logon page. You do this with an external CSS file. Before that, let me take you through best practice of creating a project directory for external files in any Web application.
Refer to Figure 9 to understand the folder structure you should create to maintain a CSS and other JS external files.
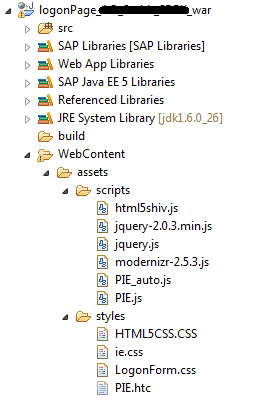
Figure 9
The folder structure for external CSS and JS files
Create a new folder named assets inside the WebContent folder of your WAR project. Create two folders—one named scripts and one named styles—at the same level of the hierarchy. I recommend that you keep all JS files under the scripts folder and then refer to these files as required in your logon page file as I already did in the code shown in Figure 8. Keep all CSS files in the styles folder in a similar way.
The CSS file for this application is available as a downloadable file [click here]. You can download and customize it further as per your own need.
Styling SAP Tags
You can define a class attribute for any HTML element. The HTML element can be styled using an external CSS. You can do this only for HTML elements. However, because the 7.3 logon page uses SAP tags instead of HTML tags, you have no option except to use a workaround.
Most SAP tags have a separate class attribute defined that you can use in CSS. Instead of a simple class attribute, SAP tags use a styleClass attribute.
Figure 10 shows a decompiled class file of INPUT SAP tag.
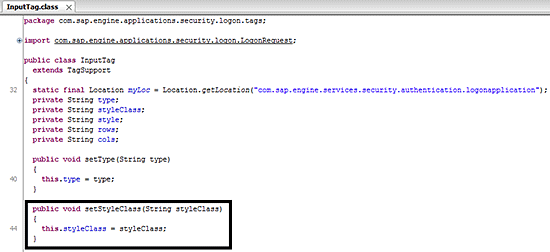
Figure 10
A decompiled version of INPUT Class showcasing styleClass definition
Figure 11 shows how to use this attribute to use a custom CSS class for styling UI elements rendered with SAP tags.

Figure 11
Code implementation of a typical tag after JAE decompilation
This attribute was not in the 7.0 logon page and is another code-level change in the 7.3 logon page.
Note
The names input and username are not one class, but two different classes defined in CSS. The first class (i.e., input) is a generic class defined for all input fields. This allows you to reuse classes for different elements. The username class specifies what extra styling is required for the input field for the user ID. The takeaway is that you can define multiple classes even for SAP tags.
Note
If you try to define an HTML attribute for SAP tags that is not defined in the tag class file, you can deploy your application without any error. However, when you try to access the portal to test the logon page, all you get is a blank page. No errors are displayed. Nothing is written even in the error log. If you face such an issue, cross-check the SAP tag attributes defined in your code.
Working with the JAVA Decompiler
So far I have designed a new version of a logon page and also seen code-level changes in the 7.3 logon page application. You may wonder if there is a way to customize implementation of SAP tags so that you can accommodate extra functionality that is not available out of the box.
Note
Customizing a standard JAR file is not a recommended way of enabling certain features that are not available out of the box. Instead, I recommend that you always create a new Java project and create your own classes to accommodate new functionality. You can then export this project as a JAR that you can use in any future developments.
Download Java Decompiler
Java Decompiler (JAD) is an open source tool available for free download. You can download JAD here-
https://jd.benow.ca/. Once you download and extract JAD, launch a jd-gui executable file. This should launch a blank JAD session. Before going further, let me remind you that SAP tags are defined as classes and are packaged in a tc~sec~ume~logon~logic_api JAR file. Class implementation is available under tc~sec~ume~logon~logic_api > com >sap >engine >applications >security >logon >tags. You can open any class file to check the implementation of the UI element.
A Step Further
Having discussed everything related to code changes, using right development practices, developing a Web standard compliant project, and finally decompiling JAR files, I also want to discuss some of the advanced techniques that improve the user experience and provide seamless design rendering across all browsers and platforms.
Use PIE in Older IE Versions
PIE stands for Progressive Internet Explorer. It is an IE-attached behavior that, when applied to an element, allows IE to recognize and display a number of CSS3 properties. PIE is the most commonly used IE fix for CSS properties that are not recognized by older IE versions. For example, the majority of the modern browsers recognize border-radius property either directly or with CSS transforms. However, with older versions of IE (mostly IE 6 and 7), this is not the case. This is when PIE comes to the rescue. PIE forces an older version of IE to render a specific property in a specific way.
If you check the CSS file of the project I have created in this post, you observe a number of instances in which I have referenced a file called PIE.htc. I have come to terms with the fact that the majority of SAP users still use IE as their primary browsers. This makes it imperative to have unified rendering in IE if you want your users to appreciate the design and have an enhanced user experience.
If you want to know how you can use PIE in your own project, refer to my blog post on SDN with all steps. Just follow the instructions and you are done. I have also posted screen captures of the logon page application showing before and after effects of using PIE. Here is the link:
https://scn.sap.com/community/netweaver-portal/blog/2013/12/10/use-pie-in-sap-portal-logon-page-for-rendering-css3-properties-in-older-browsers
Displaying Error Messages
As you already know, you no longer use a <sap:form> tag to render a logon form. Instead, you use an HTML FORM element. However, if you simply deploy this application to test whether error messages are displayed correctly, you end up disappointed to see that your application does not display any error messages at all, not even when a user enters a wrong user ID or password. You have to fix this; otherwise, you receive user ID locked messages from your users as there are no error messages to correct users from entering wrong data.
Here is how error messages are handled in the newer version of the logon page for the Portal 7.3.
The logon page for SAP Portal 7.3 primarily recognizes events only if there is at least one <sap:form> tag present in your code. That means that if you have completely moved a logon page application to an HTML form, as I just did, your logon page does not recognize an event on the logon button and therefore, does not display any error or warning message. The default trace also does not log any error message. The quick fix is to use <sap:form> tags just to display user messages.
Logon application (i.e., logonPage.JSP) contains the following code shown in
Figure 12 to display error or warning messages.
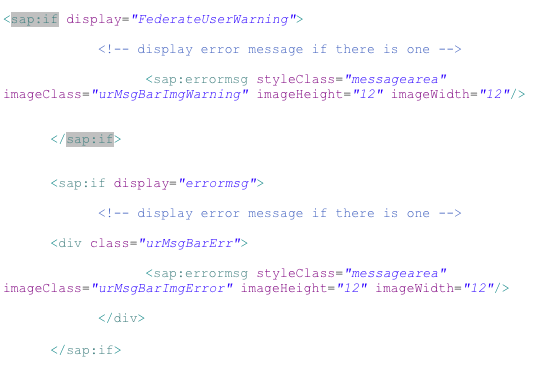
Figure 12
Error message display code in SAP Portal 7.3 logon page
This piece of code controls all user-triggered messages on the logon page. All you have to do is enclose this code in an <sap:form> tag so that whenever there is an error or warning message, your logon page listens and logs the message and displays it to the user. Remember, just enclosing this code in an <sap:form> tag does not create another form on your logon page. It simply tells HTML to display error messages if there is one.
If you try to just write message display code without <sap:form> tags, you continue to receive no messages at all. This quick fix can really save a lot of time, and you also don’t have to move the logon form into <sap:from> tags again. Otherwise, what is the use of designing an HTML-based form?
Greater Scope
There is still a lot of scope to improve your logon page design. I do not use old HTML in this article. Instead, I use HTML5 elements. This is just to show what more can you do with logon pages using HTML5. Let me give you a possible improvement point here.
Instead of displaying messages on the same screen, you can capture error or warning messages using a jQuery selector and style it with CSS3 to display in a pop-up window. A lot of companies have this requirement so that the design of your logon page is in line with any other Web site logon forms. You can do wonders with HTML5 and jQuery in a 7.3 logon page. For example, you can use HTML5 Geolocation API to display client offices or integrate CEO messages with HTML5 v
ideo or audio tags.
Ameya Pimpalgaonkar
Ameya Pimpalgaonkar is a senior SAP architect. He specializes in SAP Netweaver Portal, SAP BPM, BRM, MDM, and SAP Mobile. His interests include UI and front-end technologies, SAPUI5, Responsive Design, and integration of modern technologies with SAP UI. He has also worked on HTML5, CSS3, and jQuery. Ameya is also a certified usability analyst from HFI, USA.
You may contact the author at
ameya85@gmail.com.
If you have comments about this article or publication, or would like to submit an article idea, please contact the
editor.