Learn how to develop an Internet of Things (IoT) application that fetches data from a sensor and saves it on an SAP HANA database on SAP HANA Cloud Platform.
Key Concept
SAP HANA Cloud Platform is a platform for extending, integrating, and building new applications. It provides design templates and prebuilt applications that have responsive user interfaces that help to expedite the development process for developers. SAP HANA Cloud Platform provides many services, with one of them being the Internet of Things (IoT). SAP HANA Cloud Platform for the IoT helps you to build real-time applications from sensor feeds and perform real-time predictive analysis.
The Internet of Things (IoT) is quickly moving from concept to reality and various enterprises are working toward implementing the concept. A 2016 report by Forrester indicates that 23 percent of enterprises use IoT technology, with another 29 percent planning to do so within 12 months. The initial discussion about billions and billions of devices with a vast amount of data is now over, and it is time to generate value from these connected devices. Some of the concepts that are already implemented by enterprises are:
- Fleet logistic companies monitor the condition and location of their vehicles
- Manufacturing companies manage their remote objects to identify problems early and address them in a timely way
The IoT alone does not suffice. Integration with technology platforms such as SAP HANA Cloud Platform, which stores and shows real-time data to do predictive analytics, is the game changer.
While building an IoT application a developer has to focus on the following points:
- What data is available from the sensors and useful for the business
- What data needs to be filtered before sending it to central services (in this case SAP HANA Cloud Platform) for processing
- What type of analytics functionality is required, such as real-time analysis or streaming, as drill-down static charts are no longer interesting
- Whether the connectivity is continuous from the sensor to the central process and, if not, then you need a feature to persist data during a connection failure
- If offline data collection capability is required in the solution
The basic architecture (
Figure 1) of SAP HANA Cloud Platform for the IoT consists of a sensor device, SAP HANA Cloud Platform, and integration with an SAP landscape system such as SAP ERP or SAP CRM.

Figure 1
SAP HANA Cloud Platform for the IoT basic architecture
The sensor sends the data to SAP HANA Cloud Platform using IoT services with either HTTP or the WebSocket Protocol. The received data in SAP HANA Cloud Platform is saved to the SAP HANA database to be used for analytics. SAP HANA Cloud Platform can interact with SAP on-premise systems either using Open Data Protocol (OData) or the SAP HANA Cloud Connector for various reasons such as the creation of a notification (
Figure 1).
The basic architecture works fine when no filtering of data is required at the sensor, all the processing happens in SAP HANA Cloud Platform, and there is continuous connectivity between the sensor and SAP HANA Cloud Platform. The basic architecture does not suffice in the following scenarios:
- Intermittent connectivity between the sensor and the platform device
- Unwanted data needs to be filtered at the sensor and a decision needs to be taken at the device
- Local alerting and response capabilities without reliance on being connected to the central services when things happen
- The sensor cannot transmit the data in the format required by the central services, such as HTTPS or WebSocket, in SAP HANA Cloud Platform
- Offline data storage capability when the device is not connected to the central services
- Real-time stream processing capability such as sending an alert to the system if the last 20 measurements are beyond the threshold
- Device aggregation when multiple sensor devices connect to the central services
You can solve all the above points by adding edge components, which provide enhanced functionality to SAP HANA Cloud Platform for IoT Gateway. The edge components require separate licenses. The edge components help to reduce the latency of the response by eliminating the dependency on a round trip to the central services.
Figure 2 shows the new architecture.

Figure 2
Advanced SAP HANA Cloud Platform for IoT architecture
The various edge components and their functionality follows:
- Streaming Lite is a lightweight component designed to run in IoT scenarios. It allows you to filter data at the source, which helps to reduce bandwidth and the need for extra capacity. Streaming Lite allows you to generate local alerts without depending on a round trip to central services.
- The IoT Connector retrieves data from IoT devices by means of their specific protocols and application programming interfaces (APIs). The data is then forwarded to central services. The IoT Connector helps to connect those devices that lack Internet connectivity or devices that do not support protocols supported by SAP HANA Cloud Platform. It also offers offline data collection capability (i.e., to store the data when connectivity is not available and to send it to central services when connectivity is available).
- SQL Anywhere with SAP HANA Remote Data Sync: SQL Anywhere is a lightweight relational database server to be deployed at the IoT Gateway. It supports Windows, Linux (x86 and ARM), and Mac OS X. SQL Anywhere connects to the SAP HANA Remote Data Sync over TCP/IP or HTTPS to keep the data synchronized between the company database and thousands of remote sensors. It can easily be embedded in any partner applications and hardware. SQL Anywhere also provides remote and offline secure data storage and remote data processing on the Gateway Edge Node shown in Figure 2.
Now I explain how to configure the sensor using IoT services on SAP HANA Cloud Platform. The IoT services provide a device URL used in the application for sending the data to SAP HANA Cloud Platform. The steps are as follows.
Log in to the SAP HANA Cloud Platform Cockpit and click the Services button in the left side panel (
Figure 3).
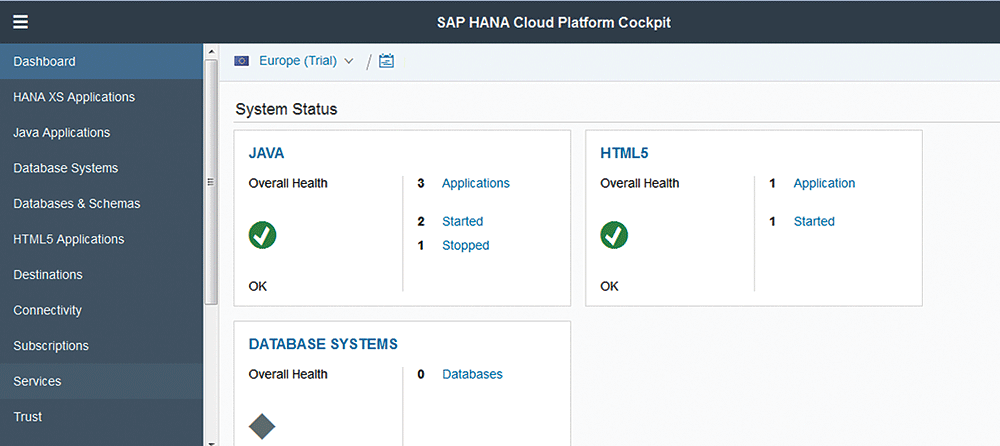
Figure 3
The SAP HANA Cloud Platform Cockpit
SAP HANA Cloud Platform has many services, as shown in
Figure 4.

Figure 4
Internet of Things Services
Scroll down until you see the Internet of Things Services and click it, which takes you to
Figure 5.

Figure 5
Activate the Internet of Things Services
Click the Enable button to activate the Internet of Thing Services. This action takes you to
Figure 6.

Figure 6
Go to the IoT Services dashboard
Click the Go to Service link in
Figure 6 to go to the IoT Services dashboard shown in
Figure 7.
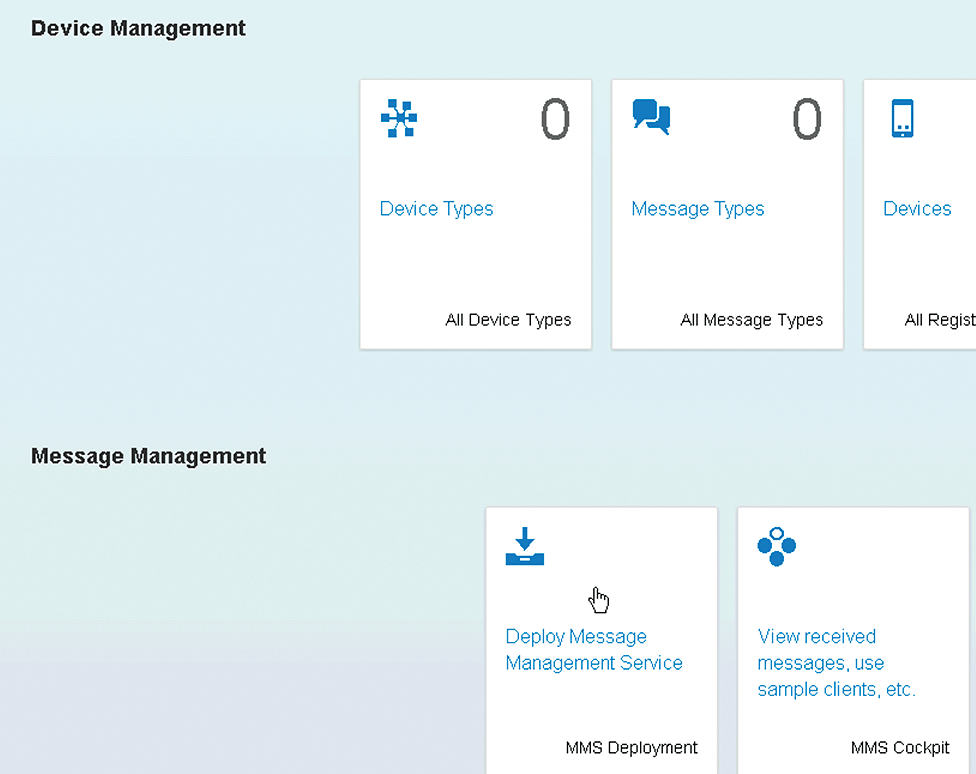
Figure 7
Message Management Service Cockpit
Click the Deploy Message Management Service link on the IoT Services dashboard shown in
Figure 7 to start the message management services. This action opens the screen in which you enter your password (
Figure 8) and click the Deploy button to start the Message Management Service. The deployment of the Message Management Service starts the iotmms application in the Java applications of the SAP HANA Cloud Cockpit.
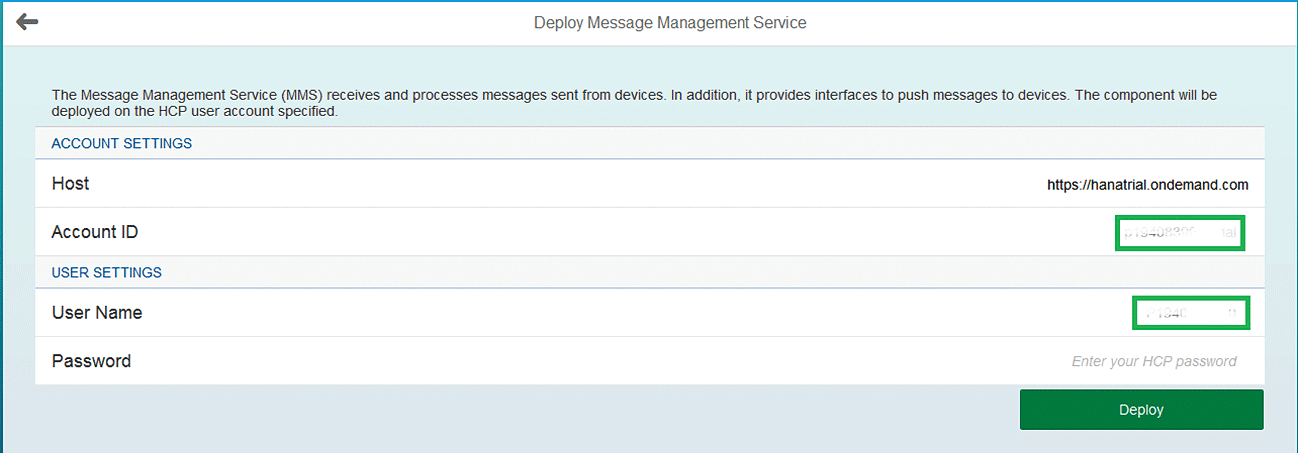
Figure 8
Deploy the Message Management Service
The role IoT-MMS-User is required to access the Message Management Service. You can assign the role from the iotmms application by following menu path SAP HANA Cloud Platform Cockpit > Java Applications (
Figure 9). In
Figure 9, click the iotmms link, scroll down the screen, and click the Roles link to assign the role (
Figure 10).

Figure 9
SAP HANA Cloud Platform Java Applications Cockpit

Figure 10
SAP HANA Cloud Platform roles in Java applications
The IoT Message Management Service is now operational. Further, you have to register the sensor, device type, and the message type. Click the link under Application URLs to open the Message Management Service Cockpit (
Figure 11).

Figure 11
IoT Services URL
That takes you to
Figure 12.
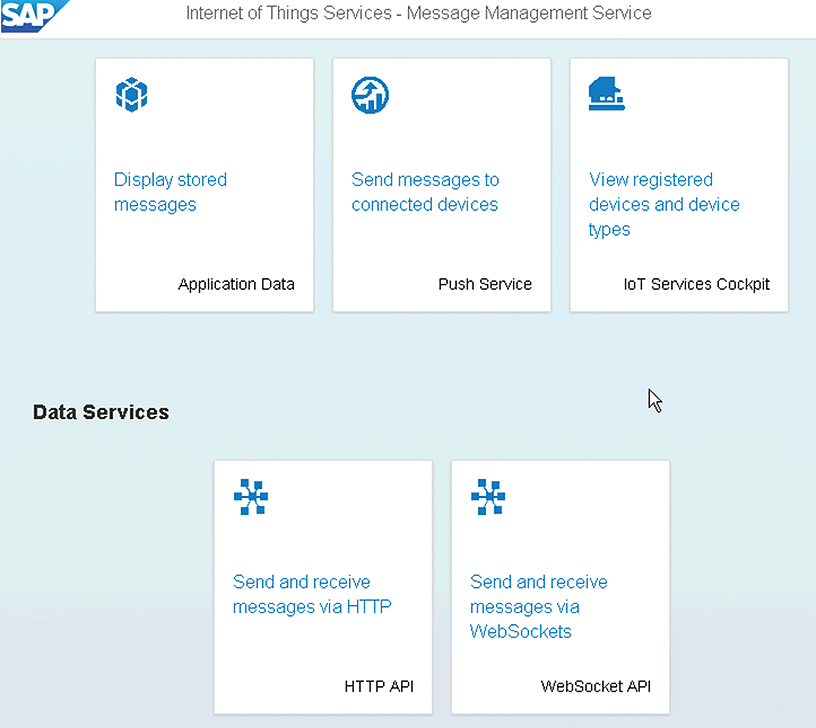
Figure 12
Message Management Service cockpit
In
Figure 12, click the View registered devices and device types in the Message Management Service Cockpit, which takes you to
Figure 13.

Figure 13
Click the Device Types link
Click the Device Types link in the Internet of Things Services Cockpit shown in
Figure 13 to create the sensor device types. That takes you to
Figure 14.
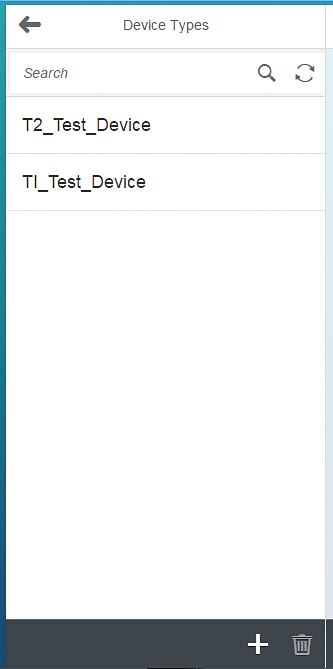
Figure 14
Create a device type
Click the + icon at the bottom of
Figure 14 to add a new device type. That takes you to
Figure 15.

Figure 15
Name the device type
Name your device type. I named mine SAP_Journal_Sensor, but you can use any name. Enter the name and click the Create button shown in
Figure 15 to create the device type.
Afterwards, click the back arrow (top left) to return to the Internet of Things Services Cockpit (
Figure 16).

Figure 16
Click the Message Types link
Click the Message Types link in the Internet of Things Services Cockpit to create the message type from the device type. A message type is the data format that comes from the sensor. That takes you to
Figure 17, where you click the + icon at the bottom of the screen.
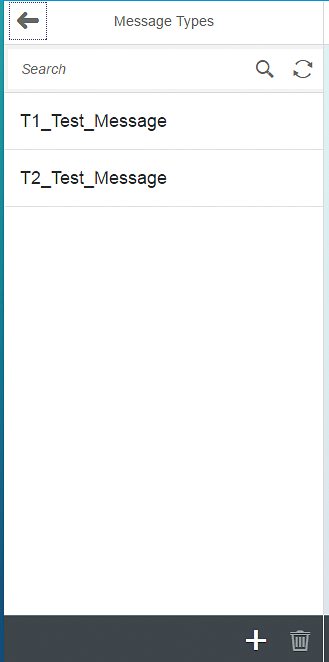
Figure 17
Create a message type
For my example, name the message Journal_Message (
Figure 18).
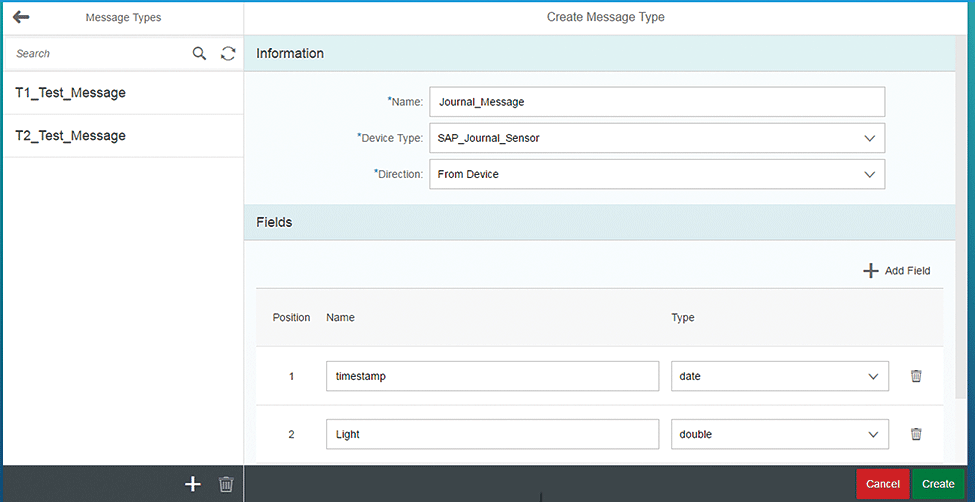
Figure 18
Enter details for the message type
Add the fields by clicking the Add Field button that comes in the message from the sensor. Click the Create button after all the fields are added. The sensor can send multiple types of data such as temperature. A developer has to decide what information is required for the business (
Figure 19).

Figure 19
Enter the message format
Click the back arrow (top left) (
Figure 20) to return to the Internet of Things Services Cockpit (
Figure 21).

Figure 20
Message Type Details
Click the Devices link which takes you to
Figure 22 to create the device using the message type and device type from the previous steps (
Figure 21).

Figure 21
Create the devices
Click the + icon at the bottom of
Figure 22 to create a new device entry. Give it a name, select the device type that you created earlier, and click the Create button. These devices are actually sensors such as the sensors that are used on places such as a robotic arm in the automobile industry or a gas pipeline. These sensors continuously send data to SAP HANA Cloud Platform.
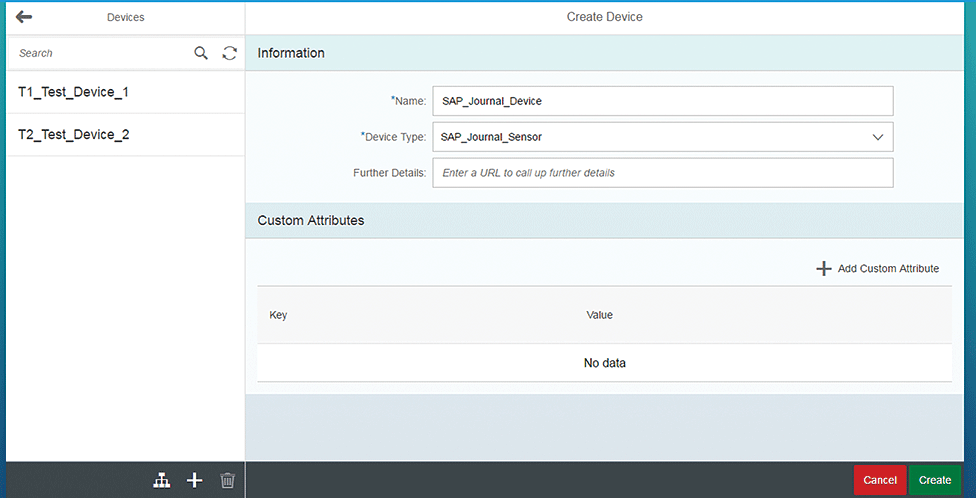
Figure 22
Create a device
After you create the device, a pop-up screen appears with a token value. Copy that and save it as you use it later to authenticate the device while sending data to SAP HANA Cloud Platform (
Figure 23).
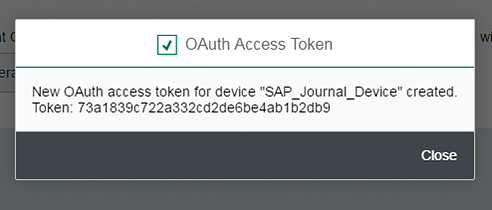
Figure 23
OAuth token for the IoT device
The device is configured on SAP HANA Cloud Platform and is ready to consume data from the sensors using HTTP. The HTTP URL for the SAP Journal Device is as follows:
https://iotmmsp1940839970trial.hanatrial.ondemand.com/com.sap.iotservices.mms/v1/api/http/data/f15ef2c8-7c14-4851-9e26-cf25790352e9
The URL consists of device ID f15ef2c8-7c14-4851-9e26-cf25790352e9 and the SAP HANA Cloud Platform Trial account ID with the standard URL. The device ID changes with each new sensor registered on SAP HANA Cloud Platform (
Figure 24).

Figure 24
IoT HTTP URL
The sensor sends data to SAP HANA Cloud Platform in JavaScript Object Notation (JSON) in the following format (
Figure 25):

Figure 25
Format for data
The message type ID is a unique ID that changes for every message format defined in the IoT dashboard on SAP HANA Cloud Platform (
Figure 26). The different sensors can send different data to SAP HANA Cloud Platform. You initially define the data format, which generates the unique ID in the IoT.

Figure 26
The message format template
Now let’s test from the Postman Client in Chrome to see if the external world is able to send the data to the above URL. The Postman Client is present as an extension in Chrome Tools. You can go to Chrome Extension, search for Postman, and add it to the Chrome browser. You have to pass the content type and the authorization as a header to the tool to authenticate the incoming message (
Figure 27).

Figure 27
Postman header fields
The sensor message is passed to SAP HANA Cloud Platform, which contains light and temperature measurements (
Figure 28).

Figure 28
Postman message body
After SAP HANA Cloud Platform saves the sensor data to the SAP HANA database, it sends the following acknowledgment saying that the message is received from the device (
Figure 29).
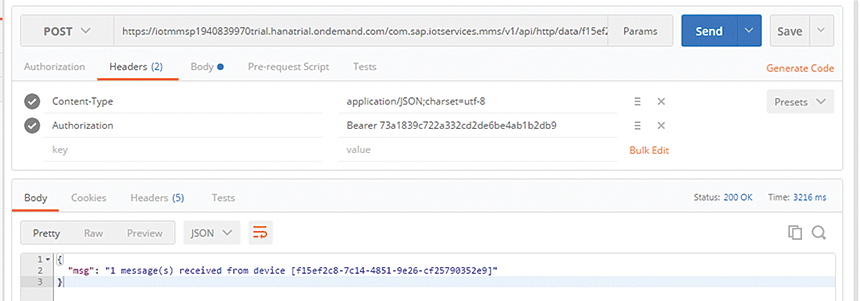
Figure 29
Postman message status
Click the Display stored messages link in the Message Management Service Cockpit (
Figure 30).
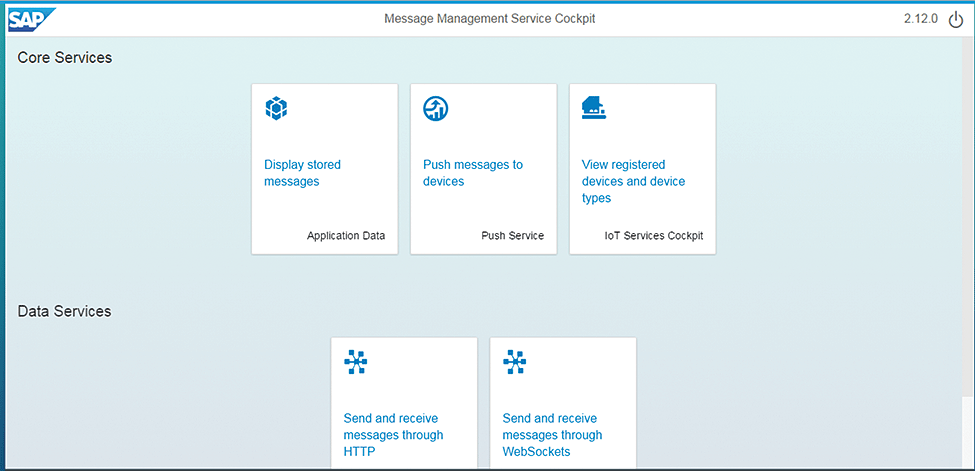
Figure 30
Click the Display stored messages link
You see a lot of tables. The tables have message IDs appended to the name of the table. The name is appended so that you can easily identify the sensor table as there can be multiple message IDs created for the device. In my scenario the message ID is dcb28b33eb12c9c22480, which will be appended to the table name (
Figure 31). The ID makes it easier to identify the particular sensor table as there can be multiple sensors with multiple message formats linked to SAP HANA Cloud Platform.

Figure 31
IoT application data tables
Click the table T_IOT_ DCB28B33EB12C9C22480, which shows that the data sent to SAP HANA Cloud Platform from the sensor is saved to the SAP HANA database (
Figure 32).
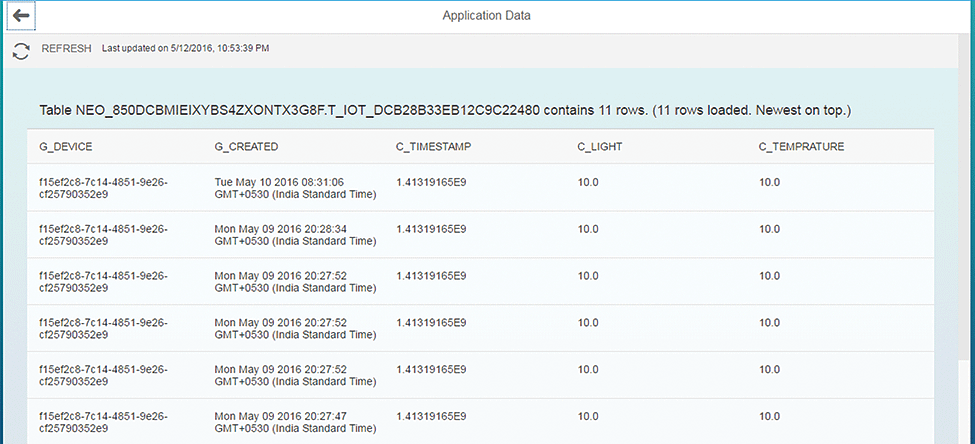
Figure 32
IoT data in tables
I have also created a Java application whose main code (
Figure 33) is deployed on SAP HANA Cloud Platform. The code takes data from the sensor and inserts it into the SAP HANA database in SAP HANA Cloud Platform.
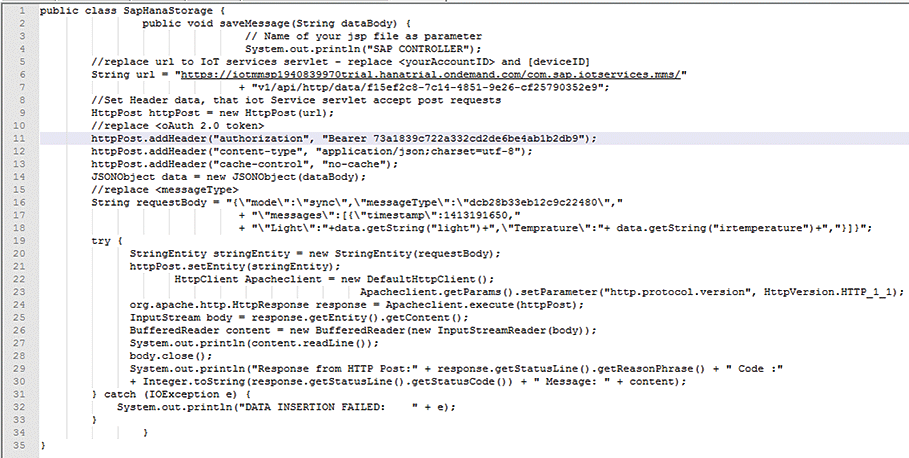
Figure 33
IoT code deployed on SAP HANA Cloud Platform


