- Use ABAP code to create a utility that allows you to generate a Smart Forms Navigator similar to the Object Navigator, transaction SE80. This code lists all those Smart Forms that have been defined in a package. The list is comprised of a tree structure.
Key Concept
To navigate through all Smart Forms of a specific package, Smart Forms Navigator allows you to see and navigate through all Smart Forms of a specific package. It is similar to the way other objects of a package are available in Object Navigator, transaction SE80. Each Smart Form’s interface parameters, Smart Styles, and graphics are also accompanied within the list.
The Object Navigator provides the ability to navigate through different objects defined in a package in transaction SE80. However, it lacks the ability to display Smart Forms as a child node among the list of other objects under a specified package. An ABAP developer involved in the development of Smart Forms needs this kind of navigator when constructing technical documentation of an SAP implementation or for searching Smart Forms by package.
I’ll show you how to develop a utility that provides a list of all Smart Forms in a package as well as information of its interface parameters, such as import, export, tables, exceptions types, Smart Styles, and graphics objects. It displays a tree-structured list through which users can navigate. When the user selects a node, the Smart Form specified in that node (or in its parent node) is called and a Display Form screen for that Smart Form appears. The user can step back to the list of Smart Forms by pressing F3 or Esc, or by clicking the back icon on the main toolbar.
I’ll show you the ABAP code you need to develop this utility. All you need is basic ABAP knowledge; there is no third-party tool required. You can download a Word document with the complete code shown in this article
here.
Utility to Generate a Smart Forms Navigator
Now I’ll show you the code for the utility.
Figure 1 shows a deferred definition of custom class lcl_application that makes it known regardless of the location of its actual definition. It also shows types and data definitions with their declarations that you need throughout the program.
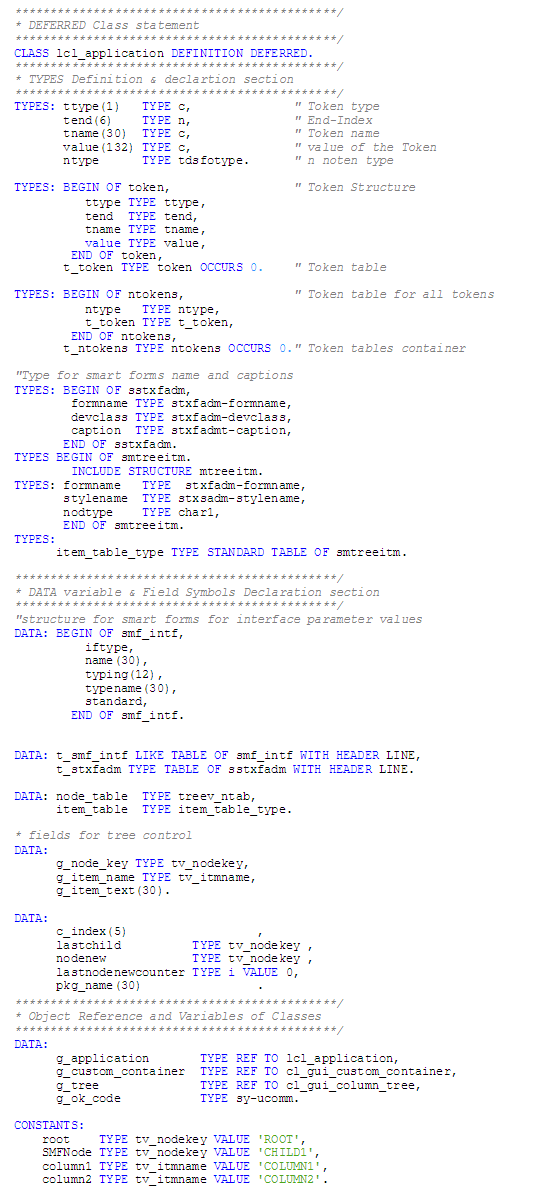
Figure 1
TYPES and DATA declarations and definitions
Figure 2 contains the code to define and implement a custom class lcl_application, which provides handlers for the events of a tree object. Events that are handled by this class include Node_Double_Click, Item_Double_Click, and Expand_No_Children.
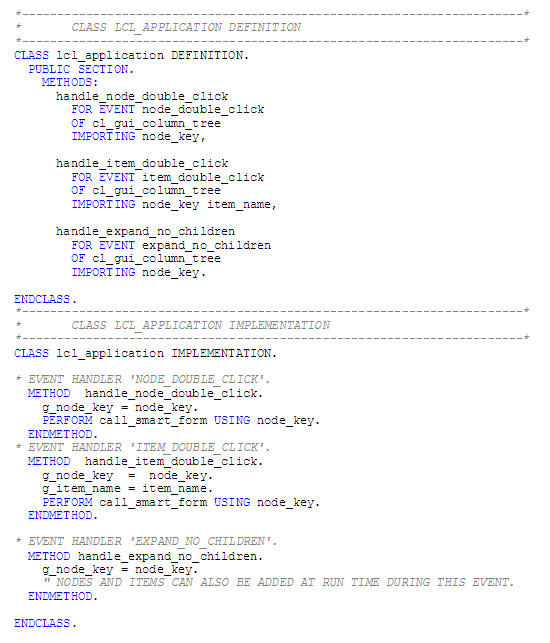
Figure 2
Custom class lcl_application definition and implementation
As this program displays a Web Dynpro screen when it runs, the flow logic of the screen follows the code shown in
Figure 3. It includes process before output (PBO) and process after input (PAI) module implementation of the program’s Dynpro screen.
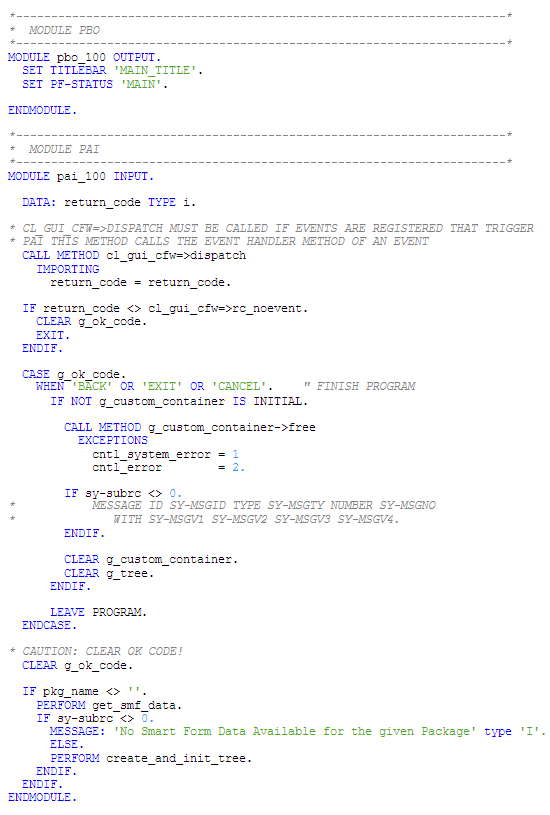
Figure 3
PBO and PAI module implementation
Most of the code shown in
Figures 4 through
8 contains the modularization implementation of the program. It includes a subroutine for creating and initializing the g_tree object of the cl_gui_column_tree class. Other subroutines are related to building nodes of the g_tree object, obtaining parameters and attributes information of Smart Forms. Finally, it shows a form routine for calling the display screen of the Smart Form and Smart Style when selected in the tree.

Figure 4
Creation and initialization of the column tree object

Figure 5
Building nodes and node items of the tree g_tree
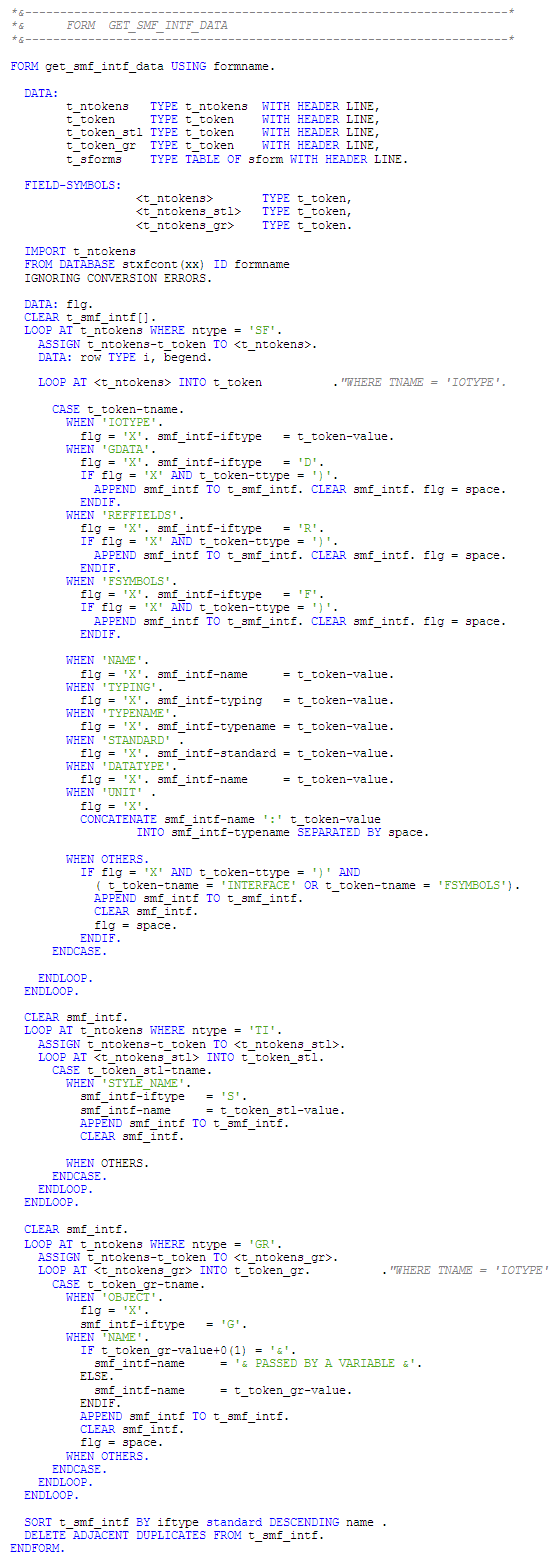
Figure 6
Smart Forms’ interface and attribute information manipulation
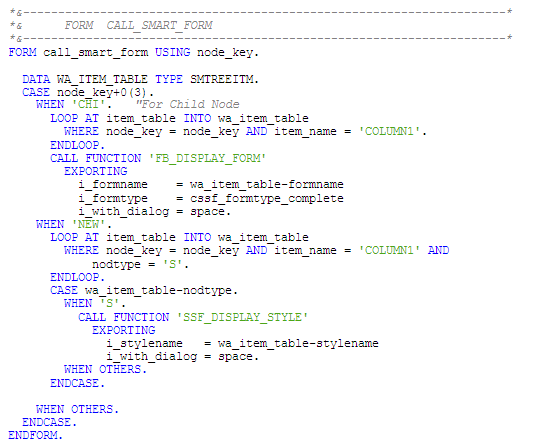
Figure 7
Code for calling a selected Smart Form in a tree node

Figure 8
Code for getting Smart Forms defined in a package
Finally, call the screen in the start of selection event of the program.

Figure 9
Start of selection event of the program
The Smart Forms Navigator uses a Dynpro screen to arrange Smart Form objects together in an object list. To define a Dynpro screen (e.g., 100), use transaction SE51 or the Forward Navigation feature of Workbench. Through Forward Navigation, when you double-click the screen number (e.g., 100) in the line of code CALL SCREEN 100, the screen appears with the Flow logic tab selected by default (
Figure 10). Enter the code shown in the figure in the Flow logic tab of screen 100.
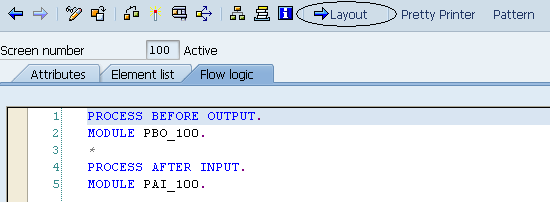
Figure 10
Flow logic of screen 100
Define the layout of the screen 100 in screen painter. Click the Layout button in the toolbar to bring up the layout screen (
Figure 11). Define an input field for accepting the package name, a text label for that input field, and a custom control for the tree structure with their default properties. However, for better visibility of the navigation area in the screen, I recommend you take a visible length and height of custom control as 100.
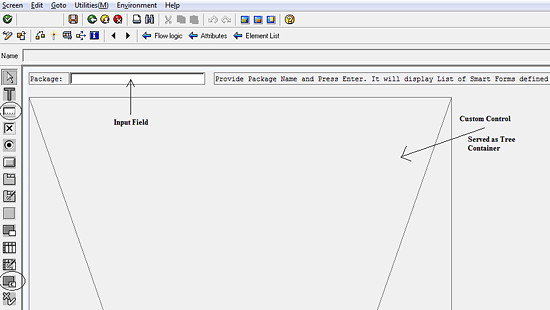
Figure 11
Layout of screen 100 in Screen Painter
In
Figure 12, along with other objects, the element list of screen 100 also includes an attribute G_OK_CODE of type OK. When the user interacts with the screen elements, the function code that you have assigned is filled in the sy-ucomm field that in turn is reflected in the G_OK_CODE attribute.
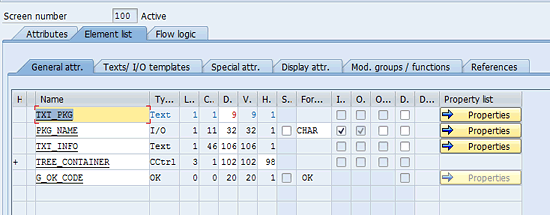
Figure 12
Element list tab of screen 100
To define the GUI Title and GUI Status, use forward navigation by double-clicking 'MAIN_TITLE' in the line of code SET TITLEBAR 'MAIN_TITLE' and 'MAIN' in the line of code SET PF-STATUS 'MAIN'. It follows with the dialog and screens shown in
Figures 13 and
14.

Figure 13
Define the GUI title for screen 100

Figure 14
Define the GUI status for screen 100
After creating the screen elements, GUI title, GUI status, flow logic, and the program itself, save and activate them. Afterwards, make a transaction code of the saved program. Alternatively, you can run the utility via transactions SE38 or SA38.
Now let’s look at the Smart Forms Navigator utility you’ve created. There is only one parameter that you use: Package, which is the name of the Package for which you want to generate the Navigator of Smart Forms.
Figure 15 shows the first screen of this utility. After you’ve filled in the parameter, press Enter to bring up the screen in
Figure 16.
Figure 16 is the main screen that finally displays the Smart Forms Navigator.

Figure 15
First appearance of the main screen of the program

Figure 16
Results in screen 100 when the package name is inserted
In the above screens, I provided the custom package name ZRZN in which I worked for the development of Smart Forms. You can pass the package name you worked on. As an example, I provided a standard package name CMS_COR shown in
Figure 17. It displays Smart Forms defined in that package. Double-click a Smart Form (e.g., CMS_RE_GENERAL) and it navigates to the display screen of the same Smart Form I selected in the list (
Figure 18). Press Esc or F3 or click any of these icons

in the main toolbar. Navigate back to the Smart Forms Navigator screen.
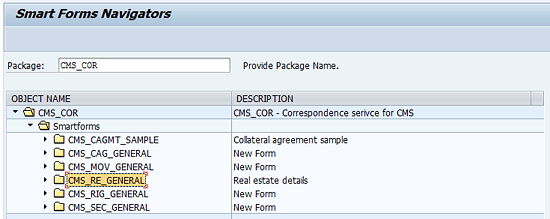
Figure 17
A tree node in selection mode
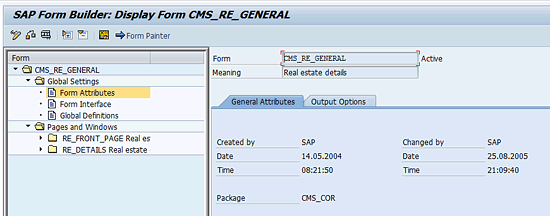
Figure 18
Smart Form selected in the node displayed in the Smart Form Builder screen
Figures 19 and
20 show you when a Smart Style name is selected, the utility navigates you to the Smart Style screen with the selected Smart Style Name in display mode.
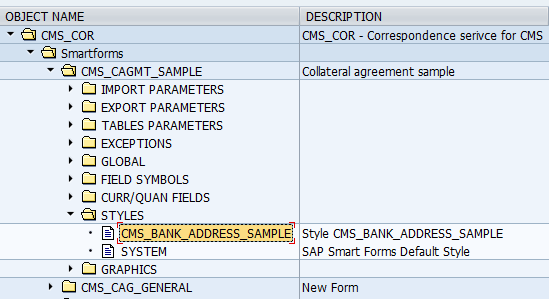
Figure 19
Smart Style selected in a node
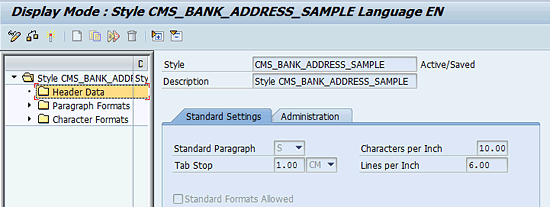
Figure 20
Selected Smart Styles displayed in the Smart Style builder screen
Exceptions
There are a few exceptions to this utility. These are:
- It accepts only one package name for which it generates the Smart Form list.
- It does not navigate to data types, table types, and structures listed as interface parameters of a Smart Form.
- It does not navigate to graphics populated as attributes of a Smart Form object in a node of the tree-like structured list.
Muhammad Ramzan
Muhammad Ramzan is an experienced SAP Certified Consultant in ABAP and Portal development. He has more than five years of development experience in SAP. His current affiliation is with EJADA Systems at the Saudi ARAMCO Project in Saudi Arabia. Previously, he was a senior SAP Development Associate in DESCON Engineering Limited in Pakistan, which is a leader in the Engineering & Construction, Chemical, and Power industries. His career experiences in the software development industry as well has made him capable of integrating SAP and non-SAP solutions successfully.
You may contact the author at
Muhammad.Rumzaan@gmail.com.
If you have comments about this article or publication, or would like to submit an article idea, please contact the
editor.


