SAP Professional Journal
Muhammad Ramzan explains how to get your Smart Form download with all the information it needs so that you can activate it successfully after uploading it to a target system.
Key Concept
The term template method describes a design pattern. The ZSAPLink class features abstract methods that are called by the SAPLink framework for various purposes.
Thus, after you upload this Smart Form at the target system, it lacks these custom data types. When you try to activate it, you cannot because the target system lacks the custom data type objects used for declaration of variables in the form interface. Since these custom data types are unknown to the system, errors for these unknown data types will be raised on activating this Smart Form, and the Smart Form remains inactive. The system is not able to generate its preview and the Smart Form remains useless.
To address this issue, I have enhanced the SAPLINK_SMARTFORM class to complement the Smart Form download with the download of all the required custom data types. The result is a new version of SAPLINK_SMARTFORM class. After this development, when a Smart Form is downloaded, it becomes a handy one-unit object in the form of a nugget file. You then can activate the Smart Form in just one click on the target system. It imports that nugget file using ZSAPLINK with the same version of ZSAPLINK_SMARTFORM class.
Prerequisites
Following are the prerequisites for using this method. SAPLink must be installed at your source landscape as well as at the target landscape. For more about SAPLink installation and documentation go to
https://wiki.scn.sap.com/wiki/display/ABAP/SAPlink+User+Documentation.
Along with the program ZSAPLINK, you also need to install the following classes. If any class is not available on the source and target system, you may get it from a list available at
https://code.google.com/p/saplink-plugins/downloads/list. You can find the classes from this link in the .nugg or .slnk extension file. You can import both through the ZSAPLINK program.
The following classes are plug-in classes to ZSAPLINK class and thus inherited from ZSAPLINK. Every plug-in class conforms to the convention ZSAPLINK_<your plugin type>. For example a plug-in class name for SMARTFORM object type is ZSAPLINK_SMARTFORM.
You can find a list of all ZSAPLINK referenced classes from transparent table VSEOEXTEND using transaction SE11. Enter ZSAPLINK in the REFCLSNAME field when you browse the data of table VSEOEXTEND in transaction SE11.
Classes:
- ZSAPLINK_NUGGET
- ZSAPLINK_DOMAINS
- ZSAPLINK_DATA_ELEMENTS
- ZSAPLINK_TABLES
- ZSAPLINK_TABLE_TYPES
- ZSAPLINK_CLASS
- ZSAPLINK_VIEWS
- ZSAPLINK_SMARTSTYLE
- ZSAPLINK_SMARTFORM
Add Methods and Code Snippets
To achieve the goal, you need to add some utility methods and code snippets to the ZSAPLINK_SMARTFORM class in the following steps. The eventual result is a new version of the ZSAPLINK_SMARTFORM class.
From the SAP Easy Access screen, follow menu path Tools > ABAP Workbench > Development > Class Builder (transaction SE24). Enter ZSAPLINK_SMRTFORM under the Object Type input field in the Class Builder initial screen (not shown). Click the Change button. ZSAPLINK_SMRTFORM is opened in change mode as shown in
Figure 1.
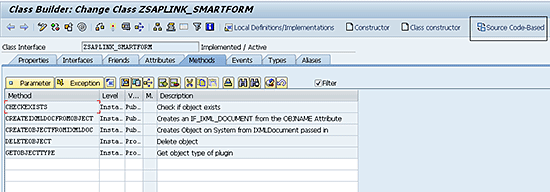
Figure 1
Class Builder in change mode of class ZSAPLINK_SMARTFORM
Click the Source Code-Based button from the application toolbar and add the following code snippet under PROTECTED SECTION. of Class ZSAPLINK_SMARTFORM Definition as shown in
Figure 2. It shows the definition of its own data types and variables to act as a container for the information about data types used in a Smart Form.
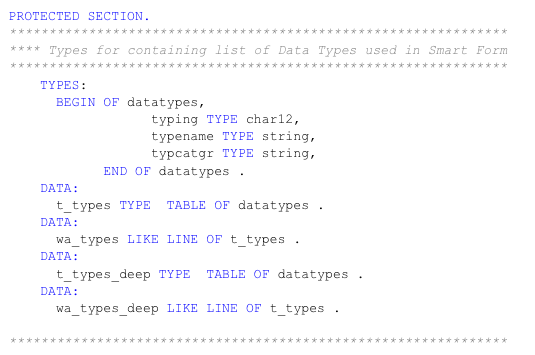
Figure 2
Code segment in protected section of ZSAPLINK_CLASS
After adding the above code snippet, go back to the form-based screen of the class (
Figure 1) by clicking the Form-Based button in the application toolbar shown in
Figure 3.
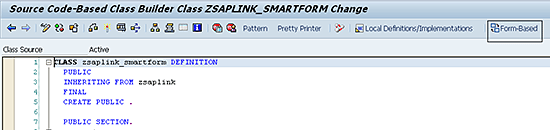
Figure 3
Source code-based definition of class ZSAPLINK_SMARTFORM
Next, you add two protected instance methods, GET_TYPES and TRAVERSE_TYPES, to the class ZSAPLINK_SMARTFORM. Choose the Methods tab and enter GET_TYPES and TRAVERSE_TYPES in the Method Column of the displayed grid. Choose them as the Instance Method in the Level Column. Choose Protected in the Visibility Column for both Methods shown in
Figure 4. These methods serve the major purpose of getting the information of all Data Types used in a Smart Form.
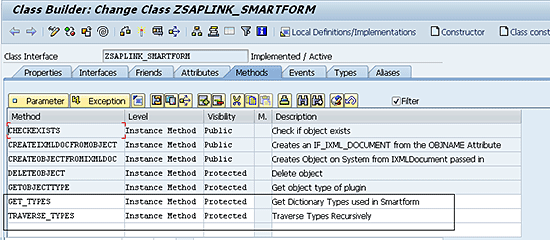
Figure 4
Add GET_TYPES and TRAVERSE_TYPES methods of class ZSAPLINK_SMARTFORM
The GET_TYPES method remains a method without any formal parameters. However, you add two parameters, TYPENAME and TYPECATGR of Data Type STRING, to the TRAVERSE_TYPES method. Place your cursor on the TRAVERSE_TYPES method. Click the Parameter button to add parameters of this method. Enter TYPENAME and TYPECATGR Importing parameters of Associated Type STRING as shown in
Figure 5.
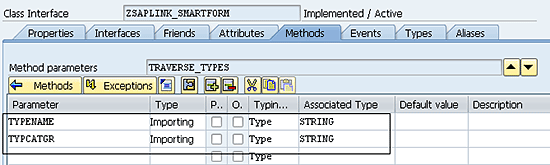
Figure 5
Parameters of TRAVERSE_TYPES method of class ZSAPLINK_SMARTFORM
This TRAVERSE_TYPES method is used recursively to traverse the data types of all the custom data types used in a Smart Form at a deep level so that information of all the custom data types that are required to install and activate those data types can be collected.
The next step is to add or append a source code to the methods of ZSAPLINK_SMARTFORM class. Add the code snippet shown in
Figure 6 to the recently created GET_TYPES method.

Figure 6
Code segment in method GET_TYPES of ZSAPLINK_CLASS
You now add or append the source code to the methods of ZSAPLINK_SMARTFORM class. Add the code snippet in
Figure 7 to the recently created TRAVERSE_TYPES method.

Figure 7
Code segment in TRAVERSE_TYPES method of ZSAPLINK_CLASS
To get your plug-in working you have to implement at least five template methods. Each of these five necessary methods was listed under the Methods tab of class ZSAPLINK_SMARTFORM in
Figure 1. For a successful implementation of downloading a Smart Form in an activatable condition, I focus on two of these methods, CREATEIXMLDOCFROMOBJECT and CREATEOBJECTFROMIXMLDOCd.
ZSAPLINK_SMARTFORM has a method CREATEIXMLDOCFROMOBJECT to convert the object to an XML document and a method CREATEOBJECTFROMIXMLDOC to create an SAP object from an XML document stored in a .nugg file. I now amend these two methods to achieve the goal of sending data types along with downloading a Smart Form so that you can upload and activate it in just one click.
Append the code snippet to the end of source code of CREATEIXMLDOCFROMOBJECT method as shown in
Figure 8. Although you append a code snippet to the source code, the original source code of the method must remain intact.
In this code, the GET_TYPES method is called to populate the T_TYPES internal table defined in protected section of the class. The GET_TYPES method uses recursion and calls TRAVERSE_TYPES recursively to collect information of all the custom data types at their deep levels (i.e., domains). The collected data types in turn must be installed on the target system for the successful activation of a Smart Form after its uploading.
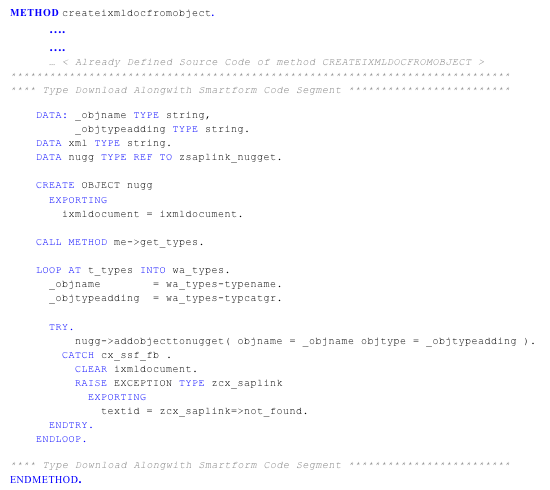
Figure 8
Code segment in the CREATEIXMLDOCFROMOBJECT method of ZSAPLINK_SMARTFORM
Insert the code snippet shown in
Figure 9 at the start of the method CREATEOBJECTFROMIXMLDOC and after the end of the first Types: statement.

Figure 9
Code segment in CREATEOBJECTFROMIXMLDOC method of ZSAPLLINK_SMARTFORM
Append the code snippet in
Figure 10 to the end of existing source code of method CREATEOBJECTFROMIXMLDOC
.
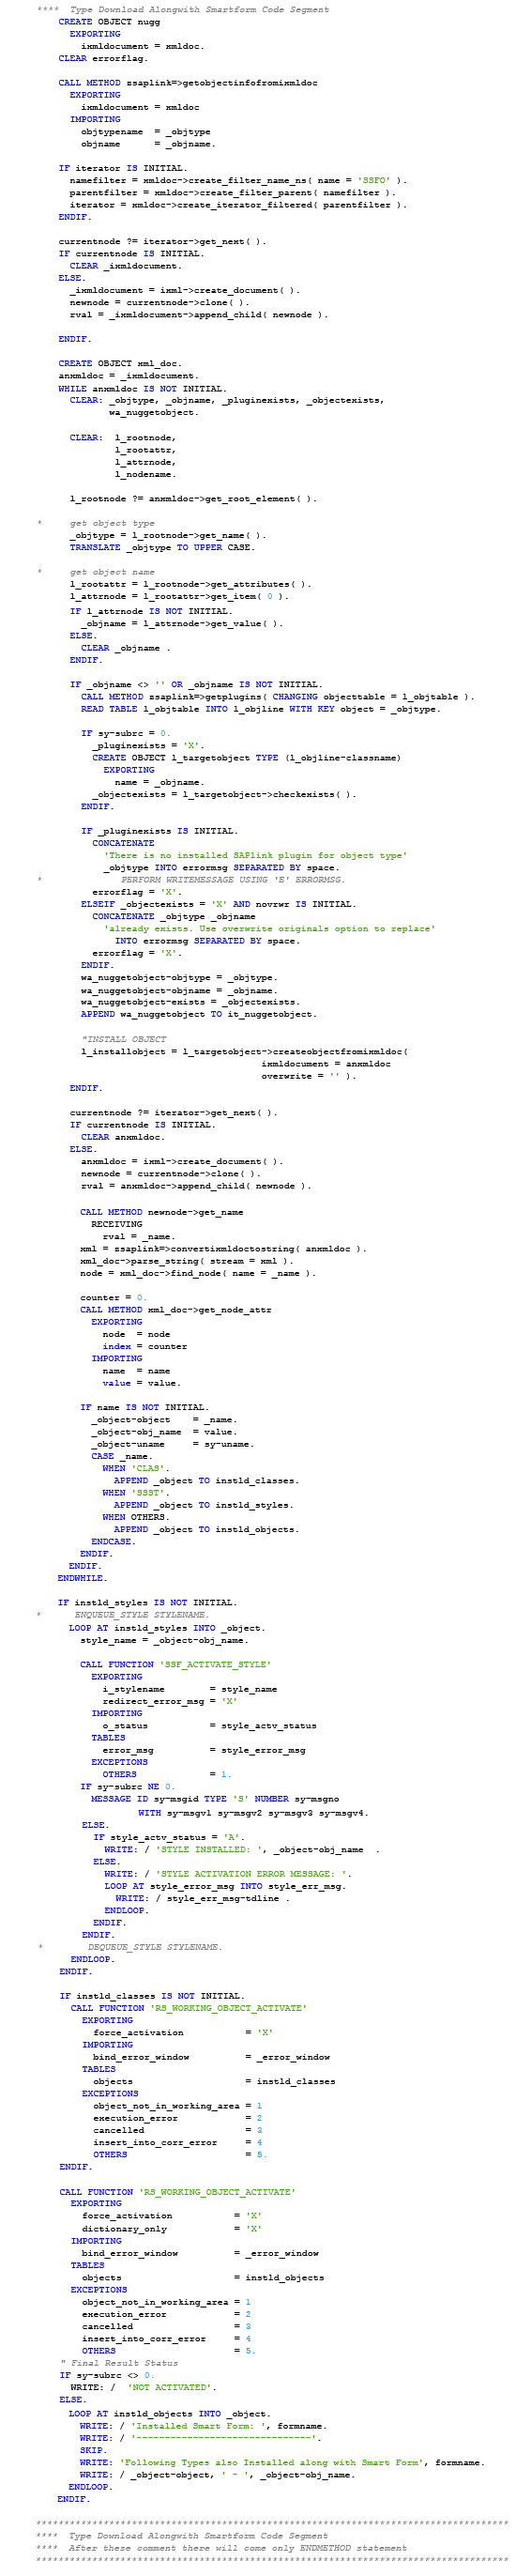
Figure 10
Append code snippet to end of method CREATEOBJECTFROMIXMLDOC
To save ZSAPLINK_SMARTFORM class, click the save icon

or press Ctrl+S. After you save the class successfully, activate it with Ctrl+F3 or click the activate icon

. You have now created a new version of ZSAPLINK_SMARTFORM class.
A Demonstration of an Activatable Smart Form Download Using Program ZSAPLINK
Make sure to test your plug-in carefully. I suggest you create an object especially for testing that features all possible cases. For demonstration purposes, at the source landscape from which I want to download a Smart Form I would create a Smart Form that uses some custom Data Types.
Execute transaction code SE11 and click the Data Type tab. Enter ZADDRS_1 in the Data element field. Click the Create button. A pop-up screen (not shown) displays the options Data Element, Structure, and Table Type. Choose the Data Element option. On the initial Data Element screen, enter a Domain (e.g., CHAR100), in the Domain field as shown in
Figure 11. Maintain its Field Label with any arbitrary text. Click the save icon or press Ctrl+S. After you save the class successfully, activate it with Ctrl+F3 or click the activate icon.
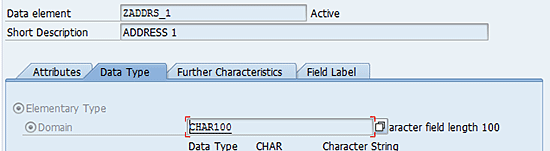
Figure 11
ZADDRS_1 data element defined in the ABAP Dictionary (DDIC)
Similarly, create two more data elements ZMETAL and ZWELD of character field length 20 and 100, respectively. You can use the CHAR20 and CHAR5 domain defined in the DDIC. These are used in the creation of a structure ZPRODUCT. Similar to creating a Data Element, you create the structure ZPRODUCT using transaction code SE11. Define two components of type ZMETAL and ZWELD in the ZPRODUCT structure as shown in
Figure 12. Click the save icon or press Ctrl+S. After you save the class successfully, activate it with Ctrl+F3 or click the activate icon.
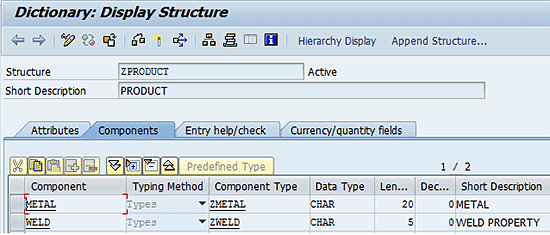
Figure 12
ZPRODUCT structure defined in the DDIC
Now create a Table Type ZLOT using transaction code SE11. As shown in
Figure 13, define it with the Line Type ZPRODUCT that you recently created. This Table Type serves as the Tables parameter of the Smart Form that you are going to create.
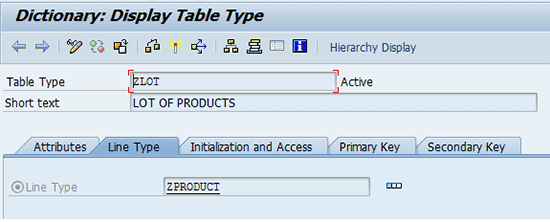
Figure 13
A ZLOT table type defined in the DDIC
Execute transaction code SMARTFORMS and create a Smart Form (e.g., ZTESTFORM_ACTVTABLE). Define Import parameters of the Smart Form’s form interface section using the ZADDRS_1 data element as shown in
Figure 14.
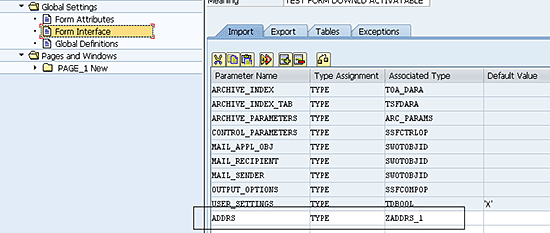
Figure 14
Import parameters defined in the form interface of Smart Form ZTESTFORM_ACTVTABLE
Define the Tables parameters of the Smart Form’s form interface section using the ZLOT Table Type (
Figure 15). These are the data types you defined recently.
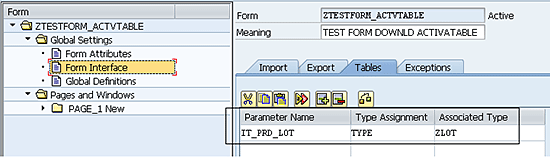
Figure 15
Tables parameters defined in the form interface of Smart Form ZTESTFORM_ACTVTABLE
You also need to define a Global Data Variable WA_PRD_LOT in the Global Definitions section using the ZPRODUCT structure defined recently in the DDIC (
Figure 16). WA_PRD_LOT serves as a variable that is global to a Smart Form and is used, for example, in the Table Control you create later in the Smart Form.
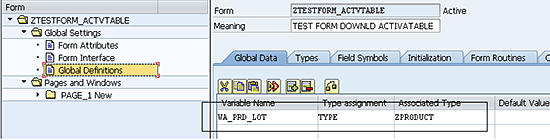
Figure 16
Global variable defined in the Global Definitions of Smart Form ZTESTFORM_ACTVTABLE
After you create parameters in the Smart Form’s Form Interface and variables in the Global Definitions section to demonstrate the test scenario, create a Table control in the Main window of Page 1. Right-click the Main Window node. A context menu appears. Choose Create > Table as shown in
Figure 17.
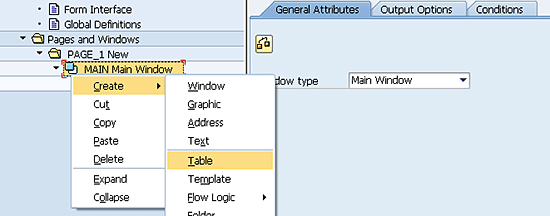
Figure 17
Insert a Table control in the Smart Form
In the next screen (
Figure 18) name the Table control on the Smart Form page. I named it LOT_TABLE. This table control uses the recently defined Smart Form’s Tables parameter and Global Data variables IT_PRD_LOT and WA_PRD_LOT, respectively, in the Data tab of table control LOT_TABLE.
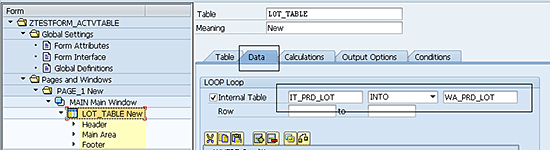
Figure 18
The Data tab of the Lot_Table Table control in Smart Form ZTESTFORM_ACTVTABLE
Click the save icon or press Ctrl+S to save the ZTESTFORM_ACTVTABLE Smart Form. Activate it using Ctrl+F3, the activate icon in the toolbar, or from the menu item Form > Activate. Now at the source landscape, execute program ZSAPLINK using transaction code SE38. The screen in
Figure 19 appears. Select the Create New Nugget radio button in the SAPlink section of this screen. In the Nugget Name field of the Options section enter any name of your choice or the name of the Smart Form you want to download. I opted for the latter choice and named it ZTESTFORM_ACTVTABLE.

Figure 19
Create a nugget file in the ZSAPLINK program
Press F8 or click the execute icon

. A file saving dialog appears to ask for the path for saving the file. Use extension .nugg with the file name format of NUGG_<Name you gave in the input field>. Click the Save button as shown in
Figure 20.
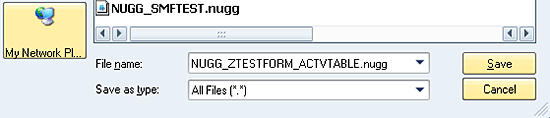
Figure 20
The .nugg file name format at the time of saving a nugget file in program ZSAPLINK
After you create a nugget, select the option Add Object to Nugget. Add object type SSFO, which refers to the Smart Form object, and the name of the Smart Form in the respective fields of the selection screen as shown in
Figure 21. Select the nugget file you created recently in the file name field. Press F8 to execute the program. After you create the file, a message of success appears in the status bar as shown in
Figure 22. The message indicates that you have successfully created the nugget.
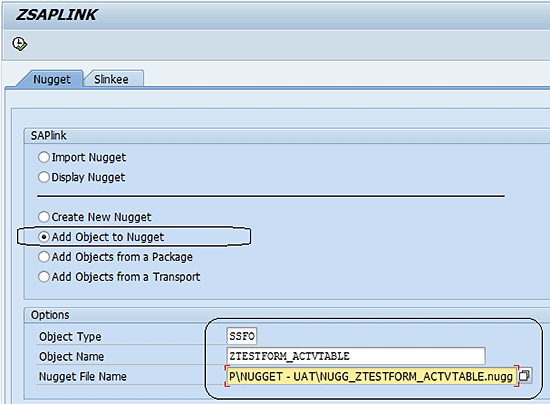
Figure 21
Add an object to the nugget file in the ZSAPLINK program

Figure 22
A message that you successfully added an object to the nugget
You can review the created nugget file by opening it in any text editor; for example, Notepad in Microsoft Windows. It is a well-formed XML document with <nugget> node as its parent and <SSFO> as the child of <nugget>. All custom data elements, structure, table type and Smart Style that were used in Smart Form have now become the children elements of the <SSFO> node in the nugget file produced by SAPLink. This indicates that these data types were part of the downloaded Smart Form.
Now it is time to import and activate this downloaded Smart Form at the target system. You must ensure that the target system also meets the previously stated prerequisites of SAPLink and has the same implementation of ZSAPLINK_SMARTFORM class as you created recently. To upload a nugget file, you need ZSAPLink installed on the system.
Let’s upload the downloaded Smart Form onto the target system of a landscape other than the one from which the Smart Form was downloaded. You then can activate it in just one click.
Execute the ZSAPLINK program in transaction code SE38 at the target system. A selection screen appears. Select the Import Nugget button and then enter the file path of the recently created
.nugg file in the Nugget File Name input field as shown in
Figure 23. Do so either by clicking the lookup icon

or pressing F4 when the cursor is focused on that field. You could also enter the file path manually. In my example, the recently created .nugg file is NUGG_ZTESTFORM_ACTVTABLE.nugg.
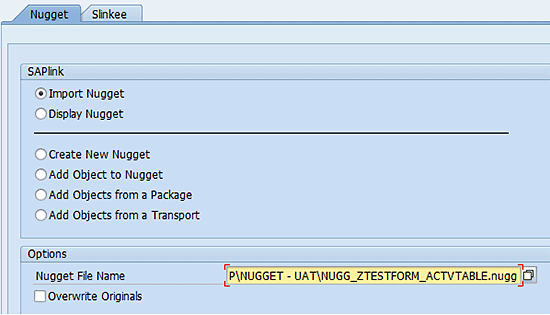
Figure 23
Import a nugget file in program ZSAPLINK
When the program finishes creating the upload of Smart Form ZTESTFORM_ACTVTABLE, it asks you to assign a package name to the Smart Form as shown in
Figure 24. Enter a package name and click the save icon.
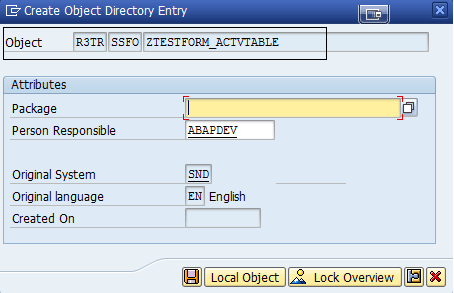
Figure 24
Assigning a package to a Smart Form Object
If there is information about any custom Smart Style being used in Smart Form, the program also installs the custom Smart Style and asks you to assign a package to the Smart Style. The system then activates that Smart Style as well. (This topic is beyond the scope of this article.)
Because the program continues to undergo its execution and installs all the other objects downloaded along with the Smart Form ZTESTFORM_ACTVTABLE, an activation confirmation pop-up screen lists all data types the program has installed and wants to activate. Click the enter icon

and the system activates all the listed data types as shown in
Figure 25.
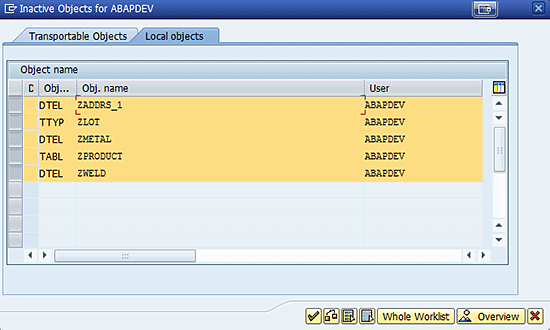
Figure 25
A pop-up screen appears during activation of data objects by ZSAPLINK
Here, the point of one click activation of an uploaded Smart Form comes into play. Open the installed Smart Form ZTESTFORM_ACTVTABLE using transaction code SMARTFORMS in the change or edit mode and click the activate icon or press Ctrl+F3. Because the system has already installed and activated all those custom data types and Smart Styles required for activation of the Smart Form, the system activates ZTESTFORM_ACTVTABLE. As shown in
Figure 26, it changes ZTESTFORM_ACTVTABLE Smart Form’s status from inactive to active.
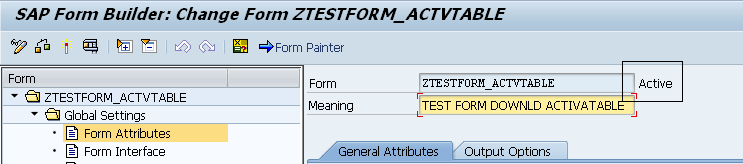
Figure 26
Active status of ZTESTFORM_ACTVTABLE
Muhammad Ramzan
Muhammad Ramzan is an experienced SAP Certified Consultant in ABAP and Portal development. He has more than five years of development experience in SAP. His current affiliation is with EJADA Systems at the Saudi ARAMCO Project in Saudi Arabia. Previously, he was a senior SAP Development Associate in DESCON Engineering Limited in Pakistan, which is a leader in the Engineering & Construction, Chemical, and Power industries. His career experiences in the software development industry as well has made him capable of integrating SAP and non-SAP solutions successfully.
You may contact the author at
Muhammad.Rumzaan@gmail.com.
If you have comments about this article or publication, or would like to submit an article idea, please contact the
editor.