Learn how Interview Scheduling functionality of SuccessFactors Recruiting Management enables recruiters to quickly and easily manage the recruiting process, thereby reducing the time spent scheduling interviews.
Key Concept
The Interview Scheduling feature of SAP SuccessFactors allows interviewers to enter their availability directly into the system to easily schedule interviews. The candidate self-scheduling functionality allows organizers to propose times to candidates, who can then select their preferred time.
Interviews are an essential and sometimes scary part of the hiring process, both for candidates and recruiting users. Candidates want to ace their interviews, and interview organizers need to make sure the interview process goes smoothly. Setting up an interview schedule that works for everyone involved is not easy and can be somewhat challenging.
The SAP SuccessFactors Interview Scheduling functionality helps simplify and streamline the entire interview-scheduling process. SAP SuccessFactors Interview Scheduling enables interview organizers to access an interviewer’s availability directly within the tool, and gives candidates the flexibility to choose time slots that work for them.
I show how to configure the SAP SuccessFactors Interview Scheduling feature; create, edit, and delete interview schedules; and integrate with the Microsoft Outlook calendar functionality. Along the way, I also provide you with interesting tips.
System Prerequisites
Before configuring the Interview Scheduling feature, you need to make sure the system meets the following requirements:
- SuccessFactors version 12 user interface (UI)
- Version 2 for Data Retention Management (DRM) or Data Privacy Consent Statement (DPCS), if using either
- Career Site version 12. This option is available by following menu path Admin Center > Manage Recruiting > Manage Recruiting Sites > Enable V12 External Career Site.
Steps for Configuring the SAP SuccessFactors Interview Scheduling Functionality
This section details the steps needed to configure the Interview Scheduling functionality in SuccessFactors Recruiting Management module.
Step 1. Enable the Interview Scheduling Feature
The first step is to enable the interview-assessment feature for at least one candidate or applicant status in the Talent Pipeline. Associating the feature to a desired candidate status or statuses (e.g., phone interview, first in-person interview, second in-person interview, and so forth) is done in the Job Requisition template. If a company maintains different requisition templates and wants to use the Interview Scheduling feature for all of them, the tool must be enabled separately in all the templates.
Note
Feature permissions are embedded inside the <application-status-config> tag. Companies need to work with Professional Services or Partners to do this step of configuration.
The sample code in
Figure 1 grants interview-scheduling permissions to the recruiter [R] and originator [O] roles for the candidates’ first in-person and second in-person interview statuses. You enter this code in the Job Requisition template.
<feature-permission type="interviewAssessment">
<description><![CDATA[Enabling Interview Scheduling in 1st In-Person Interview status]]></description>
<role-name><![CDATA[R]]></role-name>
<role-name><![CDATA[O]]></role-name>
<status><![CDATA[1st In-Person Interview]]></status>
</feature-permission>
<feature-permission type="interviewAssessment">
<description><![CDATA[Enabling Interview Scheduling in 2nd In-Person Interview status]]></description>
<role-name><![CDATA[R]]></role-name>
<role-name><![CDATA[O]]></role-name>
<status><![CDATA[2nd In-Person Interview]]></status>
</feature-permission>
Figure 1
Code with permissions
Step 2. Enable the Interview Scheduling Feature in Manage Recruiting Settings
Once the code has been entered, navigate to Admin Center > Manage Recruiting > Manage Recruiting Settings > Interview Central section. In the screen that opens (
Figure 2), select the Enable Interview Scheduling check box.

Figure 2
Manage Recruiting settings
Step 3. Set Up the Virtual Interview and the Face-to-Face Interview Locations
The next step is to create picklists for the virtual and face-to-face interview locations. Navigate to Admin Center > Picklists Management and, in the Picklists screen that opens (
Figure 3), create the required picklists. (Detailed steps on how to create picklists is out of the scope of this article.)
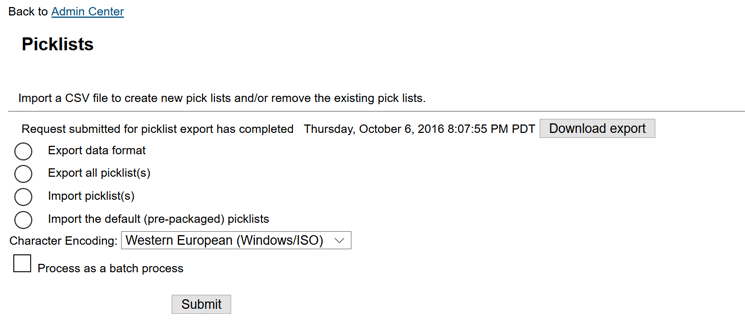
Figure 3
Create picklists
Step 4. Configure Interview Location Picklists
You need to add the newly created picklists to the respective options in Manage Recruiting Settings. Navigate to Admin Center > Manage Recruiting > Manage Recruiting Settings > Interview Central section. In the screen that opens (
Figure 2) select the picklists that were created in step 3.
This step is an optional configuration. These configuration settings allow recruiting users to choose a location when scheduling an interview (e.g., 17 Peachtree Street, Atlanta, GA).
Step 5. Set Up Email Templates and Email Triggers
Once you’ve created picklists, the next step is to create interview-scheduling related email templates to communicate interview details to interview participants and set up email triggers for them. Email triggers send emails automatically to various recipients (e.g., candidates, interviewers, or organizers). Navigate to Admin Center > Manage Recruiting > Manage Recruiting Email Templates and a screen like the one in
Figure 4 opens. Fill in the Template Name, Status, Subject, and Body to create an email template. You can add attachments to email templates, if needed. Once you’ve entered the required details, click Save Changes to create an email template.

Figure 4
Enter the email template details
Next, you need to enable the required triggers and associate them with the respective email templates. (The steps for doing this are discussed in more detail in the Email Triggers section.)
Note
A detailed discussion of email templates and triggers is out of the scope of this article.
Step 6. Grant Permissions to Interview Schedulers
Now you need to give the Interview Scheduling tab permissions to users who schedule the interviews. If you are using role-based permissions, navigate to Admin Center > Manage Permission Roles. In the screen that opens (not shown) select the interview organizer role > Permissions. This opens the screen in
Figure 5, where you select the Recruiting Permissions link. Then, on the right, select the Enable Interview Scheduling Permission check box. This permission grants organizers access to the Job Requisitions link in the Interview Scheduling tab. One you’ve made your desired entries, click the Done button to save your settings.
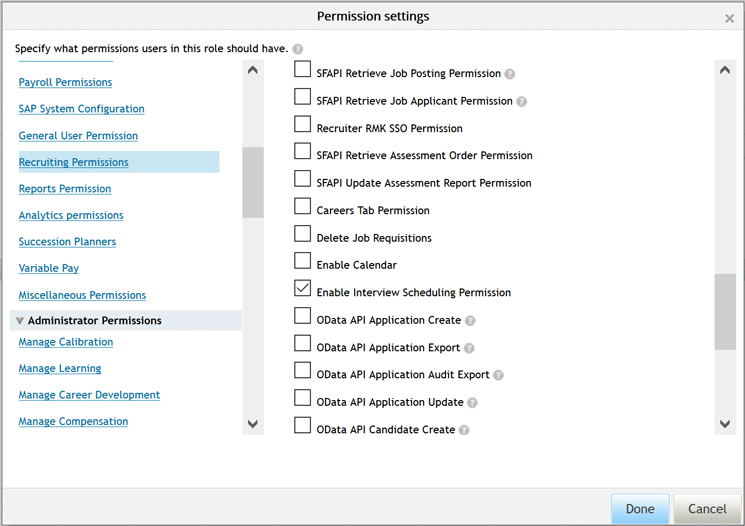
Figure 5
Grant organizers access to the Job Requisitions link
Once the recruiting users are granted the necessary permissions, they have access to the Interview Scheduling tab in Recruiting, as shown in
Figure 6.

Figure 6
The Interview Scheduling tab is added to the dashboard
Click the Interview Scheduling tab (
Figure 6), and a display of the dashboard where recruiting users access job requisitions and the candidates associated with each requisition appears.
Details for Scheduling Interviews Using the Interview Scheduling Tool
After the Interview Scheduling tool is configured, recruiting users can create, edit, and cancel interview schedules from the Interview Scheduling dashboard. I detail the steps for doing this in the following sections.
An Overview of the Interview Scheduling Dashboard
Note there are a few other conditions that must be in place for job requisitions to appear on the dashboard in
Figure 6. They are:
- The job requisition’s status must be Open Approved. Pre-Approved and Closed job requisitions do not appear on the dashboard.
- To access job requisitions, users must be named in the job requisition in a recruiting role or recruiting team role.
- Recruiting roles: These roles include Originator, Recruiter, Hiring Manager, Coordinator, Sourcer, Financial Controller, and VP of Staffing.
- Recruiting team role: These are the roles that have the same permissions as the associated recruiting role, but can accommodate more than one user. Examples of team roles include Recruiter Team and Hiring Manager Team.
- At least one candidate must be in the interview status for which the organizer has permissions to schedule an interview. (Refer to step 1, Enable the Interview Scheduling Feature.)
- To view candidates and schedule interviews, organizers and recruiting users must have permissions to view candidates in that interview status.
- Recruiting user permissions to view candidates in different statuses are found in Admin Center > Manage Recruiting > Edit Applicant Status Configuration.
Recruiting users who belong to a requisition can assign themselves or other recruiting users to an interview on the dashboard, if the following conditions are met (Figure 7):
- The user must be named on the requisition in a recruiting role or recruiting team role.
- The user must have interview-assessment permission for the corresponding candidate’s interview status. (Refer to step 1, Enable the Interview Scheduling Feature.)
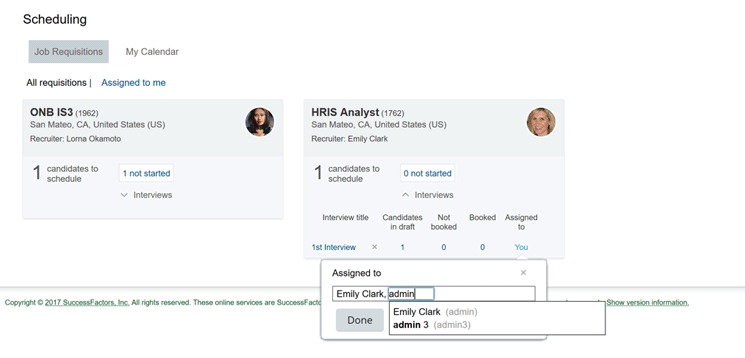
Figure 7
The Assigned to permissions in the Interview Scheduling dashboard
There are four possible interview statuses in the Interview Scheduling tool as shown in
Figure 8:
- Not started: Candidates in an interview step who are available to be scheduled for interviews, but have not yet been scheduled.
- Candidates in draft: Candidates in an interview step who are available to be scheduled and have been added to a draft interview schedule, but have not been communicated with.
- Not booked: Candidates who have been added to an interview schedule as well as communicated with via interview emails, but have not confirmed receipt of the email or selected a time.
- Booked: Candidates who have been added to interviews and communicated via interview emails and have confirmed the interview.

Figure 8
The interview status screen
At a high level, interviews scheduled in the Interview Scheduling tool can be placed in two categories: panel style (
Figure 9) and back-to-back style (
Figure 10).

Figure 9
The panel-style interview screen

Figure 10
The back-to-back-style interview screen
Panel style: This type of interview is used if more than one interviewer is added to the schedule in such a way that all the interviewers are required to interview the candidate at the same time
.
Back-to-back style: This style of interview is used if multiple interviewers are added in an order where one interviewer follows the other. In this type of interview, you can:
- Add all the interviewers and simply drag and drop them to create the order required.
- Add the interviews, one-by-one, in the order that the interviews will occur, and the first position becomes the first interview scheduled.
- Add breaks to the schedule in between interviewers, if needed.
Steps for Creating an Interview Schedule
This section provides a detailed walkthrough for creating a new interview schedule.
1. Navigate to the Recruiting module (using the Home drop-down [
Figure 11]) and in the screen that opens (
Figure 6) select the Interview Scheduling tab.
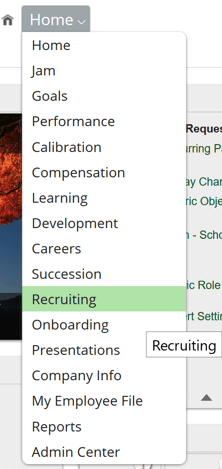
Figure 11
Click the Recruiting module option from the Home drop-down list
2. A list of job requisitions is displayed on the Interview Scheduling dashboard based on the conditions previously explained.
3. Choose the job requisition for which you would like to schedule interviews—in this example, the HRIS Analyst requisition.
4. Click the link for the candidates shown in not started status. The system displays different interview statuses as well as the candidates grouped by each of their statuses (
Figure 7). Each candidate is represented by a candidate card that displays information that includes name, email, location, status in the pipeline, and the date they are moved to this interview status (
Figure 12).
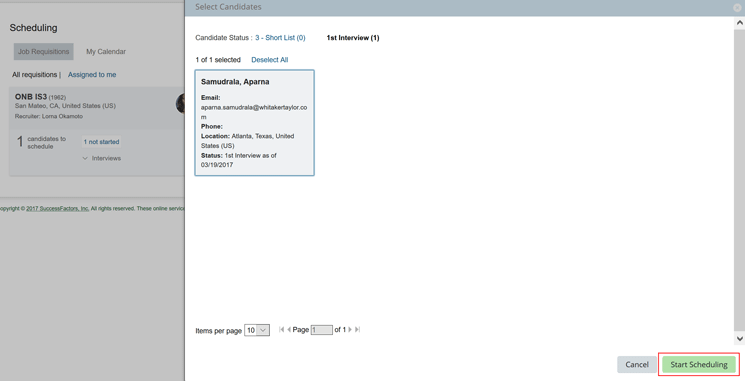
Figure 12
View the candidate’s details
5. Select the candidates’ names for which you would like to schedule interviews. You can select more than one candidate or select all of them to schedule all the candidates at once.
6. Click the Start Scheduling button after selecting the candidates.
7. The system displays a new screen in which you can add information such as interviewers, locations, and times (
Figure 13).

Figure 13
View and add interview details
8. Provide an Interview Title if you would like to change the defaulted status name from the talent pipeline.
9. Select the Interview Type and Location settings in
Figure 13. The location values in the drop-down are based on the picklist configuration made in the Manage Recruiting settings. If you need a new location that is not available in the picklist, the interview organizer can use the Add New option to add additional locations (
Figure 13). New locations added using this option do not automatically update the picklist and these location options are only added to this schedule. (Refer to step 3 shown in
Figure 3 if you want to add new location options to the picklist.)
10. The next step is to add the Interviewers under the Manage Interviewers section (
Figure 14). Organizers can add interviewers using the interviewer’s name or by choosing the role name in the requisition. It is not possible, however, to add the same user twice in one schedule (e.g., if you have already added an interviewer using his or her name, you cannot add that person again by choosing his or her role).
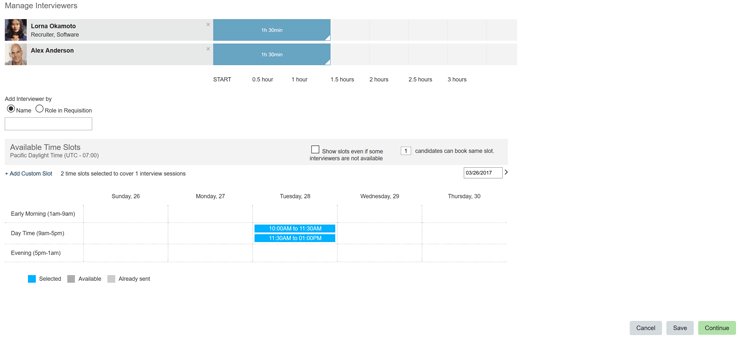
Figure 14
Check the Available Time Slots in the interview details screen
11. After adding all the interviewers, you can reorder them if they need to interview the candidate in a specific order (refer to
Figure 10).
12. The default interviewer length is 30 minutes, but the time can be extended by dragging the white space on the bottom right of the interview duration box shown in
Figure 13.
Tip!
The maximum number of interviewers that can be added to one schedule is 15, and the longest an interview can last is 12 hours.
13. After adding all the interviewers, click the Find Availability button (
Figure 13). This action opens a screen that displays all the available times that fit the entire interview schedule in the Available Time Slots grid (
Figure 14). For example, if Interviewer A is available from 09:00AM to 1:30PM and Interviewer B is available from 10:00AM to 1:30PM in the same time zone, and the interview duration is one hour and 30 minutes, then the availability is shown with two slots, 10:00AM – 11:30AM and 11:30AM – 01:00PM, for the entire interview schedule. Select the desired times slots and click the Continue button to finish.
Tip!
Interview organizers see the time slots in their Employee Profile time zone and candidates see the time slots in their system’s time zone. If an organizer is scheduling an interview for a candidate in another time zone, the organizer must manually handle the time zone conversion when selecting time slots.
14. After selecting the time slots you can click the Save button to save the schedule if you wish to proceed. Clicking the Save button saves the entire schedule and changes the status to Candidates in draft and the candidates are not sent the interview details.
15. If you select the Continue button to finish, the Contact Candidate(s) screen opens (
Figure 15) prompting you to choose the Language and Email Template you want to send to candidates to send them the interview details.
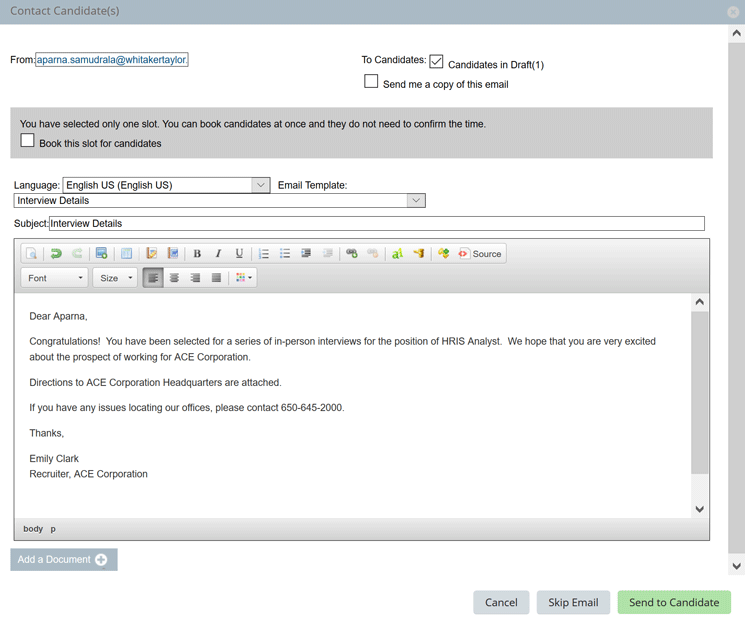
Figure 15
Draft the interview email in the Contact Candidate(s) screen
16. Modify the subject or body of the email, if needed, select the candidate to whom to send the email using the To Candidates check box, and select the optional check box to send yourself a copy of the email (if required). You can add documents using the Add a Document button at the bottom (such as directions to the interview location). Once you’ve made your desired entries and reviewed the email, click the Send to Candidate button. Click the Skip Email button if you do not want to contact candidates or the Cancel button to close the current screen if you want go back to the interview schedule details page.
Tip!
You can associate a default email template to be populated on this screen via Admin Center > Manage Recruiting Email Triggers.
17. Based on the configuration, candidates and interviewers receive email communications and interview meeting invites if the Outlook calendar is integrated. I discuss the Outlook calendar integration later in the article.
Manage Interview Schedules
In this section, I discuss how to manage interview schedules that were created. Learn different options available to schedule interviews as well as edit, cancel, and delete interviews.
Candidate Self-Scheduling Interviews
If organizers select multiple slots in the Availability screen (
Figure 14) for one round of interview for a candidate, the candidate self-scheduling feature is enabled. In this case, candidates are sent one email with multiple options showing the time slots chosen by the organizer, and they can choose their preferred time. Candidates need to log in to the external career site to select and confirm their availability.
If the candidate self-scheduling option is not required, organizers send an email with one interview time slot and candidates don’t have the option to select a time slot.
Editing Interview Schedules
You can add more candidates to the schedule, add additional time slots, change interviewers, and change the duration of interviews using the edit functionality,
Adding additional candidates: You can add additional candidates to an existing interview schedule rather than creating a new schedule altogether. Simply select the job requisition card in the Interview Scheduling dashboard (Figure 7) and click the names of the candidates in draft status or Not booked status. This action opens a screen with a list of the candidates in those statuses. Select the candidate’s names, one by one, and continue with the scheduling process. In the final email screen (Figure 15), you can choose to send email communication to the candidates.
Adding time slots: Organizers can add more time slots to the interview schedule if there are any candidates who were not booked at the time the schedule was first created. Select the job requisition card in the Interview Scheduling dashboard (Figure 7) and click the name of the interview. This action opens the Interview Setup page (Figure 14) where you can select some more available time slots. Once you’ve made your selections click the Continue button to add them. On the final email screen that opens (Figure 15), you can choose to send email communication to candidates.
Changing interviewers or interview duration: If you want to change either interviewers or the interview duration, you only have this option when the candidates are still in draft status. If there are candidates in either Not Booked or Booked statuses, changes to the schedule are not allowed.
Canceling Interview Schedules
There are three options for canceling interviews once they’ve been scheduled. Interviews can be canceled by:
- Candidates
- Interviewers
- Organizers
I discuss each of these options in the following section.
1. Interview cancellation by candidates: Candidates can cancel their interview anytime by logging in to their candidate profile > My Interviews tab (Figure 16). Once logged on, candidates see a Cancel link if they have already booked an interview time, or a Decline link if they have not. Candidates cannot rebook an interview once canceled unless the organizer sends an invite to reschedule.

Figure 16
The candidate has the option to cancel an interview schedule in My Interviews
2. Interview cancellation by interviewers: When the Outlook calendar integration is not enabled, interviewers can cancel their interviews from My Calendar sub-tab under Interview Scheduling tab (Figure 17). Select the interview and click the Cancel link. If one interviewer cancels, the interview is canceled for everyone. The candidate’s status changes to Not Booked and a cancel interview notification email is sent out to candidates.
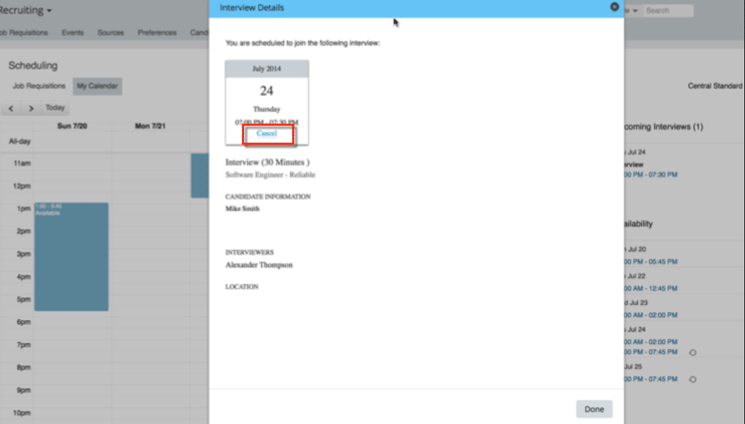
Figure 17
The interviewer cancels the interview
When the Outlook calendar integration is enabled, interviewers receive an Outlook meeting invitation when interviews are scheduled and they can respond to the invitation just as they would to any other Outlook invite (Accept, Decline, or Tentative). To cancel the interview, they just decline the invite.
Tip!
The Cancel Interview Notification Email functionality must be enabled for interviewers to be able to cancel interviews regardless of Microsoft Outlook integration.
3. Interview cancellation by organizers: If organizers need to change any details about the interview for a candidate(s) or if a candidate is no longer interested in interviewing for that position, they can remove candidates from the existing interview schedule. Select the Job Requisition card on the Interview Scheduling dashboard and click the number link under the desired interview status to view the candidates. (
Figure 18). Then click the desired candidate’s name, and remove them by clicking the Remove Candidate(s) button (
Figure 19). Once they’ve been removed, the system triggers and sends a Candidate Deleted from Interview notification email to all the participants. Removing candidates changes their status back to Not Started for that interview step and they can then be sent a new interview schedule, if so desired.
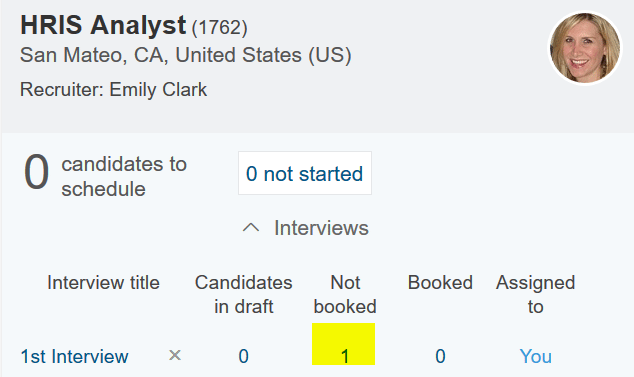
Figure 18
Click the number link to view candidate(s)

Figure 19
Remove candidate(s) from the interview
Deleting Interview Schedules
If there are changes in interviewers or interview duration after the candidates are communicated, the entire interview schedule needs to be deleted. Choose a job requisition card on the dashboard and click the X link next to the Interview step to be deleted (Figure 20). Deleting the entire interview schedule moves all the candidates to Not Started status and triggers and sends an Interview Delete Notification email to all the participants.

Figure 20
Delete the interview to make changes late in the process—this requires starting over in Not Started status to reschedule
Configuring Email Triggers
To configure the triggers to automatically send email notifications during the scheduling process, navigate to Admin Center > Manage Recruiting > Recruiting Email Triggers (
Figure 21). Click the trigger you want to enable to open the Edit Trigger screen shown on the right of the figure. Associate an email template to be sent when the trigger fires. You can enable multiple interview triggers and associate appropriate email templates to each trigger. Once you’ve made your desired entries, click the Save button to save your trigger settings.
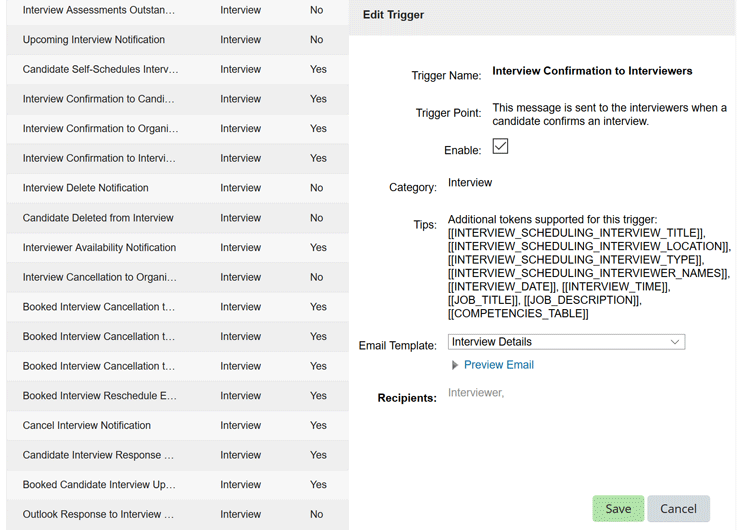
Figure 21
Enable triggers to send automatic interview-related emails to multiple attendees
Integrating with Microsoft Outlook Calendars
The integration of the Microsoft Outlook calendar with Interview Scheduling is an optional feature. With Outlook integration enabled, interviewers no longer need to manually enter their availability in the SAP SuccessFactors calendar as it is automatically retrieved from their Outlook calendars.
It is important to set up the interviewers’ and organizers’ time zones in their Employee Profiles to capture and display the correct availability. Any times that are shown as available (free) in the interviewers’ Outlook calendars can then be used to get available time slots when the organizer clicks the Find Availability button after adding the interviewers in the interview details page (Figure 14).
To do this, the following prerequisites must be in place:
- The Interview Scheduling feature must be configured in the SAP SuccessFactors HCM suite.
- The integration only works with Microsoft Exchange 2007 or higher, or Office 365.
- The interviewers’ Employee Profile email addresses must be their Outlook email addresses.
The configuration steps are as follows:
1. Create a service account within the user’s Microsoft Exchange Web Server (EWS).
2. Make EWS available to the SAP SuccessFactors servers, using either a direct URL method or Auto discovery.
3. Grant the System Administrator permission to set up the Interview Scheduling/Outlook Integration. To do this, go to Admin Center > Set User Permissions > Manage Permission Roles > select the Admin role > Permission > Manage Recruiting > Set up Interview Scheduling Outlook Integration.
4. Log in as the System Admin and go to Admin Tools > Manage Recruiting > Set up Interview Scheduling Outlook Integration. This action opens the screen shown in
Figure 22 in which you provide the Microsoft Exchange URL or choose the Auto discovery option. Provide the Service Account Username, Password, and Email, and Verify the connection.

Figure 22
Provide the details to connect with Microsoft Outlook
5. Once the connection is successfully established, select the Establish Outlook Integration for Interview Scheduling check box and click the Save button (
Figure 23).
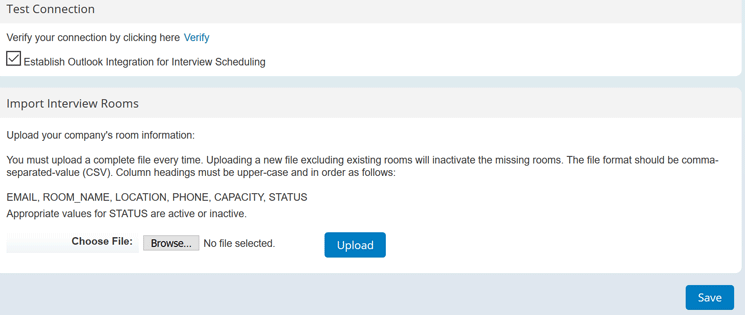
Figure 23
Set up the interview scheduling integration with Microsoft Outlook
6. Once the Outlook calendar integration is enabled, the SAP SuccessFactors My Calendar sub-tab in the Interview Scheduling tab disappears. If the Outlook calendar integration is disabled later, the My Calendar automatically become visible.
Email Notifications
When an interview is booked, an Interview Confirmation to Interviewers email is triggered and interviewers receive an Outlook meeting invitation. All the interviewers receive the same meeting invite, if there is more than one Interviewer. Interviewers can respond to the meeting invitation just as they would to any other Outlook invitation with Accept, Decline, or Tentative responses, and their calendars in Outlook are updated accordingly.
Interview Responses with Microsoft Outlook Integration
If Microsoft Outlook integration is enabled, organizers can view interviewer responses in the Interview Scheduling dashboard. Select the job requisition and locate the interview for which you want to check responses. Click the candidates’ names in Booked status and the system displays the photos of the interviewer as well as their responses. If an interviewer accepts the interview meeting invite, a green tick mark is displayed—if the invite is declined, a red X is displayed. If interviewers do not send a response when they receive the email, the card shows no response (blank).
Aparna Samudrala
Aparna Samudrala is a certified SAP SuccessFactors Consultant, focusing on the entire SAP SuccessFactors suite. Her experience includes implementations, upgrades, and support for different global clients. Aparna graduated from the Georgia State University with a Master’s degree in Information Systems specializing in Enterprise Resource Planning.
You may contact the author at
aparna.samudrala@gmail.com.
If you have comments about this article or publication, or would like to submit an article idea, please contact the
editor.


