Organizations can benefit from replacing the traditional annual performance review process with a continuous performance culture. Users of SAP SuccessFactors continuous performance management functionality can generate reports and tiles to monitor the use and effectiveness of the solution in the organization.
Key Concept
Annual performance reviews hold employees accountable for their past performance rather than improving the current performance and developing talent for the future. On the other hand, a continuous performance culture with frequent check-ins and real-time coaching feedback provides supervisors with more insight into employees’ goals, which helps build the human resources that organizations need today and in the near future.
Performance appraisal, also known as a performance review or an employee evaluation, is a process by which an employee’s job performance and productivity are assessed and documented, typically by the employee’s supervisor. Traditionally, organizations carry out the performance evaluations at year end or on the employee’s service anniversary.
The purposes of performance evaluations are to provide useful feedback about employee performance, to recognize outstanding performance, to set future performance goals, and to contribute to professional development. Additionally, employers use this information to make important decisions in the organization, such as promotions, pay raises, and layoffs. However, despite all the best intentions, the 12-month performance management often fails to deliver what it intended because of the following reasons:
- Managers and employees do not have periodic check-in meetings and the semi-annual or annual meetings often lack structure.
- Achievements are never captured when they happen. Employees spend hours struggling to recall what they’ve achieved throughout the year and probably only remember half.
- Employees are not exactly sure if their work aligns with the organization’s objectives and do not receive coaching advice or feedback when they need it to perform at their best.
- The process is too rigid and hierarchical and follows a one-size-fits-all approach, which might not yield effective results for all employees.
However, the good news is the use of annual performance reviews in the workplace is dying out as companies are slowly transitioning to a culture of continuous performance management (CPM). CPM is a more fluid, personalized approach. It can be manager or employee driven.
The capabilities delivered by SAP SuccessFactors CPM allow employees to have more structured discussions, capture one-on-one discussions for future reference, and acknowledge achievements in real time. CPM helps managers and supervisors provide a balance of positive and negative feedback when employees need it most.
CPM is part of the SAP SuccessFactors Performance & Goals Management (PM/GM) module. A PM/GM license is required for CPM but the PM/GM module does not need to be configured to configure CPM. CPM configuration can be standalone without the PM/GM implementation.
Note
With the Report Center upgrade in the Q3 2017 release, Ad-Hoc Reports
are now referred to as Table Reports. Throughout the article, the terms
Ad-Hoc Reports and Table Reports are used synonymously. Enabling the
Report Center feature is out of scope of this article.
Dimensions of CPM
Following are five features in CPM:
1. Activities are the tasks that employees are working on—for example, preparing an expense report, working on a sales presentation, or attending a professional development training session. Activities are personal to each employee and can be linked to the employee’s performance goals and development goals. Linking activities to an employee’s goals ensures that they are working on the right things and that their goals are in alignment with business objectives. Activities are continuously tracked by employees by providing comments and updates and can be converted to achievements when they are completed. Employees can assign a priority such as High, Medium, or Low and a status such as New, In Progress, Cancelled, or Completed to their activities. Since managers have visibility into the employee’s activities, they can provide better guidance by making updates in the system or discussing them in the one-on-one conversations to ensure the activity is on track.
To create an Activity, log in to the SuccessFactors instance and select Continuous Performance from the Home menu. Click + Add Activity link under the ACTIVITIES sub tab shown in
Figure 1.

Figure 1
Click the + Add Activity link
The system displays a New Activity screen
(Figure 2). Fill in the details required and the activity can be linked to a Performance Goal or Development Goal in the Goals section. Click the Save button.
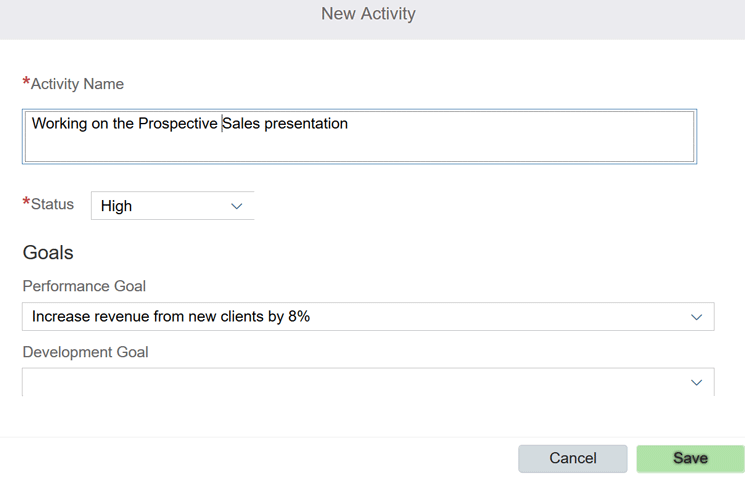
Figure 2
Create a new activity
This creates a new activity as shown in
Figure 3.

Figure 3
A new activity is created
2. Achievements often represent completed activities, but a linked activity is not necessary. It is also possible to directly link achievements to performance or development goals or to link achievements to activities, which are in turn linked to performance or development goals. When an activity is marked as complete, the system prompts you to verify if the completed activity is to be converted to an achievement, although this process is optional. The employee’s achievements can be viewed by timeline or by goals. This dimension of CPM enables employees to capture the achievements when they occur in real time rather than waiting for the end of the year. Especially with achievements, employees can also solicit feedback from other team members who worked together on a project.
To create an Achievement, log in to the SuccessFactors instance and select Continuous Performance from the Home menu. Click + Add Achievement link under the ACHIEVEMENTS sub tab as shown in
Figure 4.

Figure 4
Click the + Add Achievement link
The system displays the Add Achievement screen (
Figure 5). Fill in the details required and the achievement can be linked to an activity in the Link to Activity drop-down field. Click the Save button.

Figure 5
Add a new achievement
This creates a new achievement as shown in
Figure 6.

Figure 6
An achievement is added
3. A Topic can be anything other than activities that employees want to discuss in their one-on-one conversations with managers. For example, employees wanting to discuss promotion opportunities, more flexible work hours, or training and networking events can create them as topics, thereby providing a structure to the discussions. Employees can mark topics as completed once they are discussed.
To create a Topic, log in to the SuccessFactors instance and select Continuous Performance from the Home menu. Click the + Add Topic link under the ACTIVITIES sub tab as shown in
Figure 7.

Figure 7
Click the + Add Topic link
The system displays a text box to create the topic as shown in
Figure 8. Type in the topic to be discussed and click the OK button.

Figure 8
Type in the topic details
This creates a new topic as shown in
Figure 9. After a topic is discussed select the circle icon in front of the topic.

Figure 9
A topic is created
The system strikes through the topic to visually mark it as completed as shown in
Figure 10.

Figure 10
Topic is marked completed
4. Coaching Advice is for managers to provide timely and constructive feedback to employees that helps them perform at their best and improve their performance and development. CPM enables managers to provide balanced feedback by providing employees with a record of what they did that was excellent and what they could do to improve, thereby creating a healthy feedback culture. The Coaching Advice view is only available to managers with direct reports.
To provide coaching advice, log in to the SuccessFactors instance as a manager and select Continuous Performance from the Home menu. From the My Team view on the left side, click the team member name to whom the coaching feedback is to be given as shown in
Figure 11. In this figure, Carla Grant is the manager and she selected her direct report Emily Clark from My Team to provide Emily the coaching feedback.

Figure 11
Select the direct report/team member to provide coaching advice
The manager fills in the feedback and clicks the OK button as shown in
Figure 12.

Figure 12
Provide feedback to direct reports
The feedback is now available to the team member when he or she accesses the Continuous Performance module as shown in
Figure 13.
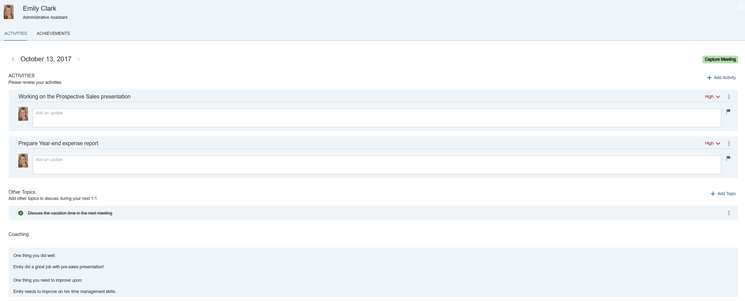
Figure 13
Coaching advice or feedback is shown to the team member
5. One-on-one meetings: After a meeting or discussion is completed between a manager and an employee, the discussion’s contents can be captured with just one click. By capturing the meeting, the employee or manager can refer to the coaching information or discussion points at any point in the future. All the past meetings, including the activities, topics, and feedback at a point in time, can be reviewed with a click. These one-on-one meetings, usually initiated by either a manager or an employee, can also be triggered based on time or transactional events. CPM can be configured to alert managers or employees by sending them reminder notifications at regular intervals.
To capture a meeting, log in to the SuccessFactors instance and select Continuous Performance from the Home menu. Click the Capture Meeting button under the ACTIVITIES sub tab as shown in
Figure 14.

Figure 14
Capture a meeting
The system prompts to confirm the action as shown in
Figure 15.

Figure 15
Confirm the Capture Meeting action
Click the OK button to capture all the contents and display them in a view only mode for future reference
(Figure 16).

Figure 16
Meeting is captured
Next, I take a detailed look at creating Ad-Hoc/Table Reports and dashboard tiles to report various dimensions of CPM. In SuccessFactors CPM, Ad-Hoc/Table Reports are used to keep track of the number of activities created over a period, the number of one-on-one meetings between supervisors and employees, the number of activities converted to achievements for employees, and the coaching advice provided by supervisors to their direct reports.
Granting Access to the Ad-Hoc/Table Reports
To create and run Ad-Hoc/Table Reports, users must have access to the Report Center in the SuccessFactors instance. Directions for granting access to create and run Ad-hoc reports follow:
1. Navigate to Admin Center > Manage Permission Roles and select the role to which Ad-Hoc Reports permissions are to be given.
2. After selecting the role, click the Permission button and scroll down to find the Reports Permission category (
Figure 17).
3. Click the Reports Permission link on the left and find the Create Report section on the right side
4. Select the Continuous Performance Management and Continuous Performance Meetings permission settings in the Create Report section.
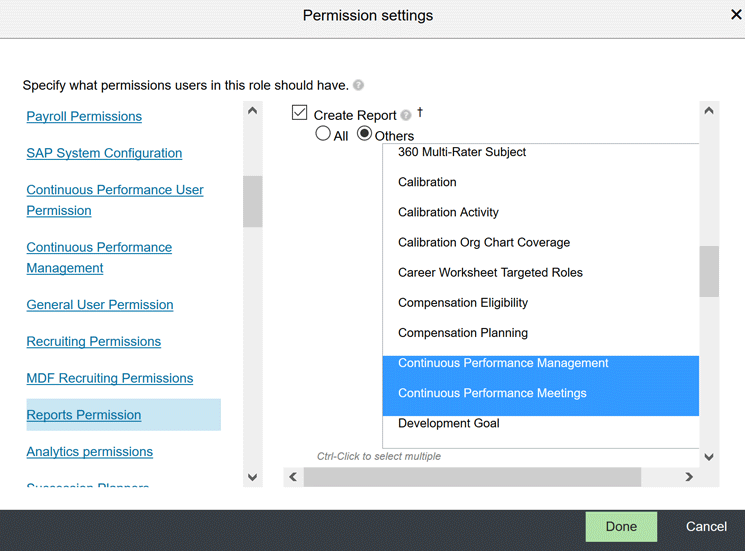
Figure 17
Select permission settings to Create Report
5. Scroll down in the Reports Permission link to find the Run Report section. Ensure that Continuous Performance Management and Continuous Performance Meetings are selected (
Figure 18). The Continuous Performance Management domain is used to report data on activities, achievements, coaching advices, and topics, whereas Continuous Performance Meetings is used to report one-on-one meeting data.
6. Click the Done button and then click the Save Changes button (not shown).
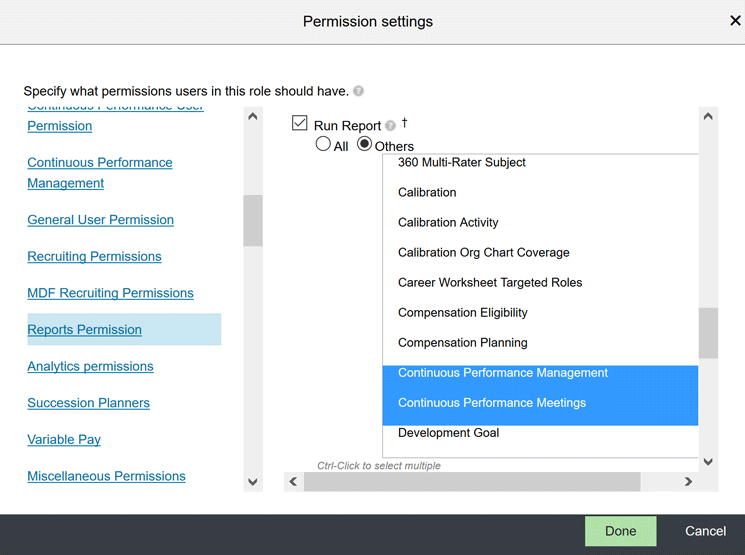
Figure 18
Select permission settings to run a report
Users now can create Ad-Hoc/Table Reports by following menu path Home menu > Reporting > Report Center.
Next, I show you how to build Ad-Hoc/Table Reports for the following use cases:
Report 1: Number of activities created by direct reports
Report 2: List of activities created by direct reports
Report 3: Number of one-on-one meetings between managers and direct reports
Report 4: Number of coaching advices provided to direct reports
Report 5: Activities that are converted to achievements
Report 6: List of achievements of direct reports
Report 1: Number of Activities Created by Direct Reports
1. Log in to the SuccessFactors instance with a user account that has permissions to create reports for CPM. Refer to the “Granting Access to the Ad-hoc/Report-Table Reports” section.
2. Select the Reporting module from the Home drop-down menu.
3. The system displays the Report Center screen (
Figure 19).
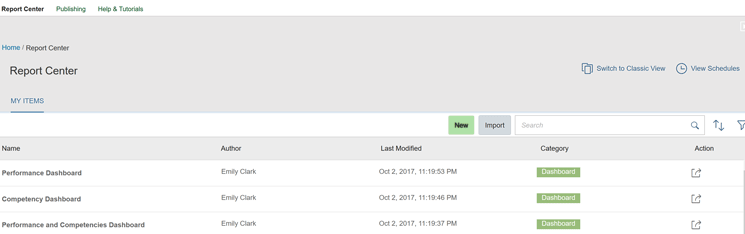
Figure 19
The Report Center screen
4. Click the New button to open the screen in
Figure 20.
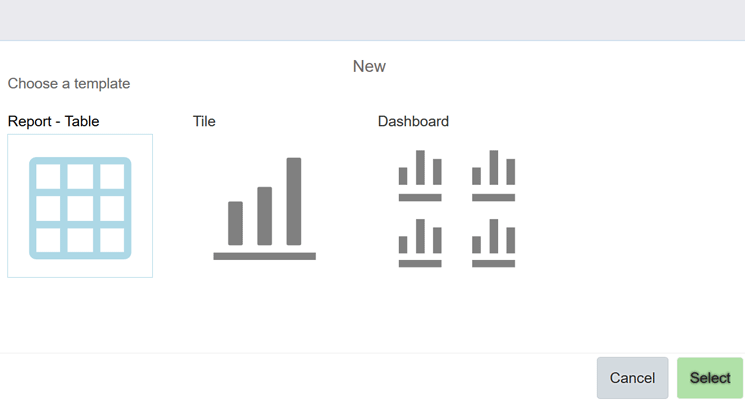
Figure 20
Select Report -Table
5. Select Report - Table to create an Ad-Hoc/Table Report and then click the Select button. This action opens the screen in
Figure 21.
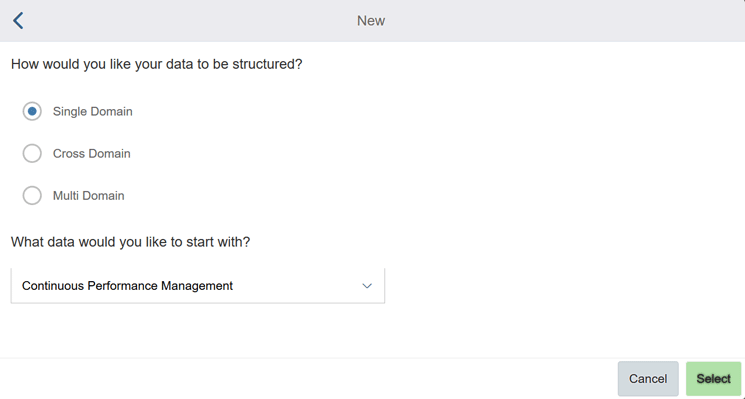
Figure 21
Select options for structuring data and the domain
6. Select the Single Domain radio button under the section How would you like your data to be structured? Choose Continuous Performance Management from the drop-down list of options under What data would you like to start with?. Then click the Select button to open the General Info tab (
Figure 22).
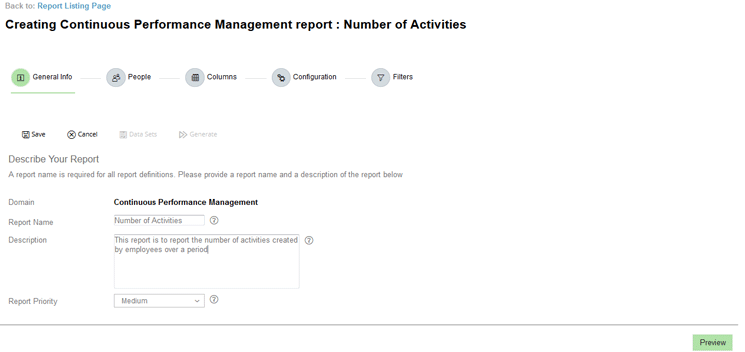
Figure 22
Enter data in the General Info tab
7. Enter data in the Report Name, Description, and Report Priority fields as required in the General Info tab.
8. Then select the People tab and click the Refine Criteria button (not shown). The system displays the Define Team screen to select the users for whom you want to run the report (
Figure 23). In this example, I selected Logged In User for Team Manager and Direct Reports from the Team Reporting Type drop-down menu options. Click the OK button. The values you choose may vary depending on your requirements.
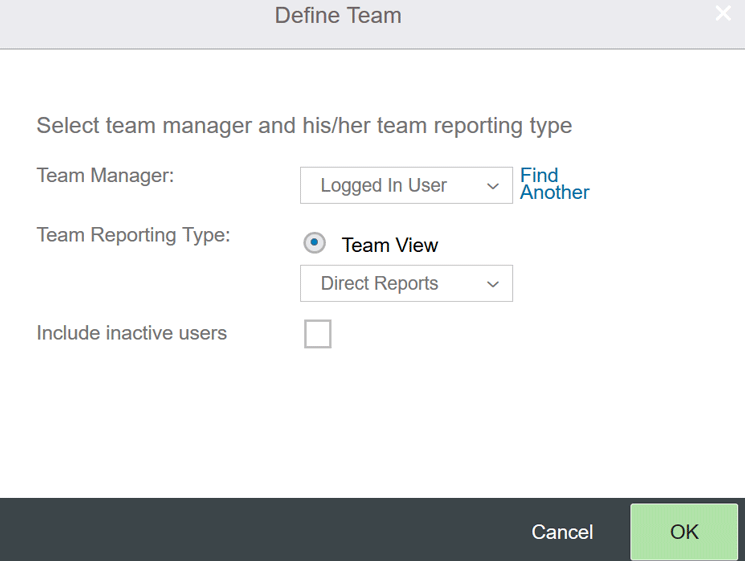
Figure 23
Select options in the People tab
9. Select the Columns tab. Click the Select Columns button (not shown) and then in the Columns section, select the check boxes for Activity Owner, Activity Owner First Name, and Activity Owner Last Name (
Figure 24). This action pulls the name of the team members who have created activities in CPM. Alternatively, you can select the Activity Owner Username or Activity Owner E-Mail columns to substitute for First Name and Last Name. Click the Done button after selecting the columns you require.

Figure 24
Select options in the Columns tab
10. In the Columns tab, under the Summary of Actions section, select the Group By link (
Figure 25) and then the Add another aggregate column link (
Figure 26).

Figure 25
Select the Group By link
Select Activity Owner for the Aggregate Column and COUNT as the Function to get the count of activities created by each direct report. Alternatively, you can choose Activity Owner E-mail if it is a unique attribute. Click the OK button.
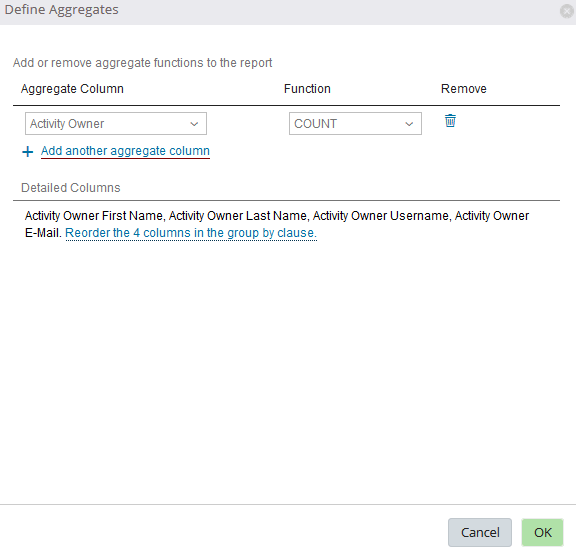
Figure 26
Select values for Aggregate Column and Function fields
11. Click the Filters tab (
Figure 27) and in the Select Filters section click the Refine Criteria button.
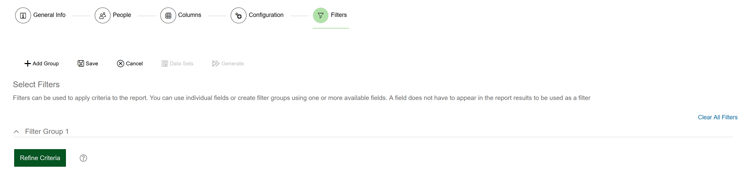
Figure 27
The Filters tab
12. Select the Activity Created Date column to filter activities created between a time range. Click the By Rule tab and then click the + Add Rule link. Create Rule 1 as Greater than or equal to the desired From Date/Start Date and choose the AND radio button. Click the + Add Rule link and create Rule 2 as Less than or equal to the desired End Date of the period you want to filter. These rules filter activities created by direct reports in the time interval filtered as above. In the example in
Figure 28, the report filters the activities created between the dates 4/11/2017 and 5/11/2017. Click the Done button.

Figure 28
Set up the date filter
13. Finally, click the save icon and then the generate icon to view the report results as filtered.
Report 2: List of Activities Created by Direct Reports
Repeat steps 1-8 as explained in the section Report 1: Number of Activities Created by Direct Reports.
1. After step 8 select the Columns tab and click the Select Columns button. In the Columns section, select the check boxes for Activity Owner First Name and Activity Owner Last Name. This action pulls the names of employees who have created activities in CPM. You can select the Activity Owner Username or Activity Owner E-Mail check boxes along with First Name and Last Name. Also select the Activity Name and Activity Created Date columns to report on the Activity Title and creation date. Click the Done button after selecting the check boxes for these columns.
2. Click the Filters tab, and in the Select Filters section, click the Refine Criteria button. Select the Activity Created Date column to filter activities created between a time range. Click the By Rule tab and then click the + Add Rule link. Create Rule 1 as Greater than or equal to the desired From Date/Start Date and choose the AND radio button. Click the + Add Rule link and create Rule 2 as Less than or equal to the desired End Date of the period you want to filter. Click the Done button.
3. Finally, click the save icon and then the generate icon to view the report results as filtered.
Report 3: Number of One-on-One Meetings Between Managers and Direct Reports
Repeat the steps from 1-5 and 7-8 as explained in the section “Report 1: Number of Activities Created by Direct Reports.” In step 6, there is a slight difference. Make sure you select Continuous Performance Meetings for What data would you like to start with?.
1. After step 8 select the Columns tab and click the Select Columns button. Choose One on One Meeting Owner First Name, One on One Meeting Owner Last Name, and One on One Meeting Owner Employee Id columns. This action pulls the name and ID of direct reports who have had their one-on-one meetings with their managers. You can also select the Manager First Name and Manager Last Name columns to identify the manager.
2. In the Summary of Actions section, select Group By link and Add another aggregate column. Select One on One Meeting Employee Id for the Aggregate Column and COUNT as Function to get the count of one-on-one meetings each direct report had with his or her manager. Click the OK button and then select the Filters tab.
3. In the Select Filters section of the Filters tab, click the Refine Criteria button. Select the One on One Meeting Created Date column to filter the one-on-one meetings that happened between a time range. Click the By Rule tab and then click the + Add Rule link. Create Rule 1 as Greater than or equal to the desired From Date/Start Date and select the AND radio button. Click + Add Rule link and create Rule 2 as Less than or equal to the desired End Date of the period you want to filter. Click the Done button.
4. Finally, click the save icon and then the generate icon to view the report results as filtered.
Report 4: Number of Coaching Advices Provided to Direct Reports
Repeat the steps from 1-8 as explained in the section “Report 1: Number of Activities Created by Direct Reports.”
1. After step 8 select the Columns tab and click the Select Columns button. Select the check boxes for the Coaching Advice Owner Id, Coaching Advice Owner First Name, and Coaching Advice Owner Last Name columns (
Figure 29). This action pulls the user ID and the names of direct reports who have received coaching advice from managers. You can also select the check boxes for the Coaching Advice Created By User First Name or Coaching Advice Created By User Last Name columns to add the manager’s name to the report.
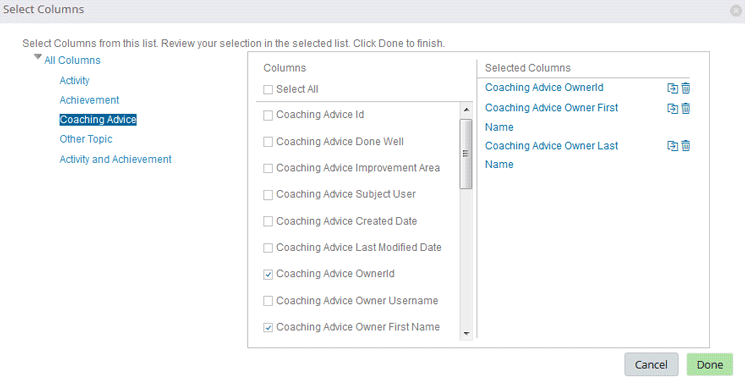
Figure 29
Select the columns for Coaching Advice
2. In the Summary of Actions section, select Group By link and Add another aggregate column. Select Coaching Advice Owner Id for the Aggregate Column and COUNT as Function to get the number of coaching advices each direct report received from his or her manager. Click the OK button and then select the Filters tab.
3. In the Select Filters section of the Filters tab, click the Refine Criteria button. Select Activity Created Date column to filter Activities created between a time range. Click the By Rule tab and then click the + Add Rule link. Create Rule 1 as Greater than or equal to the desired From Date/Start Date and choose the AND radio button. Click + Add Rule link and create Rule 2 as Less than or equal to the desired End Date of the period you want to filter. Click the Done button.
4. Finally, click the save icon and then thew generate icon to view the report results as filtered.
Report 5: List of Achievements Created From Activities
Repeat steps 1-8 as explained in the section Report 1: Number of Activities Created by Direct Reports.
1. After step 8 select the Columns tab and click the Select Columns button. Select the check boxes for the Activity Id, Activity Name, Achievement Id, and Achievement Name columns. This action gives information about the activities and achievements created from those activities. In addition, you can select the check box for Achievement Owner Username to report on the username of direct reports who own the achievements.
2. Click the Filters tab, and in the Select Filters section, click the Refine Criteria button. Select the Achievement Parent Type column from the Activity and Achievement section. In the Define “Achievement Parent Type” Filter screen choose By My Selection and then select ACTIVITY. This filter only pulls the achievements that are created from activities for your direct reports.
3. To filter achievements created between a time range select the Achievement Date column. Click the By Rule tab and then click the + Add Rule link. Create Rule 1 as Greater than or equal to the desired From Date/Start Date and choose the AND radio button. Click the + Add Rule link and create Rule 2 as Less than or equal to the desired End Date of the period you want to filter. Clicking the Done button adds filters as shown in
Figure 30.
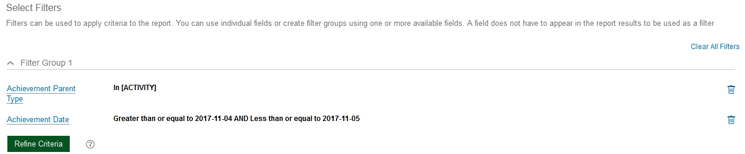
Figure 30
Set up the filters for achievements
4. Finally, click the save icon and then the generate icon to view the report results as filtered.
Report 6: List of Achievements of Direct Reports
Repeat the steps from 1-8 as explained in the section “Report 1: Number of Activities Created by Direct Reports.”
1. After step 8 select the Columns tab and click the Select Columns button. Select the check boxes for the Achievement Owner First Name and Achievement Owner Last Name columns. This action pulls the names of direct reports who have created Achievements in CPM. You can select check boxes for the Achievement Owner Username or Achievement Owner E-Mail columns along with First Name and Last Name. Then select check boxes for the Achievement Name and Achievement Created Date columns to report on additional information such as the Achievement Title and Achievement creation date. Click the Done button after selecting the columns required.
2. Click the Filters tab, and in the Select Filters section, click Refine Criteria button. Select the Achievement Created Date column to filter achievements created between a time range. Click the By Rule tab and then click the + Add Rule link. Create Rule 1 as Greater than or equal to the desired From Date/Start Date and choose the AND radio button. Click the + Add Rule link and create Rule 2 as Less than or equal to the desired End Date of the period you want to filter. Click the Done button.
3. Finally, click the save icon and then the generate icon to view the report results as filtered.
This concludes the Ad-hoc/Report-Table reports section for different use cases. In the following section, you see how to build Dashboard Tiles to visually report on the CPM data. Dashboards are used to create a graphical representation of the CPM data, such as the number of activities and achievements recorded by direct reports over a period, the number of one-on-one meetings between managers and employees, and the number of coaching advices provided by supervisors to their direct reports.
Granting Access for Dashboards
To create Dashboard Tiles, users must have access to the Reports and Dashboards screens. Follow the steps below to grant access to build Dashboard Tiles for CPM.
1. Navigate to Admin Center > Manage Permission Roles and select the role to which dashboards permissions are to be granted.
2. After selecting the role, click the Permission button and scroll down to click the Reports Permission category under User Permissions.
3. Find the Analytics Tiles and Dashboards section and select the All radio button (
Figure 31).
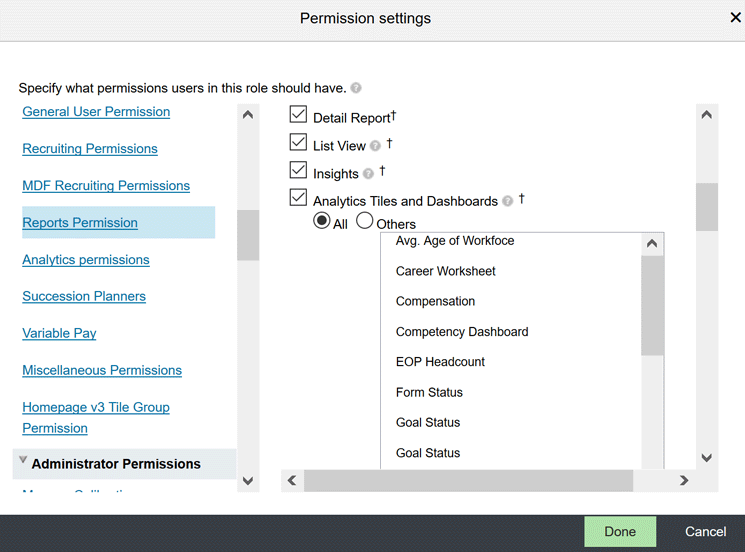
Figure 31
Analytics Tiles and Dashboards permissions
4. Under the Administrator Permissions > Manage Dashboards / Reports category, select Analytics Tiles and Dashboards permission (
Figure 32).
5. Click the Done and the Save Changes buttons.
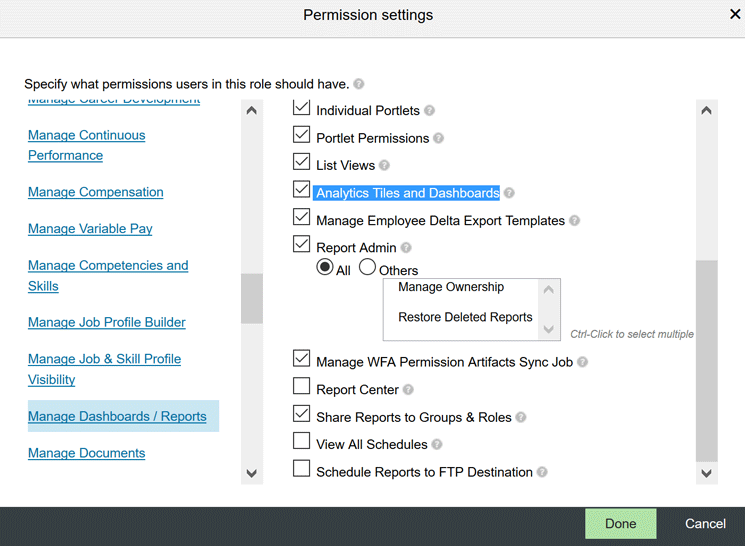
Figure 32
Permissions for Analytics tiles and dashboards
Now follow these steps to build Dashboard Tiles for the following use cases:
Tile 1: Number of activities created by direct reports
Tile 2: Number of achievements recorded by direct reports
Tile 3: Number of topics created by direct reports
Tile 4: Number of one-on-one meetings between manager and direct reports
Tile 5: Number of activities converted to achievements
Tile 6: Number of coaching advices provided to direct reports
Tile 1: Number of Activities Created by Direct Reports
1. Log in to the SuccessFactors instance with a user account that has permissions to create dashboard tiles for Continuous Performance Management. Refer to the “Granting Access for Dashboards” section.
2. Go to Admin Center > Reporting and Analytics > Manage Dashboards > Manage Standard Dashboards and YouCalc Files (
Figure 33) and click the Build Tile button.

Figure 33
The Manage Standard Dashboards and YouCalc Files screen
3. Select Continuous Performance Management from the options in the drop-down menu in the Select a domain field and click the Create button (
Figure 34).

Figure 34
Select Continuous Performance Management as the domain
4. Enter the Name and Description as desired in the General Info tab and click the Next button (
Figure 35).
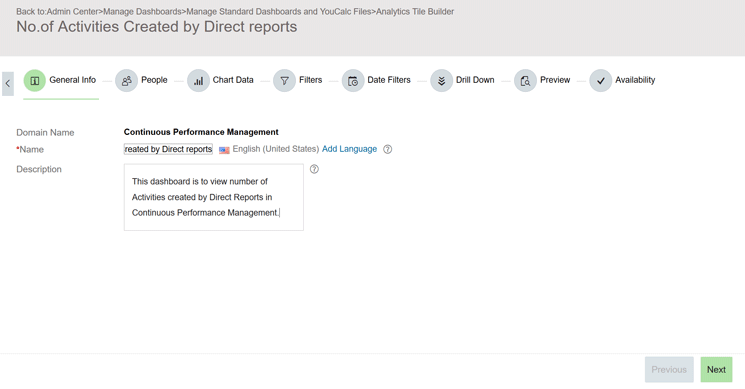
Figure 35
Enter data in the Name and Description fields in the General Info tab
5. In the People tab (
Figure 36) select the criteria to filter users for whom you want to build the dashboard. For this example, I selected Team View for Report Type, Logged In User for Starting From, and Direct Reports for Levels. You can further filter by Division, Department, and Location. The values you choose for filtering people depend on your requirements.

Figure 36
Select options in the drop-down menus of the fields in the People tab
6. Clicking the Next button opens the Chart Data tab (
Figure 37). In the Chart Type field, select an option from the drop-down menu. Here I selected Column. Choose Activity Owner Username for the Category, Activity Id for the Metric, and COUNT as the Calculation. These values provide the number of activity IDs grouped by Activity Owner Username with the Category selection on the X-axis and the Metric on the Y-axis of the tile.
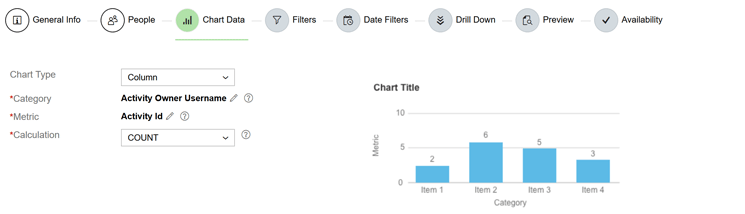
Figure 37
Select options in the Chart Data tab
7. Click the Next button to go to the Filters tab and then click the Refine Criteria button. Select the Activity Created Date column to filter activities created between a time range. Click the By Rule tab and then click the + Add Rule link. Create Rule 1 as Greater than or equal to the desired From Date/Start Date and choose the AND radio button. Click the + Add Rule link and create Rule 2 as Less than or equal to the End Date of the period you want to filter. Click the Done button.
8. Click the Drill Down tab and select Activity Name, Activity Create Date, and Activity Status Id as drill-down columns. Columns selected in this tab show extra information when you drill down a column in the output chart. The selection varies depending on the requirements. This step is optional.
9. Click the Preview tab to visualize the output in preview mode.
10. Lastly, you can activate the tile you just built and make it available on the Homepage or mobile device as required in the Availability tab. Click the Save or Save and Exit button.
Tile 2: Number of Achievements Recorded by Direct Reports
Repeat the steps from 1-5 as explained in the section Tile 1: Number of Activities Created by Direct Reports.
1. This step begins in the Chart Data tab. In the Chart Type field select an option from the list in the drop-down menu. Choose Achievement Owner Username for Category, Achievement ID for Metric, and COUNT as the Calculation. These values provide the number of achievement IDs grouped by Achievement Owner Username with Category selection on the X-axis and Metric on the Y-axis of the tile.
2. Click the Next button to go to the Filters tab and then click the Refine Criteria button. Select the Achievement Created Date column to filter achievements created between a time range. Click the By Rule tab and then click the + Add Rule link. Create Rule 1 as Greater than or equal to the desired From Date/Start Date and choose the AND radio button. Click + Add Rule link and create Rule 2 as Less than or equal to the End Date of the period you want to filter. Click the Done button.
3. Click the Drill Down tab and select Achievement Name and Achievement Create Date as drill-down columns. Columns selected in this tab show extra information when you drill down a column in the output chart and the selection varies depending on the requirements. This step is optional.
4. Click the Preview tab to visualize the output in preview mode.
5. Lastly, you can activate the tile you just built and make it available on the Homepage or mobile device as required in the Availability tab. Click the Save or Save and Exit button.
Tile 3: Number of Topics Created by Direct Reports
Repeat the steps from 1-5 as explained in the section Tile 1: Number of Activities Created by Direct Reports.
1. This step begins in the Chart Data tab. In the Chart Type field select an option from the list in drop-down menu. Choose Other Topic Owner Username for the Category, Other Topic ID for the Metric, and COUNT as the Calculation. These values provide the number of Topic IDs grouped by Topic Owner Username with Category selection on the X-axis and Metric on the Y-axis of the tile.
2. Click the Next button for the Filters tab and then Refine Criteria. Select the Other Topic Created Date column to filter out the topics created between a time range. Click the By Rule tab and then click the + Add Rule link. Create Rule 1 as Greater than or equal to the desired From Date/Start Date and choose the AND radio button. Click the + Add Rule link and create Rule 2 as Less than or equal to the End Date of the period you want to filter. Click the Done button.
3. Click the Drill Down tab and select Other Topic Name and Other Topic Create Date as drill-down columns. Columns selected in this tab show extra information when you drill down a column in the output chart and the selection varies depending on the requirements. This step is optional.
4. Click the Preview tab to visualize the output in preview mode.
5. Lastly, you can activate the tile you just built and make it available on the Homepage or on a mobile device as required in the Availability tab. Click the Save or Save and Exit button.
Tile 4: Number of One-on-One Meetings Between the Supervisor and Direct Reports
Repeat the steps from 1-2 and 4-5 as explained in the section Tile 1: Number of Activities Created by Direct Reports. The only difference is in step 3, where you select Continuous Performance Meetings as the domain.
1. This step begins in the Chart Data tab. In the Chart Type field select an option from the list in the drop-down menu. Choose One-on-One Meeting Owner User name for the Category, One-on-One Meeting Id for the Metric, and COUNT as the Calculation. These values provide the number of one-on-one Meeting Ids grouped by one-on-one Meeting Owner User name with Category selection on the X-axis and Metric on the Y-axis of the tile.
2. Click the Next button for the Filters tab and then Refine Criteria. Select the One-On-One Meeting Created Date column to filter the one-on-one meetings that happened between a time range. Click the By Rule tab and then click the + Add Rule link. Create Rule 1 as Greater than or equal to the desired From Date/Start Date and choose the AND radio button. Click the + Add Rule link and create Rule 2 as Less than or equal to the End Date of the period you want to filter the one-on-one meetings. Click the Done button.
3. Click the Drill Down tab and select Other Topic Name and Other Topic Create Date as drill-down columns. Columns selected in this tab show extra information when you drill down a column in the output chart and the selection varies depending on the requirements. This step is optional.
4. Click the Preview tab to visualize the output in preview mode.
5. Lastly, you can activate the tile you just built and make it available on the Homepage or on a mobile device as required in the Availability tab. Click the Save or Save and Exit button.
Tile 5: Number of Activities Converted to Achievements
Repeat the steps from 1-5 as explained in the section Tile 1: Number of Activities Created by Direct Reports.
1. This step begins in the Chart Data tab. In the Chart Type field select an option from the list in the drop-down menu. Choose Achievement Owner Username for Category, Achievement ID for Metric, and COUNT as the Calculation. These values provide the number of achievements grouped by Achievement Owner Username with Category on the X-axis and Metric on the Y-axis of the tile.
2. Click the Next button for Filters tab and then Refine Criteria. Select Achievement Parent Type column from the Activity and Achievement section. In the Define “Achievement Parent Type” Filter screen choose By My Selection and then select ACTIVITY. This action filters out the achievements that are created from activities by your direct reports.
3. To filter achievements created between a time range, select the Achievement Date column. Click the By Rule tab and then click the + Add Rule link. Create Rule 1 as Greater than or equal to the desired From Date/Start Date and choose the AND radio button. Click Add Rule and create Rule 2 as Less than or equal to the desired End Date of the period you want to filter. Click the Done button.
4. Click the Drill Down tab and select Activity Name and Achievement Name as drill-down columns. Columns selected in this tab show extra information when you drill down a column in the output chart and the selection varies depending on the requirements. This step is optional.
5. Click the Preview tab to visualize the output in preview mode
6. Lastly, you can activate the tile you just built and make it available on the Homepage or mobile device as required in the Availability tab. Click the Save or Save and Exit button.
Tile 6: Number of Coaching Advices Provided to Direct Reports
Repeat the steps from 1-5 as explained in the section Tile 1: Number of Activities Created by Direct Reports.
1. This step begins in the Chart Data tab. In the Chart Type field select an option from list in the drop-down menu. Choose Coaching Advice Owner Username for Category, Coaching Advice Id for Metric, and COUNT as the Calculation. These values provide the number of Coaching Advice Ids grouped by Coaching Advice Owner Username with Category selection on the X-axis and Metric on the Y-axis of the tile.
2. Click the Next button to go to Filters tab and then click the Refine Criteria button. Select the Coaching Advice Created Date column to filter coaching advices created between a time range. Click the By Rule tab and then click the + Add Rule link. Create Rule 1 as Greater than or equal to the desired From Date/Start Date and choose the AND radio button. Click the + Add Rule link and create Rule 2 as Less than or equal to the End Date of the period you want to filter. Click the Done button.
3. Click the Drill Down tab and select Coaching Advice Done Well and Coaching Advice Improvement Area as drill-down columns. Columns selected in this tab show extra information when you drill down a column in the output chart and the selection varies depending on the requirements. This step is optional.
4. Click the Preview tab to visualize the output in preview mode.
5. Lastly, you can activate the tile you just built and make it available on the Homepage or mobile device as required in the Availability tab. Click the Save or Save and Exit button.
Aparna Samudrala
Aparna Samudrala is a certified SAP SuccessFactors Consultant, focusing on the entire SAP SuccessFactors suite. Her experience includes implementations, upgrades, and support for different global clients. Aparna graduated from the Georgia State University with a Master’s degree in Information Systems specializing in Enterprise Resource Planning.
You may contact the author at
aparna.samudrala@gmail.com.
If you have comments about this article or publication, or would like to submit an article idea, please contact the
editor.