Learn how to use standard planning functions that come with SAP BW Integrated Planning (SAP BW IP) to implement your own custom planning functions and program them to call SAP HANA-stored procedures. Learn how to set up an ABAP Managed Database Procedure and why this approach provides the best performance boost.
Key Concept
SAP BW Integrated Planning (SAP BW IP) runs on SAP Business Warehouse (SAP BW), which can either sit on a traditional database, such as Oracle or Microsoft SQL, or on SAP HANA. When SAP BW uses the SAP HANA database, SAP BW IP planning functions can be created with ABAP Managed Database Procedures (AMDPs) that result in the most efficient solution for complex scenarios.
SAP BW Integrated Planning (SAP BW IP) comes delivered with a variety of standard planning functions such as copy, delete, and distribution, for example, which are used in straightforward scenarios. However, when a company needs to perform a more complex planning calculation, it can implement its own custom planning functions and program them to call SAP HANA-stored procedures for the best performance. For example, a company may want to perform an allocation or a rolling forecast, both of which involve high data volumes and complex algorithms. Learn why this approach provides the best performance boost for these kinds of calculations and how to set it up.
In this article, I show how to set up the test table in SAP HANA and test your SQL script in the SAP HANA studio SQL console. In addition, I show how to use program RSPLS_SQL_SCRIPT_TOOL to help develop the ABAP code in the custom ABAP class. Finally, I show you how to link the class to a function type, create a corresponding planning function, and test it in SAP BusinessObjects Analysis, edition for Microsoft Office.
ABAP Managed Database Procedures (AMDPs) are used to execute calculations in the SAP HANA calculation engine. AMDPs are created as ABAP classes that execute SAP HANA-stored procedures. On traditional databases, companies would use function modules to do this, but in the SAP HANA database function modules are processed by the application server, not the SAP HANA database; therefore, AMDPs are now the most efficient solution in most cases.
Before I go into the details of how to develop an AMDP, let’s first discuss the business scenario and positioning of AMDPs.
Business Scenario and Positioning
Although quite a few planning calculations can be executed via standard planning functions, frequently companies have calculations that are complex in nature that either involve mass quantities of data or that cannot be performed by standard functions. They therefore require a customized solution. For example, to perform a planning calculation it may be necessary to use a subroutine, use a temporary table to solve a rounding issue, or read data that has not yet been committed to the database. When SAP Business Warehouse (SAP BW) is on a traditional database you would use function modules (an ABAP solution for complex logic), but with SAP BW on SAP HANA, AMDPs are the best solution since they are faster than function modules.
Note
Even with SAP BW on SAP HANA it is still possible to use function modules; however, the processing would occur on the application layer, not the database layer. This is fine when the calculation is not run frequently or has lower data volumes, but in most scenarios, AMDPs are a better solution.
In addition, SAP BW IP planning functions are all executed on the SAP HANA calculation engine for the most part thanks to the Planning Application Kit (PAK). The SAP HANA calculation engine essentially is the core of the CPU, which means that this is where the fastest processing takes place. PAK is the SAP solution that allows SAP BW IP planning functions to run on the SAP HANA calculation engine. PAK is available for SAP BW IP customers when SAP BW is run on SAP HANA.
To understand why using the SAP HANA calculation engine is so important, you need to know about the concept of pushing down code.
Figure 1 shows how instructions can be sent down to the database where calculations can be performed, thereby avoiding a lot of data transfers between the application layer and database layer. In traditional applications, databases are used as a data-storage mechanism only and all the calculations occur in the application layer. In this model, lots of application execution time is spent in the application server processing data and then in passing it to the database.
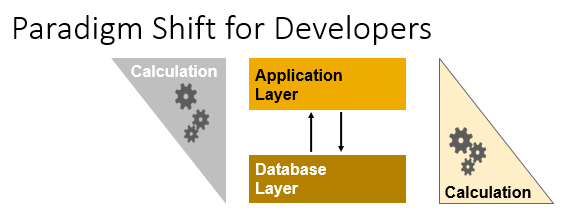
Figure 1
Push down calculations to the database layer
With SAP HANA, the key to the best performance is to push as much of the logic execution down into the database as possible, thereby eliminating the exchange of data between the application and database layers and increasing the processing speed. The objective is to perform all the data-intensive logic in the database layer, including the execution of complex planning functions.
However, in some cases you might not want to push the data down. For example, let’s say you have some complex logic and it only takes 20 minutes to do the calculations. In this case, since it doesn’t take long and you may only run the calculation once a month, it’s not necessary to force the calculation down to the database.
So, in short, the business scenario involves a high volume of frequently run sets of complex logic to perform a calculation in order to meet a planning business requirement.
Now that I have discussed the business scenario and positioning, let’s take a look at the components.
A Review of the Necessary Components
Since you are working in several different user interfaces and dealing with a variety of components in SAP HANA, SAP BW, SAP BW IP, and SAP BusinessObjects Analysis, edition for Microsoft Office, I’ve provided a diagram of the components to help keep it all straight, shown in
Figure 2. I am assuming that you have experience with SAP BW, SAP HANA, and SAP BW IP, so here I focus on the key steps necessary to use AMDPs.
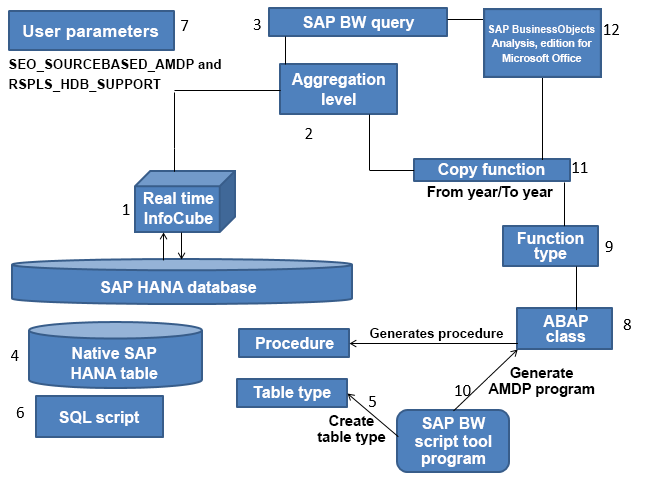
Figure 2
AMDP components
In
Figure 2 you can see the components involved in this scenario. Before going into details, here’s a high-level overview of the 12 components.
- Real-time InfoCube – This is essentially a write-optimized table where the results are stored (Note: You can also use AMDPs with planning-enabled DataStore objects [DSOs]).
- Aggregation level – This is a view of the real-time InfoCube and provides the data structure that you need in almost every step.
- SAP BW query – This is a planning-enabled query since it is created against the aggregation level. You use the query to view the results.
- Native SAP HANA table – This a very useful but optional item. You use it to test the SAP HANA SQL script in SAP HANA studio
- Table type – This is a structure that is used to import and export data and is based on the aggregation level.
- SQL script – This the code that performs the planning task at hand; in this case, it simply copies data from one year to another. This is referred to as SAP HANA SQL script as well, and this syntax is unique to SAP HANA.
- User parameters –SEO_SOURCEBASED_AMDP is a user parameter, and it is needed to allow the development of AMDPs, while user parameter RSPLS_HDB_SUPPORT allows planning functions to run in memory.
- ABAP class – This is the ABAP class that contains the code to run the planning function on the SAP HANA calculation engine. When activated, the class generates a stored procedure in SAP HANA.
- Function type – This template is used to create planning functions. Function types require an ABAP class.
- SAP BW script tool – This is the RSPLS_SQL_SCRIPT_TOOL program that is used create table types and that automatically generates the code for the ABAP class (thereby making it much easier to create the ABAP class).
- Copy function – This planning function is created based on the function type.
- SAP BusinessObjects Analysis, edition for Microsoft Office – An Excel add-in tool that is used to carry out the final test.
Some of these components are not affected when using AMDPs, such as real-time InfoCubes, aggregation levels, and planning-enabled queries, and therefore don’t require much discussion (assuming you have a background in SAP BW and SAP BW IP). Therefore, let’s start by taking a deeper look at native SAP HANA tables.
Create a Native SAP HANA Table for Testing
Since the calculations are performed in SAP HANA, I’ll start with showing how to create a native SAP HANA table. Log into SAP HANA studio and open the SQL console (the programming user interface [UI] in SAP HANA SQL). To access SAP HANA studio follow menu path Start > SAP HANA > SAP HANA Studio > Add a System (with your own Host Name and Instance Number). Enter your user ID and password. To open the SQL console, right-click your system and choose Open SQL Console.
In
Figure 3 you see some sample code that creates the table (ZTSQL_DATA20). It then populates the new table with the amount and quantity data for January and February 2014, by product.
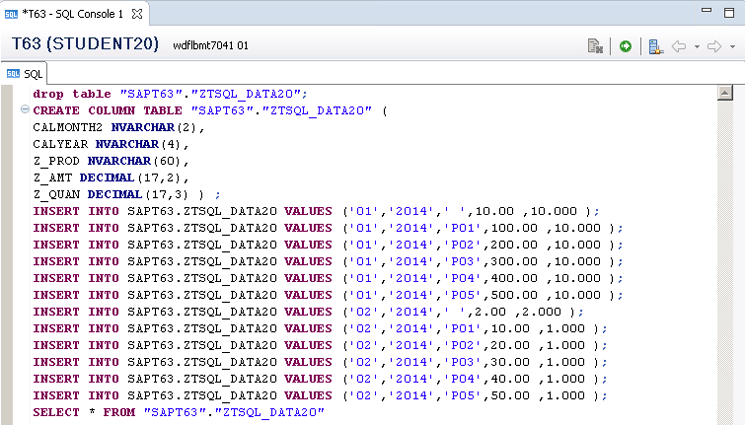
Figure 3
The SQL statement to create and populate a table for testing
In more detail, the SQL script in
Figure 3 performs the following:
- It drops the ZTSQL_DATA20 table so you can run this program more than one time
- It creates the ZTSQL_DATA20 column-based table
- It sets the data types and lengths for the key fields (CALMONTH2, CALYEAR, Z_PROD) and key figures (Z_AMT, Z_QUAN)
- It inserts data for months 01 and 02 for 2014, for products P01 to P05 for the Z_Amt and Z_Quan key figures
- It performs a select statement so the data can be viewed
Execute the SQL statement using the execute icon

.
This results in a new table with 12 rows of test data for 2014, as shown in
Figure 4..
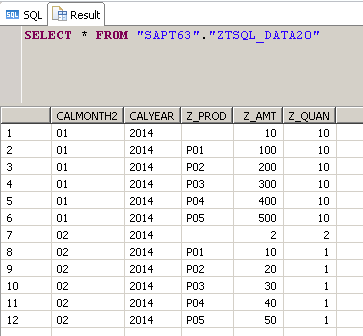
Figure 4
The results of running the SQL script to create test data
Now that the test table and data are in place, the next step is to create the table type.
Create a New Table Type
In this step you need to create a table type that is structurally equivalent to that of the associated aggregation level. The upcoming SQL script procedures require an in structure (e.g., table type) that contains the existing data in the selection, and an out structure with the changed data. To generate the table, you can use either an ABAP program, such as RSPLS_SQL_SCRIPT_TOOL, or SQL script.
In this case, let’s use the ABAP program. When you run the program, select the Create Objects radio button and enter the Aggregation Level—in this case, AMDPAL20 (
Figure 5). Then enter the HANA-Table-Name (ZSQL20) and execute the program.
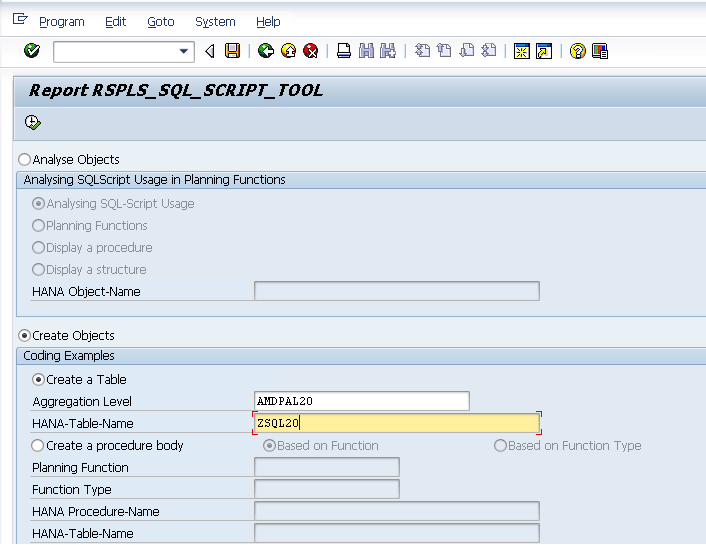
Figure 5
Run the ABAP program to create the table type
This creates a table type that can be viewed from SAP HANA studio (
Figure 6). Note that it has the same fields as the aggregation level (e.g., CALMONTH2, CALYEAR, Z_PROD, Z_AMT, and Z_QUAN). To display the table type in SAP HANA studio, use the nodes on the left to expand your system until you get to the Table Types folder. Then double-click the desired table type (ZSQL20, in this example) to see the definition (in the screen on the right in
Figure 6).
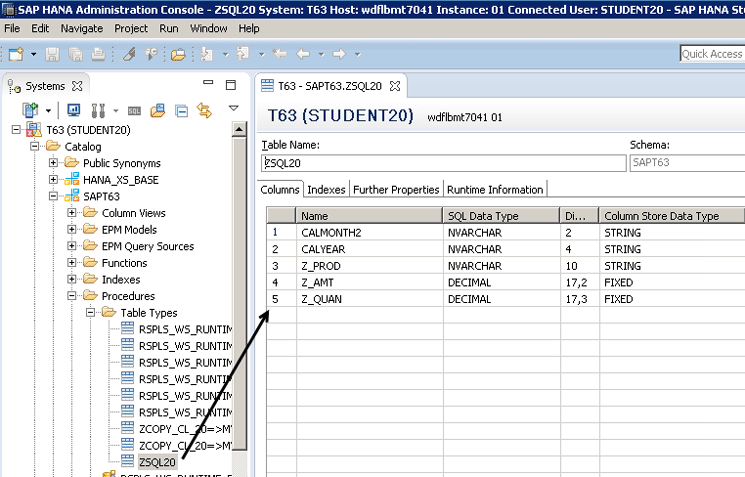
Figure 6
Display the table type definition in SAP HANA studio
Now that the table type is created, the next step is to develop the SAP HANA SQL script that is used for the initial testing and, later, in the ABAP class.
Create the SQL Script
Normally, AMDPs would be used in very complex scenarios that require a significant amount of coding. However, in this example I use a simple set of code so that the focus is on the integration points.
Figure 7 shows the SQL program to copy data.

Figure 7
SQL program to copy data from 2014 to 2015
The SAP HANA SQL program code shown in
Figure 7 does the following:
- It drops the ZCOPY_SIMP20 procedure so you can run the program more than once, for testing purposes
- It creates the ZCOPY_SIMP20 procedure in schema SAPT63
- It assigns the structure from the ZSQL20 table type to the incoming view (I_VIEW)
- It sets the data types and lengths for the From/To Year
- It assigns the structure from the ZSQL20 table type to the out-bound external table (E_T_TABLE)
- In the beginning, it selects the E_T_TABLE and assigns the target field to I_TO_YEAR
- The call SAPT63.ZCOPY_SIMP(ZTSQL_DATA20, '2014', '2015', ?), copies the data from year 2014 to year 2015
After executing the SAP HANA SQL program, you can see that the data from 2014 has been copied to 2015 and so this simple test was a success (
Figure 8).
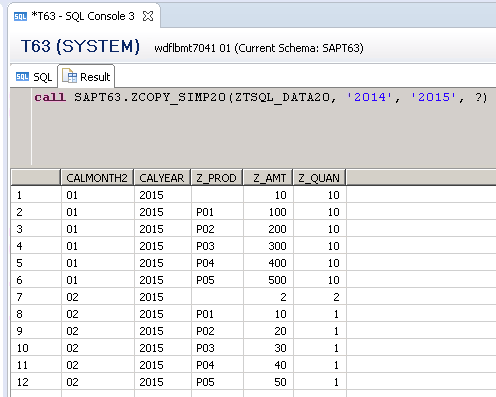
Figure 8
The results of executing the SAP HANA SQL code
Since in this example you are only developing a very simple set of code (for clarity) this task was completed very quickly. However, in a more realistic scenario this could take hours or days. As mentioned before, testing in SAP HANA isn’t strictly necessary, but it makes sense because this is where the data is and, at this point, there are no other moving pieces that could cause issues.
Now let’s turn our attention to the required user parameters and the ABAP class.
Create User Parameters and ABAP Classes
To allow for the development of an ABAP class that uses AMDPs, the user parameter SEO_SOURCEBASED_AMDP must be set to a value of X. Execute transaction code SU01 and enter the user ID for the developer (in this case, BPC-20). In the Parameters tab, enter the Set/Get parameter ID and value (
Figure 9).
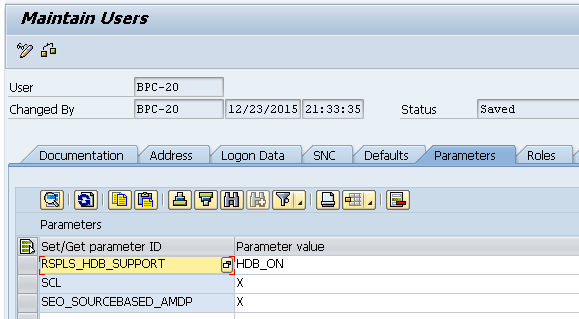
Figure 9
Set the user parameters
Note
The RSPLS_HDB_SUPPORT value of HDB_ON makes the planning function run on the SAP HANA calculation engine when executed by the user.
Now that the user parameter is in place you can create the ABAP class. To do this, execute transaction code SE24 and enter ZCOPY_CL_20 as the Class/Interface (
Figure 10). Press Enter, and in the screen that results confirm that it is a class object and not an interface. Next, choose Continue, enter a description, and confirm that the class type is a usual ABAP class. Finally, click the Save button and then click Local Object.
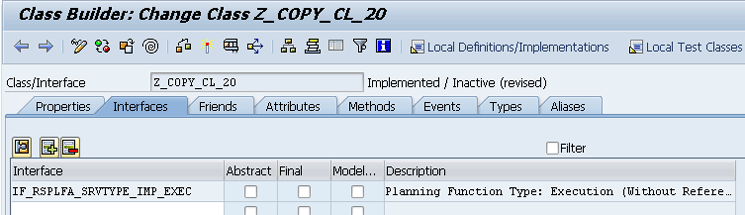
Figure 10
Create the new ABAP class interface
After creating the new class, go to the Interfaces tab, enter the interface (IF_RSPLFA_SRVTYPE_IMP_EXEC), and press Enter.
This interface is delivered by SAP to be used for planning function types that don’t use any reference data. When you add this interface, three associated methods are automatically added (
Figure 11).
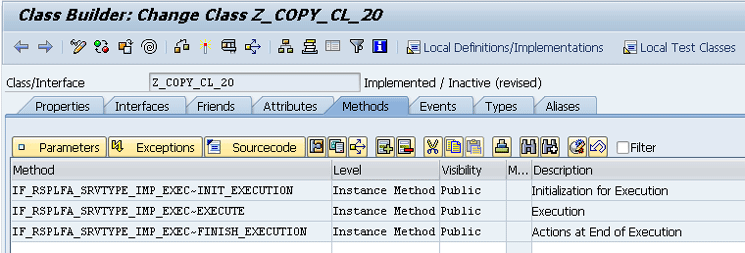
Figure 11
ABAP class initial set of methods
If you have worked with function modules before, you should recognize these three methods:
- The first method initializes the data.
- The second method carries out the execution of the planning function.
- The third method carries out actions at the end of the execution, such as clearing data in memory that is no longer needed.
Next, you need to save and activate the class. When activating the class, be sure to select all the objects as shown in
Figure 12 (using the gray icon to the left of each one), and then click the green checkmark icon (not shown).
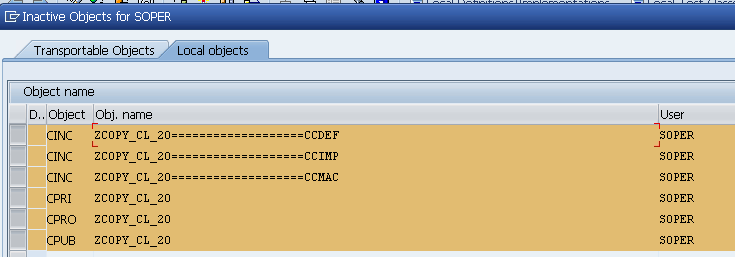
Figure 12
Save and activate the ABAP class
Note
By default, SQL script procedures are not allowed to change any data other than the outgoing table data. As a result, they are referred to as Side Effect Free. However, this scenario is an exception to this rule so the table must be set to allow writing to a normal database table (e.g., the real-time InfoCube). To do this, execute transaction code DBACOCKPIT and, under Configuration, go to the INI files. Open the indexserver group and set the planningengine Section value to true for the allow_non_readonly_sqlscript parameter.
At this point the class is activated but is not yet complete since no ABAP code has been added to it. To help develop the ABAP code I again use the RSPLS_SQL_SCRIPT_TOOL program. This program requires not only an aggregation level (to determine the data structure) but also the function type (to determine the planning function parameters).
Note
Aggregation levels are created in transaction code RSPLAN. In the Edit Aggregation Levels screen, choose Create > enter the Aggregation Level ID, add a description along with the real-time InfoCube ID, and click the green checkmark icon. In the screen that opens, drag the desired characteristics and key figures from the real-time InfoCube on the left into the Aggregation Level structure on the right. Then activate the new aggregation level using the activate icon

.
Create Function Types
Function types are used as templates upon which planning functions are created. They contain an ABAP class and parameters that are used to control their behavior. There are quite a few standard (off-the-shelf) function types; however, in this scenario, the business requirement cannot be met with the delivered function types. You have to create your own.
Execute transaction code RSPLF1 and in the screen that opens (not shown) click the Create button. This opens a screen like the one in
Figure 13, where you (in the Properties tab) give the function type a name and description, enter the class created previously, and choose the Without Blocks option.
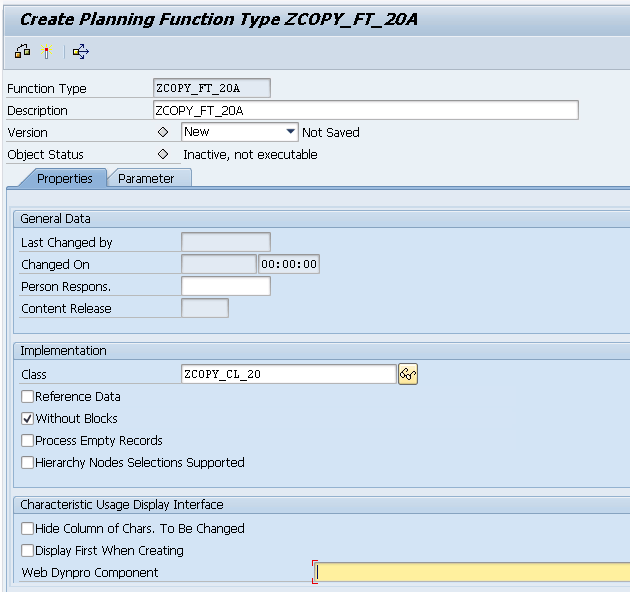
Figure 13
Enter the properties for the new function type
Note
Data blocks would be inefficient when working with AMDPs since there would be more calls to the database than what is optimal.
Now that the properties of the function type are set, you can complete the parameters that allow for the selection of the source and destination year.
In the Parameter tab, right click the YR_FROM folder on the left and choose Create from the context-menu options. In the Details Parameter pop-up screen that opens (
Figure 14) make the following entries:
- Parameter: YR_FROM (for the source year)
- Description: From Year
- Parameter Type: Elementary
- InfoObject: 0CALYEAR
- Tick the Variables Allowed check box
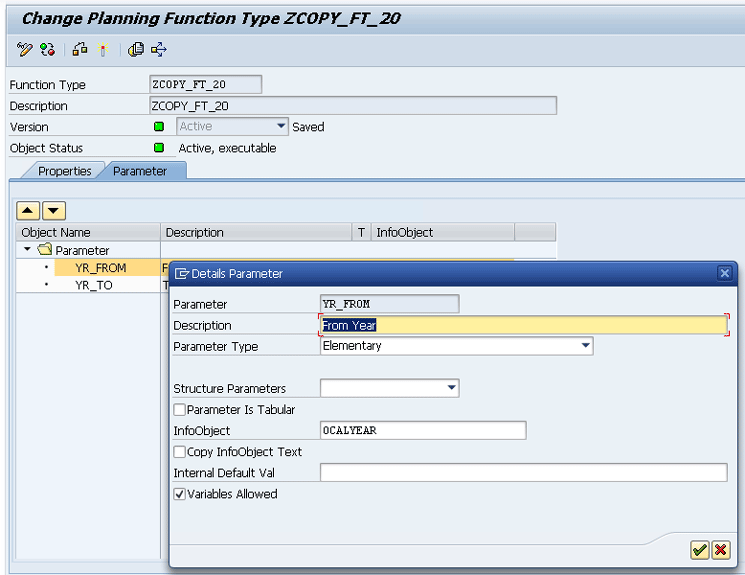
Figure 14
The details for the function type for the year from parameters
Once you’ve made your entries, click the green checkmark icon to save them.
Next, set the YR_TO parameters following the same steps (
Figure 15).
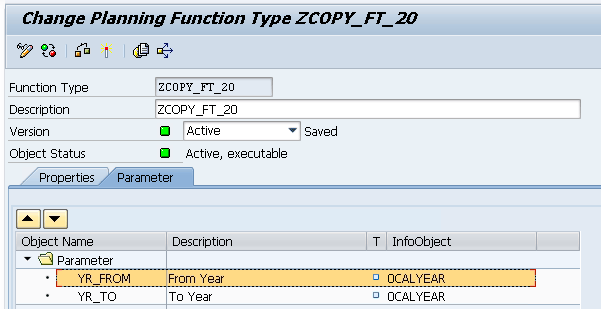
Figure 15
Enter the YR_TO parameters for the function type
At this point the function type is complete and you click the activate icon to save and activate it. Then the function type can be used to help generate the ABAP code that is needed to complete the ABAP class that was created earlier.
Run the SAP BW Script Tool Program (Generating the AMDP Program)
To generate the ABAP code, you need to run the RSPLS_SQL_SCRIPT_TOOL program. In this section, I show you how to perform the following steps:
- Add the types and methods to the ABAP class definition
- Add the generic methods to the ABAP class implementation
- Add the technical method to the ABAP class implementation
- Add the calculation method to the ABAP class implementation
Add Types and Methods to the ABAP Class Definition
Execute transaction code SE38 and, in the screen that opens (not shown), enter RSPLS_SQL_SCRIPT_TOOL and click the execute icon. This opens the screen in
Figure 16 where you tick the Create Objects radio button, enter the Aggregation Level (AMDPAL20) and the Function Type (ZCOPY_FT_20), and tick the Show Example coding radio button. Once you’ve made your entries, click the execute icon.

Figure 16
Use RSPLS_SQL_SCRIPT_TOOL to generate the AMDP program
After executing the program you get the system-generated ABAP types and methods that can be copied and pasted into the ABAP class. The code to be copied is highlighted in
Figure 17. (Note: The code can be selected using CTRL+V.)
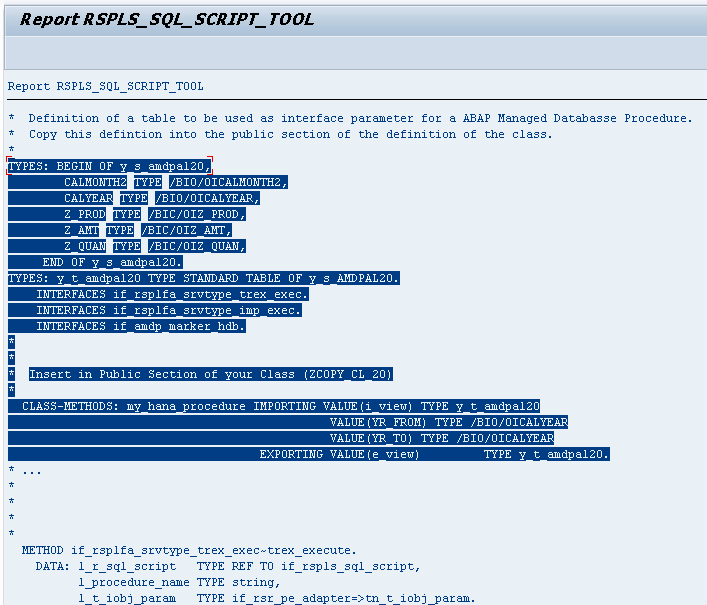
Figure 17
The RSPLS_SQL_SCRIPT_TOOL-generated code
Note
For better context, I explain what this code does after it is copied into the ABAP class later in this article
After the code is copied onto the clipboard, go back to the ZCOPY_CL_20 class via transaction code SE24. Once there, access the class in change mode and then select Toggle to Source-Based Code Builder in the upper right of the screen to go to the initial set of code.
Figure 18 shows the code before it’s modified. At this point, there are two CLASS and ENDCLASS sections—one for the definition and one for the implementation. Rows 1 through 4 are system controlled. Under row 4 (create public) you can add your own code. The system also added an interface in row 8; however, this is replaced shortly.
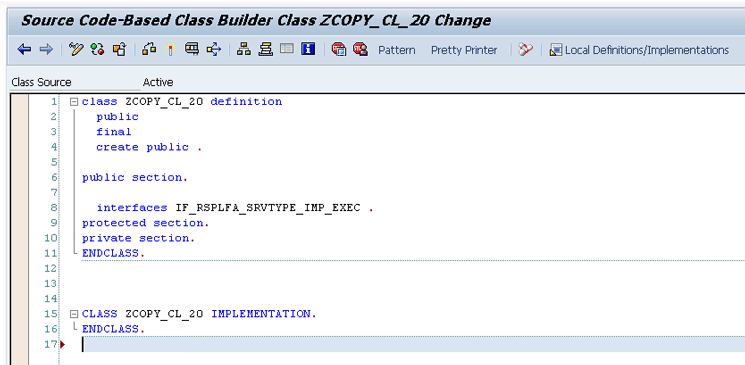
Figure 18
The initial code for the ABAP class
Figure 19 shows the ABAP class definition after it’s pasted in the TYPES and METHODS sections (rows 7 to 25).

Figure 19
The ABAP class definition with types and methods added
In rows 5–11, the types include the aggregation level (amdpal20) fields such as CALMONTH2, CALYEAR, and so forth. Also, note the syntax: Y = type, S = structure, and T = table. For example, y_s_amdpal20 is a structure type of the object named amdpal20.
The three interfaces are in rows 12–15:
- if_rsplfa_srvtype_trex_exec – This is the call to the SAP HANA (trex) calculation engine
- if_rsplfa_srvtype_imp_exec – For fall back, this calls the ABAP (imp) engine. Otherwise a short dump could occur.
- if_AMDP_marker_hdb – This signifies that this should be run as SAP HANA SQL script, not on the ABAP layer, and is therefore required for AMDP
In rows 22–25, the my_hana_procedure class method called has an import structure based on the y_t_amdpal20 table type, a from and to year field based on the /BI0/0ICALYEAR Data Dictionary object, and an export value based on the y_t_amdpal20 table type.
Note
Comments are grayed out and are preceded with an asterisk (*).
Because you’re using the if_amdp_marker_hdb interface (row 17 in
Figure 19), you may see the informational message shown in
Figure 20. This message is sent because writing stored procedures in transaction code SE24 is normally not allowed since that would generally be performed in SAP HANA studio. This class method is an exception to this rule.
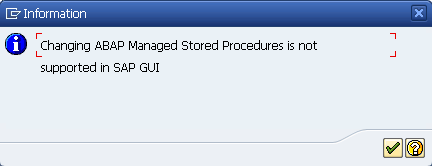
Figure 20
Message regarding ABAP Managed Stored Procedures not being supported
In the detailed help, it says that this message means that you forced the Class Builder to allow changes in class ZCOPY_CL_20 because you defined the parameter SEO_SOURCEBASED_AMDP (=X) in your user settings. Since it is only an informational message, click the green checkmark icon to proceed.
At this point you don’t need the interface in line 26 (
Figure 19), so you can delete it.
The next steps are to add three generic methods into the implementation class. (These are generic in nature since they do not refer to any of the objects in this scenario).
Add the Three Generic Methods to the ABAP Class Implementation
In the screen in
Figure 21, you can see that an empty row is inserted in line 34 under the implementation class.
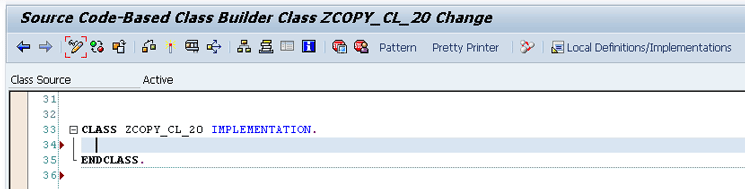
Figure 21
The ABAP implementation class before adding generic methods (methods 1 through 3)
There are three required (generic) methods (
Figure 22):
- METHOD if_rsplfa_srvtype_IMP_exec~execute – This is the ABAP execution of the planning function
- METHOD IF_RSPLFA_SRVTYPE_IMP_EXEC~INIT_EXECUTION – For example, this reads the filter
- METHOD if_rsplfa_srvtype_trex_exec~init_and_check – This is an important system check if the planning function should run on SAP HANA (X = yes); otherwise it runs on the application layer. Assign the parameter E_TREX_SUPPORTED with a value of 'X'.
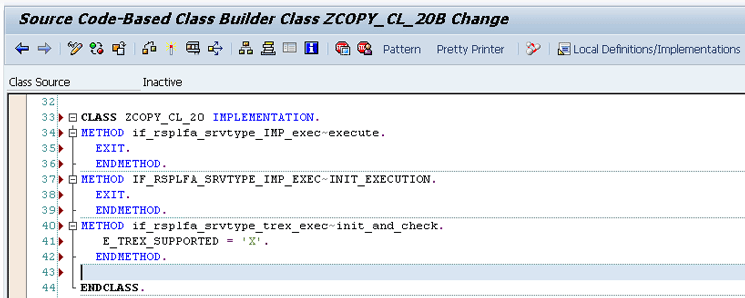
Figure 22
ABAP Implementation Class—after adding generic methods (methods 1 through 3)
The script tool doesn’t generate the implementation methods as of SAP BW 7.4, Support Package 10, so these should be entered into the class manually.
Add the Technical Method to the ABAP Class Implementation
Now you are ready to add the fourth method to the implementation class. In the output of the RSPLS_SQL_SCRIPT_TOOL program, copy the method as shown in
Figure 23.
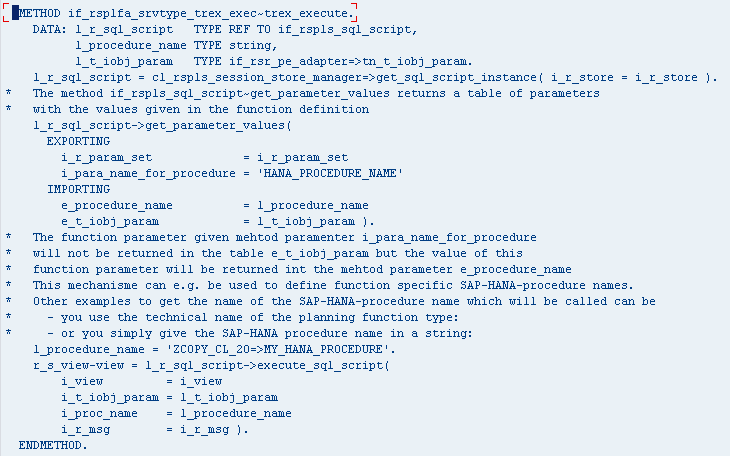
Figure 23
RSPLS_SQL_SCRIPT_TOOL implementation (method 4)
The fourth implementation method is definitely more technical in nature and may be useful, for example, for a programmer in naming the stored procedure. The comments help to explain what the code is doing and are somewhat self-explanatory. The key points in the fourth implementation method are that the IMPORTING and EXPORTING parameters are included, and the ZCOPY_CL_20 class is designated as My HANA Procedure.
After pasting the method into the class, you can see the results in lines 43–70 (
Figure 24).
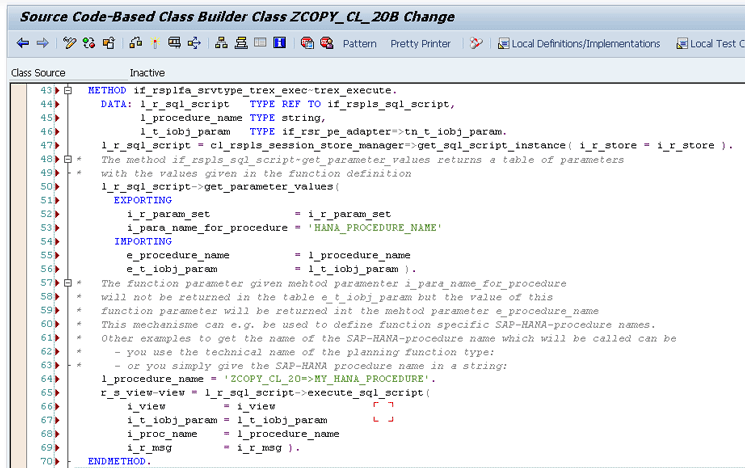
Figure 24
Implementation class with method 4
Up to this point, most of the code in the implementation methods 1 through 4 is standard in nature in that most scenarios would use them.
Add the Calculation Method to the ABAP Class Implementation
The next step is to include the method (method 5) that actually performs the data calculation (rows 71–82 in
Figure 25). You should recognize it since it is essentially the same code that was tested earlier in SAP HANA studio.
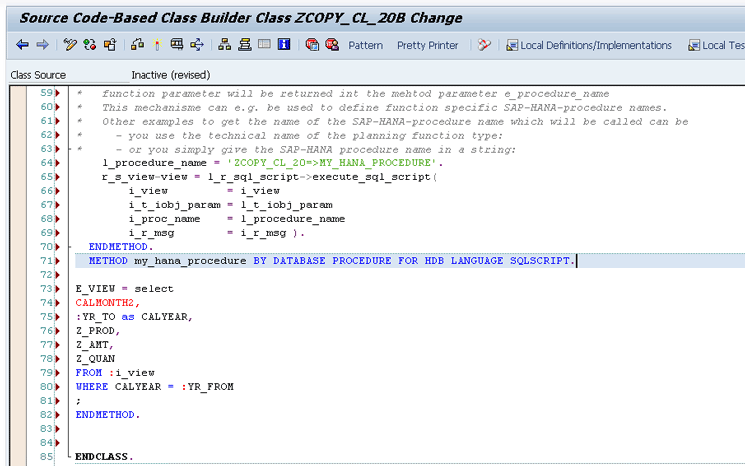
Figure 25
Calculation method 5
At this point, the class can be saved and activated. After activation, the MY_HANA_PROCEDURE method is included in the Methods tab (
Figure 26).
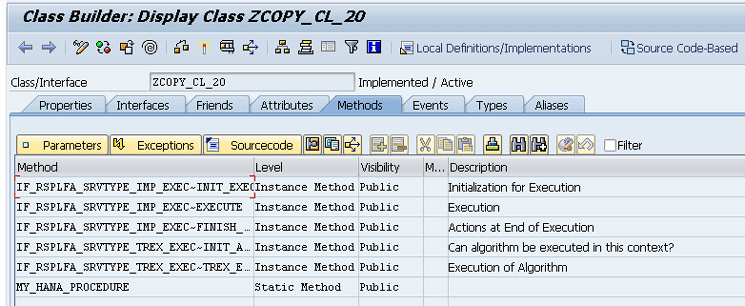
Figure 26
ABAP class—the methods after activation include MY_HANA_PROCEDURE
Also, if you display the code after activation you notice that the system automatically adds a signature to each method (
Figure 27), which provides useful information to the programmer.
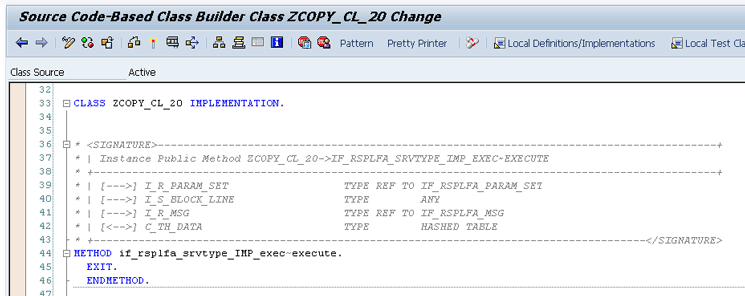
Figure 27
The system-provided signature is added
Now that the class is in place, all you need to do is to create a planning function and test it.
Copy the Planning Function
To create a planning function, execute transaction code RSPLAN and open the Edit Planning Functions screen (not shown). In this screen click the Create button. In the screen that opens (
Figure 28) select the function type; in this case, the one you created earlier, ZCOPY_FT_20. Then enter the planning function name, description, and select the aggregation level.
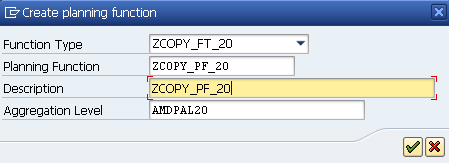
Figure 28
Create the copy function based on the custom function type
Once you’ve made your entries, click the green checkmark icon and the screen in
Figure 29 opens. The initial definition includes a comment that the planning function type does not have a block (remember the Without Blocks option was not selected in the function type definition step earlier).
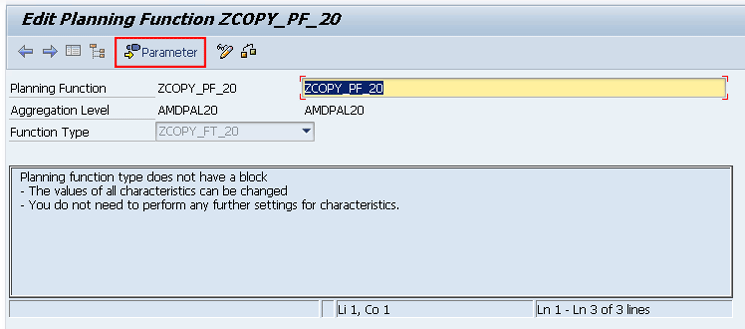
Figure 29
The planning function screen without fields to be changed or fields for conditions
Note
Most planning functions have selections for fields to be changed and fields for conditions, but the one in this example does not. That is because you did not choose the Display Characteristic Usage option in the function type.
You only need to provide the source and target year parameters. Click the Parameter button in the ribbon of
Figure 29, and the screen in
Figure 30 opens. Using the Edit buttons you can specify that 2014 is the From Year and 2015 is the To Year. Once you’ve completed the planning function entries, click the save icon to save them.

Figure 30
Planning function from and to year selections
Tip!
It is also possible to use variables instead of hard coding the source and target years.
The final step is to test the planning function. For the test, you can use several UIs, such as BEx Analyzer, Design Studio, and SAP BusinessObjects Analysis, edition for Microsoft Office. Since SAP BusinessObjects Analysis, edition for Microsoft Office, is the premium alternative for Excel, let’s use that one in this example.
Test the Planning Function Using SAP BusinessObjects Analysis, edition for Microsoft Office
To access SAP BusinessObjects Analysis, edition for Microsoft Office, launch it from your desktop or use the Start menu and go to Business Intelligence. Once it’s open, go to the Analysis tab and use the Insert Data Source button to add your planning query (
Figure 31). There are values for Z_AMT in 2014 for products P01-05 that are available to copy into the year 2015.
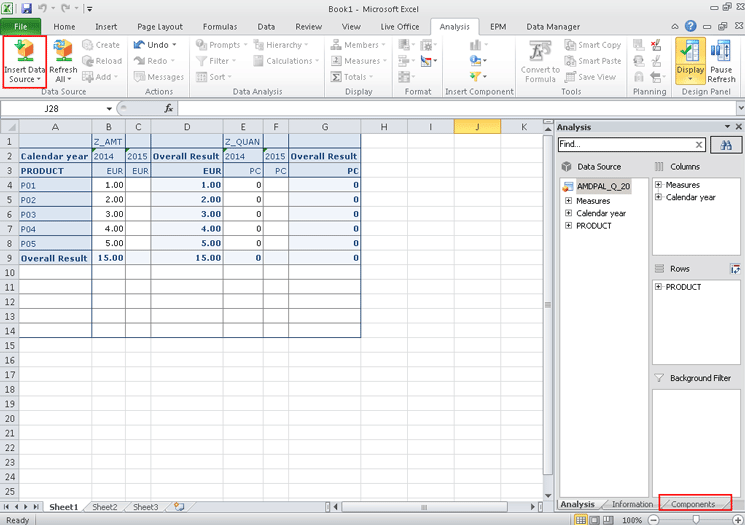
Figure 31
SAP BusinessObjects Analysis, edition for Microsoft Office, with values for the year 2014
To test the planning function in SAP BusinessObjects Analysis, edition for Microsoft Office, you need to add it to the workbook. Go to the Components tab on the lower right (boxed in red in
Figure 31). Next, right-click Book1 and choose Use Planning Function. Select the ZCOPY_PF_20 function and then click the OK button. The planning function now appears in the Components tab (
Figure 32)
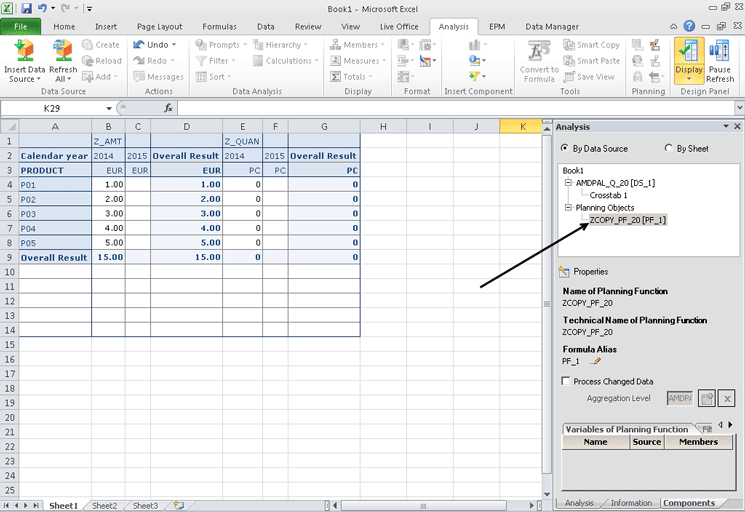
Figure 32
SAP BusinessObjects Analysis, edition for Microsoft Office, with the planning function
To test the function, right-click it and choose Execute Planning Function from the context-menu options that open. The values are copied from 2014 to 2015, as shown in
Figure 33.
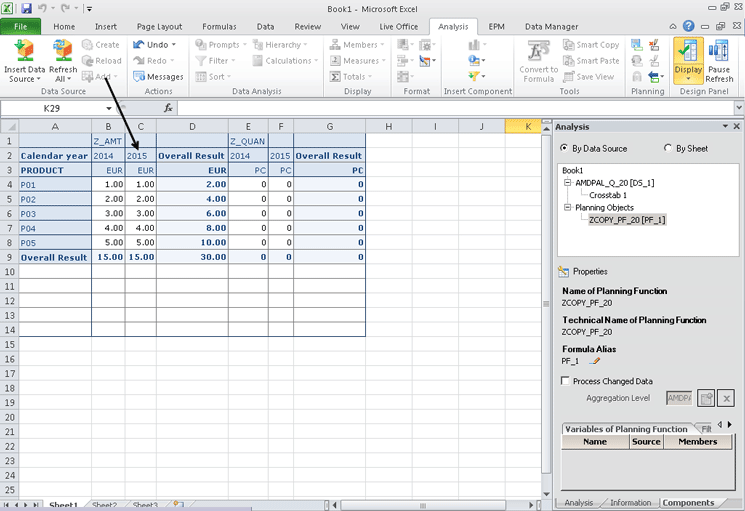
Figure 33
SAP BusinessObjects Analysis, edition for Microsoft Office, with values copied from year 2014 into 2015
You should now have a very good idea of when you might need to use an AMPD in complex planning scenarios.
Charles "Tim" Soper
Charles “Tim” Soper is a senior education consultant at SAP. For the last 17 years, he has been teaching SAP classes on a variety of topics in financial and managerial accounting, business warehouse, business consolidations, and planning. He is the planning and consolidation curriculum architect and has written SAP course manuals. He also works as an SAP Senior Educational Consultant. Early in his career, he worked for Eastman Kodak Company in Rochester, NY, as a senior financial analyst. He has an undergraduate degree in economics and an MBA in finance from the University of Rochester.
You may contact the author at
Charles.Soper@sap.com.
If you have comments about this article or publication, or would like to submit an article idea, please contact the
editor.