Report Painter and Report Writer are two comprehensive reporting tools provided by SAP. You can use only reporting tables that are defined in the system in these tools to create reports. Learn how to enhance the functionality to use multiple tables to increase their capabilities.
Key Concept
Report Writer and Report Painter are SAP reporting tools with which you can define reports using standard reporting objects such as libraries, standard layouts, and row and column models. Standard reports delivered by SAP can meet most of the reporting requirements. However, if your reporting requirements are not fulfilled by SAP’s standard reports, you can also define complex reports using these tools.
Report Writer and Report Painter are flexible reporting tools available in the SAP system for developing reports for all kinds of evaluation without ABAP development. In finance, many standard reports developed with Report Writer and Report Painter are available in managerial accounting (CO) and the Special Purpose Ledger. With SAP ERP Central Component (SAP ECC), Report Painter and Report Writer became available in SAP General Ledger (the new general ledger).
The limitation is that not all database tables can be used to develop these reports — only those tables configured as reporting tables. Most of them are preconfigured and delivered by SAP or configured in applications such as the Special Purpose Ledger. Most of these tables are single tables with transaction data. You can develop these reports using the Report Writer and Report Painter only with those characteristics that exist in the respective table.
I’ll discuss how to combine more than one table that can be configured as the reporting table and then create reports using characteristics from multiple tables. In this example, I’m using the SAP General Ledger total reporting table FAGLFLEXT with the general ledger master data table SKA1. Reports created from this view can use the group account from the master data table instead of the general ledger account from the standard reporting table. The article is appropriate for business super users who can create ad hoc reports, analysts who design the reports, and technical staff who support the enhancement.
You need to follow a six-step process:
- Step 1. Create a database view
- Step 2. Include the view in data declaration
- Step 3. Perform the technical setup of the Report Writer table
- Step 4. Maintain the table directory
- Step 5. Maintain the integrated master data
- Step 6. Generate the FI programs using report RGZZGLUX
Step 1. Create a Database View
An ABAP developer needs to create a database view by joining tables FAGLFLEXT and SKA1. Use transaction SE11 and select the View radio button (Figure 1). Enter a name for the database view that joins the tables FAGLFLEXT and SKA1. In this example, I’m using ZFI_FLEXT_SKA1. Click the Create button.
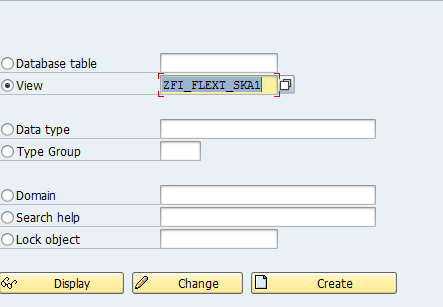
Figure 1
Create a database view
In the following pop-up screen, select the Database view radio button and click the Copy button. In the screen in Figure 2, enter a short description. You see the tables that the view uses in the left side of the screen. You need to define the join conditions that the view will use in the right side. The selection of suitable join conditions is important; if they aren’t suitable, you may have reporting inconsistency and performance issues in the future.
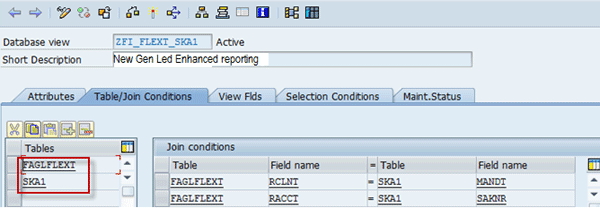
Figure 2
Define join conditions that the view uses
Select all the fields that will be used from the view for future reporting as shown in Figures 3 through 6. Avoid selecting the fields that will never be used in the report. In the View Flds tab, enter the view fields, table (FAGLFLEXT or SKA1), and corresponding field name. The remaining data (e.g., data element, short description) is populated automatically in the view. Since the objective is to use the group account number in the reporting, make sure that the Group Account Number view field is selected in the list of view fields (Figure 4). In the screen in Figure 5, all the fields required for reporting are selected. There are more than 60 fields, including transaction currency fields, selected. In the screen in Figure 6, you can see local and group currency fields selected.
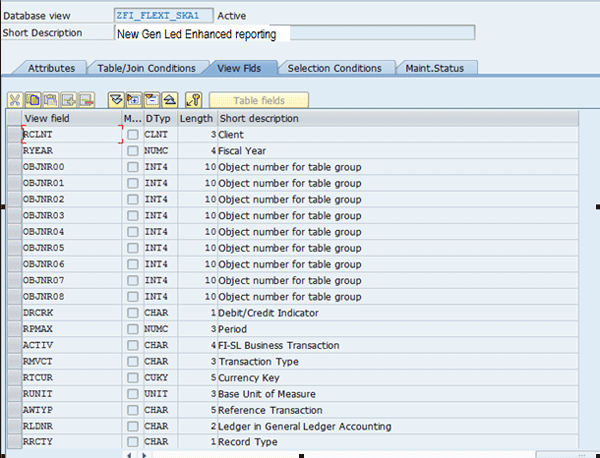
Figure 3
Selection of fields for reporting
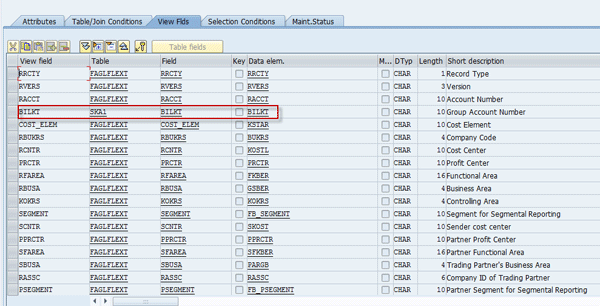
Figure 4
Selection of fields for reporting
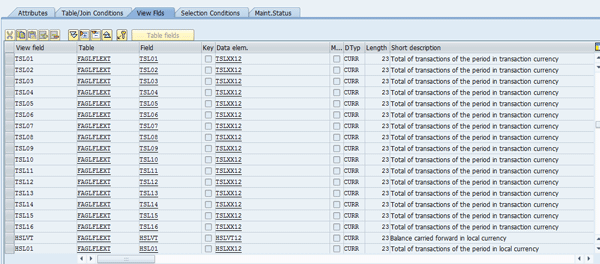
Figure 5
Selection of fields for reporting

Figure 6
Selection of fields for reporting
In the screen in Figure 7, use a suitable selection condition to restrict the data required for reporting. The standard tables FAGLFLEXT and SKA1 contain data other than what is required for your reporting. Therefore, use a condition to filter the required data. In this example, filter the data with the controlling area and chart of accounts.
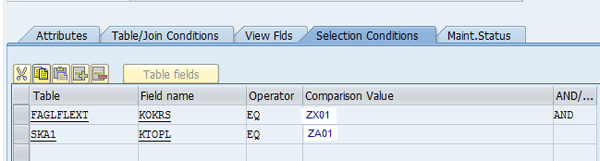
Figure 7
Selection filter
In the Maint.Status tab, select the read only radio button under Access (Figure 8). Then activate the view by pressing Ctrl-F3 or following View > Activate.
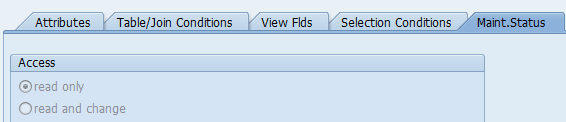
Figure 8
Maintenance status
Step 2. Include the View in the Data Declaration
The view that is created is not a reporting table that the reporting tool can use. You cannot create a library or create reports in the tool with this new reporting structure. You have to perform a few additional steps to make it a reporting table. Include the view in the data declaration include program LGUMDTABDEC. If you don’t do this, the report RGUMD000 that generates LGUMDVALUETABDEC then generates a table declaration twice and the SAPLGUMD program has syntax errors. Using an enhancement implementation in the enhancement object GUMD, you can include the new structure ZFI_FLEXT_SKA1 in the data declaration program. Use transaction SE38, enter LGUMDTABDEC in the Program field, select Source Code, and click the Display button (Figure 9).
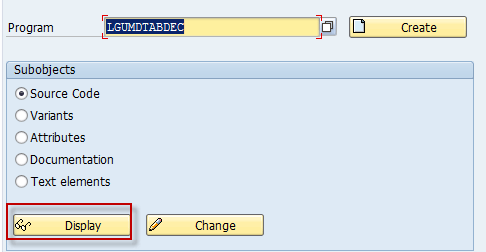
Figure 9
Enter the Program name
In the screen that appears, click the spiral icon to go into enhancement mode so you can implement explicit enhancements (Figure 10).
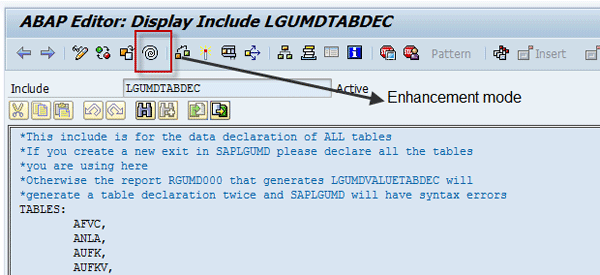
Figure 10
Enhancement spot
The editor screen changes to edit mode (Figure 11). At the end of the code, you see a gray enhancement point.
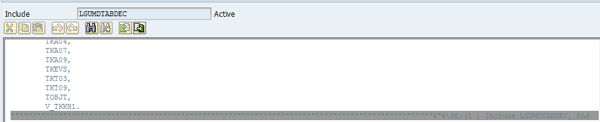
Figure 11
The gray enhancement point at the end of the code
Right-click the enhancement point you plan to implement and select Enhancement Implementation > Create. Then click the create enhancement implementation icon to produce the pop-up screen (Figure 12). Enter the name ZADD_TABLE and some short text. Click the green check mark icon. Enter ZZFI in the Pack column in the screen in Figure 13 and save.
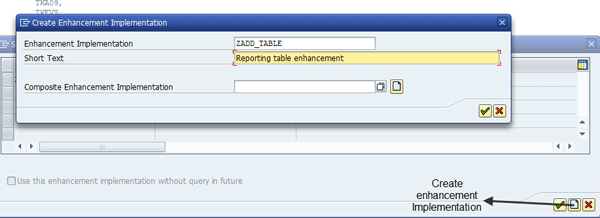
Figure 12
Enhancement implementation pop-up window

Figure 13
Enter ZZFI in the Pack column
The subscreen shows the list of enhancement implementations. Select your enhancement and press Enter. You can then add your new reporting structure name in the enhancement code between ENHANCEMENT and ENDENHANCEMENT (Figure 14).
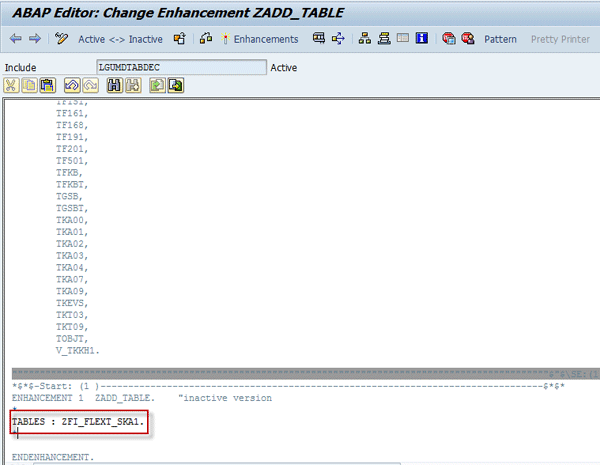
Figure 14
Add a custom structure in the data declaration program
Now the custom view ZFI_FLEXT_SKA1 is included in the global declaration program for data generation with the enhancement implementation in the enhancement object GUMD.
Step 3. Perform the Technical Setup of the Report Writer Table
The reporting table directory is automatically updated whenever you install a table group in the Special Purpose Ledger. The installed table automatically becomes a reporting table in the Special Purpose Ledger, so you can create the reports. Here you are not implementing the Special Purpose Ledger, nor installing the table group. You have to maintain these table entries manually for the enhanced table view ZFI_FLEXT_SKA1 if you do not have the Special Purpose Ledger implemented.
The new table view ZFI_FLEXT_SKA1 is still not eligible to be used as a reporting table. You have to include it in the reporting control table definitions using customization. You need to add the new custom table view to Report Writer control tables T804*. You do this by copying with an existing reference and changing the values based on the new table. Enter table T804 in the View Cluster using transaction SM34, or use transaction GRCT to manually maintain the values in the control tables. Here you have to include the new view as shown in Figure 15.
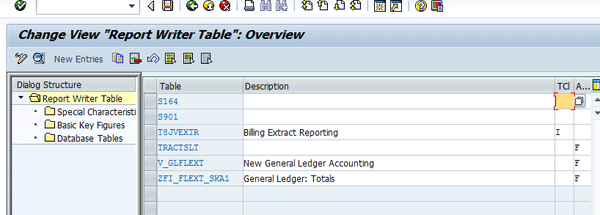
Figure 15
Add ZFI_FLEXT_SKA1 in the Report Writer control table
The new custom table view should be included in the tables T804A, T804B, T804C, T804E, and so forth. This is a complex table cluster containing the Report Writer Control tables as shown in Figure 16.
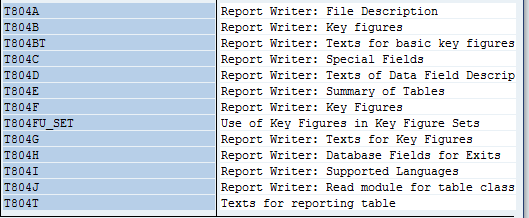
Figure 16
Report Writer control tables
You can use the copy function in transaction GRCT and copy the existing table (e.g., FAGLFLEXT) as a reference and change the values. Note that there are many tables in T804* in which the values are to be maintained for the new view, ZFI_FLEXT_SKA1. In the screen in Figure 17, select the row with table FAGLFLEXT and click the copy as icon in the toolbar.
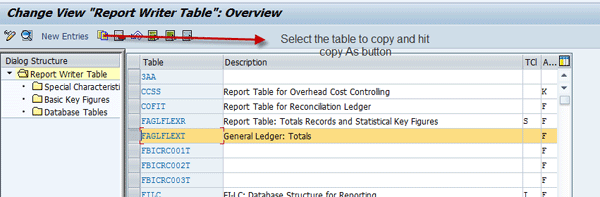
Figure 17
Use the copy as function to copy the new structure
The screen in Figure 18 appears with a reference table for the copy function. Change the values to the new structure, ZFI_FKEXT_SKA1. Specify the corresponding description and press Enter.

Figure 18
Copy the tables
A pop-up screen appears with three buttons (Figure 19). Click the copy all button.
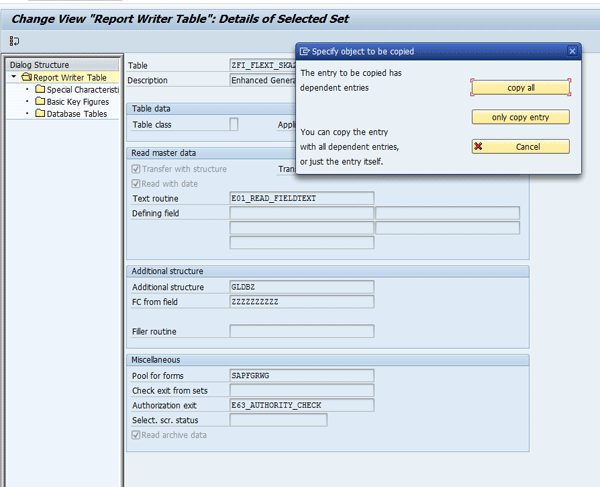
Figure 19
Copy table entries
The screen in Figure 20 pops up showing the number of dependent entries copied. Press Enter.

Figure 20
Copy of dependent entries
Now you have your table view inserted into various Report Writer control tables. However, the table is not yet ready to be used for creating Report Writer or Report Painter reports using the tool. The inserted records still contain data related to the standard table FAGLFLEXT that you use as reference to copy. Now you need to change those entries for your new view, ZFI_FLEXT_SKA1 (Figure 21).

Figure 21
Change table entries with ZFI_FLEXT_SKA1 in control table T804A
Table T804A contains the details of text routine, authorization exit, and other figures. The copied table records still contain the values relevant for FAGLFLEXT. Change those values for the new table view ZFI_FLEXT_SKA1 that was created and inserted in this table.
Refer to the following entries in the screen. Replace the table structure to show ZFI_FLEXT_SKA1 (Figure 22) wherever the original table reference is used to copy. To do this, double-click the row with ZFI_FLEXT_SKA1 when the Report Writer table folder is selected in the tree on the left. Change the value in the Transfer structure field to ZFI_FLEXT_SKA1 and leave other entries as is. Fields such as Text routine, Pool for forms (program containing ABAP routines), and Authorization exit can have the existing values because the same validation and authorization can work for the custom view as well.

Figure 22
Assign routines
Make sure that the other control tables, T804B, T804C, and T804E, have values that correspond to your view by changing the old value FAGLFLEXT to ZFI_FLEXT_SKA1 as in Figures 23, 24, and 25. Select the row ZFI_FLEXT_SLA1 and click the Special Characteristics folder in the tree structure in the Dialog Structure window (Figure 23). The window on the right shows multiple rows with the reference table, FAGLFLEXT. Replace those values with the new structure, ZFI_FLEXT_SKA1. Then perform the same process for the Basic Key Figures (Figure 24) and Database Tables (Figure 25).
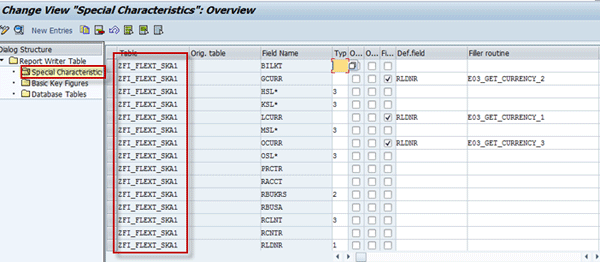
Figure 23
Replace FAGLFLEXT with new table ZFI_FLEXT_SKA1 in control table T804C
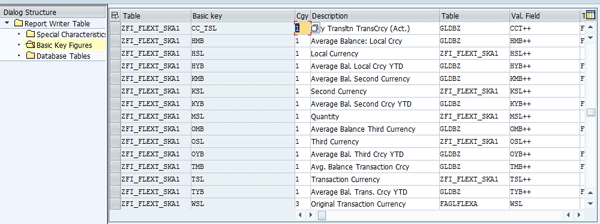
Figure 24
Replace table FAGLFLEXT in Basic Key Figures with new table ZFI_FLEXT_SKA1 in control table T804B

Figure 25
Replace with new table ZFI_FLEXT_SKA1 in the control table T804E
Step 4. Maintain the Table Directory
Use transaction GC13 or follow menu path IMG > Financial Accounting (New) > Special Purpose Ledger > Basic Settings > Maintain Table Directory (Figure 26). You can call up a directory of all the tables used in the special purpose ledger and display or maintain these tables. Note that the entries in this table are maintained automatically when a totals table is installed in the Special Purpose Ledger. Here you are not installing the table, but only maintaining the required entry, Table Type.
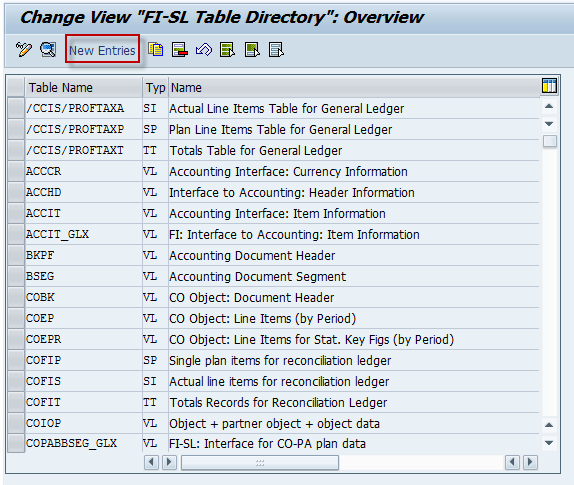
Figure 26
Maintain the table directory
Click the New Entries button to bring up the screen in Figure 27. You include the view ZFI_FLEXT_SKA1 here. Note that the changes to the table directory are only effective after the code in FI-SL is regenerated.
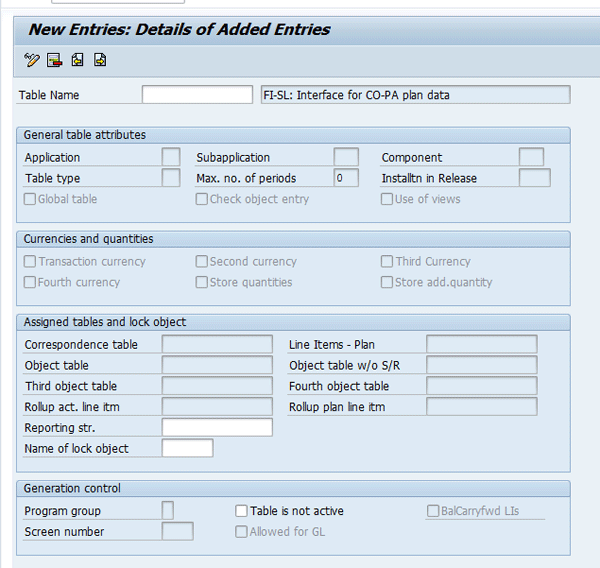
Figure 27
Maintain the table directory
If the Table type field is grayed out, enter =MAST in the transaction code window and press Enter to make the field ready for input (Figure 28). Enter the table type VL for your view ZFI_FLEXT_SKA1 in the customizing transaction GCI3 (table T800A) (Figure 29) and save the record.
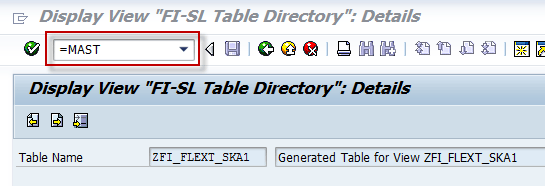
Figure 28
To enable the Table Type field available for input

Figure 29
Enter the table type
Step 5. Maintain the Integrated Master Data
Now you define how the validation is to be carried out for the master data. Use transaction code GCS1 (table T800D) or follow IMG menu path Financial Accounting (New) > Special Purpose Ledger > Basic Settings > Tables > Maintain Integrated Master Data. Enter the required fields for the view ZFI_FLEXT_SKA1 and their master data exits. This is required to make sure the texts for the master data elements are appearing correct in the report that are created from the custom table view.
Use transaction GCS1, select the entries for table FAGLFLEXR, and click the copy as button (Figure 30).
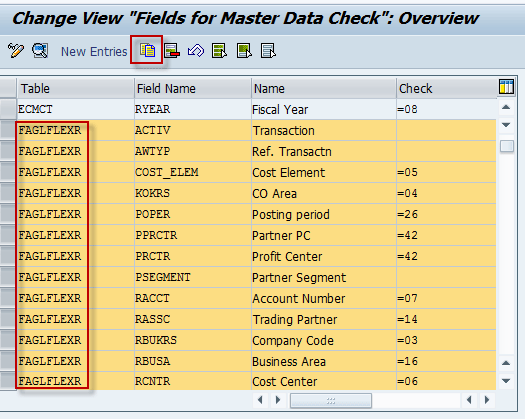
Figure 30
Copy entries from FAGLFLEXR
Specify target values by replacing the table value FAGLFLEXR with the value ZFI_FLEXT_SKA1 for each field and save (Figure 31).
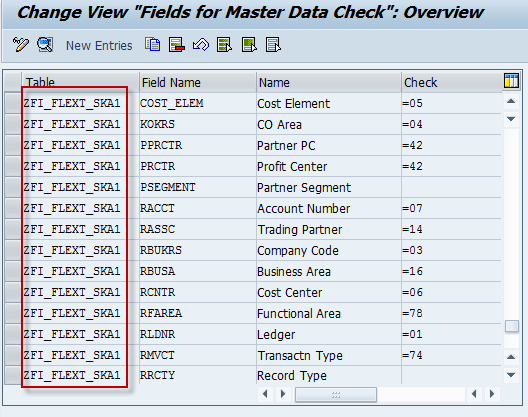
Figure 31
Replace FAGLFLEXR with ZFI_FLEXT_SKA1 as the target value to copy after clicking the copy as icon for each field
Now you have to create a new entry for group account BILKT. Use transaction GCS1 and click the New Entries button (Figure 32).
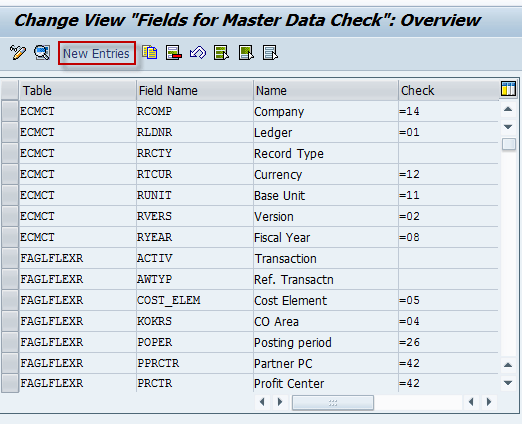
Figure 32
Field master data check
In the next screen, enter ZFI_FLEXT_SKA1 as the Totals Table, BILKT as the Field Name, SKA1 as the Value Table, SAKNR as the Field Name, SKAT as the Text Table, TXT20 as the Short tx fld n., and TXT50 as the Long tx fld n. (Figure 33). Save your entries.
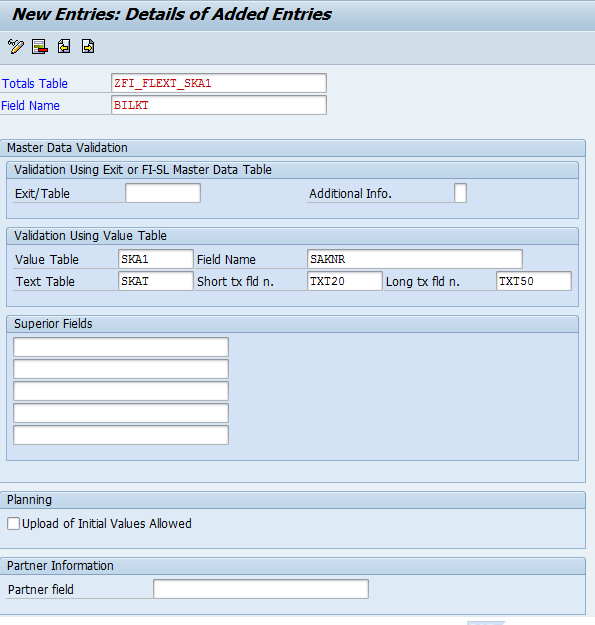
Figure 33
Maintain master data check for BILKT
The other fields are already maintained with the copy function from existing table entries for table FAGLFLEXR. You can also maintain these entries individually by referring to entries in table T800D as in Figure 34 for FAGLFLEXT and entered one by one as described previously.
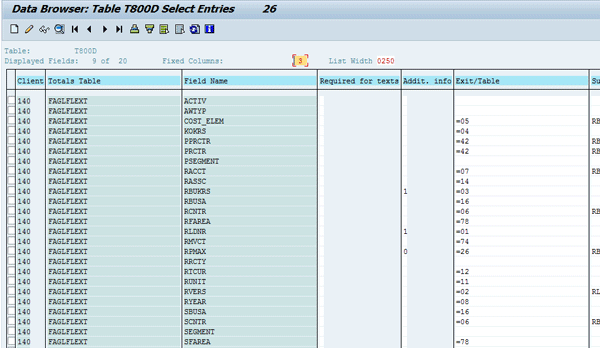
Figure 34
Table entries in T800D for table FAGLFLEXT
After maintaining the integrated master data in the table T800D the entries are as shown in Figure 35.
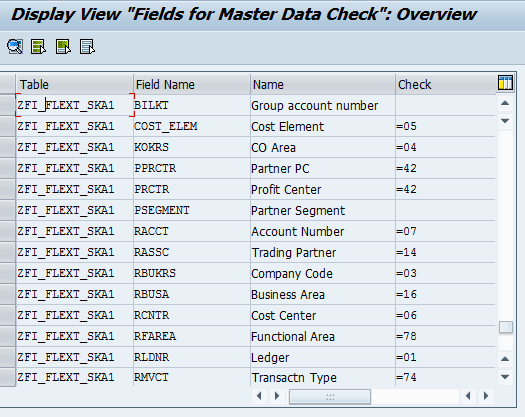
Figure 35
Integrated master data for new view ZFI_FLEXT_SKA1
Step 6. Generate the FI Programs Using Report RGZZGLUX
The program RGZZGLUX generates FI programs and Special Purpose Ledger programs and routines. Use transaction code SE38 and enter the program name RGZZGLUX (Figure 36).
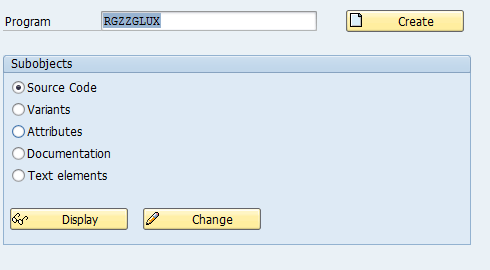
Figure 36
Enter program RGZZGLUX
Execute the report by clicking the execute icon or pressing F8. The output shows the details of the log with the generated objects (Figure 37). Now the table view ZFI_FLEXT_SKA1 is available as a reporting table. You can create libraries, variables, rows, and column models required for your reporting using this table view and then create required reports.
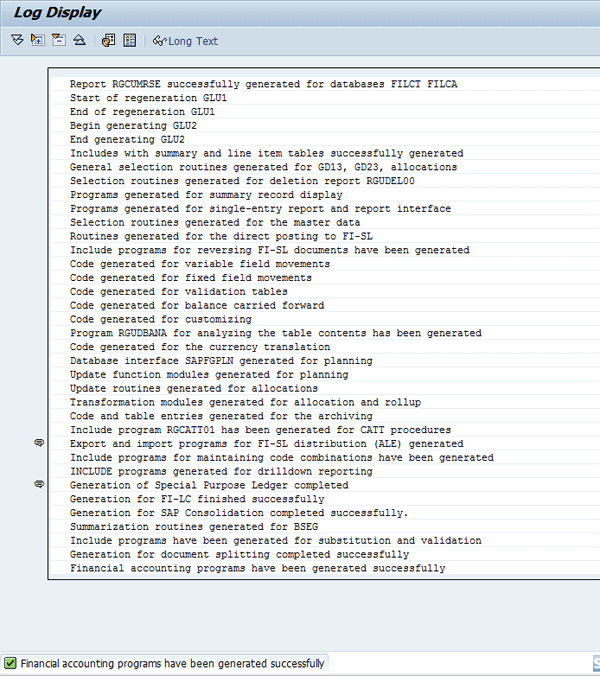
Figure 37
Generate FI programs
Soorian Ethirajulu
Soorian Ethirajulu is a business systems analyst at a leading global medical technology company. He has a master’s degree and professional certifications in accounting and finance. He is also an SAP-certified solution consultant in FI and CO. He has about 13 years of SAP experience in FI and CO, including more than seven years as a consultant. He is currently involved in a global implementation of SAP ERP Central Component (SAP ECC) 6.0.
If you would like to submit an idea for an article for SAP Professional Journal, contact managing editor Scott Priest.
You may contact the author at soorieus@gmail.com.
If you have comments about this article or publication, or would like to submit an article idea, please contact the editor.