Using this step-by-step approach, you can avoid problems when you move, delete, or add holidays in your calendar.
Key Concept
The holiday calendar is the base calendar in the Time Management module for time and payroll calculations. Changes in an existing holiday calendar affect several infotypes. Unless you regenerate the work schedules after the changes, the system does not reflect the changed holidays in infotypes 0007 (planned working time), 2002 (attendances), 2001 (absences), 2050 (annual calendar), 2051 (monthly calendar), or 2052 (weekly calendar). Also, it does not calculate absence quotas correctly in infotype 2006 (absence quotas).
Business Scenario
In my example, a company wants to move the floating Diwali “festival of lights” holiday from November to October. The change affects infotypes 0007, 2001, 2002, 2006, 2050, 2051 and 2052. If you use the following steps, the system reflects the changes in all those required infotypes:
Step 1. Review the annual holiday calendar
Step 2. Analyze the company requirements (for example, a date change for a movable holiday for the year 2008)
Step 3. Delete the existing work schedule for that month with transaction PT02
Step 4. Delete the assignment of the movable holiday from the holiday calendar
Step 5. Change the dates as required for the holiday
Step 6. Assign the movable holiday with the new date to the holiday calendar
Step 7. Generate the work schedule through transaction PT01 or through batch input for multiple Work Schedule Rules (WSRs)
Step 8. Run the report RPTUPD00 to fix discrepancies among infotypes 2001, 2002, and 2006. Infotypes 2050 and 2051, and 2052 are views of 2001 and 2002, so they don’t need to be fixed separately.
Step 9. Do a random check of infotypes 2001, 2002, and 2006 master data for one or two employees
NOTE
The procedures that I describe in this article are relevant to both negative and positive time management. Program RPTUPD00 corrects any absences and attendances discrepancies due to holiday calendar adjustments.
Configuration Steps
Step 1. Review the annual holiday calendar. Go to transaction SPRO and follow menu path Time Management > Work Schedule > Define Public holiday classes or use transaction code SCAL from the SAP Easy Access Menu. Select Holiday calendar (Figure 1) and click the change icon. Select your holiday calendar ID (for example, AB) as shown in Figure 2. Select the required calendar from the list. Click the Calendar button and select the year (2008, for example) and click the Year button (Figure 3).
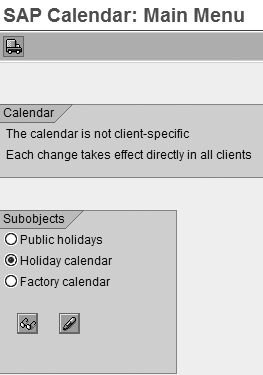
Figure 1
SAP calendar main menu
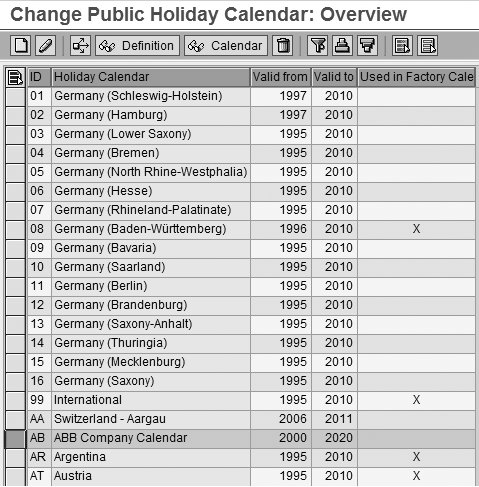
Figure 2
List of holiday calendars configured in the system
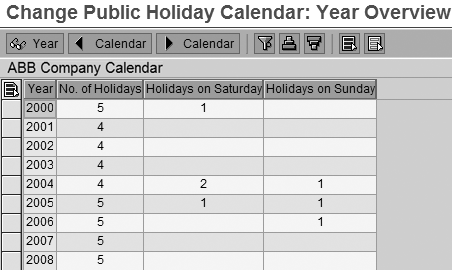
Figure 3
Select the year
The screen shown in Figure 4 automatically appears. Review the holidays shown in the calendar.
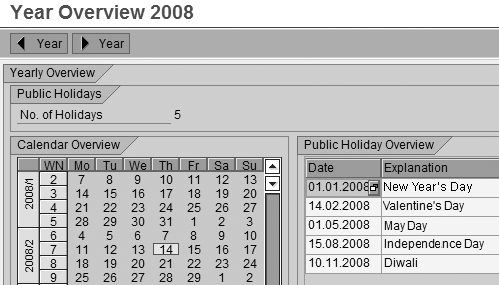
Figure 4
List of 2008 holidays for holiday calendar AB
Step 2. Analyze the company requirements (for example, a date change for a movable holiday for the year 2008). In my example, I am going to change the 10/11/2008 Diwali date to 27/10/2008. Use transaction SPRO and follow menu path Time Management > Work Schedules > Define Public holiday classes or use transaction code SCAL.
Select the Public holiday button and click on the change mode icon. Search for Diwali in the holiday list (Figure 5) with sort key ABB. You can find holidays with the sort key if you give the search criteria as ABB in the Find icon. The system then shows the available entries. Click on Diwali and review the characteristics.
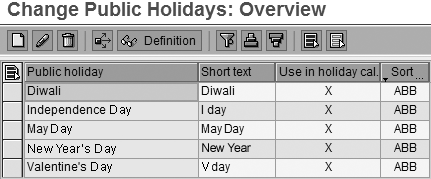
Figure 5
List of holidays reached with sort key ABB
Select Diwali as a Floating Public Holiday (Figure 6) and click on the enter icon. The holiday is marked as Used in Figure 7. In my example, the holiday is used in holiday calendar AB. The holiday calendar AB uses all the holidays marked with sort criterion ABB.
Tip!
Standard R/3 has many holidays defined with the same names but you need to make changes for holidays that have been assigned to your holiday calendar. You can do this by using a unique identifying sort key (ABB in my example) that is assigned for your company’s holiday.
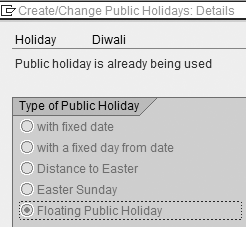
Figure 6
Designate Diwali as a floating holiday
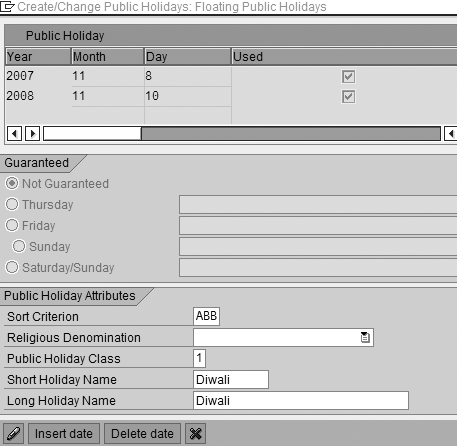
Figure 7
Calendar marked as Used on the Floating Public Holidays screen
You now need to confirm that the dates captured in Figure 7 are reflected in the relevant work schedule. Check it with transaction code PT03. Enter the required details or select them from the drop-down list: Employee subgroup grouping, Holiday calendar, Personnel subarea grouping, Work schedule rule, and Period — for example, 11/2008 to 11/2008 as shown in Figure 8. Click the Display button.
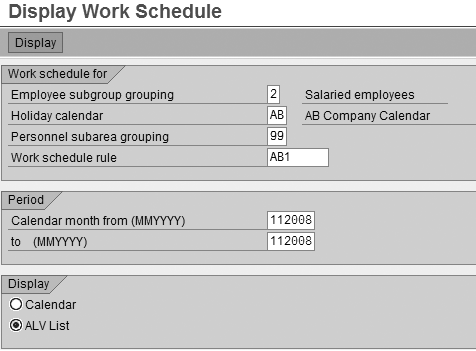
Figure 8
Check the work schedule
Choose the ALV List view. In Figure 9, you can see that 10.11.08 is used as a public holiday with Hol.class 1 (ordinary public holiday with pay).
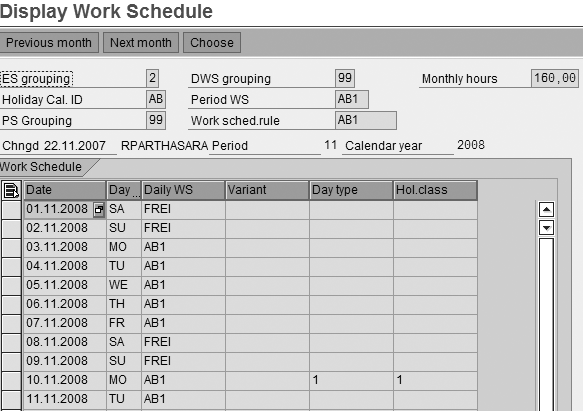
Figure 9
List view of work schedule
Step 3. Delete the existing work schedule for that month with transaction PT02. Delete the schedules for the months 10/08 and 11/08. Use transaction PT02 and select the values as required in the screen:
- Employee subgroup grouping refers to employee groupings in the system for work schedules (1 = hourly-paid employee, 2 = salaried employee in a standard system)
- Holiday calendar refers to a two-digit calendar ID
- Personnel subarea grouping refers to subarea grouping for work schedules
- Work schedule rule refers to the eight-digit rule created for your company
Enter required details (Figure 10) and click Delete all. Repeat the steps for different work schedule rules.
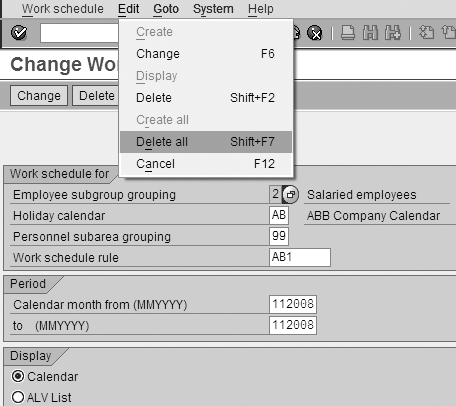
Figure 10
Change the work schedule screen
Tip!
In a standard system, if you create a work schedule, it automatically overwrites the previous entry. However, to ensure everything is correct, I follow the additional step of deleting the previous work schedules for that period.
Step 4. Delete the assignment of a movable holiday from the holiday calendar. Go to transaction SCAL. Select Holiday calendar (AB). Highlight the calendar as shown in Figure 1 and click the on holiday calendar. Click the change mode icon. The system then allows you to edit the holiday calendar.
Figure 11 then shows the list of holidays assigned for the required public holiday calendar with Valid From years. Select Diwali and click the Delete Assignment button. Click the save icon.

Figure 11
Validity dates for holidays
Step 5. Change the dates as required for the holiday. Now go to transaction SCAL. Select the Public holiday button and then select Diwali as shown in Figure 12.
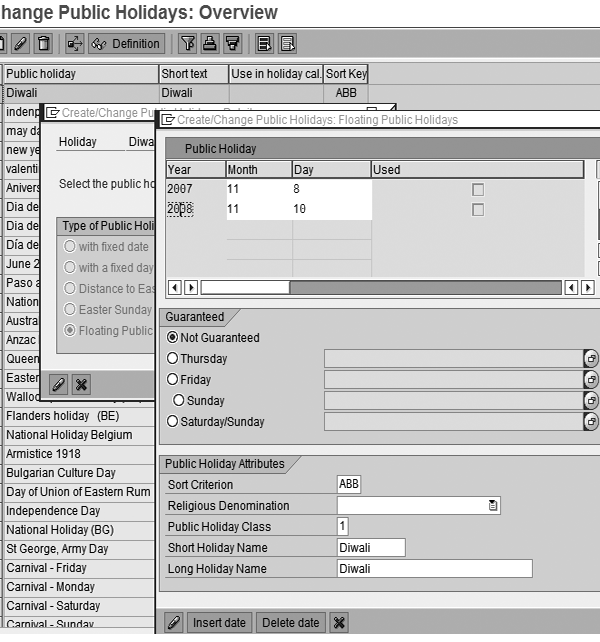
Figure 12
Make changes to the Change Public Holidays screen
Click on the date you want to change. Change it to 27/10/08 by overwriting the existing date. Note that the Not Guaranteed option is selected. This indicates that the public holiday should not be moved if it falls on a weekend.
Step 6. Assign the movable holiday with the new date to the holiday calendar. Reassign the holiday to the holiday calendar as captured in Figure 11 and click on the Assign Holiday button. The system sends the message Selected public holiday was changed.
Step 7. Generate the work schedule through transaction PT01 or through batch input for multiple WSRs. Use transaction PT01 and enter the required information or select it from the drop-down list (Figure 13). Click the Create all button to generate the new work schedule.
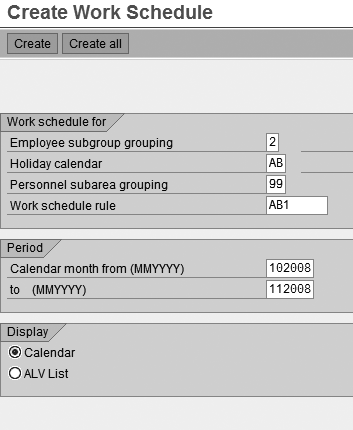
Figure 13
Enter the required information to generate a new work schedule
Review the changed personal work schedules with transaction code PT03. Figure 14 shows the list of working days/holidays and personal work schedule per work schedule rules for the month of 10/2008.
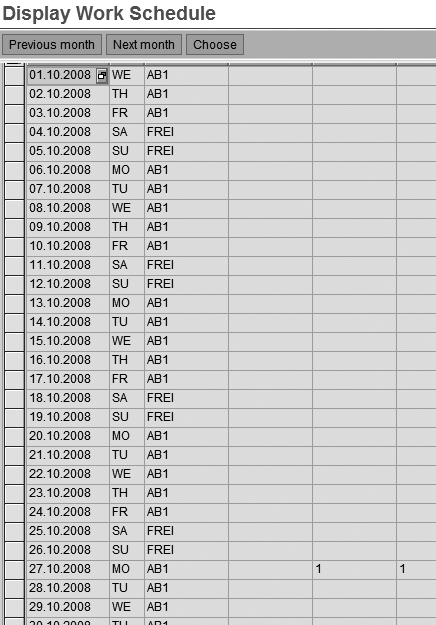
Figure 14
Display of work schedule for October 2008
This figure confirms 27.10.08 as a holiday with holiday class 1 (ordinary paid public holiday) and it shows the regenerated work schedule for October 2008.
Figure 15 shows there is no holiday marked for 10.11.2008. This figure confirms 10.11.2008 as working day and shows the regenerated work schedule for November 2008. Note there is no day type 1 and holiday class 1 for 10.11.2008. Now you have finished your configuration work.
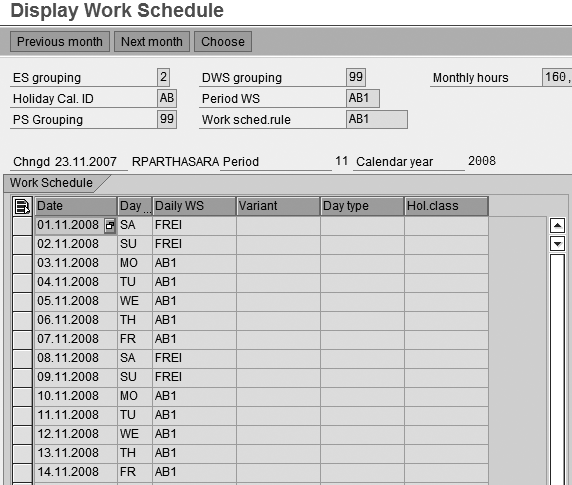
Figure 15
Work schedule for November 2008 with no holiday
Tip!
Because you are changing the holiday from the 11th month to the 10th month, you need to regenerate the work schedule for both months.
Step 8. Run the report RPTUPD00 to fix discrepancies among infotypes 2001, 2002, and 2006. Run the program RPTUPD00 with transaction code SE38 and execute the batch input file through SM35 in background mode to update the absence and attendance quotas. This program helps to fix issues arising out of holiday date changes and absences recorded in the system during that period, and it applicable for both negative and positive time management implementations. After you regenerate the personal work schedules, the reevaluated absences and attendances are reflected in infotype 2052.
Step 9. Do a random check of infotypes 2001, 2002, and 2006 master data for one or two employees. Check the updated infotypes 2001, 2002, and 2006 if the employee has any absences during that period linked with a quota. If an employee has an absence during that period, you need to refresh the data with report RPTUPD00. Otherwise changes will not occur in those infotypes.
Tip!
If an absence is booked during a holiday period and if that absence is linked with the absence quotas, this report adjusts the quota deduction automatically. For example, if an employee is on annual leave between 01.11.2008 and 15.11.2008, the system recalculates 10.11.2008 as a working day and reduces the quota by 1 day. If an employee is on annual leave between 25.10.08 and 31.10.08, the system treats 27.10.08 as a holiday and adds a day. These two examples are relevant only for absences that are linked to an absence quota.
Points to Remember
If multiple work schedules are attached to this holiday calendar, generate all the work schedules through program RPTSHF00 and execute the batch input session in transaction code SM35. If you want to add a new holiday, follow the same steps and create the holiday with a floating public holiday type. Then insert the dates, assign it to the holiday calendar, and regenerate the work schedule for that period.
Although you can configure and generate work schedules in a production environment, I recommend that you do this in a development system, test it in a quality control system, and then if everything is correct, transport it to the production system. This ensures the sanctity of the production system.
Raghavendran Parthasarathy
Raghavendran Parthasarathy works for Hexaware Technologies as a Principal Consultant,where he manages SAP solution design for customers across the globe. He has worked in SAP ERP HCM for over 14 years in various capacities, including payroll projects in the Middle East, Europe, and Asia/Pacific. In addition to payroll, Raghavendran has experience in negative time management, personnel administration, and recruitment. He has also been a part of portal implementations. Currently, he is involved with cloud-based HCM applications such as SAP SuccessFactors and Workday.
You may contact the author at raghs99@yahoo.com.
If you have comments about this article or publication, or would like to submit an article idea, please contact the editor.