Learn the essentials of the SAP Business Rules Framework Plus (BRFplus) rules. Discover how to work with the BRFplus tool, how to create a simulation for rules, and how to call a rule from an ABAP program.
Key Concept
The
BRFplus tool provides a sophisticated user interface for creating functions that comprise a number of rules. You can use these functions to represent business rules and scenarios as well as other formulas and conditions. You can call functions created using the BRFplus tool from an ABAP program.
With the launch of NetWeaver 7.02, SAP updated its Business Rules tool as Business Rules Framework Plus (BRFplus.) This tool, which is accessed via transaction BRFplus, offers numerous advantages, and therefore, learning the essentials is a must for SAP developers.
BRFplus is an ABAP-based framework that provides a user interface for defining, modeling, and processing business rules. You can use these rules in many different applications. For example, the rules can be used for data validation or calculation and computation based on formulas and conditional checks. It is also possible to generate Web services based on rules defined within the BRFplus tool. In this way, you can offer the rules as a service within a service-oriented architecture (SOA) landscape. In the section “An Example Scenario and Corresponding BRF Application Components,” I describe a sample business scenario that uses the BRFplus tool.
Before explaining BRFplus in detail, I cover the various components for a typical application in the sidebar “Getting the Feel for BRFplus.” I describe an example of a business requirement that can be fulfilled by using BRFplus. I also walk you through the various steps required to create the scenario-specific function and then run a simulation test of the created function. Last, I show you how the function is called from an ABAP program. My examples are taken from an SAP NetWeaver 7.02 system.
The rule set includes multiple rules. The rules contain the main logic, formula, or action to be taken based on applicable conditions and circumstances. A rule set can also contain variables and expressions necessary for rule set variable initialization. There are a number of applicable expression types. However, in my opinion, the decision table is the easiest to follow because the possible inputs and result can be viewed as columns and rows. Consequently, in this article I emphasize the decision table expression type.
Getting the Feel for BRFplus
There are several components in a BRFplus application.
The function is one of the components. It forms the interface between the calling program and the application. The function contains the context (i.e., a set of importing parameters) and one result parameter. The importing parameters and the result together form the signature of the function. You can run the function in an event mode, where the function is comprised of rule sets that are assigned numbers according to priority. The order of execution for the rule sets is determined at runtime based on a priority value of 0-99. The rule set with priority of 0 is executed first, and the one with priority 99 is last. You can test the function in a simulated test environment.
An Example Scenario and Corresponding BRF Application Components
Consider this sample requirement that can be fulfilled using BRFplus. Suppose you have a company that issues incremental salary raises to its employees based on contract type and the previous year’s rating. The formula for the new salary for permanent employees is:
New Salary = Old Salary + (Increment Percentage * Old Salary / 100)
The formula for contractual employees is:
New Salary = Old Salary + (Increment Percentage * Old Salary / 100) + 1000
For permanent employees, the increment percentage is shown in
Table 1. This is based on the rating of an employee.
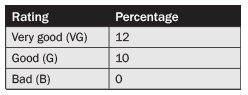
Table 1
Increment percentage for permanent employees
The increment percentage for contractual employees is shown in
Table 2.
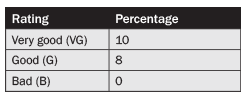
Table 2
Increment percentage for contractual employees
You can create a BRFplus application based on this scenario. Add the current salary, rating, and contract type as inputs. You then can use the function to compute a new salary. For this scenario, create the following:
- Application name: ZST12_NEWSALARY_APP
- Function: NEW_SAL_CALC with the following signature:a.) Context: CONTRACT_TYPE, OLD_SALARY, RATINGb.) Resulting data object: NEW_SALARY
- Rule set: MY_RULE_SET. In the rule set, you define a variable increment percentage and decision table for specifying the increment percentage based on the employee rating and contract type. The decision table INC_DECISION_TAB_PC is used for the initialization of the INCREMENT_PERCENTAGE variable defined within the rule set.
- The rule incorporates an IF condition that checks the contract type and, based on the possible outcome (permanent [P] or contract [C]), calls the appropriate formula. The relevant formula depends on the contract type of the employee in question.
Note
For this example, I created an event mode operation for my function.
Steps Required to Create Rules
To apply the theory to implement the business scenario, follow these four steps:
- Step 1. Create the BRFplus application
- Step 2. Create the NEW_SAL_CALC function
- Step 3. Create the rule set, rule set variable, and decision table
- Step 4. Create a rule
Step 1. Create the BRFplus Application
Start by creating the application in which the function and the rule set with your rule will be contained. Use transaction BRF+ or BRFplus. Open the browser to activate BRFplus. Follow menu path Workbench > Create Application to open the dialog box shown in
Figure 1. Enter the data shown in this figure. Click the Create And Navigate To Object button.
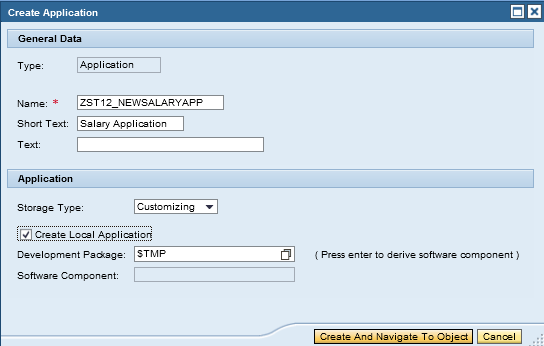
Figure 1
The Create Application dialog box
Step 2. Create the NEW_SAL_CALC Function
The function NEW_SAL_CALC takes the current salary, rating, and contract type of the employee as inputs and returns the computed new salary. To create this function, click the Contained Objects tab of the application in the detail screen of the newly created application (
Figure 2). This activity displays the Create Function dialog box (
Figure 3).

Figure 2
Create the Function Object
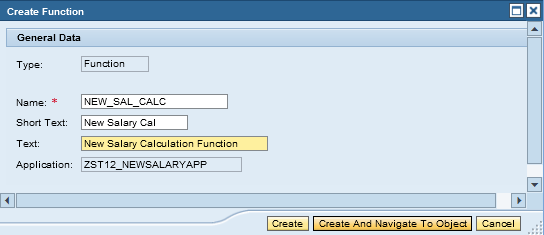
Figure 3
The Create Function dialog box
Enter the name NEW_SAL_CALC in the Name field along with the Short Text and Text names shown in
Figure 3. Click the Create And Navigate To Object button. This leads to the Detail screen of the function.
On the Detail area, click the Signature tab and then click Add New Data Object to open the available menu options. Select the first option, Add New Data Object (
Figure 4). This takes you to the Create Object screen (
Figure 5).
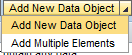
Figure 4
Add a new data object
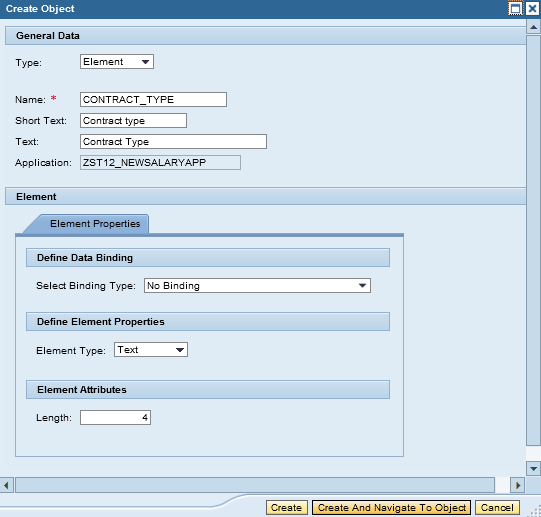
Figure 5
Create an object
To create the CONTRACT_TYPE element, enter CONTRACT_TYPE in the Name field of the Create Object screen. Populate the Short Text and Text fields as shown in
Figure 5. Select Text for the Element Type and enter 4 in the Length field. Click the Create And Navigate To Object button.
Define the domain values for the element CONTRACT_TYPE. These are either P (Permanent) or C (Contract). On the CONTRACT_TYPE detail area, click the Domain Values tab. Then click the Create Value button (
Figure 6).
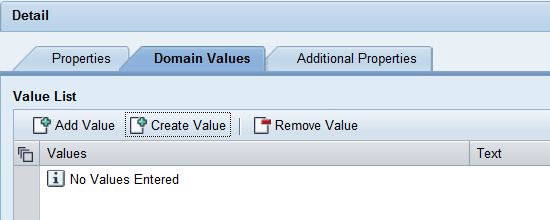
Figure 6
Create domain values
Enter the first Constant details (
Figure 7). The name of this constant is Permanent with the value P. Define a constant value for the Contractual Contract type with the value C.

Figure 7
Create a Constant of the type Permanent for the contract type
Next, define the element OLD_SALARY with the Element Type of Amount and a length of 15 (
Figure 8). Salary must be of the type Amount, and I kept the length at 15 to allow for large amount values. You also define the rating, which has a Text type and a length of 4. Use the same steps you used for the old salary and contract type. Also, create an object with the name RATING that has a type text and length of 4. Set the values shown in
Table 3 as the domain values for the rating. Make sure to select the Positive Values Only check box.
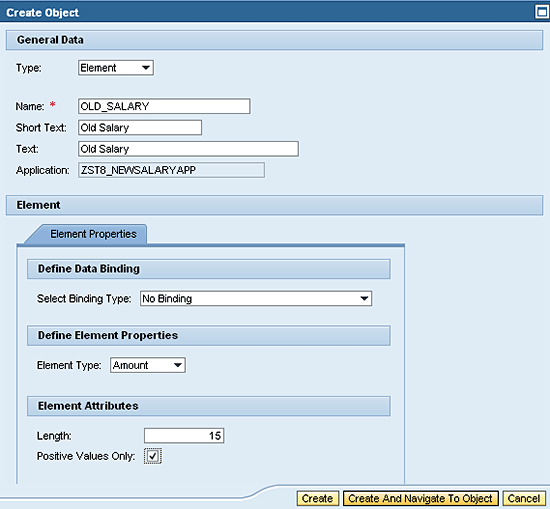
Figure 8
OLD_SALARY properties
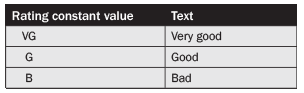
Table 3
Rating domain values
The signature (input and output) of the function is shown in
Figure 9.
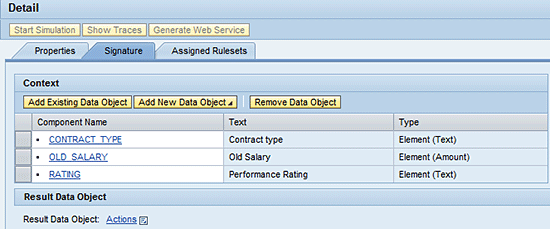
Figure 9
Function Signature
To create the Result Data Object click the square icon

next to the Actions link and select Create from the drop-down menu (
Figure 10).
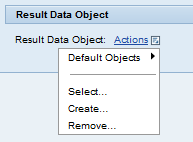
Figure 10
Default objects
This takes you to the dialog screen shown in
Figure 11. Enter details for the Short Text, Text, Type, and Length fields. Follow steps similar to the ones you used to create an OLD_SALARY element and define the Result Data Object NEW_SALARY with the Length 15 and Element Type Amount. Select the Positive Values Only check box. I chose a length of 15 for this example because it is a high enough number to work for large salary values.
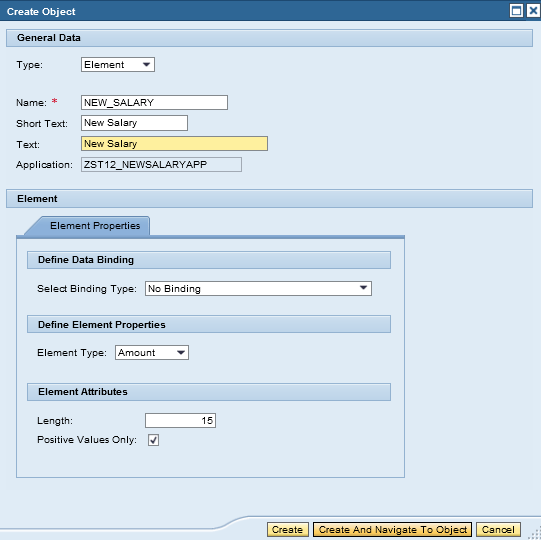
Figure 11
New salary element properties
Click the Create button shown in
Figure 11. This takes you back to the screen shown in
Figure 9.
Finally, activate your BRFplus function by clicking the Activate button on the toolbar displayed at the top of the Function Edit screen. The next screen that appears (
Figure 12) displays all the objects contained within the function. Click the OK button.
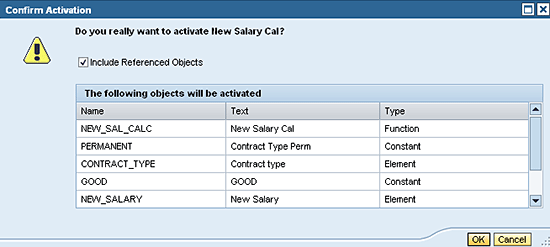
Figure 12
Activate the new salary
Step 3. Create the Rule Set, Rule Set Variable, and Decision Table
The next step is to create the rule set for the rule. Click the Assigned Rulesets tab on the Detail area of the function object screen (
Figure 13) and then click the Create Ruleset button.
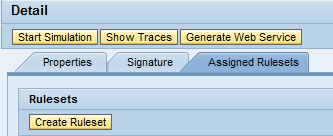
Figure 13
Create the rule set
In the next screen (
Figure 14), enter MY_RULE_SET in the Name field and enter names in the Short Text and the Text fields.
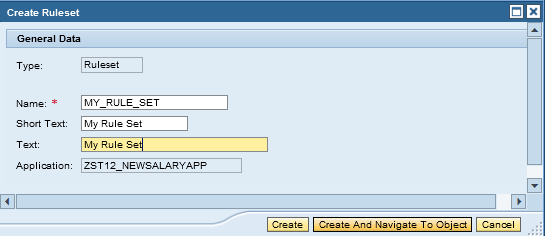
Figure 14
Enter data for the rule set
Click the Create And Navigate To Object button. This takes you to the screen in
Figure 15.
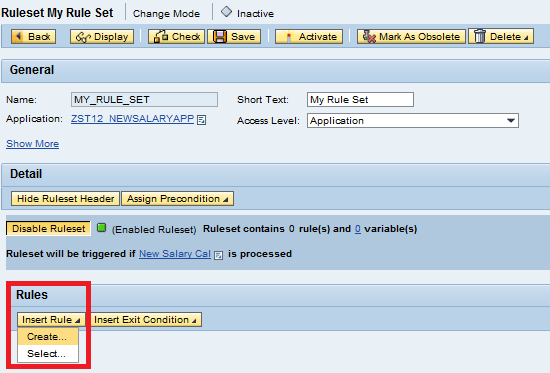
Figure 15
Rule set edit screen
The rule set header is in the Detail section. Click the number link next to variable(s) (
Figure 16). Initially, this number is zero.

Figure 16
The ruleset header
In the Maintain Ruleset Variables screen (
Figure 17) click the Add Variable button and select the Create… option.
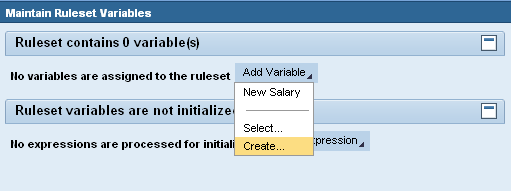
Figure 17
Maintain rule set variables
Note
Make sure that Edit mode is on before accessing the rule set variable. Otherwise, the necessary buttons are not available. In Figure 15, if the Change Mode button is visible, it means Edit mode or Change mode is on. Otherwise, instead of the Display button (shown between the Back and Check buttons), an Edit button appears. Click the Edit button to reach Change mode.
Click the Add Variable button and select the Create button to bring up the dialog screen in
Figure 18. Now create the INCREMENT_PERCENTAGE element object. Specify the Short Text and Text values. In my example, this object is based on the Element Type Number with a length of eight and decimal places of two. Click the Create button. The system adds the Incremental Percent variable to the rule set and sends the following message: Object(s) created successfully (
Figure 19).
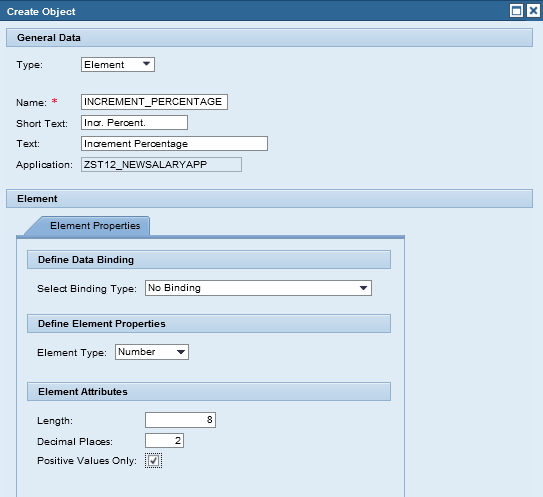
Figure 18
Create INCREMENT_PERCENTAGE
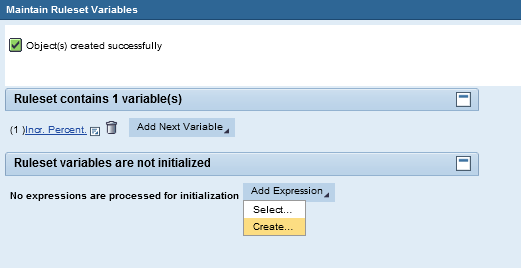
Figure 19
Ruleset variables
Create a decision table expression for initializing the newly created variable INCREMENT_PERCENTAGE. On the Maintain Ruleset Variable dialog, under the heading Ruleset variables are not initialized, click the Add Expression button and select the Create… option. In the Create Object dialog box (
Figure 20) choose Decision Table for the type and enter INC_DECISION_TAB_PC in the Name field. Enter names in the Short Text and Text fields and click the Create And Navigate To Object button.
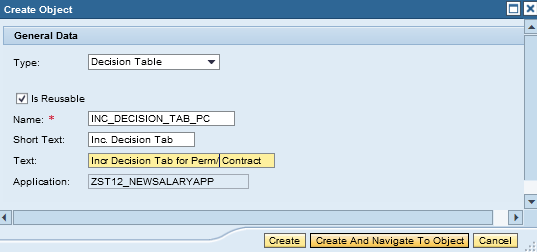
Figure 20
Create the decision table
Note
Decision tables are a form of BRFplus expression in which the logical conditions are specified using a set of table rows. One or more table columns are used for defining each possible condition, and they are populated with appropriate values. Each table row also contains the result value column along with the condition columns. Based on the applicable input data, a comparison is made with the applicable condition columns in the table rows, and the result is determined and returned.
The Table Settings dialog box (
Figure 21) appears when the decision table is created. Define the columns of the decision table and the result data object. For the result object, click the square icon next to Result Data Object under the Result Data Object area. In the menu that appears click the Select… option.
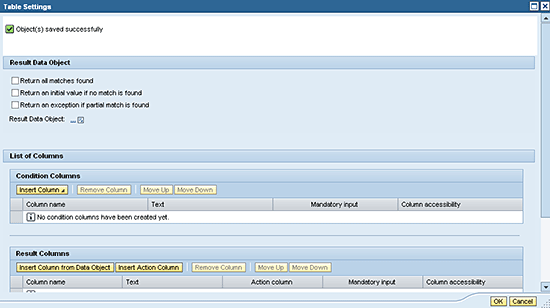
Figure 21
Table settings
From the dialog menu, choose the Increment Percentage variable that you defined earlier. This adds the Increment Percentage as the Result Data Object, as shown in the table settings in
Figure 22.
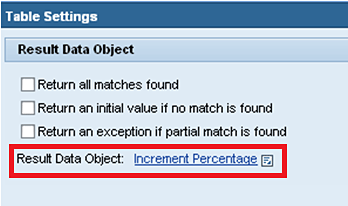
Figure 22
Click the Increment Percentage link
Define the list of condition columns in the table. Under the List of Columns section in the Table Settings screen (
Figure 21), click the Insert Column button and select From Context Data Objects from the drop-down menu.
In the pop-up screen that appears (
Figure 23) click the Search button. The various context data objects display. Choose the CONTRACT_TYPE and RATING objects and then click the Select button. This activity adds these objects under the Condition Columns section of the Table Settings screen (
Figure 24). Click the OK button.
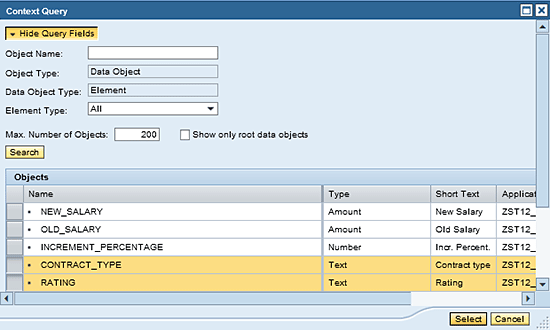
Figure 23
Context query
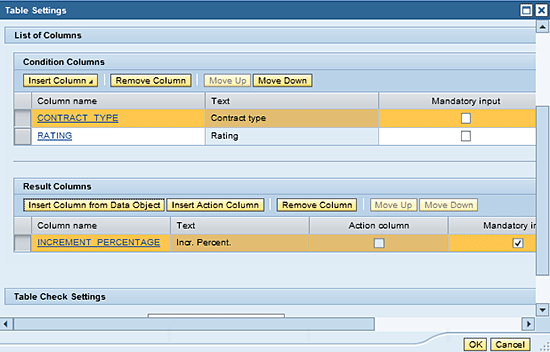
Figure 24
Condition Columns
In the next screen (
Figure 25) to enter data into the decision table, click the Insert New Row button.
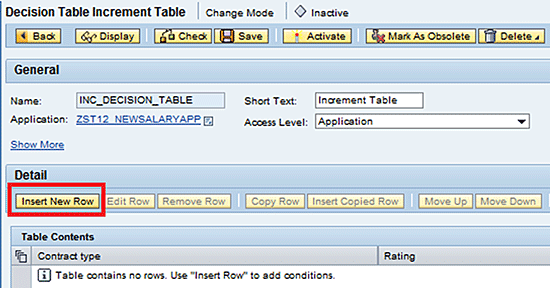
Figure 25
Insert a new row
The screen changes as shown in
Figure 26. Now click the square icon below the Contract type and then choose the option Direct Value Input from the menu. Enter P in the field and click OK.
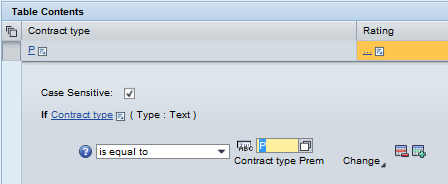
Figure 26
Contract type
This activity enters P (Permanent) in the Contract type column (
Figure 27).
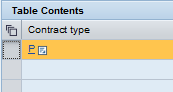
Figure 27
Contract type P
Repeat this step for the Rating and the Incr. Percent columns and insert values G and 10, respectively (
Figure 28). The entered values mean that if a person has contract type P (permanent) and a rating of G (good), his or her incremental raise is 10 percent.

Figure 28
Table contents
Insert rows until the table contents look like the data listed in
Table 4.
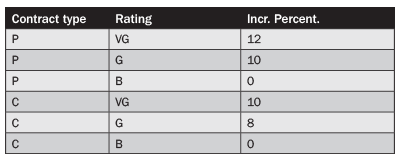
Table 4
Decision table rows
Save your rule set and activate your work.
Step 4. Create the Rule
The next step is to create the rule that determines the new salary using the increment percentage and an IF condition to check the contract type. Within this rule, for both the contract type P and C, the applicable formula is added. In the Rules area click Insert Rule and select Create… (
Figure 29)

Figure 29
Create the rule
The next screen shows you see an empty IF condition. Enter Contract type as the operand and specify the operator as is equal to P (
Figure 30). Make P the comparison value.
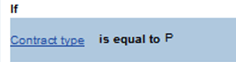
Figure 30
IF condition
Specify the action to be taken when the IF condition holds true. In the Then menu of the IF condition, click Add and then Process Expression. Click the Create… button from the context menu (
Figure 31).
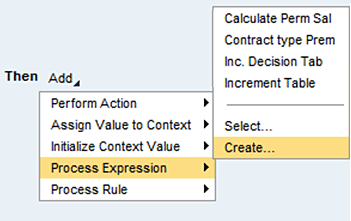
Figure 31
Create a process expression
This activity displays the Create Object dialog box (
Figure 3). Choose Formula as the Type and enter CAL_PERM_NEW_SAL in the Name field. Populate the Short Text and Text fields as shown in
Figure 32. Click the Create And Navigate To Object button.
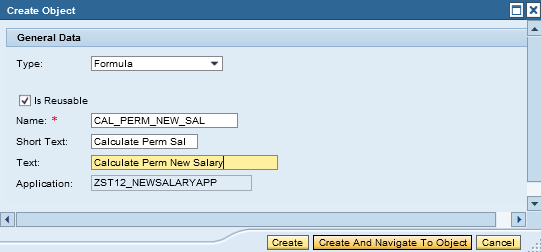
Figure 32
Create the object
Enter the formula for the permanent employees as shown in the Formula editor screen (
Figure 33). To enter a number, click the Number button and type the number in the pop-up box provided (
Figure 34). Click the OK button to return to the Formula editor screen.
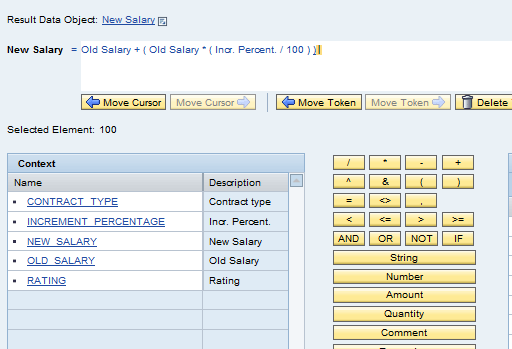
Figure 33
Formula editor
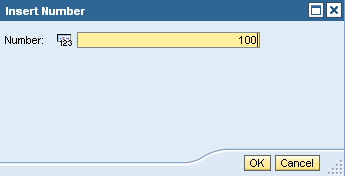
Figure 34
Insert a number
Next, select the square icon next to the Result Data Object as shown in
Figure 33. When you click the square icon, the options appear as shown in
Figure 35.
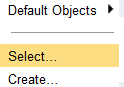
Figure 35
Available options
Choose Select from the options to bring up the dialog box in
Figure 36.
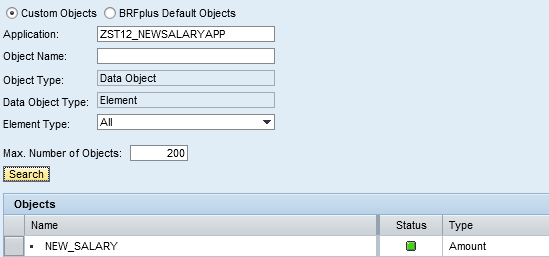
Figure 36
Custom objects
Click the Search button to display the NEW_SALARY in the Objects list and select the NEW_SALARY object. Save the formula. The rule should now look like the screen shown in
Figure 37.
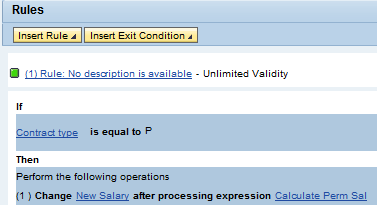
Figure 37
The rule after saving the formula
Carry out the same steps for the ELSE part of the IF condition. Click Add and select Process Expression. Click the Create button from the context menu shown in
Figure 38.
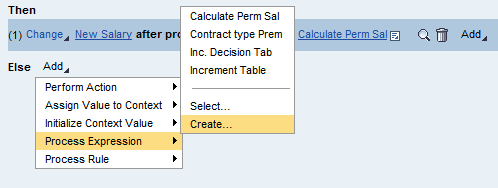
Figure 38
Menu path for ELSE
A Create Object dialog appears. Enter the name CAL_CONTRACT_SALARY in the Name field and populate the Short Text and Text fields (
Figure 39). Click the Create And Navigate To Object button, which takes you to the formula editor. Enter the new salary as the result data object and write the example formula shown in
Figure 40.
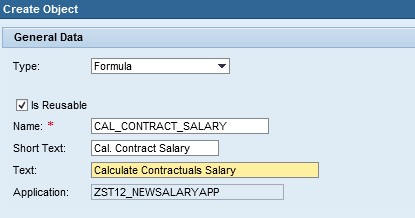
Figure 39
Create a formula object
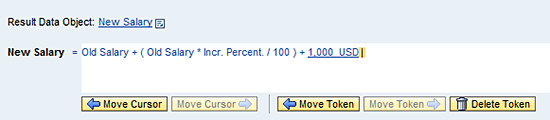
Figure 40
New salary formula
After you add the two formulas, the rule should look like the one shown in
Figure 41.
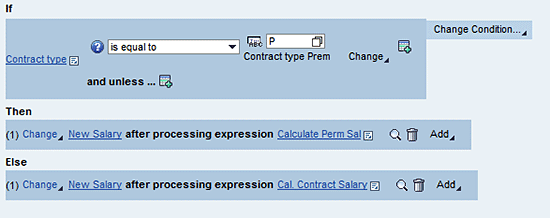
Figure 41
The completed rule
Save and activate the rule, rule set, function, and application.
Testing the Function
Now I show you how to simulate the created function NEW_SAL_CALC. On the Detail part of the function screen, click the Start Simulation button. The next screen looks like the one shown in
Figure 42.
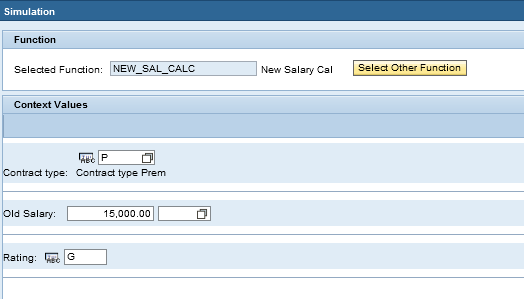
Figure 42
Simulation
For this example, enter the values P, 15,000.00, and G in the Contract type, Old Salary, and Rating fields, respectively. This data means that this particular person has a salary of $15,000, a rating of good (G), and the contract type is permanent. At the bottom of the screen, find the Simulation Mode radio buttons (
Figure 43). Select the Show only Result option and then click the Run Simulation button.
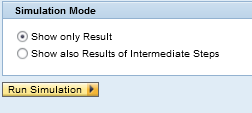
Figure 43
Simulation mode
This activity executes the function, rule set, and the rule within the rule set by using the supplied values. The necessary increment percentage is determined using the decision table and the permanent employees’ formula is executed. The calculated value of the New Salary is shown in
Figure 44.
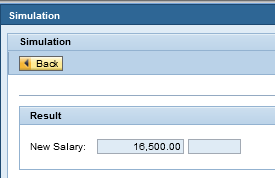
Figure 44
New salary simulation
Calling the Function from ABAP Code
Now you can call the created function in an ABAP program. For calling the function from within coding, first determine the function ID. Selecting the function makes your screen appear like the one shown in
Figure 45. You can find the function ID in the General tab of the function properties screen.
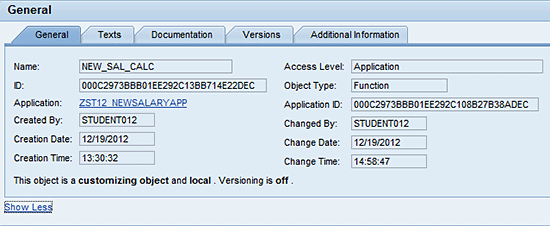
Figure 45
Find the function ID
Use the function ID and the appropriate interfaces and methods in the coding to call the BRFplus function. In my example case, the interfaces are IF_FDT_FUNCTION, IF_FDT_CONTECT, IF_FDT_RESULT. The interfaces and methods use the ID that identifies the newly defined function, accepts input values, and then returns the result based on function execution. The ABAP coding pertaining to the context values in the simulation mode is shown in
Figure 46.
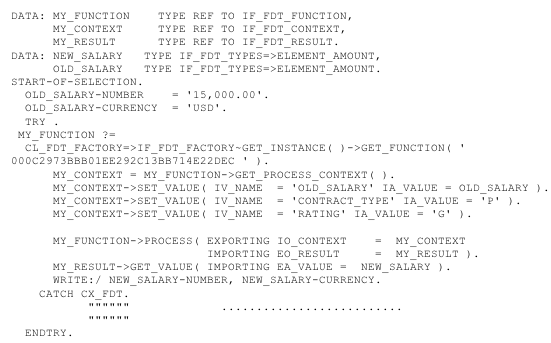
Figure 46
ABAP code
Rehan Zaidi
Rehan Zaidi is a consultant for several international SAP clients (both on-site and remotely) on a wide range of SAP technical and functional requirements, and also provides writing and documentation services for their SAP- and ABAP-related products. He started working with SAP in 1999 and writing about his experiences in 2001. Rehan has written several articles for both SAP Professional Journal and HR Expert, and also has a number of popular SAP- and ABAP-related books to his credit.
You may contact the author at
erpdomain@gmail.com.
If you have comments about this article or publication, or would like to submit an article idea, please contact the
editor.