Ameya Pimpalgaonkar shows how to use AppBuilder, which is a proof-of-concept tool that SAP has released to help developers adopt SAPUI5.
Key Concept
SAP AppBuilder is a browser-based tool for rapid SAPUI5 application development. It allows you to concentrate on application functionality rather than worrying about user interface (UI) design by providing UI drag-and-drop features. AppBuilder integrates with SAP Mobile Platform, which extends its authentication and Single Sign-On features to AppBuilder applications.
For years, SAP Enterprise Portal developers have been working on a development paradigm that involved Java Server Pages (JSP) and Web Dynpro Java. For them, SAPUI5 poses a major question: Where do I start with SAPUI5? Web Dynpro Java is a relatively mature framework and there is no dearth of tutorials. SAPUI5, on the other hand, is new and the development approach is significantly different from that of Web Dynpro Java.
As an answer to that question about where to start learning about SAPUI5 application development user interface (UI) functionalities, SAP has provided AppBuilder. Before I go any further, I would like to warn you that AppBuilder is no magic potion that you can use to develop SAPUI5 applications on the fly without spending any effort to learn the SAPUI5 framework. AppBuilder is more of a proof-of-concept tool that SAP has released to help developers adopt SAPUI5 application development. Think of AppBuilder as a starting point before moving on to an Eclipse-based SAPUI5 development.
Adoption of SAPUI5
A recent SAP UI roadmap presentation at https://scn.sap.com/docs/DOC-41321 shows that SAPUI5 is going to be pivotal not only in the SAP Enterprise Portal but also in SAP development as a whole. SAP Fiori uses the SAPUI5 framework and, sooner or later, everybody will have to work on SAPUI5 application development.
SAPUI5 does not have a framework in which you can drag-and-drop UI controls to design your applications. In SAPUI5, you have to think primarily about the UI and that makes SAPUI5 suitable for modern-age devices. However, if you are ignoring SAPUI5 because there isn’t any drag-and-drop-based framework available, then AppBuilder can come to your rescue. With AppBuilder you can play with the UI and build applications without dealing with UI rendering. AppBuilder takes care of the UI code and you can take a holistic view of SAPUI5, back-end connectivity, and deployment.
No Spoon Feeding
SAP UI5 official documentation helps you understand how a particular UI control works, but it does not show you how you can use the sample code in your project if you are using multiple JavaScript views. In most of the code samples, you’d find UI controls defined in an index.html file. So if you want to use multiple views, then you have to find your own way to do that.
Unless you understand SAPUI5 application development methodology and implementation of UI controls, you will find it difficult to work with SAPUI5 – for example, Shell. Shell is a UI control in SAPUI5 that enables dynamic content rendering inside a single implementation of Shell. Consider Shell as a window that shows different views. However, if you don’t know that you have to instantiate View 1 inside the implementation of View 2 while navigating back, then your application renders a blank screen. In Web Dynpro Java this was taken care of by FirePlugs. Similarly, all SAPUI5 controls are implemented differently. You must understand standard UI implementation first and then extend it in a custom application – for example, by learning how layouts are rendered and then adding new UI controls in your custom application.
Development Steps in Creating a UI5 Application
Note
Although SAPUI5 is relatively new and thus there are not many how-to
guides available on SAPUI5 scenarios, there is ample help documentation
available that you can use. In addition, there are many videos published
on SAP’s official YouTube channel. See the
SAP Professional Journal article
"Development Steps in Creating a UI5 Application" by Sarah Lottman.
Introduction to AppBuilder
According to an official SAP Note, SAP is working on an overall harmonized UI tools strategy. The AppBuilder, App Designer, and the Gateway Productivity Accelerator tools are part of these considerations around a harmonized web-based tool for UI development. Therefore, AppBuilder is provided only under this restricted end-user license agreement to bridge the time until its features are available within the harmonized solution. AppBuilder does not need any additional license from SAP.
Prerequisites
These are the prerequisites to start working with AppBuilder:
- AppBuilder runs on Windows or Mac OS (both 32 and 64 bit)
- Node JS platform Chrome or Safari
Node JS is a server-side scripting. Node JS uses asynchronous input/output (I/O) and therefore is fast.
Getting Started with AppBuilder
AppBuilder is a browser-based integrated development environment (IDE) that runs on top of a node framework. You can download the AppBuilder package from SAP HANA tools by navigating to https://tools.hana.ondemand.com/#sapui5. Documentation on setting up AppBuilder is available at https://help.sap.com/appbuilder. I assume you have installed Node JS and downloaded the AppBuilder package from the URL mentioned. Now I launch AppBuilder to show its basic functions as well as how to set up the SMP connection.
Launching AppBuilder
Navigate to the directory in which you have extracted AppBuilder and launch the application with run.bat. Double-click the run.bat file to launch the application.
You only need to execute the run.bat file to launch the AppBuilder. The server and other batch files are not required to launch the AppBuilder, although they are required for AppBuilder to function correctly. You don’t have to run or execute the other files that are required. For example, operating systems have many executable files, but you don’t have to run each of them. Once you start your computer, all files are loaded automatically. Figure 1 shows the extracted directory you need on your system when you launch AppBuilder. Once you download the appbuilder ZIP file from the SAP link that I mentioned earlier, you have to extract it to a local system. Figure 1 shows an extracted file directory.

Figure 1
AppBuilder root directory
Some operating systems do not show file extensions and that’s why, instead of displaying run.bat just Run is displayed in Figure 1. Users have to click this Run file, which is a batch file. You may see an error message saying the page cannot be displayed, but simply refresh the browser window and AppBuilder runs properly. Figure 2 is the AppBuilder initial screen. It lists some of the demo applications such as TabAppSample and SuperListSample . Once a user executes the Run file, AppBuilder is started and loaded in a browser window (Figure 2).
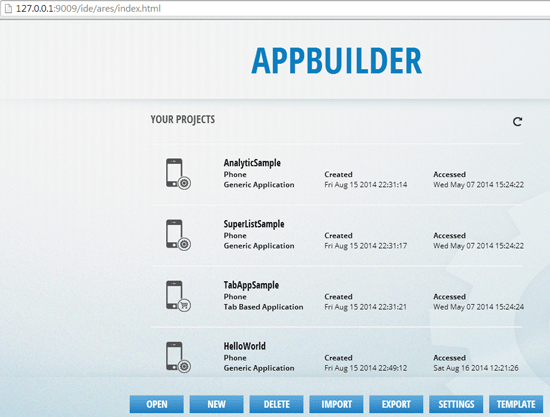
Figure 2
AppBuilder initial screen
The OPEN, NEW, and DELETE options are self-explanatory. IMPORT is to import an existing AppBuilder project. You can use the EXPORT option to export an AppBuilder project that further can be encapsulated with Kapsel Plugin or to Cordova to build a mobile application. These options are out of scope of this article. If you are interested in learning more about the Kapsel Plugin, visit and https://scn.sap.com/blogs/johnwargo/2013/10/21/an-introduction-to-smp-kapsel. To learn more about Cordova go to https://docs.telerik.com/platform/appbuilder/introduction/supported-frameworks/apache-cordova/apache-cordova.
When you click the NEW button in Figure 2 to create a new SAPUI5 application or AppBuilder application, you are given a few choices that help you target the device specifically (Figure 3).

Figure 3
Create a new project
For Device Type, you have options to create an application for either a Phone or Tablet. There is no desktop option as you would get in an Eclipse-based SAPUI5 application development. You can create a Generic Application or a Tab Based Application. The Generic Application option is used to create simple chart-based or list-based applications. The Tab Based Application is used to build an application that works on multiple tabs in the application. Click the CONFIRM button to save your changes, which opens the screen shown in Figure 4.

Figure 4
AppBuilder application home
All projects are created in the AppBuilder root directory, and can be found by following menu path AppBuilderDirectory > ares-project > hermes > filesystem> root> guest > <ProjectName>. I’m giving the location of the root directory as an additional detail because it is good to know where projects are physically created and stored when users create new projects in AppBuilder.
Figure 4 shows the AppBuilder default development environment. You can see the new project you just created is also available in the left pane with the project files and folder structure. The mid area shows the work area that holds the Designer and Source options. Designer is a modeler in which you can drag and drop UI elements. If you want to change any code or add custom code, you can click the Source button to see the code of the corresponding file. In the right pane, all UI properties and events are available. No default event is available. If you need an event in your application, you can define a new event from the EVENTS section. On the other hand, all UI properties are available under the PROPERTIES section in the right pane.
Following are some features of AppBuilder:
- Designer: This is the default view that is selected when you create a new application. This view allows you to model UIs and screens with drag-and-drop functionality.
- Source: This is the source code or implementation view of the UI that you have modeled on the designer view. This is similar to the Web Dynpro Java UI modeling and implementation view.
- Project: This left section shows the project structure of a typical AppBuilder project
- Toolbox: Toolbox lists all available UI controls that you can drag and drop on the designer view
- Data Sources: This option allows you to set up data sources on your SAP Mobile Platform or custom data source. To create a new data source, you first need to set up an SMP Profile by navigating to the HELP section in the header.
- SMP Services: This list retrieves SMP OData services from your data source
- Properties: This right section option shows all possible UI properties that you can work with. You can define a custom Cascading Style Sheets (CSS) class or add a new CSS property to an existing class. You can also define icon and button styles from this section.
- Events: If you are using a button to fire events in your application, you define the custom event from this section. Once you define an event, AppBuilder automatically creates an empty event in the controller of the view you selected.
Note
If you try to navigate to controller (i.e., View.Controller.js) without
opening the corresponding HTML file (i.e., View.html), you see an error
message that says You cannot open controller.js without first opening
corresponding HTML. As a rule of thumb, always open the HTML view first
and then navigate to the source to access its controller implementation.
Set Up an Application Profile
If you intend to consume OData services from your SMP or configure a data source for your application, then you first need to set up an application profile. The application profile is a name given to a set of connections to the same back-end server but that have multiple OData services. Once an application profile is created, users don’t have to create a new connection to the back end. They can simply use the existing connection by using the configured application profile. Each user must create at least one application profile that connects to a back-end server so that when the user intends to use a different OData service, he or she can use the application profile instead of creating a new connection. Click the HELP button on the header (Figure 4) to go to a screen that is similar to Figure 5.

Figure 5
Set up an application profile
Specify a profile name and the server URL (which is the SMP URL specific to your SMP account). The Application ID can be used for the default and is already populated. Provide a User Name and Password for your SMP instance and click the CONFIRM button to set up the application profile.
Set Up the Data Source
Now that you have configured an application profile to connect to the SMP server and OData services, you need to confirm that all application services on the SMP server are accessible. Navigate to edit the SMP service as shown in Figure 6 by following menu path AppBuilder project > Project perspective > SMP Services. Click Edit SMP Service/Query to go to Figure 7.
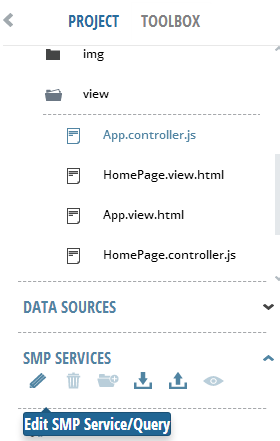
Figure 6
SMP Services

Figure 7
Connect to SMP to retrieve OData services
Click the RETRIEVE button to test the connection to SMP. This should result in a successfully connected to SMP Onboarding Services message in the Status box. Service here refers to the OData service that is available on the SMP server. After entering the details of your SAP Mobile Platform server and your credentials, click the RETRIEVE button. Once AppBuilder establishes a connection with the SMP server, the Service section (which is blank in Figure 7), is populated with a list of OData services as shown in Figure 8.
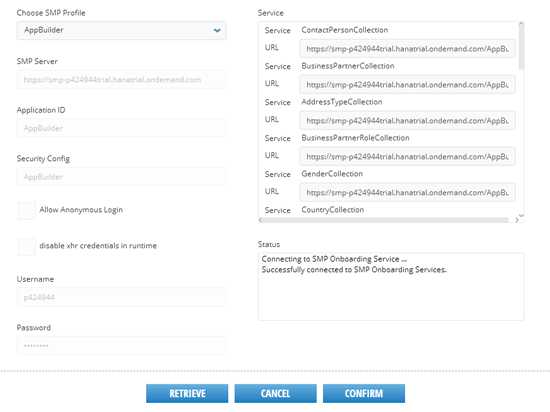
Figure 8
Successful connection to SMP and retrieved SMP services
Once you see the success message and the services, click the CONFIRM button to load all the services in your application. At this time, you should be able to find all the services in the SMP OData section of your application, as shown in Figure 9.

Figure 9
SMP OData services
SuperList and OData Consumption
Now I show how to create a new SuperList to fetch some data from the SMP OData service. To display a couple of products from the ProductCollection service follow these steps:
- Create a new SuperList. This is a UI control of AppBuilder that enables data display in a list that looks more like a table.
- Bind the SuperList data structure to the ProductCollection OData service
- Create a new panel in the SuperList
- Add a label that will be bound to the OData ProductCollection
- Add a SuperList UI on the home view and bind the metafile to a SuperList metafile
- Run the application
Create a New SuperList
From the DESIGNERS menu in Figure 10, select New SuperList to add a SuperList to your application, which takes you to Figure 11. The SuperList fetches data from OData and displays it in a way that looks like a table so that the user can perform various operations, such as lead selection.
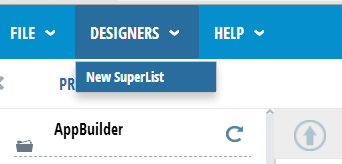
Figure 10
Create a new SuperList

Figure 11
SuperList metadata
Leave all fields with the default values and click the CONFIRM button to go to the screen shown in Figure 12.
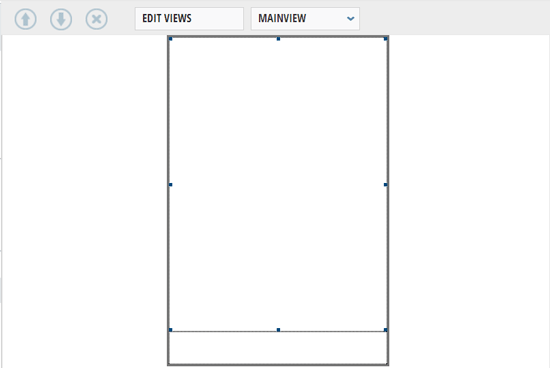
Figure 12
Default rendering of SuperList
Bind the SuperList Data Structure to the ProductCollection OData Service
To bind the SuperList created with the ProductCollection OData service, click the dataStructure button shown in Figure 13. (Figure 13 is another view of Figure 12.)
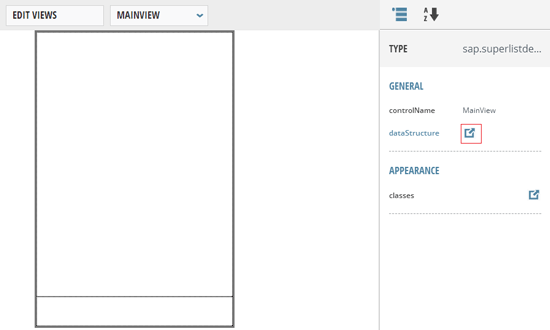
Figure 13
Bind SuperList dataStructure
That takes you to Figure 14, where you select SMPOData.ProductCollection by clicking the highlighted edit data structure icon.

Figure 14
Bind ProductCollection to the SuperList
Binding is done automatically when a user selects the required fields from the list. You do not have to manually do the binding. Simply select the fields you want to bind with the data structure and click the CONFIRM button. This binds all selected fields to data structure.
Add a New Panel and Label, and Bind to ProductCollection
Now you add a new panel to the SuperList that will display data from the ProductCollection OData service. Go to the TOOLBOX and drag and drop a new panel UI and two labels onto the SuperList screen. You change the perspective from the left pane in Figure 4 from PROJECT to TOOLBOX. Your screen should look similar to Figure 15.

Figure 15
Add a panel and labels to the SuperList
Now you bind the labels to ProductCollection so that the appropriate data can be fetched and displayed. Select the first label and click the highlighted edit text icon in Figure 16 to go to Figure 17.

Figure 16
Bind label 1
In Figure 17 you can decide which attribute you want to bind with the selected label.
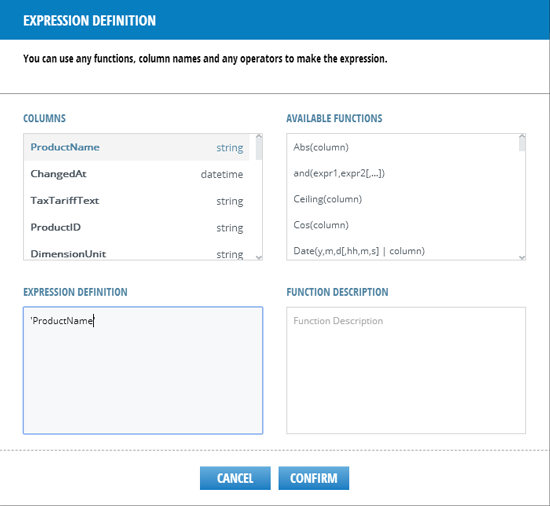
Figure 17
Select 'ProductName' and enter the EXPRESION DEFINITION
Specify the EXPRESSION DEFINITION as ‘ProductName’ and click the CONFIRM button. Select label 2 and follow the same process. Bind the label with ‘ProductDescription’ as shown in Figure 18.

Figure 18
Bind label 2
At this time, your screen should look similar to Figure 19.
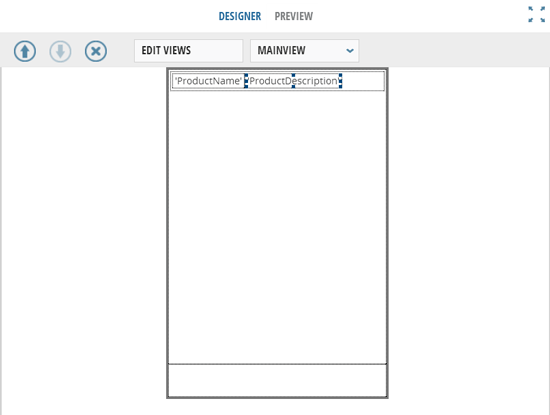
Figure 19
SuperList design screen
Add a SuperList UI to the Home View
If you try to run the application without adding any UI to the Home view of your application, you always get a blank screen. Therefore, you need to add a SuperList UI and bind it with the SuperList metadata that you just created. Navigate to the Home view (Figure 20). To go to the Home view, double-click HomePage.view.html from your project structure.

Figure 20
Home page view of the application
Select the TOOLBOX button, which takes you to Figure 21. Drag and drop the SuperList UI. Once added, bind SuperList UI with SuperList metadata as shown in Figure 21. You first need to drag and drop a Superlist UI to the home screen. This basically connects to the SuperList metadata.
To bind this UI element with the SuperList metadata, click the metadataFile property on the right pane (displayed in Figure 21). Click the edit icon to make the binding. When you click the edit icon, you are taken to Figure 22.

Figure 21
Bind the SuperList UI with the SuperList metadata
Once you click the edit icon, you are able to select the metadata file from the project structure.
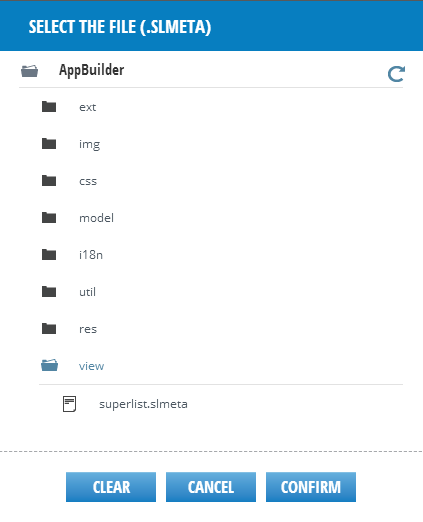
Figure 22
Select superlist.slmeta from the view
Click the view folder in Figure 22 and select superlist.slmeta. Click the CONFIRM button. Now, your application should load data from the OData ProductCollection service as shown in Figure 23.

Figure 23
Displaying data from the ProductCollection OData service on SMP
Now that you have successfully managed to fetch data from the OData service, you run the application in the browser. Save your application and click RUN from the header menu (not shown) to run the application. That takes you to Figure 24.
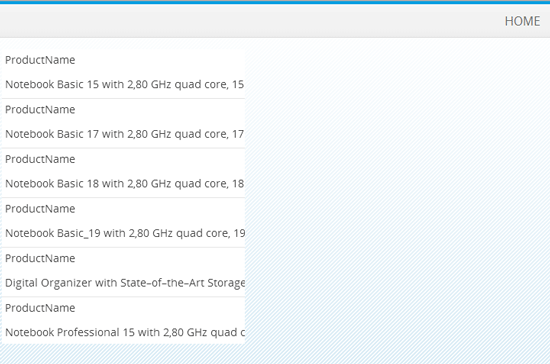
Figure 24
Application execution in the browser
You have to remove a parameter from the application URL for a fake OS to emulate the device rendering experience. A fake OS parameter simply emulates the experience of running an application on an iOS device. AppBuilder no longer supports the iOS parameter and, therefore, if your application is rendering blank, simply remove the following parameter from the URL and refresh the application. The parameter to be removed is &sap-ui-xx-fakeOS=ios.
This application is rendered with a default style. I have not taken any additional effort to style the application. If you want to style the application to suit a rendering demand, you can do that from the Properties section of your application. This article simply helps you understand how you, too, can quickly build an SAPUI5 application with AppBuilder.
I have not written any code in this application. AppBuilder is a tool that lets you build an application without writing a single line of code. However, if you choose to use custom events and buttons, then you might have to add code for navigation functions. For further details, refer to this documentation link to understand how you can work with custom events: https://infocenter.sybase.com/help/index.jsp?topic=/com.sybase.infocenter.appbuilder.1.0/doc/html/title.html.
Go to AppBuilder > Developing Apps With APpBuilder > Configuring Controls in the Project. You will also find a code snippet to set up a custom event and to use navigation functions.
Deploying the Application
This completes the steps for building an application with AppBuilder. However, there is more to AppBuilder than just running an application in a browser. If you want to run your application on a mobile device, you must deploy the application to either Kapsel on SMP or create a Cordova project. Cordova is a mobile middleware that provides native API access to custom-built mobile applications.
In addition, if you have a device-specific simulator installed on your system, you can also run an AppBuilder application on the simulator. However, that is beyond the scope of this article. To show how to use a device-specific simulator, either you need simulator software installed on the system or you need a native development IDE setup so that the AppBuilder application can use a corresponding virtual device from the native platform.
Having discussed the reasons why SAPUI5 may not be aggressively adopted and understanding how AppBuilder addresses those reasons in the earlier part of this article, I feel it is equally important to understand in which situation you should learn about SAPUI5 and adopt SAPUI5-based development.
The Future of SAP UI and Applications
SAPUI5 applications can be deployed on an ABAP stack. Earlier, there was a clear distinction between Web Dynpro for Java and Web Dynpro for ABAP. Each had its own benefits and dedicated developer community. With SAPUI5, there are no different developer communities.
In a recently released SAPUI5 Roadmap, SAP declared that it will be using a transaction-to-application approach for all of its future applications. If this trend gains traction, then the majority of SAP developers will be working on business-process-specific application development. This will certainly happen with Fiori and SAPUI5.
Open Source
SAPUI5 is open source and SAP has provided trial licenses for SAP Mobile Platform, SAP HANA Cloud Platform, SAP HANA Cloud Portal, and SAP Gateway. The development IDE is Eclipse and you can deploy your applications on SAP HANA Cloud. Enterprise applications can be enabled to provide OData services through SAP Gateway. Since it is open source, you don’t need any license to kick start learning SAPUI5. There are demo OData services available that you can consume in your SPAUI5 application to get the feel of SAPUI5 enterprise application development. Of course, you need other SAP licenses to build a custom OData service or enable your remote-enabled function modules to be able to convert into an OData service. Basically, for all custom developments, you’d definitely need SAP licenses but their trial versions are sufficient to prepare you for an SAPUI5 project.
OpenUI5 is an open source version of SAPUI5 maintained by SAP. See https://sap.github.io/openui5/. SAPUI5 and OpenUI5 are not really different except for some plugins that are available only in SAPUI5. As of January 2014, Theme Designer was not released for OpenUI5 and is available only for SAPUI5.
Ameya Pimpalgaonkar
Ameya Pimpalgaonkar is a senior SAP architect. He specializes in SAP Netweaver Portal, SAP BPM, BRM, MDM, and SAP Mobile. His interests include UI and front-end technologies, SAPUI5, Responsive Design, and integration of modern technologies with SAP UI. He has also worked on HTML5, CSS3, and jQuery. Ameya is also a certified usability analyst from HFI, USA.
You may contact the author at ameya85@gmail.com.
If you have comments about this article or publication, or would like to submit an article idea, please contact the editor.