IT
Alphanumeric numbers can be saved in a database at the successful completion of an SAP transaction. Later, you can use the same number to identify a unique record. A use case shows how to generate alphanumeric numbers using an ABAP function module, thus saving manual work and reducing errors.
Key Concept
Alphanumeric refers to combinations of letters and numbers using 26 letters (usually uppercase) and the numbers 0 through 9. When assigning a unique number to master or transaction data, alphanumeric numbers provide a wide range of unique possibilities. Automatic number generation saves effort as compared to generating numbers manually. The main manual way of generating alphanumeric numbers uses Microsoft Excel software. This method is time consuming and there is a high possibility of skipping the correct generated numbers, which is not the case with the ABAP function module number generation. The ABAP function module is code that can be reused from enhancements, custom reports, and custom class implementation.
It is important to keep your number range (from the lowest to the highest number in your set) in mind when assigning a unique number to master or transaction data. This number uniquely identifies master or transaction data. There are two types of number ranges: internal number ranges, which contain only numbers, and external number ranges, which contain combinations of numbers, letters, and other characters. Standard SAP provides the function module NUMBER_GET_NEXT to generate the succeeding number in the sequence from the lowest to the highest internal number for the internal number range. However, there is no such standard function module available to generate external numbers for the external number range.
Sometimes you may encounter a business requirement that dictates that you have to assign an external number or alphanumeric number to SAP master or transactional data. There are many reasons to use the external number range, including the following:
- If only the numbers 0 to 9 are available for three-character data, then there are 1000 (10*10*10) unique possible combinations available to use. However, if you have three-character data and each character can be a letter from A to Z or a number from 0 to 9, then there are 46656 (36*36*36) unique possible combinations available for use. Some companies are required to use the biggest set of unique possible combinations.
- Some companies want to provide nomenclature for SAP master or transaction data. They can use a naming convention with an external number range by fixing a few characters in the data. For example, the first left-most characters could always represent a country name and remain fixed for generated numbers, while the rest of the characters can take values from either the alphabet or the numbers 0 to 9.
In the following use case, which shows how to generate alphanumeric numbers using an ABAP function module, I assign generated alphanumeric numbers to material numbers of the material master data.
Preparation
Before you implement the alphanumeric number generator function module, there are six steps you need to take.
Step 1. Create custom table ZNUMCHAR using transaction code SE11 (Figure 1). Give the table the name ZNUMCHAR in the Database table text field. Click the Create button to go to Figure 2.

Figure 1
SE11 transaction code with transparent table creation
Give a Short Description called for numbers and characters. Click the Fields tab and give the field names shown in Figure 2. Add the fields MANDT, ZNUM, and ZCHAR and then click the save icon.

Figure 2
Table ZNUMCHAR field details
Step 2. Click the Delivery and Maintenance tab, which takes you to Figure 3. Select Delivery Class C. Here C refers to customer tables whose data is maintained by the customer only. Then select Display/Maintenance Allowed in the drop-down Data Browser/Table View Maint. field. Click the save icon.

Figure 3
Delivery and Maintenance screen details
Follow these steps for the technical settings options. Click the Technical Settings button in Figure 3. Click the save icon, which automatically takes you to Figure 4. Select the local object as a package by entering $TMP in the Package field or by clicking the Local Object button. Local means that whatever objects, such as ZNUMCHAR, you have created are not going to move from the development system to the quality system. Usually it means you are doing development for demo purposes. To reach Figure 5 click the save icon in Figure 4, which takes you back to Figure 3. Then press Ctrl+Shift+F9.
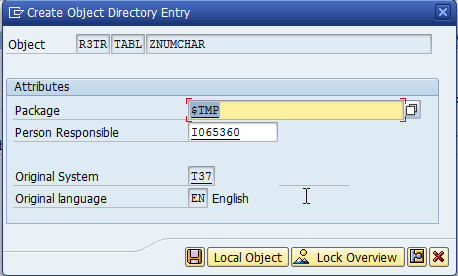
Figure 4
Package assignment for custom table
Step 3. In Figure 5 give the Data class value as APPL0, which applies to data that is frequently read but rarely updated. Give the value as 0 for the Size category field. You are to have 36 records in table Size 0, which means a table sized between 0 and 51,000 records.
Select the Buffering switched on option from the Buffering menu to make query responses faster as the table data is stored on an application server buffer. Check the box next to Fully Buffered in the Buffering section. Fully Buffered means all the records of the table are buffered at the application server. This kind of setting is applicable for tables with a data size of less than 30KB. Click the save icon and then the back icon to go back to Figure 3.
Now that the table data is saved on the application server buffer, when you query the table the query response is faster. Now the table is empty, but if you are going to add the content to it, then the above statement is applicable. Because the data is available on the application server, you do not need to query the database server. Thus, with the fully buffered setting, you can improve the overall performance of the solution.

Figure 5
Technical setting screen options
Following are the steps to create a table maintenance generator for table ZNUMCHAR. The table maintenance generator helps in entering data content to the database table. From the menu bar options, select Utilities >Table Maintenance Generator. This takes you to Figure 6, where you maintain a setting for creating a data entry screen for table ZNUMCHAR, here with number 1.
Give the Authorization Group field value as &NC& – without authorization group – and the Function Group field value as ZNUMCHAR. For the Maintenance type, select the radio button labeled one step. Click the Find Scr. Number(s) button and then click the create icon. This automatically takes you to Figure 7.

Figure 6
Table maintenance screen settings
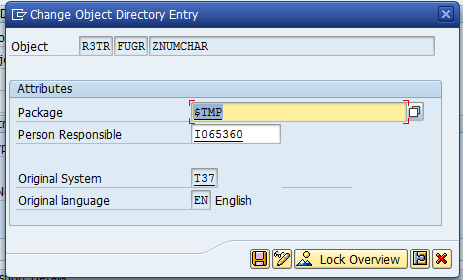
Figure 7
Selection of package for table maintenance screen
Select local objects for the Package ($TMP). Local objects means that you are creating a demo object, not a transportable object. If you assign a package other than $TMP then it is not a demo object. After naming the package click the save icon. You are saving FUGR to a local object. FUGR is function group ZNUMCHAR.
Step 4. Use transaction code SM30 to go to Figure 8, where you maintain entries in the table using the table maintenance generator. Enter the name of the table, ZNUMCHAR. Click the Maintain button and you go to Figure 9. Add content to the table. The first time you open the table it is empty. Click the New Entries button and add records one by one. The result is what you see in Figure 10.

Figure 8
Database table maintenance

Figure 9
Adding content to database table

Figure 10
Record addition in table ZNUMCHAR
Here, the ZNUM column takes values from 01 to 36 and the ZCHAR column takes values from 0 to 9 and A to Z that you entered in Figure 10. Click the save icon. Once the entries are saved in the database, the table content is as shown in Figure 11.
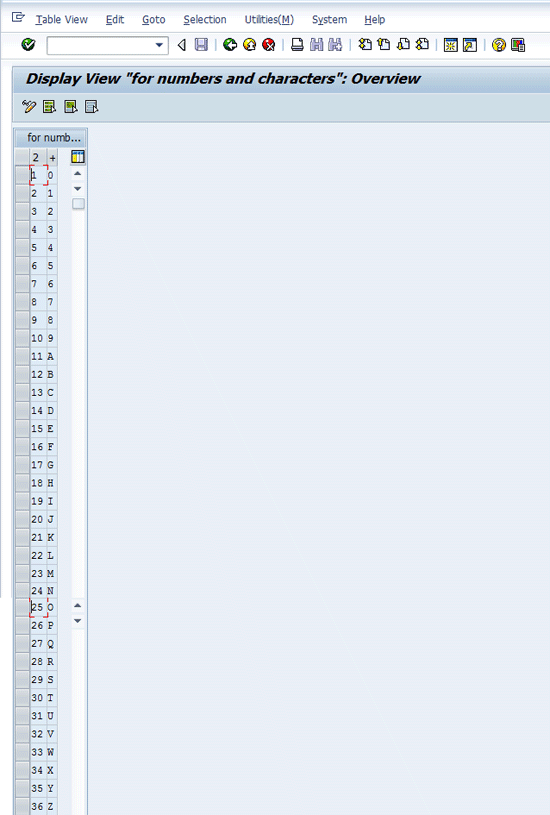
Figure 11
Final ZNUMCHAR table content
Case Study [subhead 2]
My use case involves assigning an alphanumeric number to a material number of the material type food. My example uses the ABAP function module that generates alphanumeric numbers, which is called ZNUMBER_GET_NEXT. Over the course of this use case, you create multiple groups, each with an assigned number range. Multiple material types can be assigned to each group.
An alphanumeric number is generated by function module ZNUMBER_GET_NEXT and the alphanumeric number assignment is generated by function EXIT_SAPLMG02_002.
In this example you can configure a material type food number range using transaction code MMNR, pick an external number range for food material type, and then implement function exit EXIT_SAPLMG02_002. In this exit you write ABAP code to assign an alphanumeric number generator to the material number.
Go to transaction code MMNR and click the change group icon which takes you to Figure 12. Click the Groups Maintain button. That takes you to Figure 13.

Figure 12
Maintain a new group
Insert a new group by pressing F6 in Figure 13. In my example, I name it Group 2 (not shown in Figure 13). Click the Group button in Figure 13 and scroll up to go to Figure 14.
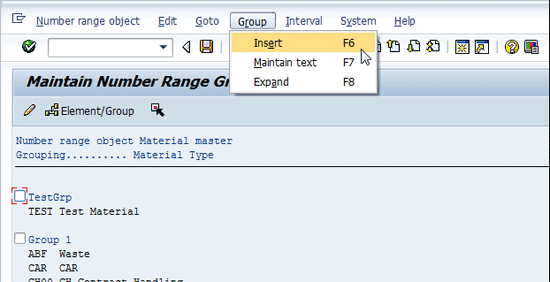
Figure 13
Assignment/linking of Material type Food to Group 2
Place the cursor on the word Food and left-click. The text color changes from black to blue.
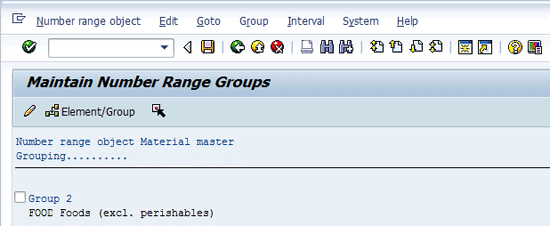
Figure 14
Assignment of material type to a group
Select the Group 2 check box in Figure 14 and press Shift+F5 to go to Figure 15.
Step 5. Maintain the number range for Group 2. The From number and To number fields are editable so you can select the lowest number and the highest number you want to use for the external number range.
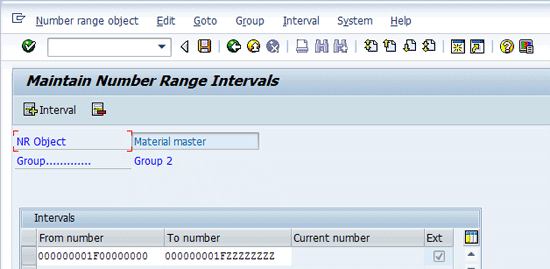
Figure 15
Assign a number range to Group 2
In Figure 15 1F is a fixed part of the material number and the rest of the characters take values from 0 to 9 or from A to Z. The Ext check box is automatically checked to show that the external number range is applicable. Click the save icon.
Step 6. Create custom table ZNUM_STATUS via transaction code SE11 (Figure 16). This table stores the last alphanumeric number generated from function module ZNUMBER_GET_NEXT.
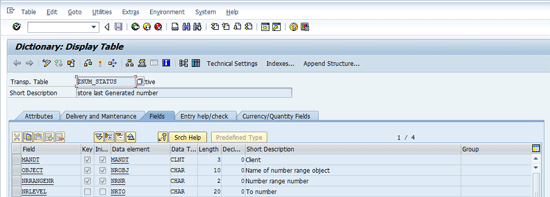
Figure 16
Table field design of ZNUM_STATUS
You use these fields later to store data. Figure 16 is a custom table that stores the result of the ABAP function module. It stores only the single record and the NRLEVEL (number range level) field stores of the last generated number. This table can be used in the material master enhancement to get the last generated number.
Solution Implementation Steps
Figure 17 is a flow chart and algorithm to generate alphanumeric numbers. You can achieve alphanumeric number generator functionality by implementing a custom function module. However, before writing ABAP programing statements in the function module, you can draw an outline of the custom solution in the form of a flow chart. The flow chart can help improve understanding of the solution irrespective of the programing language used to implement the solution. The flow chart shows the series of steps and conditions that are evaluated during the data flow. Here FROM_NUMBER is input into the flow chart and CARRY_FORWARD is flagged, which stores an indicator the same as a mathematical carry forward does in an addition operation.

Figure 17
Flow chart to generate an alphanumeric number
Implement these steps to create the function module. First you create a function group. Use transaction SE37 to reach Figure 18. Click Goto > Function Groups > Create Groups. Enter the function group name ZNUMBER_GET_NEXT in the Function group field shown in Figure 19. Click the save icon.
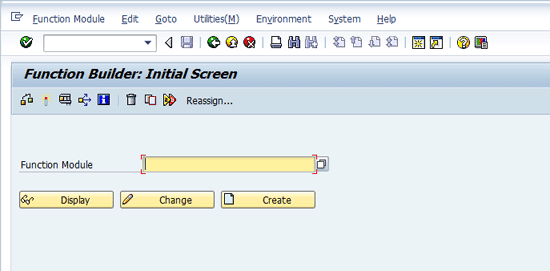
Figure 18
Initial screen for creating a function group

Figure 19
Enter the name of the function group
Next you create a function module ZNUMBER_GET_NEXT and attach it to the function group ZNUMBER_GET_NEXT. Click the Import tab of the function module and create the import parameters as shown in Figure 20. Use transaction SE37 and give the function module the name ZNUMBER_GET_NEXT. Click the Create button.

Figure 20
Function module creation screen
Implement a function module with the name ZNUMBER_GET_NEXT where FROM_NUMBER is the initial number. Add one to FROM_NUMBER to get the next available number. TO_NUMBER is the last number that can be generated by this function module. You get the result shown in Figure 21.You first add the details of the parameters in Figure 20 one by one. Click the display/change icon  to go to Figure 21.
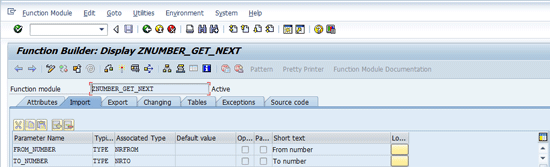
Figure 21
Function module import parameter details
NEXT_NUMBER is the exporting parameter that holds the generated number for the ZNUMBER_GET_NEXT function module. Click the Export tab in Figure 21 to go to Figure 22. Fill in the details of the parameter in the Export tab. Click the display/change icon to go to Figure 22 and enter the details about export parameters. NEXT_NUMBER is the only export parameter in the ZNUMBER_GET_NEXT function module. To go to Figure 23, click the Exceptions tab.

Figure 22
Export parameter details for function module
Enter the exception name in Figure 23 as INTERVAL_OVERFLOW. This exception should occur if the NEXT_NUMBER is greater than the TO_NUMBER. The exceptions trigger in the function module when the custom function module encounters an unwanted situation.

Figure 23
Exceptions details of the function module
Figure 24 shows the source code for the function module ZNUMBER_GET_NEXT that you created from the steps above. This source code is a reusable code that generates an alphanumeric number.
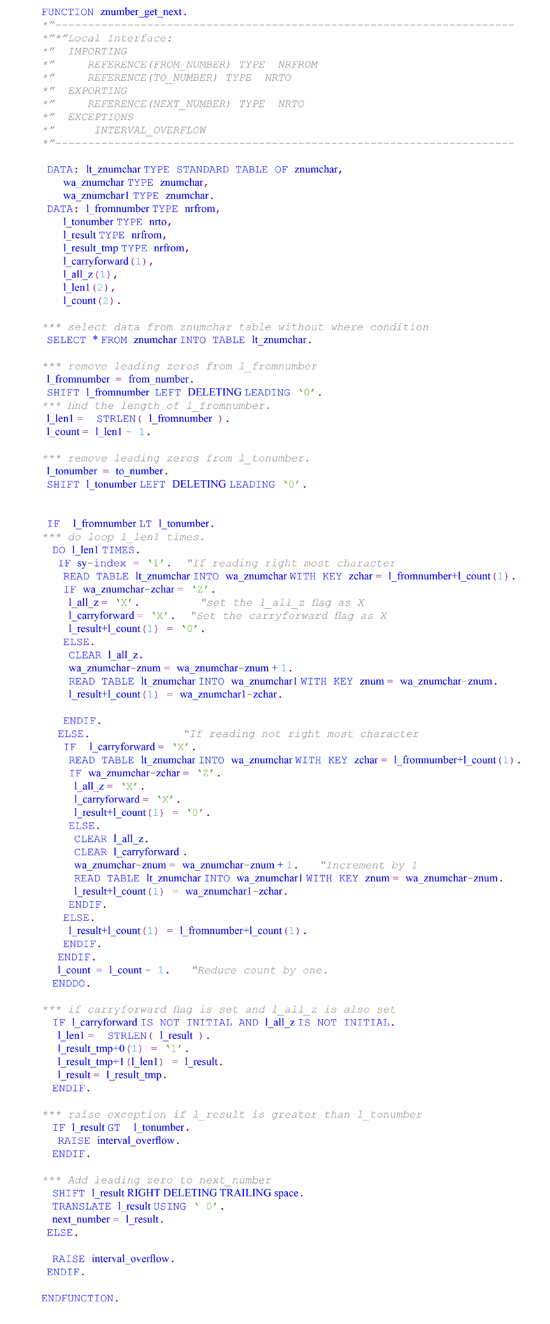
Figure 24
Source code for the alphanumeric number generator
Press F8 in Figure 23 to go to Figure 25. Figures 25 and 26 show the test result for this function module. To test the function module yourself, input the data in the FROM_NUMBER and TO_NUMBER in Figure 25. Click the execute icon  or press F8 to see the next available generated number (Figure 26).
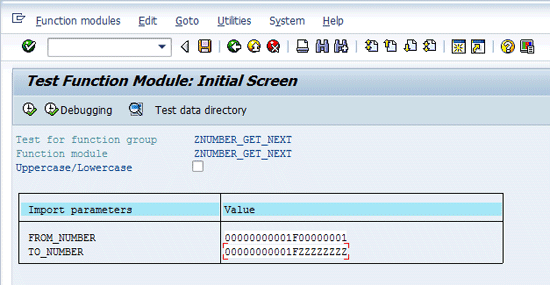
Figure 25
Input values to the function module

Figure 26
Result of Z_NUMBER_GET_NEXT with input parameters
A Use Case for the Alphanumeric Generator [head 2]
Material master numbers can be external numbers. SAP enhancement MGA00002 can be used to assign external numbers to the material master. Follow these steps to implement this use case. In this enhancement, call the ZNUMBER_GET_NEXT function module to generate an alphanumeric number.
Step 1. Implement the project in transaction CMOD (create customer project) with the name ZMAT as shown in Figure 27. Click the Create button. Then click the Enhancement Assignment radio button and the Display button, which takes you to Figure 28.
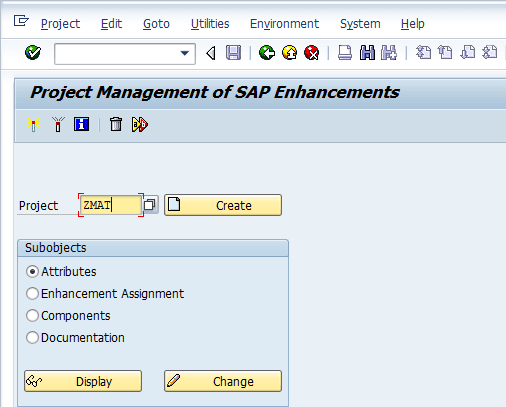
Figure 27
Create a custom project
Give the enhancement the name MGA00002 in the Enhancement section (Figure 28).
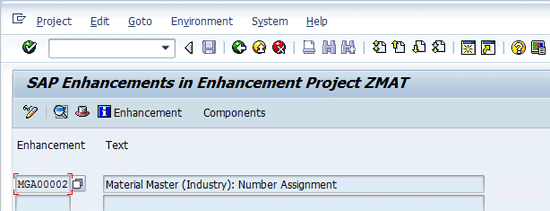
Figure 28
Enhancement assignment to the ZMAT project
Step 2. Implement EXIT_SAPLMG02_002 function exit to assign an external number to the material master and activate the project. There are two function exits available in enhancement MGA00002: EXIT_SAPLMG02_001 and EXIT_SAPLMG02_002. Here you implement the EXIT_SAPLMG02_002 function exit. EXIT_SAPLMG02_002 is one of the function exits that triggers during material creation. The icon in the upper left corner of Figure 28 changes to a green checkmark icon  . Click the Components button to go to Figure 29.

Figure 29
Function exit details of enhancement MGA00002
Below are the algorithm’s steps for implementing this enhancement. The values used below are part of the examples used for demonstration purposes.
Step 1. Check if the material type is FOOD and the industry sector is 1.
Step 2. Select FROM_NUMBER and TO_NUMBER from the NRIV table for the material master number range to which the FOOD material type is assigned.
Step 3. Select a record from the table ZNUM_STATUS. This table should be empty for the first use of material creation.
Step 4. If there is no record selected in step 3, then assign the material number as FROM_NUMBER selected in step 2. Otherwise, assign a FROM_NUMBER from step 3, assign a TO_NUMBER from step 2, and call the function module ZNUMBER_GET_NEXT. Collect the result in I_NEXT_NUMBER of the function module ZNUMBER_GET_NEXT.
Step 5. Assign the material number as I_NEXT_NUMBER. Call the function module ZUPDATE_NEXT_NUMBER in a new task and supply the value of I_NEXT_NUMBER to table ZNUM_STATUS. This table stores generated numbers that are referred to in the next material creation process.
Step 6. As you cannot call commit statements inside a function, exit the function. Call function module ZUPDATE_NEXT_NUMBER in a new task and then call the commit statement inside the body of the function module ZUPDATE_NEXT_NUMBER. Update the table ZNUM_STATUS in the function module ZUPDATE_NEXT_NUMBER and call the commit statement to update the generated number in table ZNUM_STATUS.
Figure 30 shows the code for the enhancement you created from the above instructions. This source code assigns generated alphanumeric numbers to material numbers.

Figure 30
Source code of enhancement and function module
Figures 31 to 34 demonstrate test cases for creating a new material. Go to transaction code MM01 and replace TEST1 with a newly generated number (Figure 31). Press Enter and then click the Select View(s) button.
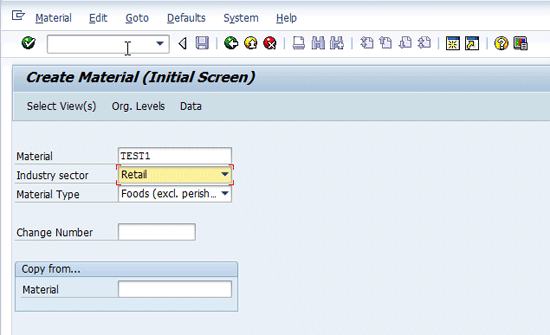
Figure 31
Material master initial screen
In the screen that appears (Figure 32), you can select the view you need to see.
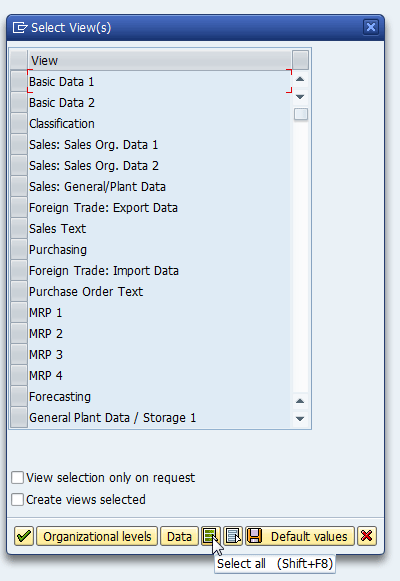
Figure 32
Select a view
To go to Figure 33, click the select all icon and then press Enter. The newly generated number is visible on the screen, as shown in Figure 33.
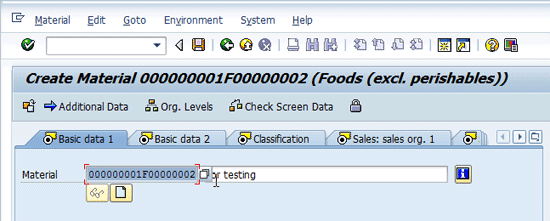
Figure 33
Basic view of material master screen
After giving input data to the different views, you get a status message on the status bar that the material has been created successfully with the generated number (Figure 34).

Figure 34
Successful message on the status bar
The ZNUM_STATUS table is also updated with the last generated number as shown in Figure 35.
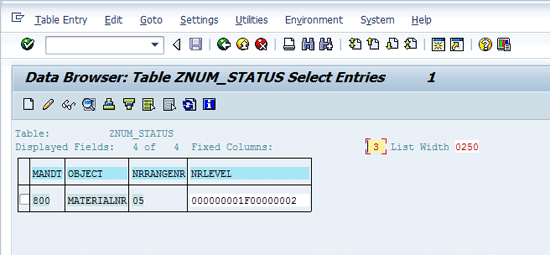
Figure 35
Table content updated for ZNUM_STATUS table
Vipin Nagpal
Vipin Nagpal is an SAP ERP technical consultant specializing in ABAP. He is a certified ABAP professional consultant. He has a master’s degree in engineering from BITS Pilani University, specializing in software systems. He has more than 10 years of experience in design, development, and production support in SAP ERP. He has worked with SAP ERP implementations for industries such as chip manufacturing, healthcare, aviation, and computer hardware equipment. He has worked with SAP ERP modules in sales and distribution, material management, plant maintenance, finance, and project system. He has been part of challenging assignments including SAP implementations for Japan Airlines and General Motors.
To contact the editor, click here.
You may contact the author at v.nagpal@sap.com.
If you have comments about this article or publication, or would like to submit an article idea, please contact the editor.