Follow these steps to transport marketing attribute master data from your CRM source client to other target clients without having to rework the same data over and over.
Key Concept
The Transport Control Process is a system/utility program that controls transports between SAP systems. This tool serves to organize and relocate customizing and development objects between SAP systems in your landscape.
Marketing attributes and attribute sets are viewed as types of master data in SAP CRM. Only customizing or development objects can be transported into target systems. Due to this reasoning, you cannot use the automated transport control process to push marketing data from the source system into target clients, such as a quality or production environment.
As a result, users are required to manually maintain this data over and over again in all clients that require such data. Not only is this process laborious, but it is also a nuisance. Figure 1 shows the marketing attribute structure, which consists of many tables and table relationships that make it difficult to tie together.

Figure 1
Composition of marketing attributes, structures, and table relationships
Fortunately, you can use the transport control process in a way that allows you to transfer marketing master data to other system clients — eliminating the need to manually maintain this data repeatedly for each respective client. Follow these steps in SAP CRM to initiate this process. You can carry out this procedure in any CRM release up to and including SAP CRM 2007. No prerequisites are necessary.
Workbench Request
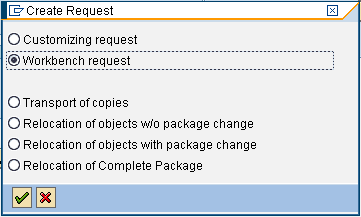
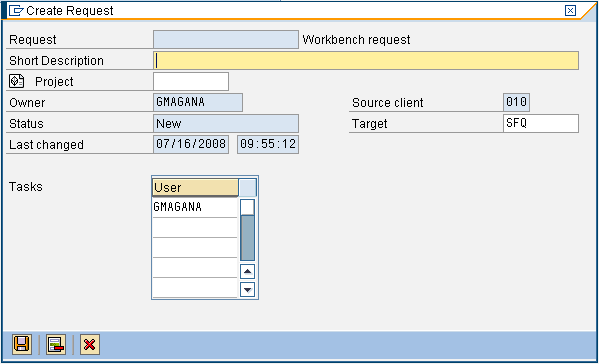
The first step is to create and model the container that will be used to store all the marketing master data. This container is referred to as a Workbench request, or Transport, and serves as the medium to encapsulate and carry the assigned marketing content from the CRM source client to target clients of your choosing. Use transaction SE09 and click on the create icon. A Create Request pop-up screen is displayed (Figure 2). Select the Workbench request radio button. A Create Request pop-up screen is displayed once again. The user needs to enter a description for the transport and click on the save icon (Figure 3).

Figure 2
Selection screen that classifies the type of transport to be assembled

Figure 3
Naming the identification of the transport request
Immediately upon saving the transport request, the user is presented with Display Request information. Figure 4 reveals the newly created transport and identification number along with an additional unclassified sub request. The sub request serves as the data container used in transporting marketing contents to target systems. However, it must first be categorized in that role type so that such activities can be performed. In my example, I’ve highlighted the sub request reflected as SFDK904240.

Figure 4
Transport sub request to be classified
Now select Request/Task>Change Type from the menu area. Select Development/Correction from the list and click on the transfer (green check mark) icon (Figure 5). The type is now changed and is reflected in the Display Request screen.

Figure 5
Menu selection prompt that characterizes the task type
Double-click on the sub request task to view Display Request/Task screen and manually insert the values for the Program ID, Object Type, and Object Name as illustrated in Figure 6. The entries indicated are important for the following reasons:
- R3TR – Provisions the type of data request and is required for identification of customizing and repository objects
- TABU – Entry is necessary to enable the complete transfer of table contents
- Object Name – All entries specified refer to tables that encompass the marketing attribute spectrum. These tables are substantiated (Figure 1).

Figure 6
Structure of transport request
Click in the function key  icon for each row and enter a table key that is represented by the following naming convention: * — for example 010* (010 represents your respective CRM system client). Click on the green arrow (back icon) to go back to the next entry in the list and repeat until all entries have table keys defined. When finished, click on the save icon. Note that the Request Check pop-up window appears with warnings. Save it anyway. The request is now available for transport. This completes the inspection and maintenance of the transport request.
Number Range Maintenance
Including the contents of database tables CABN, CABNT, CAWN, and CAWNT for attributes and KLAH, KLAT, SWOR, and KSML for attribute sets in a transport request requires that you maintain the status for two primary number range objects (MERKMAL and KLASSE) after the master data has been imported into the target system. The purpose of this exercise is to ensure that the number ranges used to support marketing attribute data remain consistent between CRM source and target clients. This exercise should only be performed initially and is not necessary after the second iteration.
Table 1 shows all the tables that are affected by the maintenance of marketing attributes or attribute sets. The corrected number range object reflects the number range used to support that particular table.
| CABN |
MERKMAL |
| CABNT |
MERKMAL |
| CAWN |
MERKMAL |
| CAWNT |
MERKMAL |
| KLAH |
KLASSE |
| KLAT |
KLASSE |
| SWOR |
KLASSE |
| KSML |
MERKMAL and KLASSE |
|
| Table 1 |
Marketing attribute/attribute set number range objects |
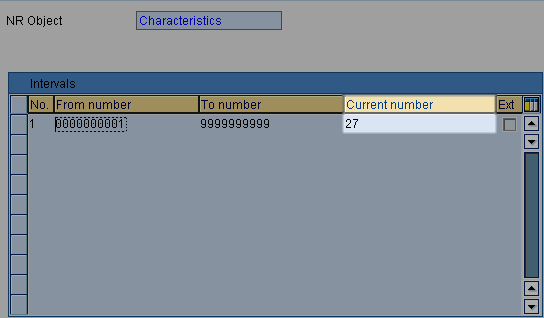
Begin by launching transaction SNUM in the CRM source client. Enter MERKMAL into the object field and choose the Number ranges button. In the following screen, Number Ranges for Characteristics, select the Display Intervals button. Confirm the Current number setting as shown in Figure 7.

Figure 7
Current number identification for number range object MERKMAL
Perform the same procedures for number range object KLASSE. After documenting the current number settings for both objects, open a session in your target CRM client (to where marketing master data was transported) and set the current number to match those values you confirmed in the source client. You can do this by executing the following steps:
1. Launch transaction SNUM
2. Enter the object name (e.g., MERKMAL or KLASSE)
3. Select the Number ranges button
4. Choose the Status button
5. Reset the Current number to match what was authenticated in the CRM source client
6. Save
Gil Magana
If you have comments about this article or publication, or would like to submit an article idea, please contact the editor.


