Learn how to integrate the Document Management System (DMS) with the SAP Enterprise Portal to enable users to quickly and easily access documents from the portal, thereby reducing the time spent searching the back end.
Key Concept
The Document Management System (DMS) connector for Knowledge Management provides several functions that enable you to edit the document-based structures and documents from the DMS in SAP Enterprise Portal (formerly called SAP NetWeaver Portal). The DMS connector enables portal users to evaluate and edit document data from the ERP system in the portal as they wish, without detailed knowledge of document management.
The SAP Document Management System (DMS) is a cross-application component of SAP ERP Central Component (ECC). It provides document, content, and digital management capabilities. The DMS connector enables SAP Enterprise Portal users to evaluate and edit document data from the ERP system in the portal as they wish, without detailed knowledge of document management such as employee files. I show the steps required to implement the DMS.
These are the basic functions of the DMS:
- Capture and manage electronic documents such as Microsoft Office files and images
- Provide version and revision control
- Provide work flow capabilities
- Perform text retrieval and search functionalities
- Access documents through the web and also through Microsoft Windows
The following data for a document info record is transferred from the back-end system to the portal through the DMS connector. Document structures are assigned to a document info record. These document-based structures are depicted as folders in the portal. Each document structure from the ERP system has its own folder in the portal. If a document structure contains an item for which a document structure also exists, the folder at the navigation level below contains an additional folder. Original application files are assigned to a document info record. These files are depicted as documents in the portal. Only document info records to which at least one original application file has been assigned are evaluated for the portal.
Prerequisites
You need to deploy the DMS connector business package. The integration requires six steps:
- Create Knowledge Management repositories
- Create a user group
- Assign roles to the user group
- Assign users to the user group
- Assign the required users to the DMSUser group
- Open the Document Explorer, which is an iView you can access through the portal
Step 1. The first step is to create a Knowledge Management repository. A repository is any information source such as a file system or content management system. Setting up the Knowledge Management repository is necessary because the Repository Manager controls how the content of the repositories is accessed by portal applications. With its repository framework, Knowledge Management gives you the option of including different repositories.
Log in to your SAP Enterprise Portal as an administrator with admin privileges. Follow menu path System Administration > System Configuration > Knowledge Management > Content Management > Repository Managers. Click the Repository Managers link as shown in
Figure 1 to go to the Repository Managers screen in
Figure 2 that has a list of repository managers.

Figure 1
Repository Manager
Click the DMSRMRepositoryManager link highlighted in
Figure 2.

Figure 2
The DMSRMRepositoryManager link
Ensure all the parameters in the DMS repository are maintained as indicated in
Figure 3. Enter the SystemAlias for the back-end system. Enter the VariantPrefix for the selection variant. The other items on the screen appear by default.

Figure 3
Edit the DMSRM Repository Manager
After you enter the parameters, the Save button appears. Click it to save the values. A restart of the portal is needed for the changes to take effect.
Step 2. In this step, create a user group unique to the document management system. Groups serve to create sets of users who have something in common, for example, users who work in the same department or users who have similar tasks in a company. Groups make it easier to manage users. For example, you can assign a role to a group instead of assigning the role to each user individually. This is known as indirect role assignment.
Follow menu path User Administration > Identity Management to go to
Figure 4. In the Portal Identity Management screen create a group with a unique name:
- Unique Name: DMS_User
- Description: This group provides users access to the DMS.

Figure 4
Create a user group
Step 3. In this step, assign the required portal role to the group. Roles reflect a user's function. By assigning a role to a user, you provide the user with the authorizations or functions that he or she needs to fulfill specific tasks. You can also indirectly assign a role to a user by assigning the group to which the user belongs to the role.
Click the Assigned Roles tab in
Figure 5, which takes you to
Figure 6.
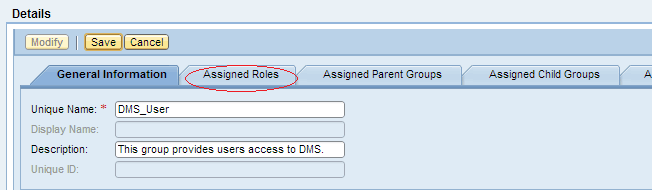
Figure 5
Assigned roles
Search for the document roles under the search criteria under the Available Roles sub tab as shown in
Figure 6. Assign the portal roles for content as shown in
Figure 6 and click the Save button to save the entries.

Figure 6
Roles assignment
Step 4. In this step, assign users to the user group. Follow menu path System Administration > System Landscape. This path takes you to the screen in
Figure 7. Click the Configure button and select the required details, such as System Alias and System Type.

Figure 7
System landscape overview
Click the Permissions tab to go to
Figure 8. Search for group DMS_User and click the Add button to assign it.
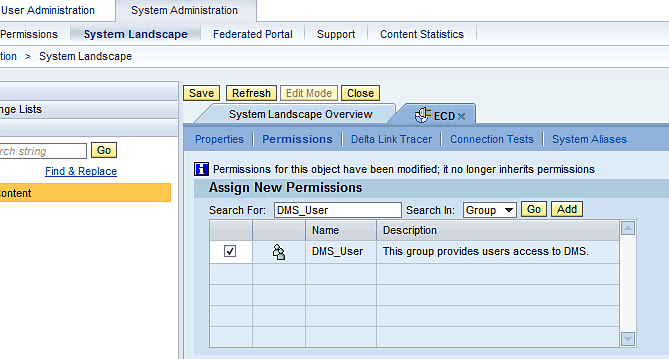
Figure 8
Assign a new permission
Step 5. In this step, assign the required users to the DMSUser group. Search for the user as an Employee Self Service (ESS) user and assign it to the user group as shown in
Figure 9. Ensure the user names in the portal and in ECC are the same. The user credentials (user name and password) should be the same in ECC and the portal as this will be useful for Single Sign-On (SSO) access from the portal.
Assign permission as an ESS user with Read access as an end user, as shown in
Figure 9, and click the save icon to save the entries.
With ESS, employees can access documents that are assigned to them as end users and can read the shared documents contents—for example, project-related content or company-related documents. This end user privilege to read the documents does not allow them to modify or delete them.

Figure 9
Assign the end user to the user group
Ensure the users also are granted necessary privileges in ECC. (This is done by the Basis team.) Users should have the necessary access (read) in the ECC back end of the HR module as each ESS user is linked to an employee personnel number. The Basis team and maintain access through transaction code PFCG.
Step 6. In this last step, access the document through Document Explorer. Follow menu path Portal > Document Explorer. Open the Document Explorer tab as shown in
Figure 10. In this tab the ESS user can view documents stored in the DMS.

Figure 10
Document Explorer
Karthigeyan Meganathan
Karthikeyan Meganathan has an MBA in Human Resources and Finance and he has worked on different implementations, upgrades, and support projects for different global clients with Tata Consultancy Services, IBM, and Satyam Computers. He currently is working as a senior business analyst. He is a certified SAP HCM Solution and SAP HCM Payroll Consultant. He is also a certified SAP SuccessFactors consultant in Employee Central, Performance and Goals Management, Learning Management Solutions, Compensation Management, and Onboarding.
If you have comments about this article or publication, or would like to submit an article idea, please contact the
editor.