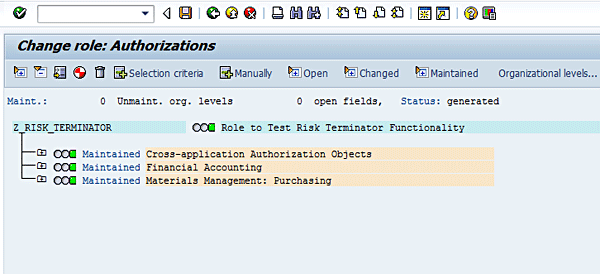
Figure 2
The role description
Click the Menu tab and then click Yes in the dialog box (Figure 3).
Figure 2
The role description
Click the Menu tab and then click Yes in the dialog box (Figure 3).
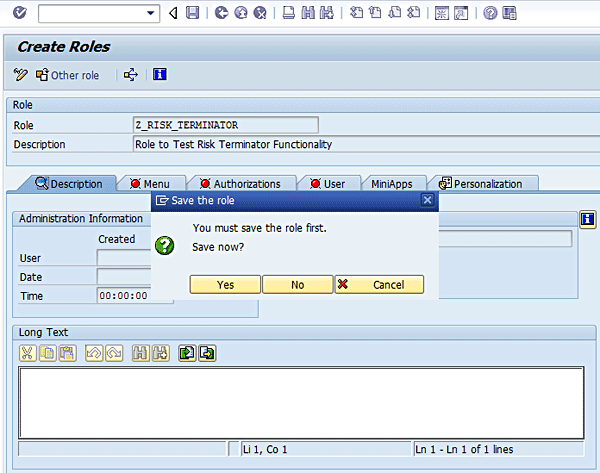 Figure 3
Save entries for role name and description
A status message is displayed (Figure 4).
Figure 3
Save entries for role name and description
A status message is displayed (Figure 4).
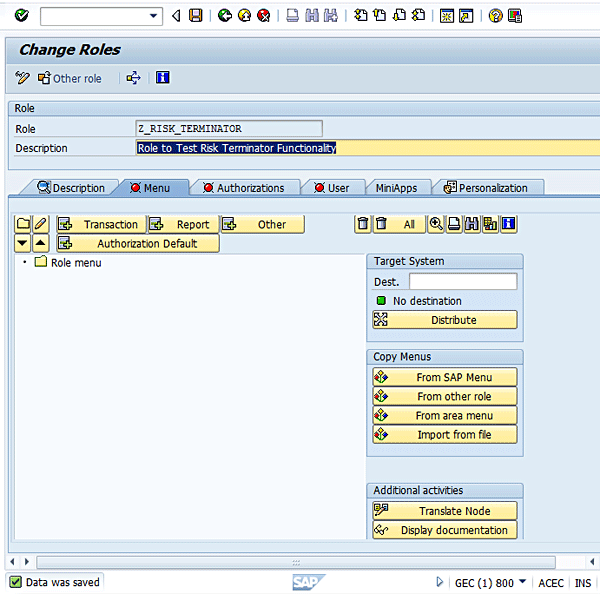 Figure 4
Menu screen for role maintenance
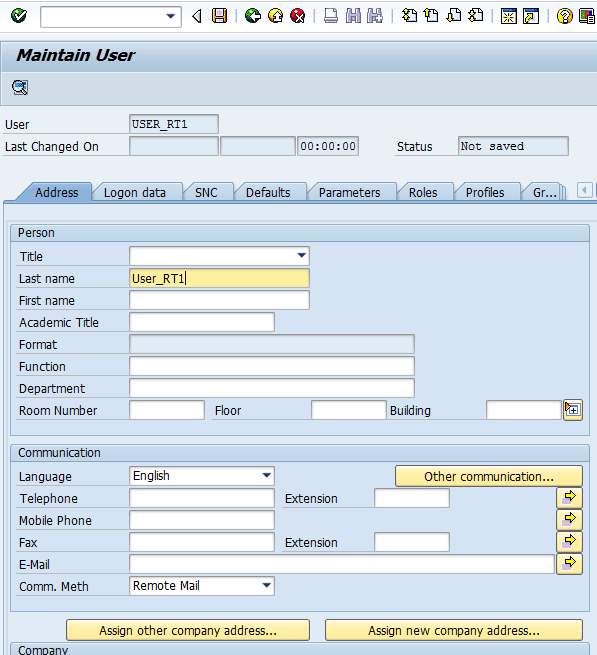
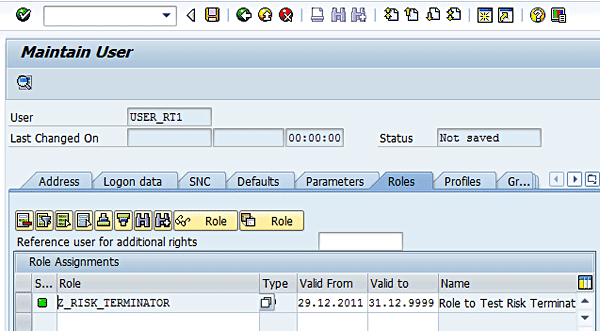
Click the + Transaction button. Enter transactions XK01 and ME21N and press Enter (Figure 5).
Figure 4
Menu screen for role maintenance
Click the + Transaction button. Enter transactions XK01 and ME21N and press Enter (Figure 5).
 Figure 5
Add transaction codes to a role
Click the Assign transactions button. You receive the following status message: 2 transactions added (Figure 6).
Figure 5
Add transaction codes to a role
Click the Assign transactions button. You receive the following status message: 2 transactions added (Figure 6).
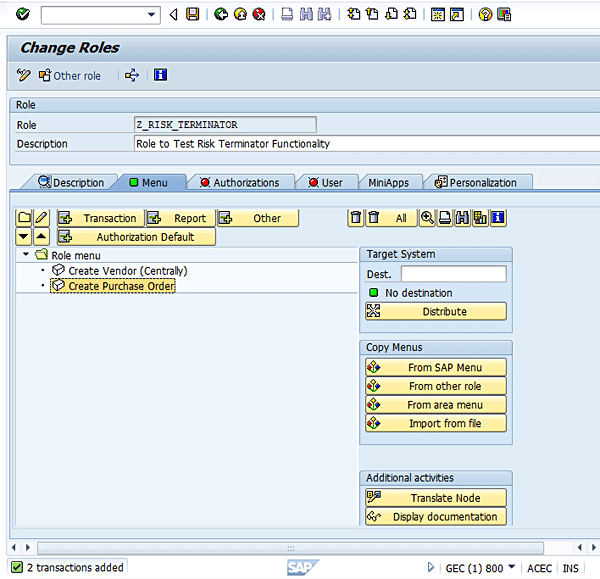 Figure 6
A status message for successful assignment of a transaction code to a role
Click the Authorizations tab and then click the Change Authorization Data button (Figure 7).
Figure 6
A status message for successful assignment of a transaction code to a role
Click the Authorizations tab and then click the Change Authorization Data button (Figure 7).
 Figure 7
Maintain authorization data for a role
Click Yes in the dialog box (Figure 8).
Figure 7
Maintain authorization data for a role
Click Yes in the dialog box (Figure 8).
 Figure 8
Save changes to a defined role
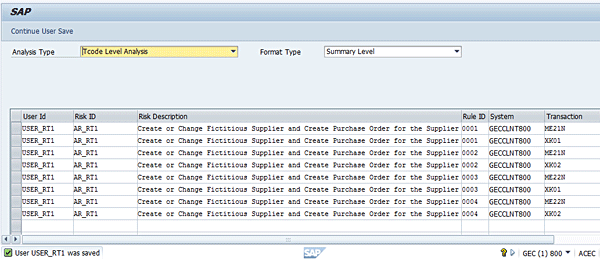
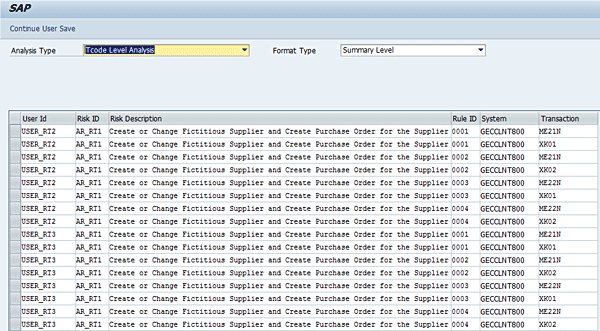
Figure 9 displays a risk analysis report (summary level report format) showing the risk violations inherent in the definition of the role.
Figure 8
Save changes to a defined role
Figure 9 displays a risk analysis report (summary level report format) showing the risk violations inherent in the definition of the role.
 Figure 9
An access risk violation report for role maintenance
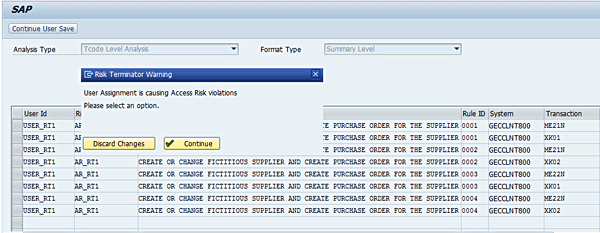
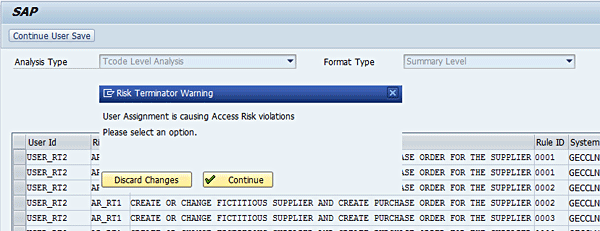
You can toggle between the different report formats (Detail Level, Executive Level, Management Level, and Summary Level). Click Detail Level using the drop-down option of the Format Type field in Figure 9. Click the Continue Profile Generation button. You have the option to discard the transaction under processing or continue processing the transaction. Click the Continue button (Figure 10).
Figure 9
An access risk violation report for role maintenance
You can toggle between the different report formats (Detail Level, Executive Level, Management Level, and Summary Level). Click Detail Level using the drop-down option of the Format Type field in Figure 9. Click the Continue Profile Generation button. You have the option to discard the transaction under processing or continue processing the transaction. Click the Continue button (Figure 10).
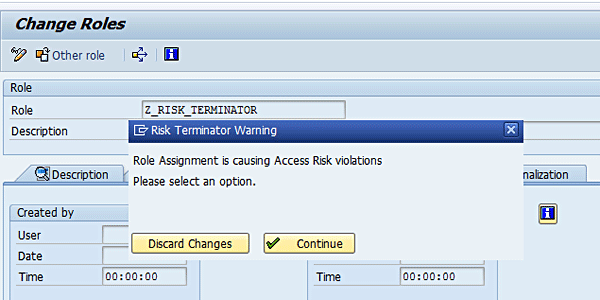 Figure 10
Risk Terminator alert for Role Assignment
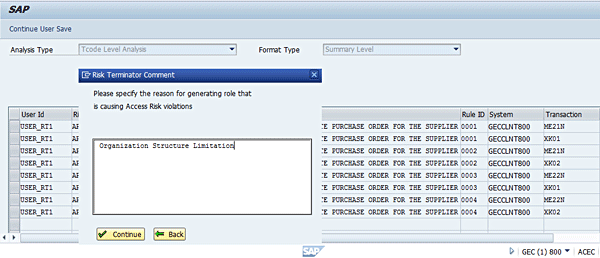
Now click the Full authorization button and then click the save icon (Figure 11).
Figure 10
Risk Terminator alert for Role Assignment
Now click the Full authorization button and then click the save icon (Figure 11).
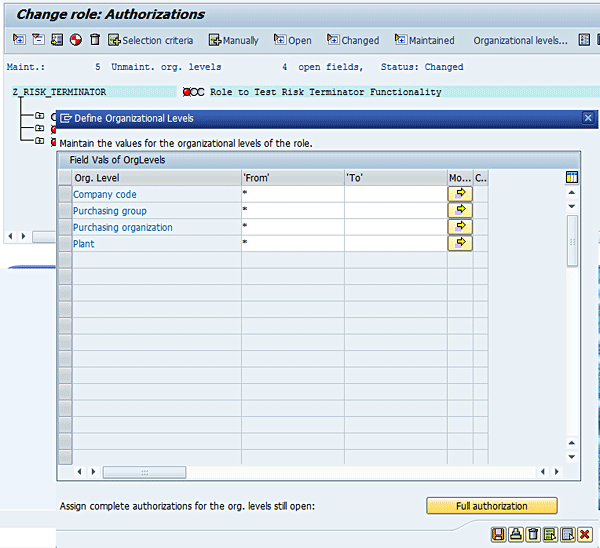 Figure 11
Define field values for organization levels of a role
You receive the following status message: Org. levels were saved (Figure 12).
Figure 11
Define field values for organization levels of a role
You receive the following status message: Org. levels were saved (Figure 12).
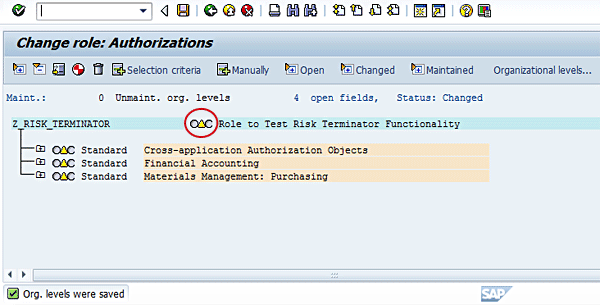 Figure 12
Save entries for organization level maintenance
Click the Yellow arrow near the role description in Figure 12. Click the enter icon (Figure 13).
Figure 12
Save entries for organization level maintenance
Click the Yellow arrow near the role description in Figure 12. Click the enter icon (Figure 13).
 Figure 13
Notification for assignment of full authorization to authorization fields
Now click the Save icon in Figure 14.
Figure 13
Notification for assignment of full authorization to authorization fields
Now click the Save icon in Figure 14.
 Figure 14
Maintained authorization data
You may wish to change the default profile name in the next screen (Figure 15).
Figure 14
Maintained authorization data
You may wish to change the default profile name in the next screen (Figure 15).
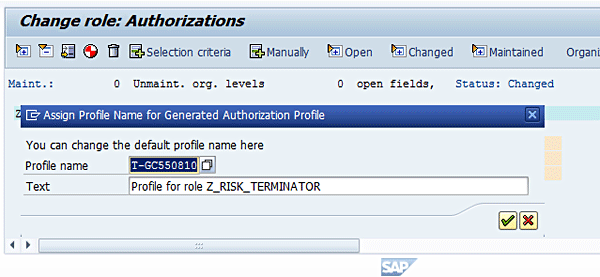 Figure 15
Maintain the profile name and a description
Click the enter icon (the green check mark) to accept the default value for the profile name. You receive the following status message: Data was saved (Figure 16).
Figure 15
Maintain the profile name and a description
Click the enter icon (the green check mark) to accept the default value for the profile name. You receive the following status message: Data was saved (Figure 16).
 Figure 16
Status message for changes to role
Click Generate by following Authorizations > Generate or clicking the icon circled in Figure 16. In the risk analysis report you receive the following status message: Profile(s) created (Figure 17).
Figure 16
Status message for changes to role
Click Generate by following Authorizations > Generate or clicking the icon circled in Figure 16. In the risk analysis report you receive the following status message: Profile(s) created (Figure 17).
 Figure 17
An access risk analysis report for role maintenance
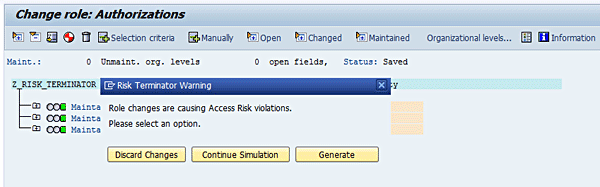
Click the Continue Profile Generation link. You have the option to discard the changes, continue a simulation, or generate the role (Figure 18). Click the Generate button.
Figure 17
An access risk analysis report for role maintenance
Click the Continue Profile Generation link. You have the option to discard the changes, continue a simulation, or generate the role (Figure 18). Click the Generate button.


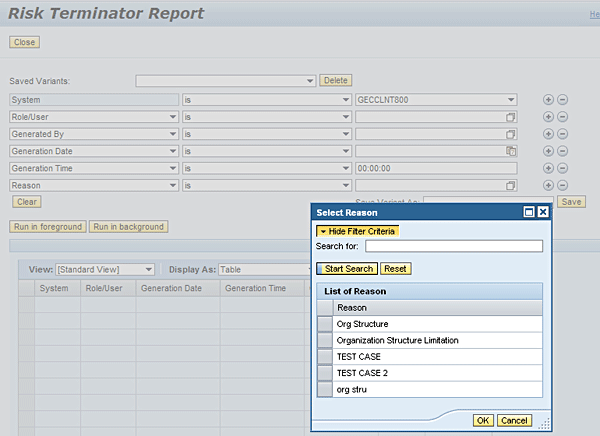


3 Scenarios for Simulating Risk Analysis Processes with Risk Terminator
Meet the Experts

Follow three scenarios that simulate risk analysis for role maintenance and user role provisioning with Risk Terminator in SAP BusinessObjects Access Control 10.0.
Key Concept
An access risk violation occurs when defined access control policies and procedures designed to enforce control of a user’s capability to perform specific activities in the system are compromised. In a typical business environment, controlling what a user can or cannot do without a robust access and risk control management system can be challenging. The Risk Terminator functionality provides the basic infrastructure needed to address this business concern, especially when user and role maintenance occur directly in the plug-in system.
The Risk Terminator functionality can be applied to different business cases revolving around user maintenance (creation and modification) and role maintenance (creation and modification). To simulate how risk analysis works for role maintenance and user role provisioning, I use three business scenarios. They are based on the configuration settings defined in the GRC system and the Plug-in system, which I described in my article titled “Combat Access Risk Violations in Your SAP ABAP Back-End System with Risk Terminator.”
Explore related questions
Here are summaries of my three Risk Terminator scenarios.