Volker Stiehl shows how to use SAP HANA Cloud Integration (SAP HCI) to model custom-specific integration flows. He introduces the underlying integration framework, Apache Camel, to help you understand how to work with message headers, properties, and the actual message payload.
Key Concept
SAP HANA Cloud Integration (SAP HCI) comes with predefined integration content that can be configured to particular user needs, which speeds up integration implementations significantly. However, SAP HCI can also be used for custom-developed integration scenarios. You can build integration flows using the web-based development environment. The underlying integration framework is Apache Camel.
SAP HANA Cloud Integration (SAP HCI) is SAP’s strategic integration platform as a service (iPaaS) for implementing all kinds of integration scenarios involving cloud applications. It is particularly useful for the integration between SAP’s cloud applications and between SAP’s on-premise and cloud applications because of the predefined integration content that SAP ships via the publicly available integration content catalog. The catalog is accessible at
https://cloudintegration.hana.ondemand.com.
The web-based tool delivered with SAP HCI allows companies to easily adjust the pre-packaged content to their specific needs by just configuring certain parameters of such a package. In most cases it is sufficient to just configure the technical connectivity parameters of the involved systems.
If, for example, you want to store a received message on a Simple File Transfer Protocol (SFTP) server, you just have to adjust the basic parameters of the SFTP adapter, such as the address of the SFTP server, the target directory where the received files should be stored, and the target filename. This approach reduces integration costs significantly and helps users to solve integration challenges in the fastest possible way.
In an earlier article titled “
Leveraging SAP HANA Cloud Integration,” my colleagues Udo Paltzer and Sindhu Gangadharan explained the configuration of pre-delivered integration content in great detail. However, what if the pre-configured content doesn’t actually fit your requirements and you want to develop your own integration solution? Or what if you’re a partner and want to deliver integration content for dedicated scenarios as well? What is necessary to actually model and run custom-built integration flows? This article gives an introduction to the development and run-time environment of SAP HCI and helps you to get started if you want to pursue custom development on SAP HCI.
SAP HCI Fundamentals
I continue where the article of my colleagues left off. I assume you have access to an SAP HCI environment and have tried out the exercises about the configuration of the pre-delivered content. By walking through the basic configuration scenario described in the other article, you have also acquired basic modeling skills using the web-based modeling environment of SAP HCI. If you haven’t done it yet, I highly recommend reading the other article before continuing with the exercises described below. In case you don’t have access to an SAP HCI tenant, I recommend applying for a tenant as is described on SCN at
https://scn.sap.com/docs/DOC-40396.
Before diving into the details of the modeling exercise, let’s briefly discuss some terms and fundamental concepts of SAP HCI’s development and run-time environment. I start with
Figure 1, which depicts a basic integration flow in SAP HCI’s web environment, showing the transfer of a message from a sender to a receiver via the SAP HCI server.
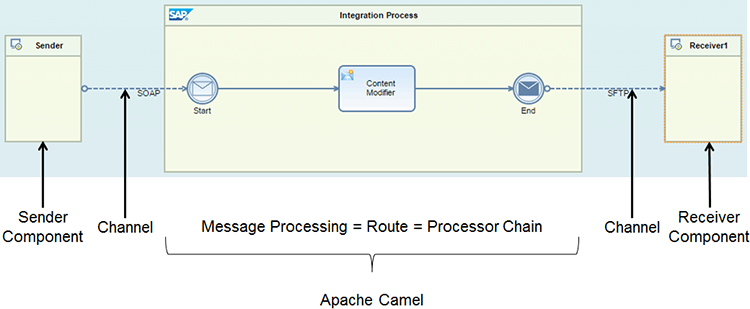
Figure 1
A basic integration flow
The overall representation of integration flows is based on Business Process Model and Notation (BPMN), a widely adopted Object Management Group (OMG) standard for graphically depicting processes. Although the roots of BPMN are in the business process domain (as the name obviously indicates), it is expressive enough to be useful for integration processes as well. Hence, SAP decided to rely on BPMN as its lingua franca for all kinds of processes.
BPMN is broadly used in SAP systems—for example, in SAP Solution Manager, SAP Process Integration (SAP PI), and SAP Business Process Management, just to name a few.
On the left of
Figure 1 you can identify the sender component representing the sender of a message. The receiver is depicted on the far right. Both sender and receiver are represented by so-called pools (the rectangles headlined with Sender and Receiver1, respectively). A pool is a term taken from the BPMN standard and typically stands for a participant in collaborative scenarios in which several processes work together to fulfill a certain goal. A third pool entitled Integration Process is shown in the middle of
Figure 1 and represents the SAP HCI server where the message processing actually happens.
The Sender/Receiver1 pools are connected via dashed arrows, so-called message flows, representing the technical connectivity between the respective participants. A dedicated label details how the two are connected: the sender and the integration flow via the Simple Object Access Protocol (SOAP) and the integration flow with the receiver via SFTP. Dedicated channels take over the responsibility of implementing and speaking the respective protocols.
What’s left is the integration flow in the middle, which contains details about the message processing steps. The circle on the left of the flow containing a white envelope is a start event (again, BPMN nomenclature). It expresses the start of the message processing sequence. The envelope indicates the start of the process caused by the reception of a message. After the flow has received the message, it continues with the Content Modifier step because they are connected with a directed solid arrow, also known as a sequence flow. The arrow indicates in which sequence steps are executed.
The rounded rectangle step is called a task and indicates an activity that is executed during run time. In my example, the Content Modifier changes the message’s content, as you will see later in this article. Once the task has finished its modifications, the process continues downstream. Again, just follow the sequence flow to the circle on the right, which contains a black envelope and represents an end event (circles in general stand for events in BPMN).
Black and white symbols in events have a special meaning: white means waiting for the event to happen, and black means that the process itself initiates the event specified by the symbol inside the circle and immediately continues. In my example, the process waits for an incoming message at the beginning (white envelope) and sends a message once the process has reached the end of the flow (black envelope). The sent message is then transported via the SFTP protocol to the receiver. This is expressed by the message flow from the end event to the Receiver1 pool in
Figure 1.
Message Processing: The Apache Camel Framework
Let’s concentrate on the message processing part of SAP HCI for a moment. From a modeling perspective, the flow is based on BPMN—that’s what I worked out in the previous paragraph. However, how is the integration flow interpreted and executed during run time? For this purpose SAP HCI relies on an open-source integration framework called Apache Camel (or Camel for short).
To understand the inner workings of SAP HCI, you have to understand the inner workings of Camel. That’s why you find additional names for message processing in
Figure 1 because in Camel the respective terms for the handling of messages are Route or Processor Chain. It doesn’t make sense to discuss the complete Camel framework in an article like this. I only concentrate on Camel’s functions and features that are relevant for the respective scenario I am going to discuss.
However, Claus Ibsen and Jonathan Anstey have written an excellent book about Camel:
Camel in Action, published by Manning Publications Co. It is the reference for all detailed Camel questions you might have. Another valuable source of information for the Camel framework is the online documentation at
https://camel.apache.org/documentation.html.
So what is Camel? It is a message routing and mediation engine. Interestingly enough, Camel is payload-agnostic. That means you can feed the engine with any data format and Camel forwards it to the respective receivers depending on the modeled route. As long as there is no need to access the message’s content (e.g., for routing purposes), Camel can verbally handle anything. However, some basic structure must also be available in Camel, as depicted in
Figure 2.
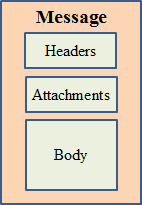
Figure 2
Camel's message model
Obviously Camel messages consist of headers, a body containing the raw data (the payload), and (optional) attachments. Messages are uniquely identified by an identifier of the type java.lang.String (not shown in
Figure 2). The headers are additional values associated with the message, such as sender identifier or hints about content encoding, and authentication information. This information is added as headers in the form of name-value pairs. The name is a unique, case-insensitive string, whereas the value is of the type java.lang.Object. This is quite interesting as almost anything can be added as an object to the header. The same is applicable for the body, which is also of the type java.lang.Object. Attachments are typically used for web-service and email components and can transport additional data as separated items if necessary.
During message processing, Camel requires a dedicated container for the message. The container is called an Exchange and it holds additional data besides the message. The Exchange is passed along, step-by-step, in the processor chain and every step has access to all the information the Exchange carries. It can be seen as a global storage for the route as long as the message is being processed. The structure of the Exchange is shown in
Figure 3.

Figure 3
Exchange structure
Let’s briefly go over the Exchange’s ingredients:
- Exchange ID: A unique ID that identifies the exchange
- MEP (abbreviation for Message Exchange Pattern): This field can contain two possible values: InOnly and InOut.
- InOnly: The route handles a one-way message and a response is not expected from the originator of the message (the sender). Hence, the Exchange carries an in message only.
- InOut: The route handles a request-response message. The sender expects a reply from the route that will be stored as an out message in the Exchange.
- Exception: In case of an error during message processing, the reason for the error is stored in the Exception field of the Exchange
- Properties: Another temporary storage where process steps can store data besides the headers area in the message. Properties can contain global-level information. Developers can store and retrieve properties at any point during the lifetime of an exchange.
Another big difference regarding message handling within SAP HCI compared to SAP PI is the flexible pipeline concept that stands behind Camel. In SAP PI, you basically have the choice between three fundamental steps:
- Receiver determination
- Interface determination
- Mapping
In addition, the sequence of the three steps was also fixed. It was not possible to have, for example, a mapping step before an interface determination step. The result was a rather static message processing environment. With SAP HCI this changes significantly. You have many more steps at your disposal and you can use them in (almost) any sequence that your scenario requires. I will show the benefits of this flexibility in future articles where I will address more complex scenarios.
Exercise: Working with Camel’s Message Model
Now that you have a basic understanding about the data and message model that are used within Camel and SAP HCI, let’s see how you can benefit from this knowledge during message processing. To demonstrate how to access properties and headers when building a response message, and to illustrate the consequences of storing data in the two locations, I use a simple scenario. In this example, I take an XML input message and store parts of the message in the properties/header areas. For building the reply, you access the previously stored data from the properties/header areas and construct the response message. Let’s get started.
It is fine to take the copied content packages as is explained in the article by Udo and Sindhu. Just delete all the superfluous shapes that you don’t need for this experiment. The integration flow should look like the one depicted in
Figure 4 (note that you don’t even need a receiver for your first self-developed integration flow).

Figure 4
The empty integration flow as a starting point for the exercise
Connecting and Configuring a Sender with Integration Flow
Start with the modeling of the connection between the Sender pool on the left and the start event by dragging a connection from the pool to the start event. This is done using context buttons. Every time you select a shape in the model, buttons appear at the top of the shape to indicate what can be done with the shape at this moment. So if you select the Sender pool, the context buttons shown in
Figure 5 appear.

Figure 5
Context buttons next to the selected shape
Next click the connector icon

, release the mouse button (no drag and drop), move the mouse pointer to the Start event (an orange dashed line is displayed), and click the Start event (
Figure 6).

Figure 6
Connect the Sender pool with the Start event
After clicking the Start event, a dialog automatically opens. The dialog allows you to pick the connection type you want to have between the Sender and the SAP HCI server. In this case the connection should be of adapter type SOAP and the message protocol of SOAP 1.x (not shown explicitly as screenprints). Just pick the respective entries from the upcoming dialogs.
Finally, you have to maintain one parameter of the SOAP adapter: the address under which the service will be accessible. For this, select the message flow between the Sender component and the Start event so that it appears in orange (
Figure 7).
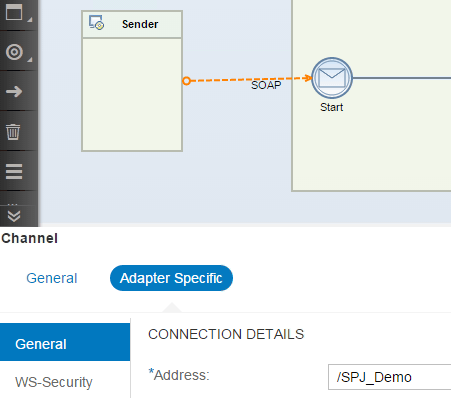
Figure 7
Configuration of the SOAP channel
Beneath the process model you find the properties of the connection (in this case, the details of the channel). It is typical for the SAP HCI modeling environment to select shapes in the graphical model and adjust properties in the area beneath the process model. The properties change depending on the selected component in the main area. In this example, for the channel click the Adapter Specific link and add /SPJ_Demo as the address in the Address field. That’s all you have to do to configure the channel.
You also have to define the authentication type for the communication between the sender and the SAP HCI server. As I chose the SOAP adapter, the most convenient authentication type is Basic Authentication by providing the user’s name and password. To tell SAP HCI that this type of authentication should be used, select the Sender pool and select Basic Authentication from the Authentication Type drop-down list (
Figure 8).

Figure 8
Set the Authentication type to Basic Authentication
Adding and Configuring Steps in the Integration Flow
Next, you need two Content Modifier steps in the model. You can find them in the palette on the left of
Figure 9.

Figure 9
Pick Content Modifier steps from the palette
Click the transformer icon

in the palette. A sub-menu opens. Click the Content Modifier shape, the black envelope

, and move the mouse pointer to somewhere in the Integration Process pool. Click again to actually position the shape in the pool. Repeat the previous steps so that two Content Modifier shapes are added to the process model (
Figure 10).
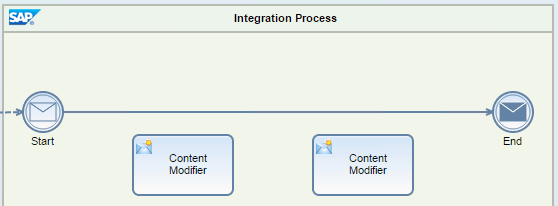
Figure 10
Process model after adding two Content Modifier steps
Let’s continue with the configuration of the first Content Modifier. The goal is to write data with the first Content Modifier into the header of the message as well as into the properties area of the exchange. The second Content Modifier step retrieves the previously stored data from the respective locations and creates a new result message. By this you prove that data can be stored in different locations on which the forthcoming steps within the route can rely.
To retrieve data from the message, it must be clear how the incoming message actually looks. The message’s structure has been defined for you beforehand by using plain WSDL. The WSDL file is shown in
Figure 11.
<?xml version="1.0" encoding="UTF-8" ?>
- <wsdl:definitions name="GetOrderShipDetails_Sync" targetNamespace="https://hci.sap.com/demo" xmlns:p1="https://hci.sap.com/demo" xmlns:wsp="https://schemas.xmlsoap.org/ws/2004/09/policy" xmlns:wsu="https://docs.oasis-open.org/wss/2004/01/oasis-200401-wss-wssecurity-utility-1.0.xsd" xmlns:wsdl="https://schemas.xmlsoap.org/wsdl/">
  <wsdl:documentation />
  <wsp:UsingPolicy wsdl:required="true" />
  <wsp:Policy wsu:Id="OP_GetOrderShipDetails_Sync" />
- <wsdl:types>
- <xsd:schema targetNamespace="https://hci.sap.com/demo" xmlns:xsd="https://www.w3.org/2001/XMLSchema" xmlns="https://hci.sap.com/demo">
  <xsd:element name="OrderNumber_MT" type="OrderNumber_DT" />
  <xsd:element name="OrderShippingDetails_MT" type="OrderShippingDetails_DT" />
- <xsd:complexType name="OrderNumber_DT">
- <xsd:sequence>
  <xsd:element name="orderNumber" type="xsd:string" />
  </xsd:sequence>
  </xsd:complexType>
- <xsd:complexType name="OrderShippingDetails_DT">
- <xsd:sequence>
  <xsd:element name="orderNumber" type="xsd:string" />
  <xsd:element name="customerName" type="xsd:string" />
  <xsd:element name="shipCity" type="xsd:string" />
  <xsd:element name="shipStreet" type="xsd:string" />
  <xsd:element name="shipPostalCode" type="xsd:string" />
  <xsd:element name="shipCountry" type="xsd:string" />
  <xsd:element name="shipDate" type="xsd:string" />
  </xsd:sequence>
  </xsd:complexType>
  </xsd:schema>
  </wsdl:types>
- <wsdl:message name="OrderNumber_MT">
  <wsdl:documentation />
  <wsdl:part name="OrderNumber_MT" element="p1:OrderNumber_MT" />
  </wsdl:message>
- <wsdl:message name="OrderShippingDetails_MT">
  <wsdl:documentation />
  <wsdl:part name="OrderShippingDetails_MT" element="p1:OrderShippingDetails_MT" />
  </wsdl:message>
- <wsdl:portType name="GetOrderShipDetails_Sync">
  <wsdl:documentation />
- <wsdl:operation name="GetOrderShipDetails_Sync">
  <wsdl:documentation />
- <wsp:Policy>
  <wsp:PolicyReference URI="#OP_GetOrderShipDetails_Sync" />
  </wsp:Policy>
  <wsdl:input message="p1:OrderNumber_MT" />
  <wsdl:output message="p1:OrderShippingDetails_MT" />
  </wsdl:operation>
  </wsdl:portType>
- <wsdl:binding name="GetOrderShipDetails_SyncBinding" type="p1:GetOrderShipDetails_Sync">
  <soap:binding style="document" transport="https://schemas.xmlsoap.org/soap/http" xmlns:soap="https://schemas.xmlsoap.org/wsdl/soap/" />
- <wsdl:operation name="GetOrderShipDetails_Sync">
  <soap:operation soapAction="https://sap.com/xi/WebService/soap1.1" xmlns:soap="https://schemas.xmlsoap.org/wsdl/soap/" />
- <wsdl:input>
  <soap:body use="literal" xmlns:soap="https://schemas.xmlsoap.org/wsdl/soap/" />
  </wsdl:input>
- <wsdl:output>
  <soap:body use="literal" xmlns:soap="https://schemas.xmlsoap.org/wsdl/soap/" />
  </wsdl:output>
  </wsdl:operation>
  </wsdl:binding>
  </wsdl:definitions>
Figure 11
WSDL file
Its name is GetOrderShipDetails_Sync.wsdl. An example message following the WSDL’s structure is depicted in
Figure 12.

Figure 12
Example message
The first Content Modifier should retrieve the order number from the message and store it in the header of the message. In addition, it should take the complete message’s body (the part between the Body tags in
Figure 12) and store it in the properties area. By this I demonstrate two important features:
- Single fields can be accessed, selectively retrieved, and stored in the header area.
- Complete complex structures, such as complete messages, can be retrieved and stored as properties.
You can also store the whole message in the header area and a single field in the properties storage—there are no restrictions in this regard. For my example implementation, proceed as described above.
Select the left Content Modifier by clicking it once so that its properties can be configured. Note that the configuration parameters of the Content Modifier distinguish between three locations: Message Header, Message Body, and Exchange Property (
Figure 13).

Figure 13
Write data into the message's header area
The first Content Modifier uses the Message Header and the Exchange Property areas to write the data. The second Content Modifier uses the Message Body to create the response message. By selecting the appropriate link shown at the top of
Figure 13, you always select the location where data is being stored.
Figure 13 already shows the correct configuration of the Content Modifier for writing data into the message’s header.
Select the Message Header link in the top row. Continue by clicking the Add button to create a new row in the table underneath. Next, define the name under which the data should be stored in the message header. In my example the name is OrderNo. You can later access the value by using exactly this name.
You now have to tell the integration engine how to access the value in the message and the type of data to be retrieved. I chose XPath from the drop-down list as I want to navigate inside an XML document and XPath is the way to go for retrieving data from an XML document. The XPath expression is simply //orderNumber as this is the information I’m interested in and the retrieved value is of type String. Here a valid Java data type needs to be assigned—hence the entry java.lang.String. That’s all for storing the order number in the message’s header. The saving is done automatically.
Figure 14 shows the configuration of the first Content Modifier for writing the complete body of the message into the property area of the Exchange. As you can see, it is possible to have two (or more) write operations configured in one Content Modifier step.

Figure 14
Write data into the Exchange's property area
Select the Exchange Property link in the top row. The message will be stored under the name msg in the exchange’s property area. This time I want to store the complete message. Therefore, I am not accessing a single field, but the whole body. For this Camel provides predefined variables as shortcuts that allow convenient access to certain parts of a message.
In my case I want to access the body of the incoming original message. The Camel variable to do so is in.body (it represents the incoming message and the body represents the body part of the in message; recall Camel’s message structure shown in
Figure 2). The syntax requires the dollar sign and the curly brackets to actually access the variable’s content. Choose Expression from the Type drop-down list. With that you have completed the configuration of the first Content Modifier. Now continue with the configuration of the second Content Modifier responsible for setting the body of the result message. The correct configuration is shown in
Figure 15.

Figure 15
Define the content of the reply message as the new message body
Select the Message Body link in the top row. Next, fill the Body input field as shown in
Figure 15. I defined a new opening and closing tag named copiedFromHeaderProperty. In between those tags I am placing the contents of the two variables defined during the configuration of the first Content Modifier. You can see how to access the different storage areas: the properties in the exchange are accessible via the predefined Camel variable property, and the data is stored in the message’s header via the predefined Camel variable header. In both cases the actual data is accessed by adding the custom declared variable’s name separated by a dot: property.msg for the complete message and header.OrderNo for the order number.
Now that you have configured both Content Modifier shapes, you can add them to your model by dragging and dropping them on the sequence flow. As soon as the sequence flow changes its color to orange (
Figure 16) you can release the mouse button and the shape is inserted correctly. After adding both shapes the final result should look like the one shown in
Figure 17.
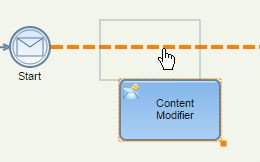
Figure 16
Add the Content Modifier to your model

Figure 17
The final result of the created integration flow
Finally, deploy the integration flow on your tenant (for details on the deployment of integration flows, see the article by Udo Paltzer and Sindhu Gangadharan).
Running the Integration Flow
After successful deployment, you need the endpoint of your integration flow to actually invoke it via a SOAP client such as SoapUI (
https://soapui.org). The address of the endpoint can be found using SAP HCI’s monitoring tools. From the three-bar navigation icon in the upper left corner of the screen

choose Monitor (
Figure 18).

Figure 18
Switch to the monitoring tool of SAP HCI
A screen with several tiles appears. Click the Started tile, which is beneath the Integration Content Monitor headline (
Figure 19). This allows you to navigate to all of the already-started integration flows of your tenant.

Figure 19
Tile for already-started integration flows on your tenant
From the list of deployed and started integration content, find your newly deployed integration flow and click its Started link (
Figure 20). This navigates you to the details of this particular flow in
Figure 21.

Figure 20
Navigate to the details of a selected integration flow
Besides other useful information, such as the version number, the deployed state, and the deploy date/time, the Endpoints URL is of particular interest. It shows the URL under which the integration flow can be invoked. Copy the address by right-clicking it and choosing the Copy link address from the context menu. The SOAP-tool of choice requires the URL as the invocation address.
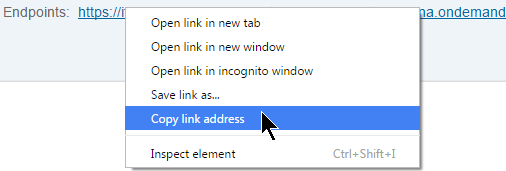
Figure 21
Copy the Endpoints URL into the clipboard
Now you have all required information to try out the integration flow. Open a SOAP client tool of your choice, such as SoapUI, and paste the copied URL as the invocation target. Prepare a message that looks similar to the one depicted in
Figure 12. Set the order number field accordingly (e.g., 10249) and don’t forget to set the correct authentication type in your tool (Basic Authentication with username and password provided by SAP operations for your SAP HCI instance). Finally, invoke the integration flow. As the result you should receive an output comparable to the one shown in
Figure 22.

Figure 22
Response after invocation of the integration flow
Why are you receiving the result although you didn’t model any connection from the integration flow’s end event to the Sender component (compare
Figure 17), which would indicate (from a modeling perspective) a result message being sent back to the initiator of the invocation? And how does the integration flow know that it is a synchronous scenario that has to return a result?
Actually the integration flow doesn’t know this. It is just a matter of fact that the SOAP connection is, by default, of type InOut. Hence, it fills the out message, which is automatically handed back to the caller. Camel takes the last content of the message body, after invoking all the processing steps in the route, as the contents of that out message. Therefore, you get the result of the last Content Modifier step in your processing chain as a result message, which is shown in
Figure 22.
You can identify the <copiedFromHeaderProperty> tag followed by the original message and the extracted order number—exactly as you defined it with the code snippet shown in
Figure 15. Finally, I want to make you aware of another important difference between storing data in the message’s header and storing it in the exchange’s property area. The data stored in the message’s header will be forwarded to the receiver of the message, whereas the data in the exchange’s properties area will not reach the receiver. How can you verify that? In your SOAP client tool take a look at the headers of your response message. I’ve done this for SoapUI and created the screenprint shown in
Figure 23.

Figure 23
The header fields of the response message
Right in the first line you can identify the OrderNo field that was set during message processing. Obviously it reached the receiver, as opposed to the data stored in the exchange’s properties area.
Summary
In this article you have learned a lot about the inner workings of SAP HCI. Although I implemented a relatively simple scenario, it revealed many details about message handling within the underlying integration framework Apache Camel. This knowledge helps you to work more consciously with messages, headers, and attachments. In forthcoming articles I will discuss how to influence synchronous and asynchronous message handling, how to route messages, and how to apply more powerful enterprise integration patterns, so stay tuned.

Dr. Volker Stiehl
Prof. Dr. Volker Stiehl studied computer science at the Friedrich-Alexander-University of Erlangen-Nuremberg. After 12 years as a developer and senior system architect at Siemens, he joined SAP in 2004. As chief product expert, Volker was responsible for the success of the products SAP Process Orchestration, SAP Process Integration, and SAP HANA Cloud Integration (now SAP HANA Cloud Platform, integration service). He left SAP in 2016 and accepted a position as professor at the Ingolstadt Technical University of Applied Sciences where he is currently teaching business information systems. In September 2011, Volker received his Ph.D. degree from the University of Technology Darmstadt. His thesis was on the systematic design and implementation of applications using BPMN. Volker is also the author of Process-Driven Applications with BPMN as well as the co-author of SAP HANA Cloud Integration and a regular speaker at various national and international conferences.
You may contact the author at
editor@SAPpro.com.
If you have comments about this article or publication, or would like to submit an article idea, please contact the
editor.