Functional experts can use standard R/3 programs that don’t require ABAP resources to transfer organizational data between clients or to create large amounts of new organizational data in a client.
Key Concept
R/3 provides standard programs that you can use to move existing organizational management objects and infotypes across clients and to load new OM objects and infotypes. They do not require ABAP programming, so a functional consultant can do this. You can also use them post-implementation to update or synchronize OM data within development and test clients. Requirements for their use include configuration of a logical file name and location and use of Excel spreadsheets to load new data.
My SAP customers often ask if there is any way to move the organizational structure in their R/3 systems from one client to another. This requirement occurs for two main reasons within the life cycle of an SAP Human Capital Management (HCM) implementation project.
First, during an SAP implementation project, an organizational structure may exist in the production client prior to go-live of the HCM system. This can occur if a company has created an organizational structure for non-HR specific processes, such as workflow processing for the user object. In this case, when the HCM project begins, the team may want to duplicate the existing production organizational structure in a development client or clients. Another scenario is that the final organizational structure has been moved to production shortly before go-live to be maintained there until the cutover date. In this case, duplicate maintenance is required for all other clients or the organizational structures will not be identical.
If you need a copy of the production organizational structure in a test client (to support a new application implementation, regression testing, development testing, etc.) and you have not maintained this client, you can use the process described here to extract and transfer the production organizational structure to a test client or clients. It is desirable to have the development and test clients contain a copy of the true production org structure, but manually maintaining all development and test clients is usually not a high priority once the production system is in use.
The second reason many customers request this ability is to continue to manage organizational data in test clients after the HCM system is in production. Over time, the organizational structure in development and test clients becomes less accurate. At regular intervals, or prior to beginning the implementation of a new HCM module, the user needs a “clean” organizational structure in these clients that is, if not 100 percent identical to production, at least close to the structure in the production client.
Allowing functional implementation or support resources to manage these requirements can provide efficiency in the implementation and support processes. Without the aid of a technical ABAP resource, you can use the standard R/3 utilities that I describe to transfer organizational data between clients or to create large amounts of new org data in a client. Some configuration assistance from Basis is required. I’ll be using R/3 Enterprise Release 4.7 screenprints and configuration.
Standard Functionality
R/3 provides two programs for data transfer between clients. Whether both are required is dependent on whether existing data is being transferred from client to client or new data is being built and loaded into a target client. The programs are RHMOVE00 and RHALTD00.
Program RHMOVE00 extracts existing R/3 organizational management objects and infotypes into a flat- file format that you can then load into another client. If new organizational objects and infotypes are to be loaded into a client, this program is not used except to create a template file so the user can determine the correct file format required.
Use program RHALTD00 to load the data files into the database regardless of the source of the file. You could create the file from an existing client with RHMOVE00 or from a spreadsheet that contains your new, updated, or legacy organizational management data. R/3 stores this organizational management data in the tables with structure HRPxxxx, with xxxx representing the infotype number. Therefore, objects (e.g., jobs, positions) are transferred to table HRP1000, and relationships between objects are stored in table HRP1001.
Create the File
This part of the process allows you to create a sequential file consisting of selected organizational structure data records (objects and infotypes), which is stored in a predefined file location.
Step 1. Log onto the source client for the OM data. Use program RHMOVE00 to create the flat file in the source client. You can access and execute this program in one of three ways:
- In the transaction field, enter SE38. In the Program field, enter
RHMOVE00 and click on the execute icon.
- Using SAP Easy Access, follow menu path Tools>ABAP Workbench>Development>ABAP Editor. Enter
RHMOVE00 in the Program field and click on the execute icon.
- Using SAP Easy Access, follow the menu path Human Resources>Organizational Management>Tools>Data Transfer>Create sequential file or use transaction OOMV.
When this program is executed, you see the selection screen in Figure 1.
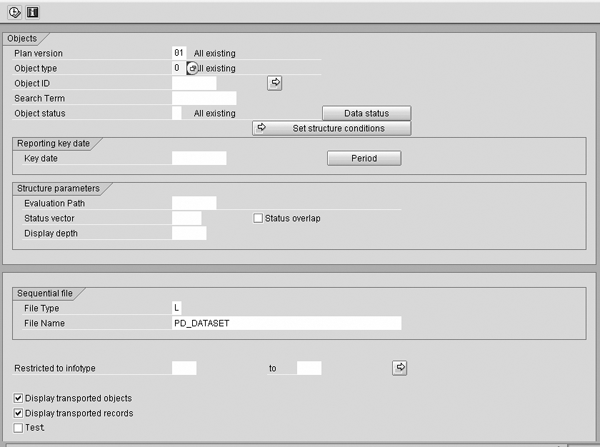
Figure 1
Selection screen for creating a file with organizational management data
Step 2. Determine which objects and relationships you want to move from the source client to the target client. (Use transaction SE16 to view the tables with structure HRPxxxx. If you view HRP1000 it shows you the objects that exist and are available to be moved; HRP1001 displays the relationships that can be moved.)
Step 3. Select the plan version, object type, and object numbers or ranges you wish to move. If you do not specify infotype 1000 for only the objects, then all relationships (infotype 1001) and all other infotypes are transferred into the flat file.
Tip!
PD_DATASET stores one file only. When a new file is created via RHMOVE00, or if a new file is manually moved to this location, it overlays the existing file. This is another reason it makes sense to transfer the organizational data to one object and one infotype at a time when using this program.
Step 4. If you do not specify any object numbers for the object ID, all objects for that object type and plan version are included in the file. The logical file name defaults to PD_DATASET. Do not change it. Enter infotype 1000 in the Restricted to infotype field. You can execute in a test mode if you wish. When you are ready to create the file, uncheck the Test box.
A best practice is to move organizational units (objects only) in one step, then move the jobs, then move the positions. All objects should be moved before you create the files for moving the relationships (infotype 1001). My preference is to move each additional infotype for each object in a separate file. This takes a few more steps, but when you are working with a large organizational structure with many infotypes on each object, it helps to keep things orderly and in proper sequence. Although you could use evaluation paths to move all your objects at one time, I have found that this can lead to data integrity inconsistencies, because users become confused about what they have already done and where they are in the process.
Step 5. After you execute this program, you see a list of organizational units created (Figure 2).
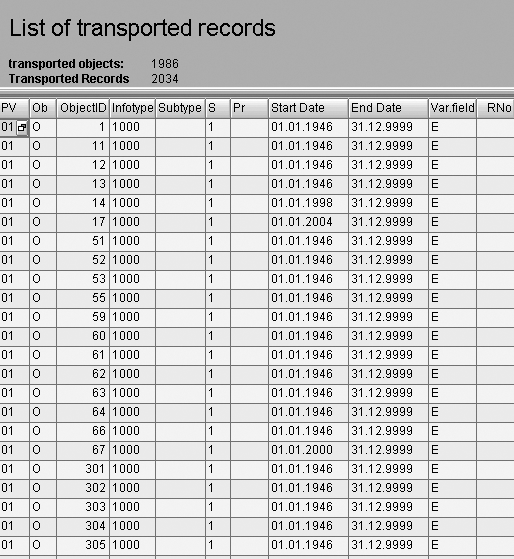
Figure 2
Number and names of transported objects
This program actually creates a sequential file in the directory PD_DATASET for the infotypes specified in the selection screen. By looking at the print format shown in Figure 2, you can verify that your selection was performed properly. If not, simply return to the program selection screen and repeat steps 3 through 5.
Step 6. If you are creating new data (objects or infotypes), execute this program for the appropriate data, using a single object and infotype. You can download the resulting display into an Excel spreadsheet. This spreadsheet is the template for the format of the data you want to load. Enter the new data into the spreadsheet, then save as a text file in the directory PD_DATASET.
Tip!
The step legacy data transfer is a somewhat misleading name, since the data does not have to be from a legacy system. It could be data from the same R/3 system but from another client or data from a spreadsheet created manually.
Load the File
In the previous process, you created a sequential file of organizational data (objects and infotypes) that represents the organizational structure in an SAP client. This next process allows you to load this file from its location in the logical file PD_DATASET into a new SAP client. You then have recreated the organizational structure from one client to another in your SAP landscape.
Step 1. Log onto the target client and use program RHALTD00. You have three ways to access and execute this program: In the transaction field, enter SE38. In the Program field, enter RHALTD00 and click on the execute icon.
- Using SAP Easy Access, follow menu path Tools>ABAP Workbench> Development>ABAP Editor. Enter
RHALTD00 in the Program field and click on the execute icon.
- Using SAP Easy Access, follow the menu path Human Resources>Organizational Management>Tools>Data Transfer>Legacy Data Transfer or use transaction OODT.
Step 2. This program displays the logical File Name PD_DATASET, User, and Client. You should not have to change anything on this screen (Figure 3). You can use this utility for other legacy data transfer processes, and this is why the data fields on this screen can hold other entries. However, the delivered default entries in the fields are defined so that a batch file is created only from the standard delivered logical file PD_DATASET, and no changes to the defaults are required for this use.
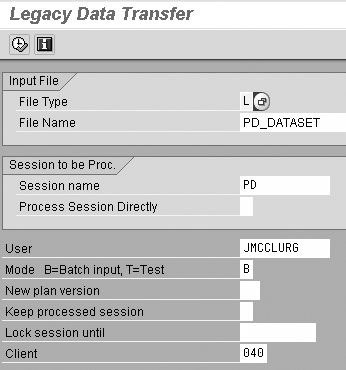
Figure 3
Program RHALTD00 creates a batch input file from organizational structure data stored in PD_DATASET
The other fields on the selection screen are:
- File Type — defaults to L, for logical. The default file holding the organizational data is PD_DATASET, which is predefined as a logical file type.
- File Name — defaults to PD_DATASET as delivered by SAP.
- Session name — default SAP session name that will appear in the batch session manager screen for the file created. If you want to be more specific in the name of the batch, you can enter a new session name, up to 13 characters.
- Process Session Directly — this field is not used at this time.
- User — entry defaults the user name of the user who accessed the program PHALTD00.
- Mode — default entry is B, which creates a batch input session. The other option is T for test. If T is selected, the system displays a report layout of the records in the file PD_DATASET.
- New plan version — default plan version for which the batch is created is always 01, or current plan, even if an entry is not entered into this field. You can enter a different plan version if appropriate for the data being transferred.
- Keep processed session — default entry is blank, which means that R/3 automatically deletes the batch session created by this program after it was processed using transaction SM35. If you do not want to delete the batch input session, enter X in this field.
- Lock session until — default value is blank. If you enter a date here, the batch session created cannot be processed until this date.
- Client — default is the client in which the user is currently working.
Step 3. Click on the execute icon and the system creates a batch session from the file it retrieves from PD_DATASET. The screen in Figure 4 is displayed.
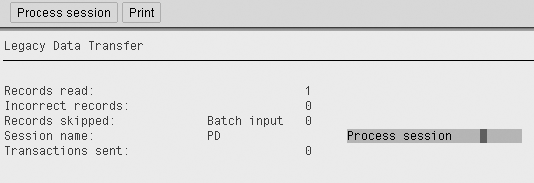
Figure 4
Summary of created batch input session
Step 4. The number of records displayed on this summary screen should match the number of data records created in your extract file from the step 6 under “Create the File.” At this point, you have finished the process of moving organizational data records from a client into a batch file (BDC) that will be loaded into a different client.
Step 5. From the Process session line on this screen (highlighted), click to access the BDC screen session manager and start the file load process. If you exit from the utility at this time, use transaction SM35 to view the batch session that was created and process the batch. Figure 5 shows the view of the batch process session manager screen.

Figure 5
Manage batch processes from this screen
Step 6. Execute the batch session to load the file in the target client. Repeat the previous process steps (“Create the File” and “Load the File”) for each object type until all objects are moved. After all objects are moved (1000), move all the relationships (infotype 1001). Move them one at a time by specifying the appropriate evaluation path and entering infotype 1001 in the Restricted to infotype field (Figure 1). Don’t forget to create additional files to move any other infotypes that you have linked to the objects (1008, 1013, etc.). You can move these at the same time that you create the object file (1000), but check your target database to verify whether you did this already. If not, transfer these additional infotypes using the same process steps as above. You need to include them in the Restricted to infotype field instead of just specifying 1000. The object file, if you move only objects, would hold only infotype 1000 records, not 1008, etc. However, when you have a large amount of organizational data to move, the recommended practice is to transfer only one infotype at a time in the file.
Remember, PD_DATASET stores one file only! Do not create subsequent files with RHMOVE00 until the previous one has been transferred to a batch using RHALTD00, or unless the previous file was incorrect and can be overlaid with the next file creation.
Tip!
You can use program RHMOVE00 to make mass changes to your organizational structure by moving positions from one organization to another. You do this by creating new relationship (infotype 1001) records for the positions, linking them to the new organizational unit. If no holders are linked to these positions, the infotype 0001 records in personnel master data are not updated in this process and you must perform a follow-up action in SAP Personnel Administration.
Transfer Data from Other Sources
The process to use these programs to load new organizational data from a legacy system or from a manually created spreadsheet basically follows the same procedures I just described. The only difference is that the flat file to be loaded into the target client does not come from another R/3 client source. Instead the file is created from legacy data or data from some other source, placed into a spreadsheet, and then converted into a flat file and placed in the directory PD_DATASET.
The program RHMOVE00 in this scenario only creates a sample template file for each object and infotype that is required for load. You can use the program RHALTD00 to load the flat file.
During implementation or production use, your organizational structure may be altered through structural graphics, manual maintenance, or the use of the RHMOVE00 utilities. In any of these instances, as positions are related to a new org unit, the previous relationship between the position and the “old” org unit exists on the holder’s (employee’s) infotype 0001 record. (The organizational unit shown on 0001 will be incorrect.) You can use RHINTE30 to update the 0001 record only if the begin date of the most recent 0001 record for the employee is equal to or later than the earliest retroactive date allowed. If this situation occurs, the error message “change before earliest retroactive date MM/DD/YYY” appears and the record will not be updated.
To avoid this situation, during the implementation phase, ensure that the “conversion” action date (which will be the first valid infotype 0001 date) in each employee record is equal to or later than the start date of the go-live pay period (earliest retroactive date allowed).
Tip!
If the infotype 0001 dates already exist and there is a conflict in the dates when using RHINTE30, a workaround solution is to write a Computer-Aided Test Tool (CATT) to update only infotype 0001 (through a short action). It sets the BEGDA to a date equal to or after the earliest retro date. You can load this new 0001 record with the same position previously held by the employee. The system automatically loads the new, correct organizational unit.
Configure the Logical File
Configuration of a logical file is performed to support the movement of data in the SAP landscape. It is possible in a customer environment for sender and receiver systems to reside on two separate physical systems, so the definition of logical files and file paths is required to support various data transfer processes among systems.
In R/3, configuration changes in one client in the system also affect all other clients in the system. Therefore, cross-client maintenance is usually restricted to a few authorized technical (Basis) resources who are responsible for maintaining technical tables in the SAP system. You should perform the eight steps below in tandem with the business process resource that is transferring organizational data and the Basis resource that has authority to define the logical file.
Step 1. When you use programs RHMOVE00 and RHALTD00, a flat file is created, stored, and accessed from a directory that is defined through customization. The menu path to this customizing step in R/3 Enterprise 4.7 is Financial Accounting>Preparations for Consolidation>General Specifications>Scope of Consolidation and Data Transfer>Periodic Extract from the Consolidation Staging Ledger>Define and Assign Logical File Name (Figure 6).

Figure 6
Overview screen for creating cross-client logical file
Step 2. Two options are displayed:
- Define cross-client logical file names
- Define client-specific logical file names
Select the option for Define Cross Client Logical File Names, which accesses table generated view V_FILEPATH (Figure 6). The logical file name needs to be created to determine the physical file path for the program to follow to get the data created through RHMOVE00 and stored in PD_DATASET.
Figure 6 shows several steps that you must take to complete the definition of the logical file. These steps are carried out in the order that they appear in the configuration view. Refer to this view for steps 4 through 8.
Step 3. In the first table/view step, which is Logical File Path Definition, create a name for your logical file path. (There are six table/view steps once you get to the IMG executable step). Alternately, you could use a name that already exists in the table, if this is appropriate for your purpose. In the substep Assignment of Physical Paths to Logical Path, you assign a syntax group and define the physical path of the logical file.
Variables that are necessary for the physical path and syntax groups for the physical path are defined in steps 6 and 7, so these fields can remain blank at this time in the logical file definition. After completing steps 6 and 7 below, you should return to this step and complete the assignment of the physical path to the logical path. However, if you are using a syntax group or variables that have already been defined in the system, you can enter them at this time and do not have to create them in the later steps.
Note
Configuration tables are identical in previous releases, but the menu path via the IMG is slightly different in R/3 Release 4.7.
Step 4. Define the logical file name definition, cross-client. The logical file PD_DATASET should be in the table (Figure 7). If it is not, add it. This is the default for the load program RHALTD00.
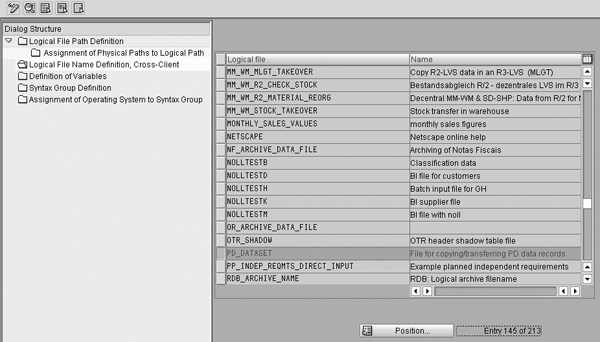
Figure 7
Screen to assign logical file name definition
Step 5. Define variables. You define any variables that you wish to use in the physical file and path names. When a variable is included in a path name, it is substituted at runtime by the corresponding value defined in this table. For example, you may need a variable to represent the system ID, so this could be SYSID, or a variable for file name, which could be called FILENAME.
Step 6. Define syntax group. You define a key that represents a group of operating systems with a common syntax for file and path names. For example, a syntax group UNIX can be defined for all UNIX-compatible operating systems, DOS for MS-DOS systems, or NT for Windows NT operating systems.
Step 7. Assign operating system to syntax group. You define an operating system and assign it to a syntax group that was created in the previous step. This configuration is a method to classify the various operating systems that you can use within your IT landscape and across which data may be transferred. If the operating system for your client does not exist in this table, create an entry for it. To assign the operating system to a syntax group, highlight the selected operating system and click on the details icon. You can then enter a previously defined syntax group that contains the operating system you defined.
For example, you might create an operating system code LINUX and assign it to the syntax group UNIX, for UNIX-compatible operating systems. You might also require an operating system code such as HP-UX, and also assign it to the syntax group UNIX.
Step 8. Map the file definition that was created in the previous steps for each user who will use the RHMOVE00 and RHALTD00 programs described above. The Basis resource who completes the file definition can perform this mapping for the user.
Janet McClurg
Janet McClurg is an SAP Platinum consultant specializing in the Human Capital Management application. She has worked for SAP for 12 years, the last eight in the platinum consultant role. Janet’s areas of specialization include Enterprise Compensation Management, Performance Management, Organizational Management, Personnel Administration and Succession/Career Planning.
If you have comments about this article or publication, or would like to submit an article idea, please contact the editor.


