SAP Access Control 10.0 uses a Multistage, Multipath (MSMP) workflow engine (an enhancement of SAP Business Workflow) to achieve a flexible configuration process for approval workflows needed for SAP Access Control business functionality. Because of the huge customer base of SAP Access Control, the MSMP workflow engine was developed to be robust and flexible to accommodate the variety of different company scenarios for approval processes. Learn about some of the enhancements that make the whole approval process configuration flexible enough to be able to cover particular user-specific requirements.
Key Concept
With SAP Access Control 10.0, the former Java-based approval workflow from SAP Access Control 5.3 was rewritten for the SAP NetWeaver ABAP platform. The new workflow, also known as Multistage, Multipath (MSMP) workflow, is based on the standard SAP NetWeaver Business Workflow (BWF) concept, but eliminates the need to know BWF when modifying pre-delivered approval processes in SAP Access Control 10.0.
Access request approval workflow is one of the most flexible workflows available in an SAP system. Because of its flexibility, it can be configured to fit user requirements. There are more than 2,000 active SAP Access Control customers, and each one has his or her own idea about how to handle access requests. Thus, while SAP was designing the core workflow engine to support the newly rewritten SAP Access Control product on the SAP NetWeaver ABAP stack, it had to consider all those customers. It had to determine how to make the underlying workflow engine — aka Multistage, Multipath (MSMP) workflow — extendable in a way that it provided the same business functionality companies were able to achieve in earlier versions of SAP Access Control (developed on the SAP NetWeaver Java stack).
To effectively use this new workflow engine in SAP Access Control 10.0, Business Rules Framework (BRF+) integration support was built in the MSMP workflow engine. It is designed so that users can cover most simple scenarios without having to understand the underlying technology in great detail. However, some basic principles still need to be followed to be able to use this concept in a typical SAP landscape environment.
To achieve full flexibility of the MSMP workflow engine, the support for ABAP class-based rules and additional Business Add-Ins (BAdIs) were incorporated into the whole MSMP workflow engine design.
I uncover some of the concepts built in Multistage, Multipath (MSMP) workflow so that you can apply them while addressing your specific requirements during an implementation of SAP Access Control 10.0. I explain the extension capabilities of the MSMP workflow engine and include some more detailed information and use examples.
The main features of the MSMP workflow engine I plan to discuss in more detail are:
- MSMP rules
- Custom fields enhancements
- Standard MSMP Business Add-In (BAdI) enhancements
Note
This article is an advanced follow-up to “Take Full Advantage of SAP Business Workflow in SAP BusinessObjects Access Control 10.0” written by Frank Rambo. In this article I assume that the reader already knows the basic MSMP approval workflow configuration.
Basic Concepts and Terminology
To understand the MSMP workflow engine you have to understand its purpose first. The purpose, as defined during development, was to provide a highly configurable workflow engine for particular workflow types — approval workflows — without needing to code the workflow logic unless really necessary. In addition, SAP didn’t target only the main workflow of the SAP Access Control application, access request, but SAP was also asked to support other types of approval workflows, such as master data creation approval (e.g., access role creation) or super user access log review workflows.
To address the challenge technically, I define the MSMP universe as follows:
The MSMP workflow approval process instance is called a request.
A request is
submitted
by an end user or the system and processed according to its predefined approval logic. The system or user knows the MSMP scenario (aka process type), such as access request or role creation, that defines the type of object that goes through various stages of the predefined approval process (
Figure 1). The request itself is represented by a Request Header data object that holds additional fields describing the request in detail (i.e., in case of an access request, it could be the user for which you are creating the request, due-date of request expected approval, request priority, and so on).
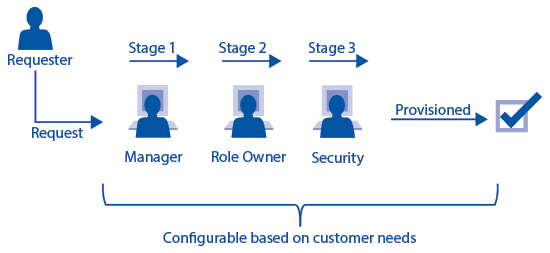
Figure 1
Configurability of approval path definition
- In the most complex scenarios (e.g., access request workflows) the request is further divided into request line items that represent sub-objects of the main request object.
Those sub-objects are themselves subject to approval, rejection, routing, and notification actions. However, they cannot exist as stand-alone objects (their broader context is defined by the request itself). Especially because of the fact that line items can be separately and independently routed to different approval stages, you have to define a concept of approval path
that represents both the history and possible future of a line-item approval during the request’s lifetime (
Figure 2).
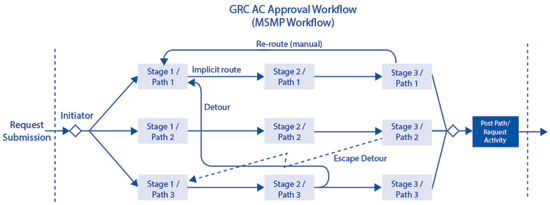
Figure 2
MSMP request structure and processing
As I mentioned earlier the routing happens on the line-item level (if required for your scenario). Now I describe in more detail which routing situations can occur while processing the submitted request (refer to
Figure 2):
- Every request is immediately, after submission, passed to a so-called initiator. The initiator represents the logic allowing you to split your request into independent approval groups being processed by different approval paths in your whole approval process definition.
- Before every approval stage, an approver determination logic is executed to identify which physical people (end users of the GRC system) need to express their approval opinion (accept/reject). There can be 1 to N approvers identified (per request line item).
- After each approval stage is processed (all approval or rejection decisions are done), there is an option to detour all or some of the line items into a different approval path. If the detour is not defined (or detour conditions are not met), then the implicit routing to the next approval stage within the same approval path happens.
- In exceptional situations (such as when the approver is not found, or a provisioning error happens) the request or some of its line items can be routed to a specific path called the escape path. This situation is called escape or escape detour.
- During the work while the request (or its part) is in the approval stage, all predetermined approvers of that stage can accept or reject the particular line items of the request. They can also forward an approval or a rejection decision to another user. In addition to that a manual reroute to different approval stage can be configured as an additional processing option (typically used for administrators to handle endless loop situations or other abnormalities).
A typical example of such a complex request is again an access request workflow scenario. Its sub-objects — line items — can be 1 to N roles or systems being requested to be assigned to particular users in a given request.
To understand the meaning of approval stages and paths, just imagine that you manage several SAP systems in your IT landscape and you want to define a more strict approval process for some of them. For example, every access request into production systems has to be audited by the security office at the end of approval process, whereas other systems require only standard approval. In other words, you want to have all line items (roles) of the request that are production systems related to be (at the end of the approval process) reviewed by your security office to have a complete record of what’s going on in production systems.
In contrast, in my example the regular roles from non-production (development/test) systems do not have to be reviewed by the security office. In such a scenario you can easily define two approval paths that differ only in the last approval stage. Those production systems roles contained in your access request are then routed into an approval path A in which the security office representatives express their opinion on the request in the last step of the path (last approval stage). The rest of the roles (from non-productive systems) can be sent to another approval path B where it is not required that the security officer has to look at the request.
You also have simpler MSMP scenarios — aka header-only scenarios — in which the request itself cannot be divided into particular sub-objects. To understand the header-only and line-item-based scenarios the same way, imagine that a header-only request is a special case of a line-item-based scenario. It is a request with exactly one line item that itself represents the whole request. An example of such a header-only scenario is an access role creation request.
As you can see the generic MSMP request can have very complex approval logic. It takes many more words and pictures to describe the whole MSMP architecture, but I describe the most essential terms and concepts of MSMP workflow to provide you with a foundation.
To Rule MSMP You Have to Understand the Rules
The behavior of the workflow after its submission is determined by two major things. The first is definition of the approval process (approval paths and approval stages). The second is the use of dynamic exits called MSMP rules. These rules can evaluate the current status of the request and decide what to do next. These MSMP rules are thus a major essential component to be understood if you really want to define and implement a good MSMP approval processes.
MSMP Rules: The Definition
MSMP rules can be seen as dynamic logic executed at a particular decision point by an MSMP engine to understand what to do next. Therefore, you do have several types of MSMP rules depending on which kind of decision logic is being evaluated (
Figure 3).
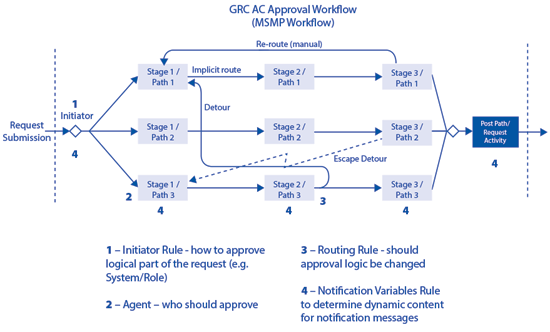
Figure 3
MSMP rule types in various parts of the request’s lifetime
(1.) The initiator rule is the only mandatory MSMP rule that is executed immediately after the request is submitted to determine the starting approval path of every line item in the request.
The logic to be implemented can be described as: For every line item passed as input, return one path that is used for this line item during the approval process.
(2.) The agent rule is used if dynamic evaluation of an approver of the request (or its line items) is needed. Because this is a very typical situation for most of the customers, this rule is very often used in MSMP configurations. The agent rule can deliver two types of results:
- The approver agent rule delivers physical user IDs of the GRC system to whom the MSMP engine needs to send the workflow work item to get an approver’s decision.
- The notification agent rule is used to deliver either user ID or an user email address to the MSMP engine to be able to send this user a notification message (e.g., the request was approved or rejected).
The type of agent is not defined by the agent rule logic, but it is defined in the MSMP configuration when creating a so-called MSMP agent (that can be implemented by the MSMP agent rule). This allows you to share the same rule evaluation logic for two different purposes (approval and notification).
Note
Approval agents return the user ID, which itself can have an email address maintained in user master data. Therefore, it is possible to use approval agents for notification purposes in the MSMP configuration. However, you cannot use notification agents to determine approvers of particular request line items.
The logic to be implemented by an agent rule can be described as follows: For every line item passed as input, the return value would be 1 to N users to be used as approvers (notification agents’ return values can be an email address instead of user IDs).
(3.) The
routing rule
is used if dynamic evaluation of the next approval stage is required. That decision (to where a current line item is routed to) can be defined inside the routing rule implementation based on the current request status. The possible options are either to return an empty value [SPACE], which means no detour is needed, or return a technical ID of the approval path, to which you prefer to route the affected line item.
There is also an option to define whether all the line items of the group being processed by a particular stage need to go to a new stage determined by the routing rule (so-called stage-level routing) or whether just some of the line items of the group need to go to a new stage (creating new logical group) — so-called line-item-level routing. Nevertheless stage-level or line-item-level routing is not defined by the routing rule logic itself. These routing properties are defined in the MSMP approval stage configuration instead. Therefore, the routing rule logic is responsible to respect that defined routing level in its implementation.
The logic to be implemented can be described as: For every line item passed as input return one path to route the line item to (or return an empty value [SPACE] if no detour should take place). Stage-level routing (if set) needs to be respected by rule business logic.
(4.) The
notification variables rule
is used to dynamically evaluate runtime values for variables used in configuration of the MSMP notification messages. SAP delivers notification variables rules per each scenario supported by MSMP. Those rules then implement variables evaluation logic for variables predefined by SAP.
During request runtime the MSMP engine evaluates current values of all predefined notification variables at the time when the notification condition is met and the notification message is about to be sent. At this time MSMP executes the configured notification variables rule to get current values of notification variables. Those values of notification variables are then used while constructing the notification message body based on notification message template (stored as SE61 document). This logic can be altered by providing your own notification variables rule in MSMP configuration. Later in this article I show you how to effectively add new custom notification variables.
As you can see from
Figure 3 the MSMP notifications can be sent from almost every part of a request’s lifetime (after submission, during approval decisions within a stage, after the whole request is processed and closed).
The logic to be implemented can be described as: For every variable passed as input return one variable value.
Variable values of type String are used by default.
Of course, to be able to leverage functionality of MSMP rules in a particular approval scenario, you need not only to develop or implement the MSMP rule but also to use it in the MSMP configuration. For information on how to use the MSMP rules in configuration of MSMP process, refer to the official documentation or to Frank Rambo’s article
“Take Full Advantage of SAP Business Workflow in SAP BusinessObjects Access Control 10.0.”
MSMP Rules: The Implementation
Now that you understand how the MSMP engine uses dynamic MSMP rules to influence the runtime of an approval request, I can discuss the options you have when implementing the MSMP rule logic. From a technical standpoint you can choose the following MSMP rule implementation types:
The first implementation type is BRF+ Rule. This rule is implemented by the Business Rule Framework (BRF) included in the SAP NetWeaver ABAP stack. The main transaction to maintain such rules is BRF+ (or BRFPLUS). The BRF allows you to define independent functions that receive some input (defined by developer). Based on that input, the function can execute certain logic to return back values representing the result of that function. This entire process is done by clicking and dragging. However, certain experience in BRF+ is needed to be able to model proper business logic.
Of course, the MSMP engine cannot process any such generically defined BRF rule. Therefore, it supports only rules having a certain predefined signature (a set of input and output parameters). To support BRF+ in a more convenient way, SAP delivers a program to generate an empty shell of BRF+ rule that is compatible with a particular MSMP scenario. The transaction code is GRFNMW_DEV_RULES. This program can generate the following BRF+ rules:
- ?Complex BRF+ rule. This rule is a very generic BRF+ rule. If executed, this rule runs only once for the request header and all associated line items. Therefore, it allows you to implement a rule logic decision based not only on current line item but also on all associated line items within one processing group. However, the implementation of a complex BRF+ rule requires really good skills and practice of BRF+ framework. I compare it almost to the skill set needed to develop ABAP-based MSMP rules. Because the BRF+ framework was introduced into the MSMP engine to simplify development of workflow rules, I focus here on the next much more convenient type of BRF+ rules – flat rules (see the next paragraph).
- ?Flat BRF+ rule (aka BRF+ easy) – in combination with decision table top expression is the preferred BRF+ rule type because of the simplicity of developing such rules. If this rule is configured, it is executed in runtime as many times as many line items are contained within a request (or more accurately as many line items are contained within the group of line items being processed together [i.e., by one approval path]). The input of the BRF+ flat rule is a request header and one line item data and the output depends on the rule kind (initiator/routing/agent/notification rule …).
The easiest way to work with BRF+ rules is to use the flat BRF+ rule with a pre-generated decision table top expression. In this case the only steps needed to be done are:
1. Generate an empty shell of BRF+ flat rule with a decision table. You have to select fields from the request header or line-item structures that are needed for evaluation of the business logic being implemented (
Figure 4).
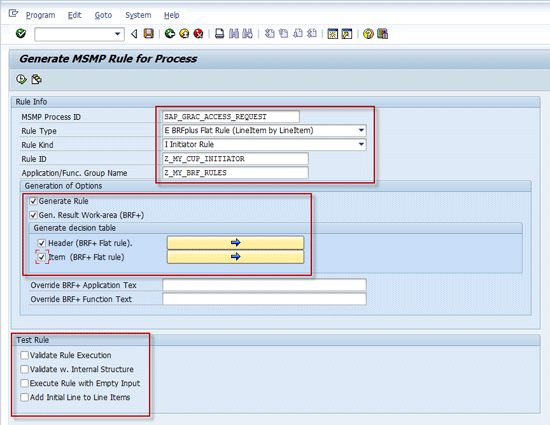
Figure 4
Program GRFNMW_DEV_RULES to generate BRF+ rule shell
Figure 4 shows the main information to be provided when generating a BRF+ flat rule:
- The Rule Info section requires you to enter the following data:
- An MSMP Process ID that represents the MSMP approval scenario (such as access request, role creation, etc.)
- The name of the rule type – in my case E for BRF+ Flat Rule
- The Rule kind – the purpose of the MSMP rule. In my example I used ‘I’ as I am defining the Initiator rule.
- The name of the BRF+ function and BRF+ application (which is the development container for the rule and defines its transportability across development landscape). If a nonexisting BRF+ application is specified, then the generation program creates the rule function in a new local (non-transportable) object. If an existing BRF+ application is specified, then a new BRF+ function is generated within it.
- Generation Options specify advanced requirements for generating the BRF+ function. Most important here are the check boxes Header and Item. If either of them is checked, then the generation program automatically generates a decision table top expression within the generated BRF+ function. After setting the Header/Item check box, the user is also prompted to select which header/line item fields are necessary to be included into the decision table to be able to formulate rule business logic.
- The Test Rule section is used for various technical validations of already existing rules (all types). Therefore, I do not need to select any check box here as I am generating a completely new rule.
2. Implement the business logic by filling a decision table (top expression) entry. The content of the decision table corresponds to the business logic of the rule. Enter decision table content maintenance data (
Figure 5).
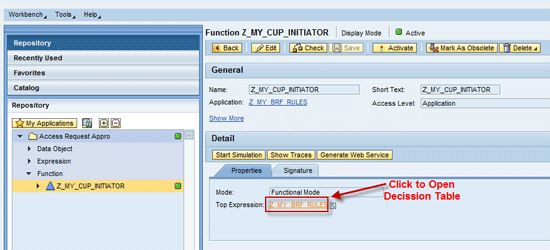
Figure 5
Maintenance of a generated decision table of a BRF+ rule
To access the BRF+ function top expression definition (in transaction BRFPLUS) you can use the left navigation section to locate your BRF+ application/function. You can use the Advanced Search button (next to My Applications button) or menu Workbench -> Open Object. Once you click the particular BRF+ function (in my example it is Z_MY_CUP_INITIATOR), its definition is opened on the right side of the BRF+ workbench. The top expression of that particular BRF+ function is located inside the Properties tab. By clicking the link of the top expression, its definition is again opened in the BRF+ workbench. As the rule Z_MY_CUP_INITIATOR from my example was generated with a decision table, the top expression is thus a decision table where the real business logic needs to be filled in (
Figure 6).
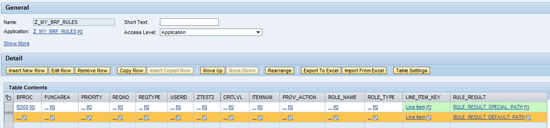
Figure 6
A BRF+ initiator based on a decision table
While you maintain decision table content, don’t forget to include a fall-back entry in case none of your above criteria are met. The reason is that the initiator rule always needs to deliver at least one return value per line item (and same applies for routing and agent rules as well).
The business logic of the initiator shown in
Figure 6 can be described as follows: If BPROC field (from Request Header) is equal to BS00, then route the current line item to the path represented by RULE_RESULT_SPECIAL_PATH. Otherwise (this is the fall-back entry), route the line item to path represented by RULE_RESULT_DEFAULT_PATH.
The rule business logic can be easily adjusted to look into line-item fields — i.e., just by adding a direct value XYZ into the ROLE_NAME field (
Figure 6), you change the whole decision logic into: If BPROC field (from Request Header) is equal to BS00 AND the line item is representing role with technical name XYZ (as ROLE_NAME field comes from line item), then route such line items into path represented by RULE_RESULT_SPECIAL_PATH.
In other words you can express such a rule as: Route all roles XYZ within a request for Business Process BS00 to a special path.
3. Activate and test the developed BRF+ rule. The one big advantage of the BRF+ framework is that it offers a simulation option to test the rule logic independently on MSMP contextual information. Register and use the developed BRF+ rule in MSMP configuration. (Don’t forget to transport the BRF+ rule together when transporting your MSMP configuration to test/production.)
The second implementation type of MSMP rules includes rules
implemented by ABAP coding. Therefore, they are flexible from both performance and implementation perspectives. However, using them requires ABAP programming skills. From an ABAP perspective you have two main implementation types:
- ?Function module-based rules. These are rules implemented within an ABAP function module. Such rules might be familiar to some implementation experts who are used to working with function modules in ABAP. However, the function module-based rules in MSMP require advanced ABAP programming skills (mainly so-called dynamic programming techniques) as their signature is very generic. I would not recommend using function modules-based MSMP rules if you are not familiar with both advanced ABAP programming techniques and some internals of MSMP engine. I strongly encourage using the class-based ABAP rules application programming interface (API) that was developed to make your implementation life easier and to be able to focus mainly on the business logic.
- ?Class-based rules. Because of the complexity of the function module-based rules, SAP has developed an alternative called class-based MSMP rules. The main availability of this interface is since Support Pack 6 of SAP Access Control 10.0 (also check other important SAP Notes related to this interface — namely, OSS 1671150 - GRC AC Workflow Rules - API for Class Based Rules – FAQ and OSS 1671153 - GRC AC Workflow - Class Based Rules API - Extensions in SP8).
This interface is trying to combine the flexibility of ABAP coded rules and the convenience of BRF+ easy rules. However, generation of the rule shell is not supported by the program GRFNMW_DEV_RULES, and ABAP OO (object-oriented ABAP) skills are required. Fortunately, only very basic ABAP OO skills are needed (all done in class-builder — transaction SE24):
- Create a class of any name (within customer namespace)
- Inherit the class from one of the 36 pre-delivered classes — depending on MSMP rule kind (initiator/routing/agent/notification) and depending on your MSMP scenario (which defines which objects are processed by the MSMP requests).
- Implement the inherited class methods — in most cases you just need to implement the business logic in P_PROCESS method only. This method has fixed signature, so no dynamic ABAP coding skills are required to access the Request Header and/or Line Item fields (or MSMP rule execution context [see below]).
- Register and use the class-based rule in MSMP configuration and do not forget to transport your class together with MSMP configuration to test/production systems.
There are 36 root ABAP-classes named CL_GRAC_RULEAPI_*.
Classes can be divided into four categories:
- Agent Rules. Classes named CL_GRAC_RULEAPI_A_*
- Initiators. Classes named CL_GRAC_RULEAPI_I_*
- Routing Rules. Classes named CL_GRAC_RULEAPI_R_*
- Notification Variables Rules. Classes named CL_GRAC_RULEAPI_V_*
In every category there are nine classes, one for each corresponding MSMP process:
- CL_GRAC_RULEAPI_*_ACCREQ: Access Request (or HR Access Request)
- CL_GRAC_RULEAPI_*_CNTLASGN: Control Assignment
- CL_GRAC_RULEAPI_*_MITICON: Mitigation Control Creation
- CL_GRAC_RULEAPI_*_RARFUNC: Function Approval
- CL_GRAC_RULEAPI_*_RISKMAIN: Risk Approval
- CL_GRAC_RULEAPI_*_RISKREVI: Risk Review
- CL_GRAC_RULEAPI_*_ROLEAPPR: Role Approval
- CL_GRAC_RULEAPI_*_SPMAUDIT: Audit Review
- CL_GRAC_RULEAPI_*_UARREVIE: User Access Review
For example, the root class CL_GRAC_RULEAPI_I_ACCREQ is intended to be used as a super-class of your custom initiator for an access request class-based rule (
Figure 7), whereas CL_GRAC_RULEAPI_A_MITICON is to be used as super-class of your agent for mitigation control creation MSMP workflow rules.
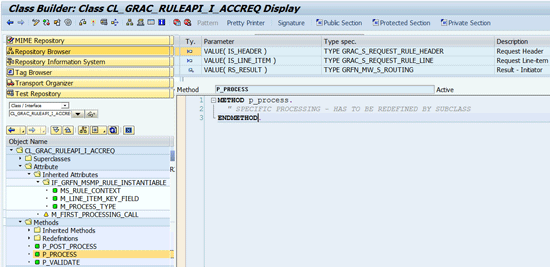
Figure 7
An example of a class-based initiator — main processing method signature and main class members
In advance, ABAP-based MSMP rules (in contrast to MSMP rules based on BRF+) do have access to MSMP runtime contextual information — aka MSMP rule context (represented by DDIC structure GRFN_MW_S_RULE_CONTEXT). This rule context contains additional information about the rule execution status and rule configuration (
Figure 8). From an execution context perspective, you can find information about which approval path or stage is executing the MSMP rule and for which request. You can also see the associated line items from the current processing group. From a configuration perspective, there is information about an agent purpose (notification versus approval with regard to agent rules) or information about routing level (stage versus line-item routing level with regard to routing rules). All those fields are exposed to your business logic, so if you really need it, you can create a flexible rule coding that makes the MSMP behave a different way in different approval paths.
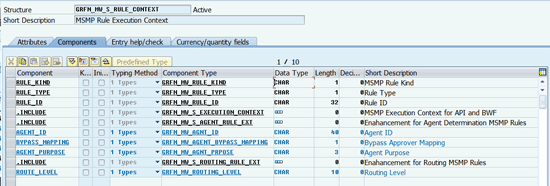
Figure 8
MSMP rule execution context structure for ABAP-based rules
Example 1: Custom Notification Variable
In this example, I demonstrate convenient use of ABAP class-based rules in a scenario in which I want to enhance MSMP notification messages by reusing
a
pre-delivered notification variables rule by adding a new custom notification variable (Z_ETA_TIME), representing an estimated time of request processing. In addition, by the same enhancement, I want to modify logic of one of the pre-delivered SAP variables (ATTACHMENT_REPORT).
In the next example I assume that you are familiar with MSMP notification configuration. Therefore, I only focus on main proof points.
Modify the text of the MSMP notification (sent on request submission) by adding your new variable Z_ETA_TIME into the text of the message (
Figure 9). Also pay attention to the HTML tags you use here to provide nicer notification message formatting and to include company logo into the message.

Figure 9
SE61 text of the message configured to be sent by MSMP once the request is submitted
As shown in
Figure 10, you have to register the newly defined notification variable Z_ETA_TIME in the configuration of the MSMP scenario — Access Request Approval Workflow. Otherwise the Z_ETA_TIME is not recognized as a variable and is not replaced by MSMP while sending the notification message.

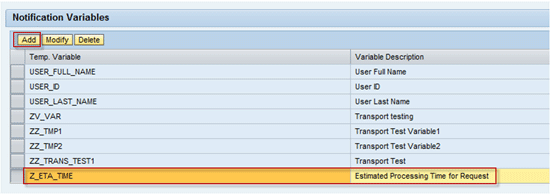
Figure 10
Register the custom variable in MSMP configuration
Use transaction SE24 — ABAP Class Builder — to create a new ABAP class named ZCL_RC_MSMP_CUSTOM_VARIABLES and inheriting from CL_GRAC_RULEAPI_V_ACCREQ (
Figure 11). This new class represents the logic of the notification variables rule that you are going to develop.
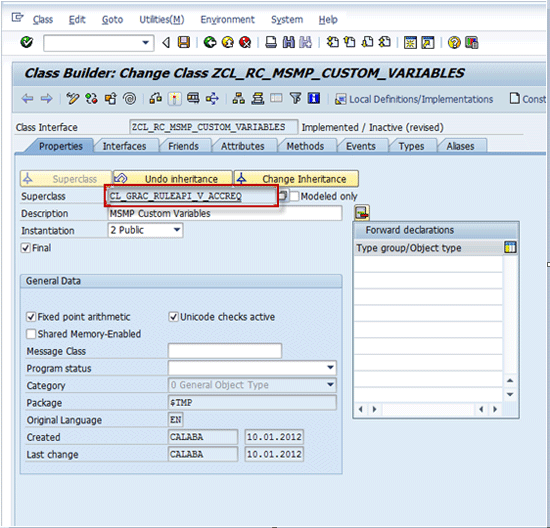
Figure 11
Create notification variables in a class-based rule
Redefine the method P_PRE_PROCESS (
Figure 12). To redefine a method in ABAP class builder (SE24), position the cursor on the inherited method name and press the Redefine button in the toolbar. The new (empty) implementation of the method is created where you can provide your own coding logic.
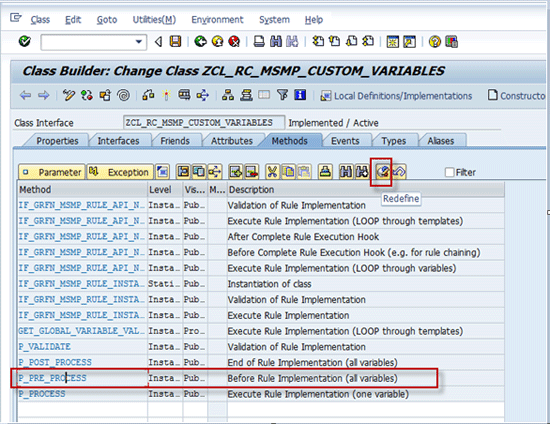
Figue 12
Redefine method P_PRE_PPROCESS
Now implement the new logic into the method P_PRE_PROCESS (
Figure 13). Do not forget to activate the newly redefined method (Activate button in the toolbar).
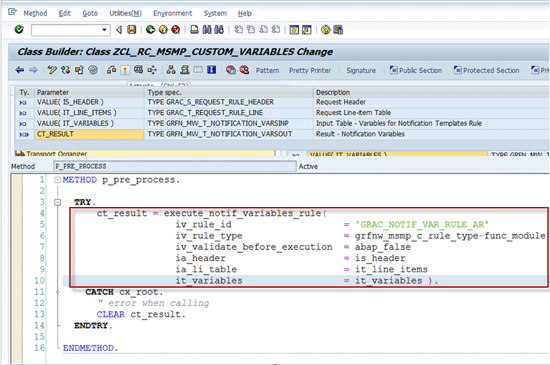
Figure 13
Implement redefined method P_PRE_PPROCESS
The method P_PRE_PROCESS is not the method for implementing the main rule logic (in this example, the business logic would be to provide the value of variable Z_ETA_TIME). Instead, you call the original pre-delivered notification variables rule of the access request MSMP scenario (implemented in function module GRAC_NOTIF_VAR_RULE_AR).
The reason to call the original SAP-delivered rule is to let the original SAP logic evaluate all by SAP predelivered variables. Because there is just one global notification variable rule per MSMP scenario, to get the values for SAP-delivered variables, you need to do the chaining of the original SAP notification variables rule and the new logic. The method P_PRE_PROCESS is an ideal place for doing it.
If you skip this step and don’t implement the P_PRE_PROCESS method as described, then the variable REQUESTER_NAME (also used in my example notification message) is not properly evaluated and thus rendered as empty.
Just as you have redefined the method P_PRE_PROCESS, now you redefine the method P_ PROCESS. Figure
14 shows the implementation of the true business logic of this rule.
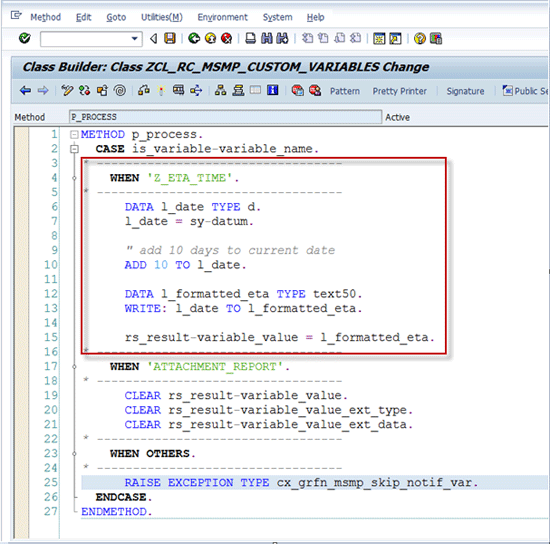
Figure 14
Implementation of method P_PROCESS
The logic implemented is: Replace variable Z_ETA_TIME with current date + 10 days.
You also modify the standard SAP-delivered variable ATTACHMENT_REPORT (which was evaluated by the P_PRE_PROCESS method logic already). In this case you clear the attachment type variable to suppress any attachment (irrespective whether it was or wasn’t provided by SAP logic). This step is just a demonstration how you can override runtime value of SAP predelivered variables.
Now that you have implemented the whole logic of the new notification variables rule, you need to register your new rule, ZCL_RC_MSMP_CUSTOM_VARIABLE, in the MSMP configuration and then replace the standard rule for notifications in MSMP configuration by the new rule (
Figure 15).

Figure 15
Configure use of MSMP notification variables rule
After registering the new rule and submitting a new request, the after submission notification (if properly configured) results in a notification message with both SAP and custom variables properly replaced (
Figure 16).
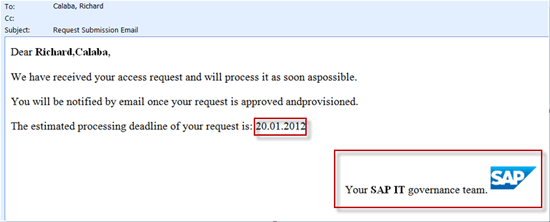
Figure 16
A notification message with replaced variables and HTML formatting
Custom Fields for Custom Functions
In a previous section of this article I covered the main framework — MSMP rules — designed to enable extension of MSMP workflow approval processes based on customer requirements.
Because the access request and role are main objects being processed by SAP Access Control application, those two objects are further enhanced to support the concept of custom fields (the customer can define additional fields in the header of access request and in attributes of role).
Custom fields are defined in transaction SE11 as the so-called ABAP data dictionary customer includes (
Figure 17). For a step-by-step description of how to define custom fields, check the SAP Note 1592286 - GRC 10.0 BRM - How to define Custom Fields.
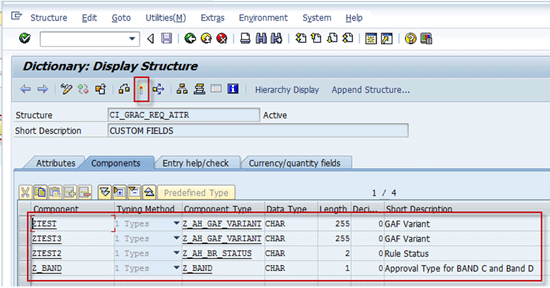
Figure 17
Custom include defining custom fields for the access request
The end user can now fill the custom fields on the UI for the access request and role (
Figures 18 and
19, respectively). Custom fields are further available in related workflow processes to be able to drive MSMP workflow logic. Thus, it is possible to develop custom business logic in MSMP rules that can access those custom fields and drive workflow logic based on values contained in them. This combination — MSMP rules and custom fields — is thus a very powerful extension concept of SAP Access Control workflow processes.
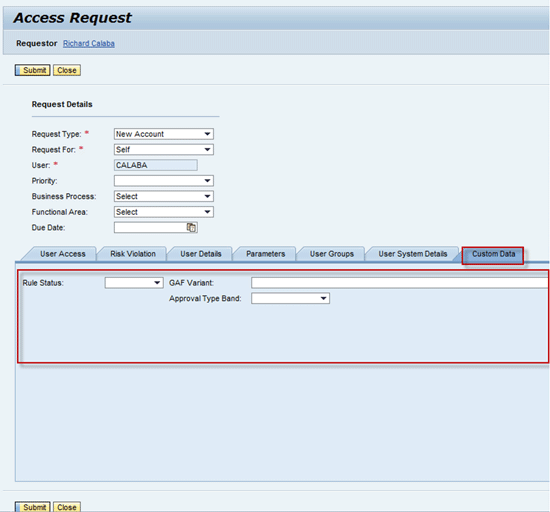
Figure 18
Custom fields of the Access Request header
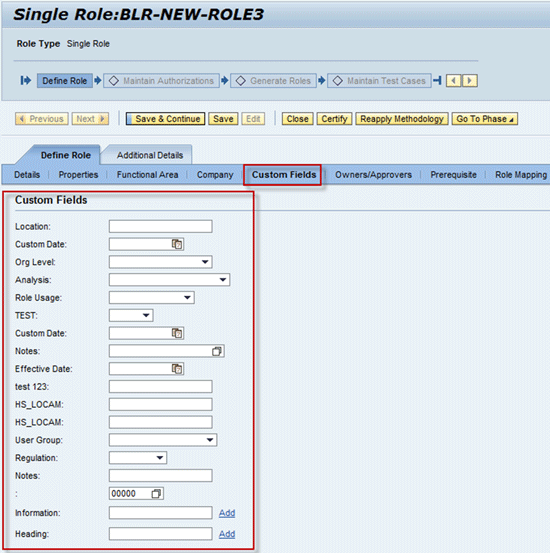
Figure 19
Custom fields of the Role object
Here is additional technical information related to custom fields.
The Access Request header features:
-
- The DDIC Custom Include name: CI_GRAC_REQ_ATTR
- Values of custom fields are persisted in DB table GRACREQ
The BRM role features:
-
- DDIC Custom Include name: CI_ROLE_ATTR
- Values of custom fields are persisted in DB table GRACROLE
- Role custom fields also available in Access Request line item level if the line item is representing Role
Here are the behavioral details of the SAP Access Control custom fields:
- All custom fields are SAP client independent (cross-client). Therefore, if you have several different SAP Access Control applications running in different clients of the same SAP system, the custom fields definition is shared across all your clients.
- Only single value attributes are supported (especially for workflow integration).
- DDIC/DB tables extension rules apply, be careful while defining custom fields as technically adding and later removing or changing custom fields (or their DDIC properties) can cause unwanted side effects (e.g., loss of data contained in those fields).
- Custom fields are also supported for extraction into SAP BW.
MSMP BAdIs: The Last Resort of Extension
As you have noticed from previous parts of this article, the main extendable concepts of MSMP workflow — the various MSMP rules — are already built into the MSMP workflow design. Nevertheless, in certain situations the concept of MSMP rules might not be completely sufficient to cover your customer-specific requirements. To handle such cases SAP has developed several BAdIs and positioned them on most important spots inside the MSMP engine.
Now I focus on the MSMP-related Business Add-Ins (BAdIs) from a high-level perspective, discuss their intention and what they can influence, and also mention their typical use. In fact, a few more BAdIs are positioned across the whole MSMP engine (i.e., SAP-internal BAdIs) and there are also some application-specific BAdIs (e.g., access request role search, training, and verification). However, I focus solely on the MSMP customer BAdIs.
Note
MSMP BAdIs can influence (override or enhance) the configured behavior of the MSMP approval process in various ways. As the auditability of MSMP request against preconfigured approval process is important feature of MSMP engine it was decided to implement automated logging of any alteration of preconfigured behavior if caused by MSMP BAdI. If this happens and MSMP BAdI influences the preconfigured behavior of MSMP request then a technical message is included into audit log of this request.
As in the case of MSMP rules, MSMP BAdI implementations also need to be transported to test or production systems together with the MSMP configuration to have the same behavior of the approval processes as in the development system.
Figure 20 summarizes the major MSMP BAdIs I have in context of my favorite picture demonstrating the MSMP request lifetime.
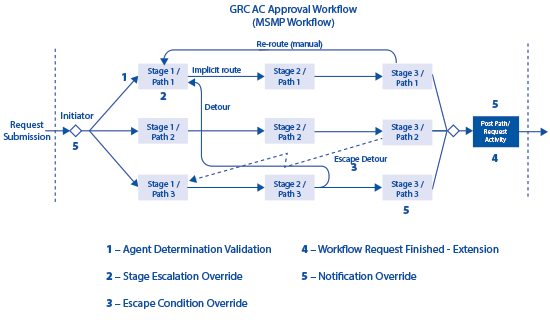
Figure 20
Customer MSMP BAdIs
General guidance on how to implement the SAP BAdI can be found in documentation of transaction SE19 – BAdI Builder. MSMP uses so-called new BAdIs (an old concept that is not used by MSMP is called classic BAdIs). The main steps to implement MSMP BAdI are:
- Create implementation of MSMP enhancement spot
- Within the enhancement spot create a related BAdI implementation by creating a custom ABAP class based on the class interface defined in the BAdI definition
- Redefine the corresponding methods of the BAdI interface in your custom ABAP class and implement ABAP code logic inside the methods
A sample step-by-step BAdI implementation is also described in SAP Note 1589130 - GRC AC 10.0 - MSMP Notification Override BADi – Enabling, and in SAP Note 1738377 - UAM: BAdI for end of path notification.
Five main BAdIs allow you to alter certain functionality happening inside the MSMP engine. I describe them in detail.
1. Agent Determination Validation BAdI
The agent determination validation BAdI is implemented by enhancement spot GRFN_MSMP_APPROVER_VALID_ES. The implementation interface is IF_GRFN_MSMP_VALIDATE_APPROVER.
It allows you to override the result of agent determination logic (executed by the agent MSMP rule in many cases). This BAdI is invoked after the standard agent determination is executed by MSMP. There is an SAP-delivered implementation of this BAdI:
CL_GRFN_MSMP_VALIDATE_APPRWARN
This implementation issues a warning if any of the resolved user IDs are not a valid user ID in the current SAP system (and client). In such cases the invalid user ID is automatically removed from the approver list to ensure that invalid user ID does not cause that whole approval workflow process to be stopped.
This implementation is by default switched on if you install the new SAP Access Control application (it can be switched off or replaced by your own approver validation logic).
Here is a potential use case for this BAdI. On top of your approver determination logic (which focuses just on resolution of user ID) you want to ensure that the user ID (if resolved as MSMP approver) has in advance certain authorization (role, profile) assigned in the SAP system. You can implement those additional authorization checks for resolved approvers (
Figure 21).
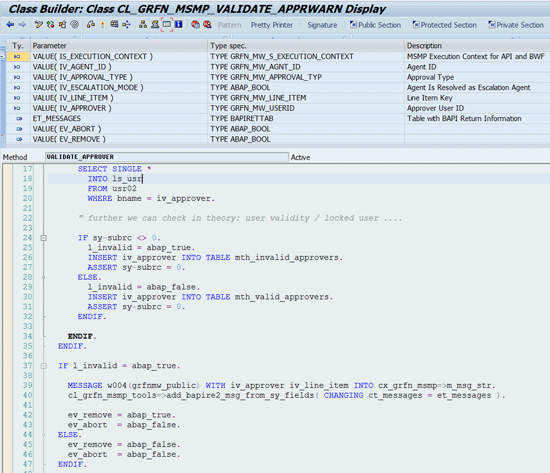
Figure 21
Sample BAdI implementation — Approver validation
2. Stage Escalation Override BAdI
The stage escalation override BAdI is implemented by enhancement spot GRFN_MSMP_ESCALATE_OVERRIDE_ES. The implementation interface is IF_GRFN_MSMP_ESCALATE_OVERRIDE.
During an MSMP approval process any stage can be escalated in case approval/rejection (for all line-items in the stage) is not completed in the configured time. If this happens, the request moves to the next stage or is sent to another approver (according to the configured stage escalation settings).
Before escalation is processed, this BAdI is invoked to provide a last chance to override escalation of the stage. By default all items in the request are escalated together (also the line items which were already approved). This behavior can also be overridden by the BAdI implementations to escalate only the not-yet-approved line items of the stage.
Note
If stage escalation is not configured in the MSMP scenario, this BAdI is not invoked.
Here is a potential use case for this BAdI. During escalation of the approval stage (approval takes longer than expected), you want to escalate only line items that are not yet approved (by default if escalation happens all line items are escalated). To achieve that you can set the returning parameter CV_DO_NOT_ESCALATE_APPROVED (
Figure 22).
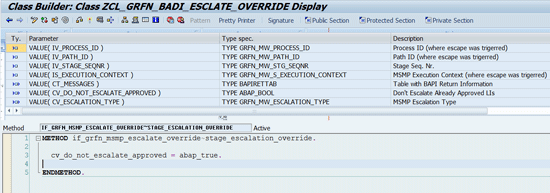
Figure 22
A sample BAdI implementation — escalation override
3. Escape Condition Override BAdI
The escape condition override BAdI is implemented by enhancement spot GRFN_MSMP_ESCAPE_OVERRIDE_ES. The implementation interface is IF_GRFN_MSMP_ESCAPE_OVERRIDE.
During the MSMP approval process the approval path can be redirected to the escape path (if configured). Currently supported escape options are:
- Agent resolution doesn't return at least one valid approver for ALL line items
- The auto-provisioning call at the end of the approval path fails for some line items
If escape happens this BAdI is invoked to give a last chance to override escape behavior. It also means that if escape is not enabled by the MSMP configuration, the BAdI is not ever invoked.
Here are some potential use cases for this BAdI. By default, there is one global escape path defined in the MSMP configuration. This BAdI can override the escape to direct execution into a different path than the one globally configured (by overriding the output parameter CV_ESCAPE_TO_PATH_ID value).
By default, the escape from the escape path is not allowed (to avoid endless loops). By setting the output parameter CV_ALLOW_LOOP_IN_ESCAPE (
Figure 23), you can allow endless escape logic. However, keep that in mind to make sure that you won’t end up in an endless loop.
A good example can be provisioning failure escape. If it happens (i.e., because the remote system is temporarily down), you can have the request being sent into the manual stage in the special path. The operator can wait until the system is up again and then can finalize the provisioning actions and close the request successfully.
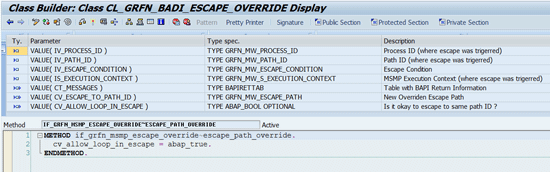
Figure 23
A sample BAdI implementation — Escape Override
4. Request Finished BAdI
The request finished BAdI is implemented by enhancement spot GRFN_MSMP_REQUEST_FINISHED_ES. The implementation interface is IF_GRFN_MSMP_REQUEST_FINISHED.
It is the generic BAdI for enabling customer-specific extensions whenever MSMP request runtime status changes (to finished or cancelled or aborted).
One potential use case for this BAdI could be that you want to trigger additional post-provisioning actions in connected systems after the MSMP request is closed (e.g., in case of user provisioning [account creation], you want to associate the business partner with the newly provisioned user account).
As you see in
Figure 24 there are three different methods of this BAdI that are invoked in case request:
-
- Is successfully closed (approved, partially approved) – method FINISHED is called
- Is rejected – method CANCELLED is called
- Method ABORTED in case that cancellation of request didn’t work (technical reasons) and a hard kill of the request needs to be done instead.
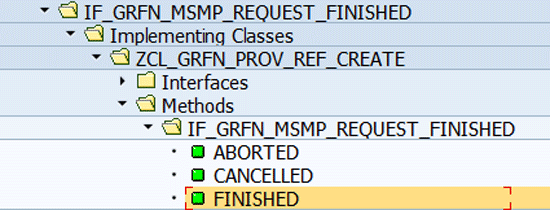
Figure 24
A BAdI for Request Finished - methods available (transaction SE80/SE24 – class builder)
5. Notification Override BAdI
The notification override BAdI is implemented by enhancement spot GRFN_MSMP_NOTIFICATION_ES. The implementation interface is IF_GRFN_MSMP_NOTIF_OVERRIDE (
Figure 25).
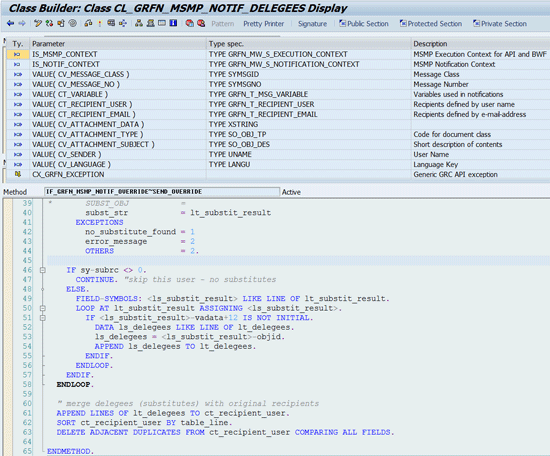
Figure 25
Sample BADI implementation — Notification Override
It is the generic BAdI exit called from MSMP runtime whenever any MSMP notification is being sent. The BAdI’s interface allows overriding everything what is being used when constructing the notification message (recipients list, text of the message, notification variable values used in the body of the message, attachment of the message, and so on).
Here are the potential use cases for this BAdI. If you want to send duplicate notifications to workflow delegates, you can use a pre-delivered BAdI implementation. The end user can specify its own delegates (aka substitutes) on the user interface (UI) if, for example, he or she goes on vacation. In such cases those specified delegates are allowed to approve or reject requests on his or her behalf, but they won’t normally get MSMP notifications unless the provided class CL_GRFN_MSMP_NOTIF_DELEGEES is plugged in as one of this BAdI’s implementations.
To enable sending notifications to all users of multiuser access requests, you can use a provided BAdI implementation using class CL_GRFN_MSMP_NOTIF_MULTIUSER. You can also disable sending all MSMP notifications to particular users and emails by clearing the CV_RECIPIENT_USER and/or CV_RECIPIENT_EMAIL output variables.
Based on notification message recipients, you can completely alter the message (or even evaluate variables or attachments). For example, in case you want to send a password inside the message after successful account provisioning – instead of sending one email to all notified users – you can use this BAdI to send several emails targeting every user specifically (no CC, BCC fields).
Richard Calaba
Richard Calaba, MSc, is director and principal solution architect at SAP America Inc. in the company’s Value Prototyping group. Prior to this position, he worked for four years at SAP Labs LLC as a development architect and later chief development architect for the SAP Access Control 10.0 product. Before he joined SAP in 2001, Richard studied computer science at Charles University in Prague, Czech Republic. Richard currently lives in Palo Alto, California.
You may contact the author at
richard.calaba@sap.com.
If you have comments about this article or publication, or would like to submit an article idea, please contact the
editor.