Learn how to easily transport a company code’s chart of accounts from a development system to other environments by modifying a transport request.
Key Concept
You can use transport requests to transport customizing settings from one SAP environment to other SAP environments. Another way to use a transport request is to transport master data, in particular a company code’s chart of accounts.
Any modifications for an SAP system are first set up in a development environment. After they are finished, they are transported to other SAP environments, including the production system. These modifications may lead to modifications in a company code’s chart of accounts; for example, the handling of automatic bank transfers may lead to additional accounts. You would like to transport these modifications in the chart of accounts as well.
I’ll describe a method in which you can easily include a modified company code’s chart of accounts in a transport request and transport the request to the SAP environments where you need the chart of accounts. These environments depend on your individual circumstances, but some examples include test or production environments. In my example, I will create a transport request for company code 1000 that uses a chart of accounts called INT. The screenprints I use are from SAP ERP Central Component (ECC) 6.0. The same solution is also possible in R/3, but the screens look different.
Before I describe this method, I’ll provide a glimpse into two standard methods SAP provides and describe their benefits and limitations. The first method usually applies when you first set up a new company code, and it involves copying all customizing settings into a transport request. The second method transports the chart of accounts using two transactions.
SAP Standard Methods
SAP has created two standard ways to copy a company code’s chart of accounts to different SAP environments.
1. Use transaction EC01 or follow menu path Enterprise Structure > Definition > Financial Accounting > Define copy delete check company code. In the pop-up screen that appears, choose Copy, delete, check company code. To include the customizing settings in a transport request, follow the menu path Organizational object > Transport org.object > Transport. On the pop-up screen that appears, enter the company code for which you want to transport the settings. The system then asks you for a transport request number.
You would use this method in situations in which you have set up a new company code in the development system. Using this method, you copy all settings, including the chart of accounts, for the new company code from an existing company code and include it in a transport request.
Although this is normally done when you set up a new company code, you can also do it at a later stage. However, the transport created using this method contains all customizing settings, which makes it risky because you may include settings you don’t want to transport.
2. A second method to transport a company code’s chart of accounts uses transactions FS15 and FS16. This method is very simple to use in situations in which the sending and receiving system are located on the same server. If they are on different systems, you need to involve a Basis consultant to help you define the correct file locations. A disadvantage of this method is that you need to make sure that the company code’s chart of accounts copies to all relevant environments. For more information on this method, see Quentin Hurst’s article "Keep Your Chart of Accounts in Synch Across Clients and Environments".
Manually Create Transport Requests
A third, less known method uses a manual modified transport request containing all or a selection of a company code’s G/L accounts. This is a useful method if you make changes to a company code’s chart of accounts in a development system and later want to move these changes to your other SAP systems, such as the quality assurance and production systems. An advantage of this method is that you can use your standard procedures for transport requests, thus ensuring the data is copied to all relevant environments. It also has the ability to select specific G/L accounts to be transported.
Step 1. Create a transport request that you use later to transport the company code’s chart of accounts. To do this, use transaction OBY9 or follow menu path Financial Accounting > General Ledger Accounting > G/L Accounts > Master Records > Transport Chart of Accounts. Create a new transport request by clicking on the create icon  (Figure 1). I created a request called EC6K900109.
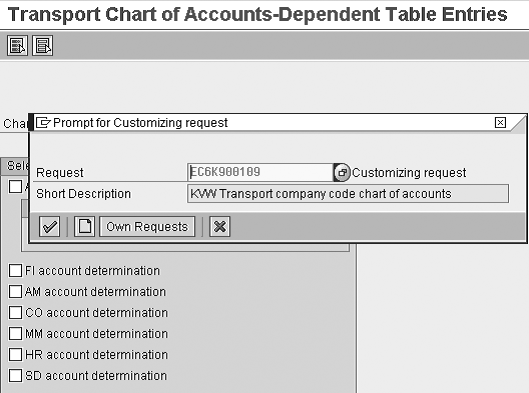
Figure 1
Create transport request
After you create a request, you can complete the transport settings as shown in Figure 2. You then need to enter the name of the chart of accounts and press Enter. In my example, I entered the name INT.
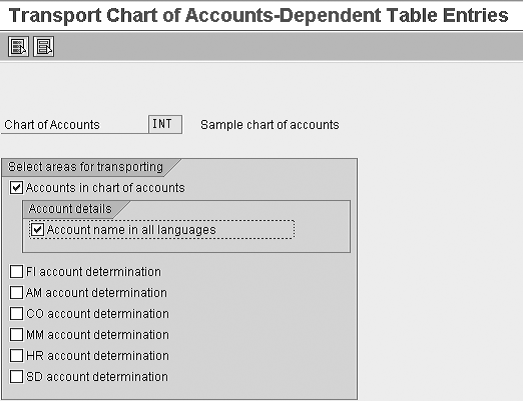
Figure 2
Indicators used in transaction OBY9
Next, indicate that you want to transport the accounts in the chart of accounts. Under Account details, you can transport the names of the accounts in all languages (Figure 2). Because you only want to transport G/L account master data, you don’t need to click on any of the other indicators as that would lead to the transport of customizing settings. When you are finished, click on the Save button.
Step 2. Modify the transport request so you can transport accounts to different SAP environments. Use transaction SE10, the transport organizer, and select the transport request you created in the first step. In my example, I need to select transport request EC6K900109 (Figure 3).
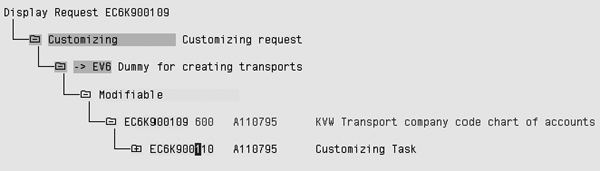
Figure 3
Select the transport request you created in the first step in transaction SE10
Note
Changing a transport request should always be done very carefully by knowledgeable people. Incorrect changes may lead to inconsistent data.
The screen shows two lines under the term Modifiable: the transport request and its underlying task. Double-click on the words Customizing Task to get to the object list (Figure 4). The object list contains all of the objects that are included in the transport. The objects with object name INT contain information about the chart of accounts INT and about the general data of the G/L accounts. Object NINT contains the description of the G/L accounts in Dutch (language code N) and object EINT contains the description of the G/L accounts in English (language code E).
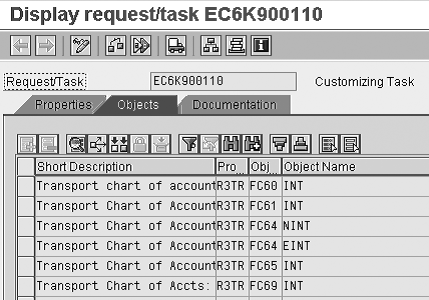
Figure 4
Object list in the transport request
Because the transport request doesn’t contain any objects for the company code’s G/L accounts, you need to add the object for the company code’s chart of accounts to this list manually. Change from display mode to change mode by clicking on the display/change icon  . Click on the insert row icon
  to add an additional object to the list.
A new line appears and you then enter the following data in the appropriate column:
- Program ID: R3TR. This program ID is part of the object key.
- Object Type: TABU. This indicates the kind of object you need to transport. TABU indicates that the object is a table.
- Object Name: SKB1. SKB1 is the SAP table containing the chart of accounts data on company code level.
Press Enter and the screen in Figure 5 appears.
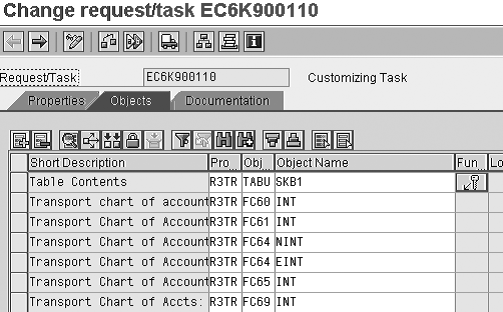
Figure 5
Object list with new request
Now you indicate which company code and which accounts you need to include in the transport. Click on the key icon  to enter the key fields. On this screen, click on the display/change icon so you can enter the key fields. Figure 6 shows the screen with the key fields. The key field consists of a client number (three characters), a company code number (four characters), and a G/L account number (10 characters). Enter the key carefully because mistakes can lead to incorrect data in the environments to which you move the transport request.

Figure 6
Enter key fields for G/L accounts
In my example, the key has the value 6001000*. This reflects the client number 600, the company code number 1000, and the wildcard * for the G/L account number, which I used to represent other characters in a search string.
Note
If you need to transport more than one company code, you can easily add an additional line on the screen shown in Figure 6 using the same process.
Save your entry and release the transport request using transaction SE10. Now you can transport the accounts to a different SAP environment using transaction STMS. The procedure for transporting transport requests is company specific; therefore, I’m providing no further explanation on this process.
Kees van Westerop
Kees van Westerop has been working as an SAP consultant for more than 25 years. He has an MBA degree in mathematics and a degree in finance. Kees has been concentrating on the financial modules, especially in general ledger accounting, cost center accounting, and consolidation. He also has a great deal of experience with rollouts of kernel systems and integrating finance and logistics.
You may contact the author at keesvanwesterop@hotmail.com.
If you have comments about this article or publication, or would like to submit an article idea, please contact the editor.