Discover how to leverage, configure, and execute the business requirement of collaborative demand planning using SAP Advanced Planning and Optimization (APO). Find out how to use the collaborative demand planning functionality of APO for a consensus demand forecast.
Key Concept
Collaborative demand planning is an agreement between business partners on demand quantity for a specific time period. Collaborative demand planning provides organizations with the benefit of developing an accurate demand plan with better communication, transparency, and quick decision making by involving business partners.
Consider this scenario: ABC organization faces issues with key customers to meet the supply per their demands. Top management is also thinking of mergers and acquisitions to expand the ABC’s profitable products’ market and reduce its loss-making products’ market.
ABC’s customers have a very flexible demand plan, and there is a delay in communication from the customer side. Therefore, ABC cannot take any quick action to align customers’ demands for supplying goods on time even though it is a profitable product. In other words, ABC can’t meet the key performance indicator (KPI) for customer service for profitable products.
ABC wants to collaborate with its key customers to get a consensus on forecast demand, quick communication, and alerts on the demand plan. ABC does not want to share more information with them (e.g., inventory or profit margins) for the next one or two years. Supply Network Collaboration (SNC) requires more information sharing than APO, so ABC chose to use APO rather than SNC.
The Business Challenges
ABC organization is using SAP ERP Central Component (ECC) 6.0 and APO 7.0 for supply chain business processes. Currently, ABC faces a myriad of major challenges to meet customer demand and align it with the supply. On the demand planning side, ABC has these requirements:
- Quick corrective action on the flexible demand changes from customer
- Availability of real-time demand information from customer
- Consensus-based forecast demand plan by involving customer
- Visibility of demand
- Transparency of demand
ABC’s IT department faces these challenges:
- It needs to understand the business requirement for selecting the right SAP product for collaboration with business partners.
- It must maintain an IT budget for purchasing new software products and implementation costs.
After a detailed study of the business requirements and challenges, ABC organization decided that the most suitable and optimized business solution would be to leverage APO 7.0 without adding any new hardware or software. With regard to business process functionality, ABC organization focused on implementing collaborative supply chain planning for collaborative demand planning for consensus demand planning.
Note
Collaborative demand planning is a functionality in which Internet Transaction Server (ITS) technology is involved to get consensus from the partners. Consensus demand planning is an agreed upon demand plan of all the stakeholders. A consensus can be taken manually or involving any ITS or web technology.
It also has the option of using collaborative promotion planning. Using APO 7.0’s collaborative demand planning functionality, ABC’s demand planner and customers can collaboratively develop a consensus-based demand plan and update it regularly based on agreed upon information shared over the web.
An Overview of Supply Chain Collaboration
Supply chain collaboration with a business partner is a necessity to stay competitive in the global market. SAP provides supply chain collaboration functionality in SAP Advanced Planning and Optimization (APO). In APO, supply chain collaboration functionality has been available since version 3.0, but organizations had to install a separate ITS. Beginning with SCM 4.1, however, an ITS became part of the SCM server and you no longer had to install a separate ITS.
Also, as of release 6.4 of the SAP Web Application Server, a large part of the SAP ITS was integrated in the kernel of the SAP Web Application Server called SAP Integrated ITS.
Note
Microsoft Internet Explorer 5.0 and higher is required for a collaborative partner to access the authorized collaborative business process data via a web browser. Refer to SAP Note 709038 (SAP Integrated ITS) for more information.
APO supports collaborative demand planning functionality. This functionality uses SAP Web Application Server, which is integrated with ITS technology. It enables you to access an organization’s SAP APO system-authorized collaborative demand planning data and execute required transactions on the Internet. APO’s collaborative demand planning functionality makes authenticated demand planning data available on the web for internal and external business partners for collaboration. Collaborative demand planning ensures that all partners agree on the defined quantities, planning horizons, and conditions to achieve the objective of collaborative demand planning.
I explain how ABC organization performed collaborative demand planning with the improved technology and functionality that SCM 7.0 provides. First, I take a look at the system architecture of SAP APO 7.0.
System Architecture
Collaborative demand planning in APO 7.0 is based on ITS built-in technology. It features predefined HTML-based collaborative templates so collaborative business partners (e.g., a customer) can access ABC’s collaborative demand planning data via a web browser.
Figure 1 outlines the system architecture for APO 7.0’s collaborative supply chain planning functionality.
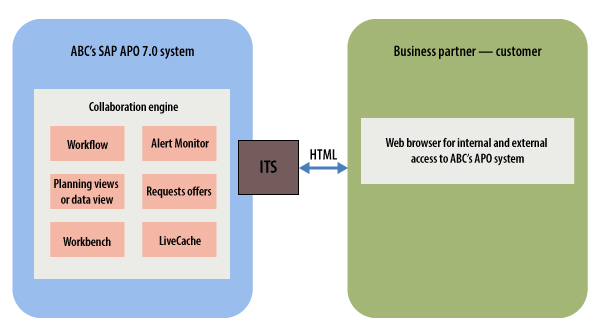
Figure 1
System architecture for collaborative demand planning
In my business scenario I have considered manual data transfer of ITS. The other option is automatic data transfer. With this option, an SAP middleware technology connector requires XML data exchange and internal links to connect a partner and a customer’s SAP or non-SAP systems. I think manual data transfer of the ITS option is better because it offers you the following benefits:
- Demand data maintenance by business partners is via a web browser interface.
- Only Internet access is required by business partner users. (The business partner is not required to invest any additional cost; it just is required to have Internet access with Internet Explorer.)
Prerequisites for Execution of the Collaborative Demand Planning Business Process
To execute the business process in the APO system, ABC had to complete several prerequisite steps. Agreement on the business processes in scope needed to be reached between the ABC and business partner for collaborative demand planning.
ABC’s system administrator had to configure all collaborative planning-related settings in the APO system. The system administrator also needed to complete all configuration settings for collaborative demand planning and user management. The collaborative partner’s user has informed the user of his or her credentials, such as user ID, password, and web URL.
The SAP system and master data for execution of the business process should be ready. (The collaborative business process requires SAP SCM 7.0 and higher. ABC’s system is SCM APO 7.0 with enhancement package 1.)
The planning book or data view needs to be configured to access the demand forecast data by users. In my example I have configured the following planning books and data views:
- ABC’s demand planner: planning book – ZCLP and data view - ZCLP_DEMAND_PLANNER
- Collaborative partner: planning book - ZCLP_CUST and data view -ZCLP_CUST_DATA_VIEW
The master data in the APO system needs to be set. In my example I have master data as follows:
- Product: SP01, SP02, SP03
- Plant: 1000, 2000
- Customer: 1500, 2000
Characteristic value combinations (CVCs) have to be created for product, plant, and customer.
Execution of the Collaborative Demand Planning Business Process
Figure 2

Figure 2
Collaborative demand planning data flow
The first step is for ABC’s demand planner to prepare the initial demand plan using interactive demand planning in the APO system. To complete this step execute transaction code /SAP/APO/SD94 – Interactive Demand planning for required products, location, and customers (
Figure 3).

Figure 3
Prepare an initial demand plan
The demand planner has to access planning book ZCLP and data view ZCLP_DEMAND_PLANNER for preparing the initial demand (e.g., product SP01 and customer 1500) and load the data for product SP01, customer 1500, and location 1000.
To select the Planning Book/Data View, the planner has to look at the left-hand side of the window on the screen after executing transaction /SAPAPO/SD94. The planner needs to complete the following steps:
- Under the Planning Book/Data view list, select one that is required.
- After selecting the Planning Book/Data view, in the Selection profile section, select the selection ID that was created before (in my example, it is ZCLP_SP01_1500),or in the Selected Objects area, choose Customer as 1500, APO Product as SP01, and APO Location as 1000.
- After the data is loaded in the planning book, the demand planner has to maintain the demand quantity in the time buckets. In the time buckets any quantity can be changed based on the planner’s experience. The planner can edit it per the business requirement. In my example the demand planner prepared an initial demand plan in the key figure Customer Forecast/Demand for a weekly bucket (the row highlighted in red).
- After you enter your data click the save icon.
The demand planner needs to execute the stats forecast based on pre-defined statistical forecast settings. In my example I have executed it interactively. To complete this step execute transaction code /SAP/APO/SD94 or follow menu path SAP Easy menu APO > Demand Planning > Interactive Demand planning. Select planning book ZCLP and data view ZCLP_DEMAND_PLANNER. Select the product (e.g., SP01), customer (e.g., 1500), and location (e.g., 1000) as shown in
Figure 4.

Figure 4
Execute the statistical forecast
Click the statistical forecast run icon to execute the statistical forecast interactively. The next screen (
Figure 5) displays the results of the interactive forecast run. Press Cntrl S to save these results for analysis.

Figure 5
Interactive forecast run details
After the statistical forecast is executed, the demand planner analyzes the results. For example,
Figure 6 shows results for product SP01 and customer 1500.
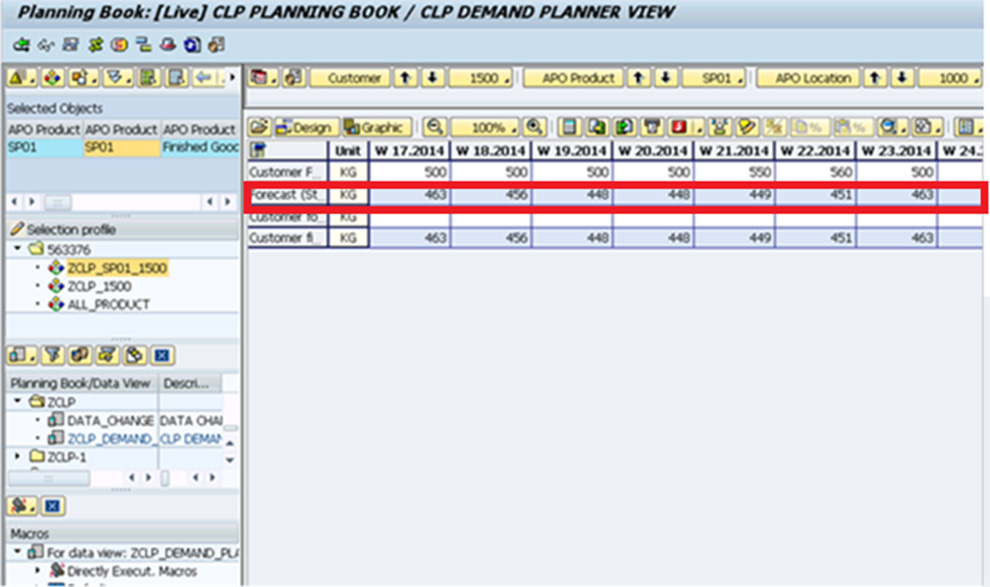
Figure 6
Results of a statistical forecast
Now ABC’s demand planner manually or via the APO system sends an email to the collaborative partner to inform the partner’s demand planner that it is time to review the results for consensus.
Note
ABC’s demand planner sends an email for information. The system already updates the details, and the business partner can view the same data.
In the second step, the collaborative partner’s user accesses the system with his or her credential via the web browser. The user sees the default planning view and the data view per the access pre-defined for him or her (
Figure 7).
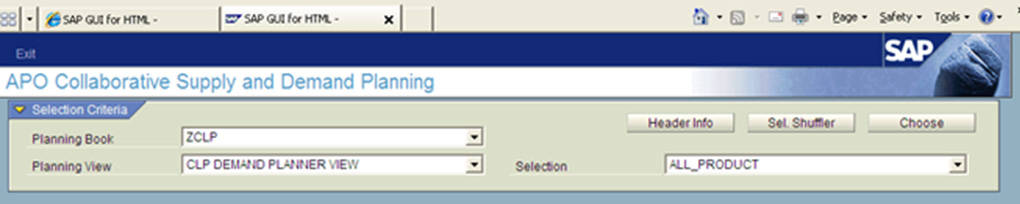
Figure 7
The initial screen for the collaborative partner’s successful login per the authorization
Figure 8
Figure 8
The demand plan by a collaborative partner
Now the demand planner reviews the demand plan for the products. If any changes are required, the demand planner clicks the change mode icon (the pencil) to change or adjust the customer forecast quantity against the key figure customer forecast adjustment for the planning period.
For example, imagine that a customer did the adjustment per the requirement for weeks 17, 18, and 19 (
Figure 9). The quantity is reduced by 100 in week 17, 50 in week 18, and 25 in week 19 as there are fewer requirements.
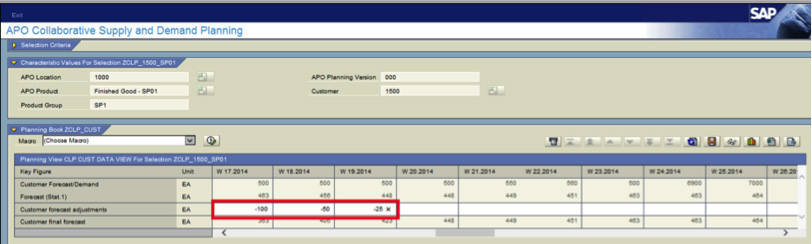
Figure 9
A customer has adjusted a key figure
The user can make changes in the planning book data only in change mode. The planning book is designed for editing by business partners. After you adjust the customer forecast quantity, execute the default macro to calculate the key figures for the customer’s final forecast as consensus demand (
Figure 10).

Figure 10
A customer’s final forecast as consensus demand
The user can write a note for adjusted forecast quantity for future reference. To enter the note, select the cell and then click the switch on note mode icon (the icon in the top right corner of
Figure 11). In the lower left section of
Figure 11, write the note for the selected cell and click the Save button to save it. Now you can see the note icon beside the cell in which you added the note.

Figure 11
Writing a note for an adjusted forecast quantity
After you save your note, the notes icon appears in cell W 17.2014 (
Figure 12).
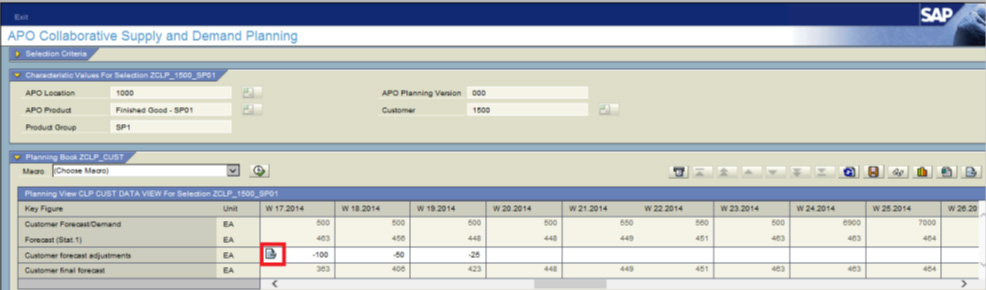
Figure 12
The notes icon in a cell
If you want to delete any notes, select the note in edit mode. Select the edit icon

to make any changes in the editable cells of the planning book. Click the Delete button to delete any notes (
Figure 13).
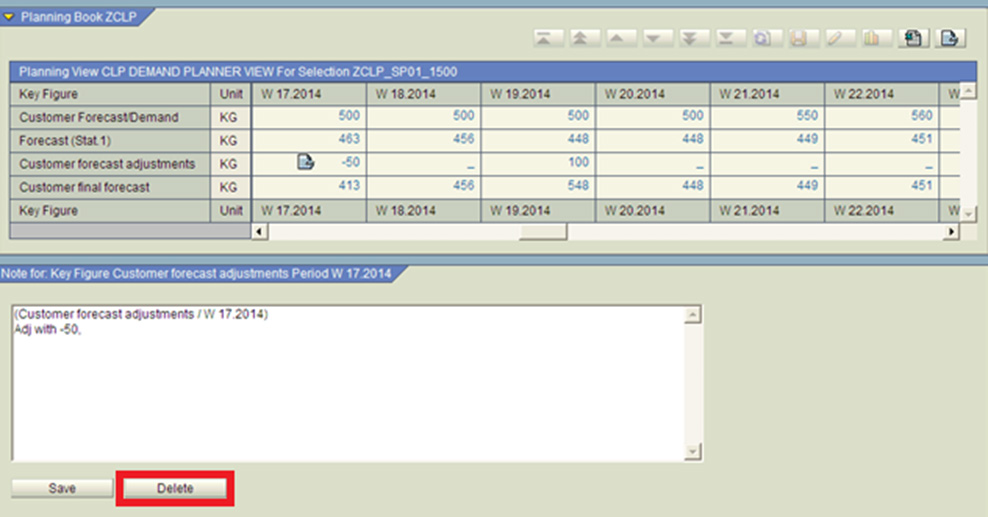
Figure 13
Deletion of notes
After you maintain all the notes, click the switch off note mode icon

To view planning data in a graphical format, click the graphical view icon

. After viewing the graphical data, you can switch off the graphical view by clicking the graphical view icon again. Click the save icon

to save changes in the planning book.
Windows Internet Explorer shows the following message: Data saved successfully (
Figure 14). Data saved by the collaborative partner is saved on ABC’s APO system. Click the OK button.
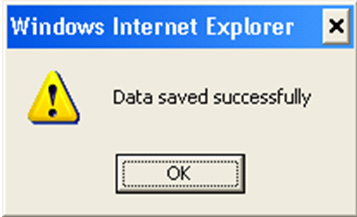
Figure 14
Windows Internet Explorer displays a message that data was saved successfully
You can download the planning book for further processing or analysis (while downloading data in Excel format, the system does not download note details). Click the display icon

. In display mode, the save and refresh icons are disabled. After all your related work is done, click the Exit button to exit your web browser (
Figure 15).
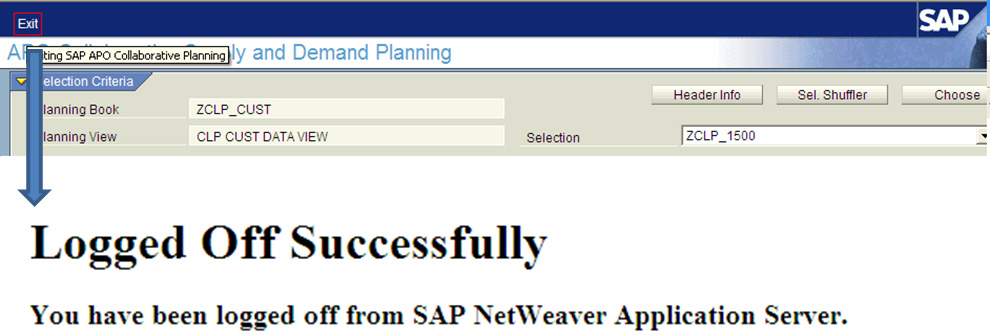
Figure 15
Exit the web browser
In the third step ABC’s demand planner needs to execute the following steps in ABC’s APO system to set up interactive demand planning. Then the demand planner can view the customer forecast adjustment and consensus demand plan received by customer. First, ABC’s demand planner executes transaction /SAPAPO/SDP94 and accesses the planning book ZCLP and data view ZCLP_DEMAND_PLANNER with the selection of product SP01 and customer 1500.
If a web user has not logged off successfully, a screen appears with a message to the other user that his or her selection is locked by another user (
Figure 16).

Figure 16
A message indicating that the selection is locked by another user
Figure 17Figure 17Figure 17

Figure 17
Consensus received by ABC’s demand planner
The demand planner can now finalize the consensus demand plan for further processing (e.g., release demand plan to supply network planning).
To view the alerts during the execution of the business process, ABC’s demand planner and the collaborative partner execute exception-based planning (i.e., alerts). The collaborative partner can log on to the web browser of Alert Monitor with credentials and view alerts and take action on them (Figure 18).
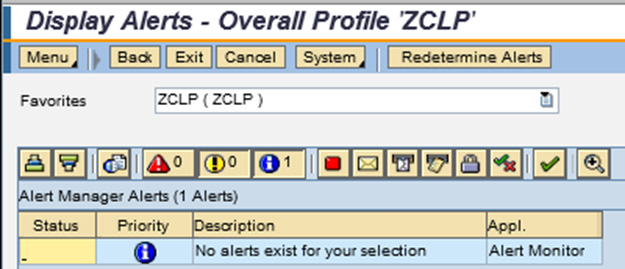
Figure 18
The Alert Monitor
Note
The Alert Monitor can be used anytime while executing the business process.
Click the Exit button to exit the Display Alerts screen (
Figure 19).
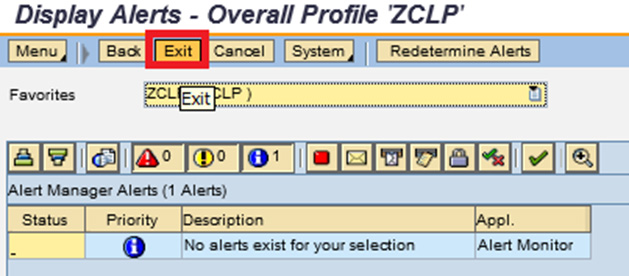
Figure 19
Exit the Display Alerts screen
After you click the Exit button, another screen appears (
Figure 20).

Figure 20
Exit the Alert Session
After pressing the Exit session button, a pop-up screen appears for confirmation to exit the session. After you click the Yes button, the following message appears: Logged Off Successfully (
Figure 21).
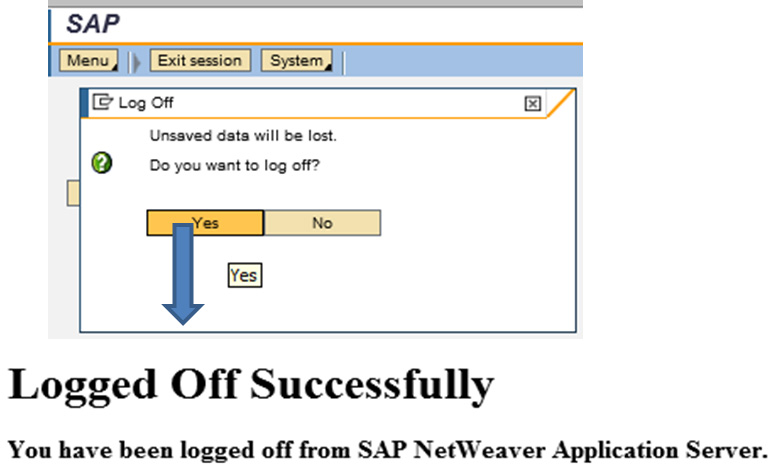
Figure 21
Alert Monitor exit — logged off successfully
Collaborative Demand Planning Tips
Here are some tips to keep in mind while using collaborative demand planning with APO 7.0:
- The main purpose of APO collaborative supply and demand planning is to collaborate with business partners for a simple process of accessing a small dataset via a web browser.
- The collaborative partner can view limited data per the pre-defined selection profile assigned to his or her user profile.
- The collaborative partners have restricted data edit functionality. If they have new product demand that is not in a pre-defined selection, then they have to be connected with their partners’ planners to add products in the selection profile.
- Collaborative partners can view the data per the pre-defined template.
- Collaborative partners have to open different URLs for different collaborative functionalities (for example, one for demand planning and another for Alert Monitor). ABC can provide a customized web URL in which all the related URLs are available on one page.
- The selections should be assigned to a user inside the APO system. If the Shuffler/Header check box is set in user settings for collaborative planning (transaction code /SAPAPO/CLPSDP_USER), the user is authorized to maintain his or her own selections.
- Notes management is not supported if a selection includes navigation attributes, entry with wildcard ‘*’, interval, or characteristic with several value restrictions.
- Transaction code /SAPAPO/CLPISDP was developed especially for the web function. This transaction opens a browser and executes the CLPSDP (collaborative supply and demand planning) web browser.
- Execute transaction code /SAPAPO/CLPISDP and follow menu path Advanced Planning and Optimization > Demand Planning > Collaborative Demand Planning > web service for collaborative supply and demand planning. The best practice is to share the URL with the collaborative partner, and the collaborative partner uses the same URL for collaborative demand planning functionality.
- Design of the planning book should be very simple. It should not contain key figures that are not relevant for the collaborative partner. The time bucket should be reduced as much as possible.
- The number of characteristics should be minimized for disaggregated status in a selection. If the business has the requirement to see many characteristic values, divide the selection into smaller ones.
- To log off from the collaborative planning web browser, do not close the browser directly (using X or choosing Close from the menu). Use the Exit button inside the collaborative planning web browser. Otherwise, the system remains connected with the ABC organization’s APO system. If the system is still connected with ABC’s APO system, the other user receives a message that the selection is locked by another user.
- If you are using ITS 6.20 with patch level 7 or higher, you can set the parameter ~disconnectonclose to 1 so that the session terminates when you close the browser or change the URL. If you use a lower ITS release and patch level, click the EXIT button to log off.
- The decimal settings must be the same in the Regional Settings in the operating systems (for example, Windows NT and in the APO system’s user profile).
- For more functionality, such as orders forecast monitoring of collaboration required, use SAP’s Supplier Network Collaboration application.
- Use standard available authorization objects that are available for customer or organization enhancements.
Collaborative Planning System Settings for a Web Browser
ABC’s system administrator configures system settings for web browsers. This activity is necessary only once. To complete the system settings for a web browser you first need to activate the Internet Communication Framework (ICF). The system administrator needs ICF services to be activated. These services are delivered inactive because of security reasons. Once these services are activated, collaborative supply chain functions are available for users.
To access the activity execute transaction code SICF or follow menu path SAP SCM - Implementation Guide > SAP Web Application Server > Internet Communication Framework Configure and Activate HTTP Services Individually.
On the Maintain Services screen, call the input help by right-clicking the Virtual Host field or pressing F4. Select Default_Host from the drop-down list of options (
Figure 22).

Figure 22
The Maintain Services screen in the ITS web browser
Call input help (F4) in the Service Path field. In the screen that appears, expand the default _host node down to the level /sap/bc/gui/sap/its/ and double-click the work item icon

that appears before its

.
In the refreshed Maintain Services screen populate the Service Name and Description fields. In my example I enter CLPSDP in both these fields. Click the execute icon (
Figure 23).

Figure 23
Enter a service name and description in the Maintain Services screen
In the structure that appears, select the work item icon located before the its node and choose Service/Host > Activate from the Application toolbar. Right-click the node SAP and choose Activate Service. The Activation of ICF Services dialog box is displayed. Choose yes including sub-node.
Note
As a result of these activities, the relevant CLPSDP (collaborative supply and demand planning) and CLPGLOBAL (the common service for collaborative planning) that are stored under the path default_hostsapbcguisapits are activated.
Publishing Templates
SAP-delivered templates are stored in the SCM system and require internal publishing. To publish the templates, execute transaction code SE80 or follow menu path Tools > ABAP Workbench > Overview > Object Navigator. The system administrator needs to specify the target ITS server to publish the templates.
Choose Utilities > Settings from the menu bar to maintain user settings. In the screen that appears click the Internet Transaction Server tab and then click the Test Service tab (
Figure 24). In the Test Service tab select the Integrated ITS and HTTP radio buttons. The organization’s web URL appears in the field to the right of the HTTP radio button (in my example, it is shaded in red). In the same screen in the Path section, select the Standard Path radio button (
Figure 24).
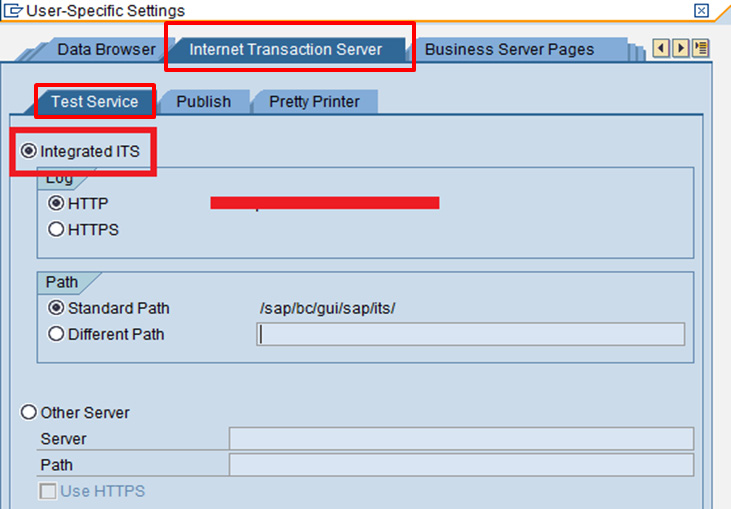
Figure 24
User-specific settings for Internet Transaction Server – Test Service
After you have completed the test service settings, click the Publish tab for settings to publish the SAP-provided templates. In the Publish tab select the Integrated ITS radio button and click the transfer icon

(
Figure 25).

Figure 25
User-specific settings – Internet Transaction Server – Publish
On the same screen, click the repository browser icon

. Select Internet service in the upper blank drop-down menu. From the second drop-down menu, select the ITS service CLPSDP (
Figure 26).
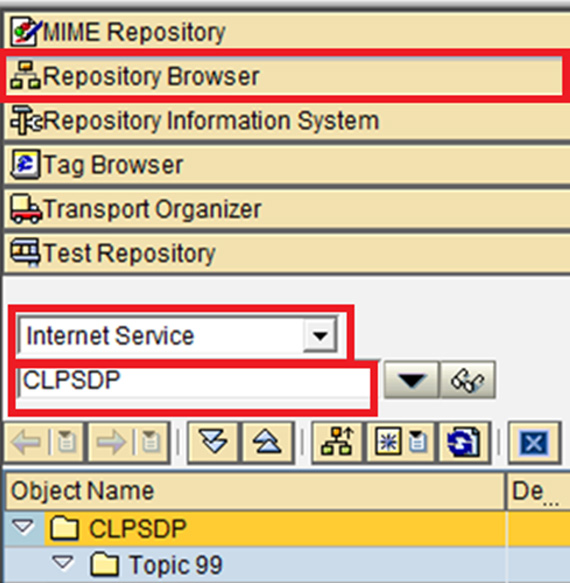
Figure 26
Maintain Internet Service CLPSDP
To check the status of the Object CLPSDP, select the CLPSDP object on the screen and double-click it to open the detail screen as shown in (
Figure 27).
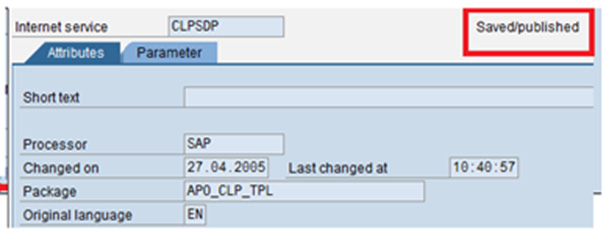
Figure 27
The status of the Internet service
If the status is not Saved/published, right-click the object node CLPSDP and select Publish > Complete Service. The following message appears: Object published successfully.
Repeat these steps to publish the remaining ITS services (CLPSDP, CLPPROMCAL, and CLPGLOBAL). Other services are AMON, AMON_STATIST, CLPBID, IAC, and SYSTEM. Display the Internet Service screen (
Figure 28) by clicking the display supported object list icon
.

Figure 28
The Web Application Builder Display Internet Service screen
The web services (e.g., CLPSDP, ALMON, CLPPROMCAL) stored in SAP SCM are now published and ready to use.
Collaborative User Management in the APO System
Collaborative user management activity is performed by ABC’s system administrator. As a prerequisite for collaborative user management in APO related to design of the planning book, the implementation or project team member configures data views.
To create a user for the collaborative partner, execute transaction code SU01 and follow menu path Tools > Administration > User Maintenance > users. Enter a user name (e.g. CLPWEBUSER-1) and click the create icon (
Figure 29).
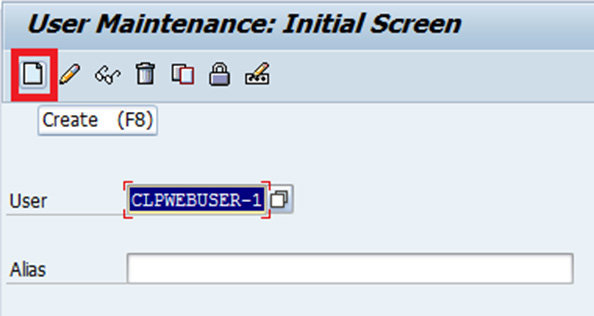
Figure 29
Create user
In the next screen click the Logon data tab and enter the initial password (
Figure 30).
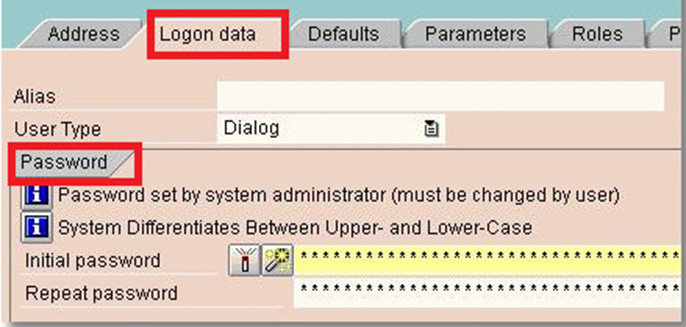
Figure 30
Create Collaborative Partner’s user — Logon data tab details
In the Roles tab add roles and in in the Profiles tab, you can see the assigned authorization profiles for the role (
Figure 31). Authorization objects for collaborative demand planning are the same as for demand planning.
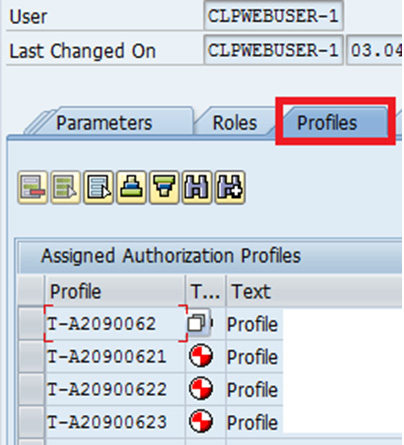
Figure 31
Create the collaborative partner’s user
Note
Role and profiles are generated using transaction PFCG. These activities are completed by system and security administrators, but they are not part of the scope of this article.
In the Parameters tab, enter the parameters per
Table 1. Make sure you use capital letters for the parameter values. Save them by clicking the save icon (
Figure 32).
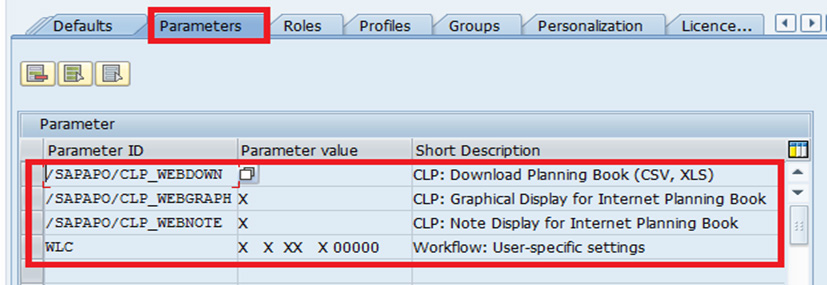
Figure 32
Create the collaborative partner’s user
To display user settings execute transaction code SU01. In the screen that appears click the display icon

(
Figure 33).

Figure 33
Display user settings
In the next screen click the Parameters tab to view the details of the collaborative partner’s user parameters setting (
Figure 34).
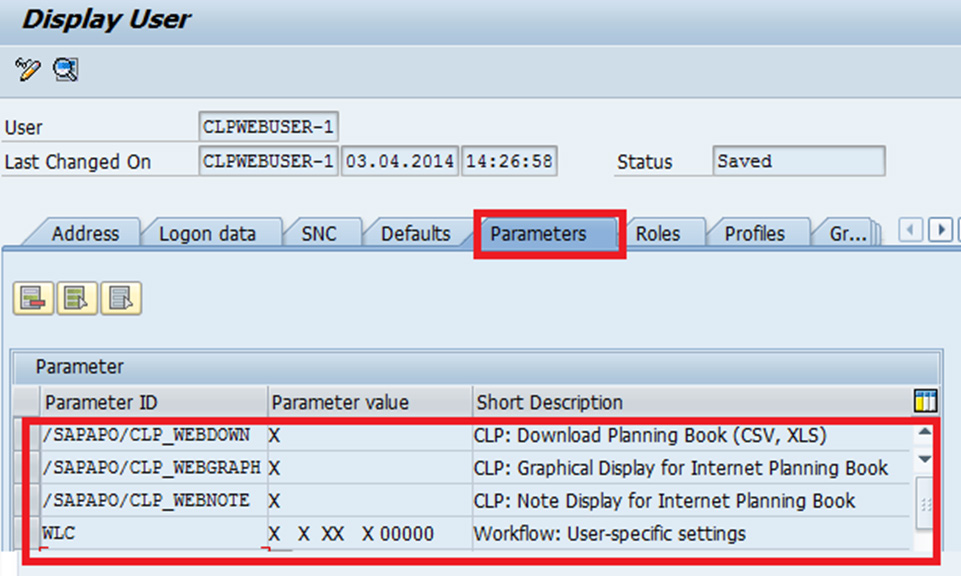
Figure 34
Display user settings — Parameters tab details
The next step is assigning the user to the planning book. This step enables the system administrator to assign a user to a planning book and data view. The system administrator can restrict the user’s access to one planning book and one data view.
Execute transaction code /N/SAPAPO/SDPPLBK and follow menu path Advanced Planning and Optimization > Demand Planning > Environment > Current Settings > Assign User to Planning Book (Figure 35). Click the New Entries button or choose an existing user. In the Plng Book field enter the name of the user who can access the planning book (e.g., ZCLP_CUST) and a name in the Data View field (e.g., ZCLP_CUST_DATA_View). With this setting a user can view only the assigned planning book and data view.

Figure 35
Assign the planning book and data view to a user
The next step is assigning a selection ID to the user. The selection ID restricts the user to access only authorized data from the Web.
Execute transaction code /SAPAPO/MC77 and follow menu path Advanced Planning and Optimization > Demand Planning > Environment > Selection Organization > Maintain Selection Assignment. In the screen that appears (
Figure 36) the profile name in my example is CLPWEBUSER-1 and the planning book is ZCLP_CUST. I selected these profiles from a list in the drop-down menus in the Profile and Planning Book fields in the Maintain profiles section. The selection IDs in my example are ZCLP_1500 and ZCLP_1500_SP01. I selected these IDs from the Reference section and dragged and dropped them into the Maintain profiles section.
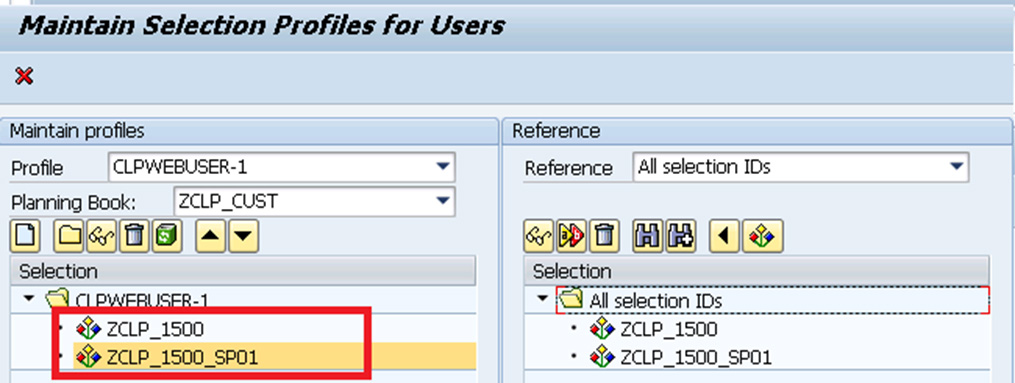
Figure 36
Assign a selection ID for a user
The next step is restricting user access for display, pivot, and drop-down access to data. This step enables a system administrator to restrict selective access to a web user such as display or change mode for a planning book, data view and selection profile for pivot sorting, and active shuffler.
Execute transaction code /SAPAPO/CLPSDP_USER or follow menu path Advanced Planning and Optimization > Supply Chain Collaboration > Environment > User setting for collaborative Supply and Demand Planning (Figure 37).
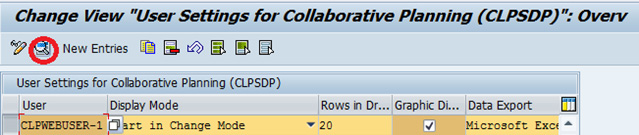
Figure 37
User settings for collaborative planning
On this screen select the user and click the display icon from the top menu bar. The next screen (
Figure 38) displays the details on the screen.
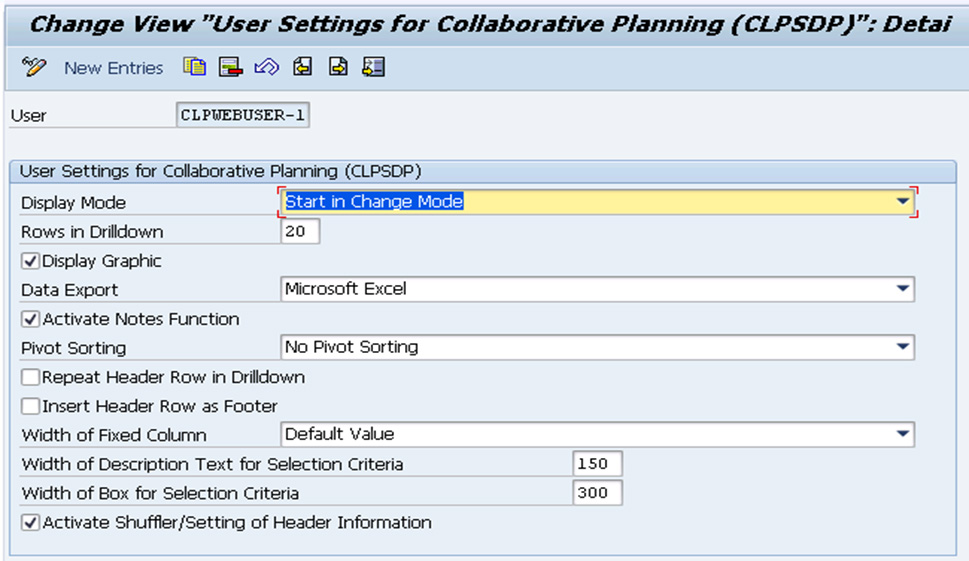
Figure 38
Details of user settings for collaborative planning
With this setting the collaborative partner can access the planning book and be able to refresh, save, display, change, graph, view data in Excel, and use the Notes function.

Anjali Butley
Anjali Butley has more than 20 years of strong functional, business, and IT experience with domain expertise in supply chain planning and logistics.
She is a business analyst with more than 18 years of SAP experience in design and development of integrated supply chain solutions for large-scale enterprises. Her expertise includes process modeling, business process analysis, application implementations, production support, and presales across multiple client engagements in the SCM domain.
She has executed various types of SAP projects, such as implementation, global rollouts, enhancement, production support, business consulting, and program and project management in multicultural environments worldwide. Her industry exposure includes areas across major industry verticals, including IT consulting, consumer, high technology, life sciences, pharmacetutical, and discrete manufacturing.
She is always interested in exploring new SAP SCM applications and products and sharing her learning experiences with the SCM worldwide community.
If you have comments about this article or publication, or would like to submit an article idea, please contact the
editor.