Businesses are required to know the country of origin (COO) for products being traded across borders. A possible way to get this information is to capture the COO as a characteristic using batch management and to see the value of the COO populated in the delivery note. Learn 5 key steps to capture the COO with batch management, maintain a COO as a characteristic, and fetch the COO through delivery documents in the sales and purchasing process using batch management.
Key Concept
A batch is a sub-quantity of the material representing one homogenous non-reproducible unit with unique specifications. Batch is represented using a unique batch number. Batch management incorporates the entire logistics process from procurement to sales.
Being able to identify the country of origin (COO) for multi-sourced products is necessary for teams involved in global trade or foreign trade. This process can be managed within an SAP ERP system using batch management. The COO can be maintained as a characteristic as part of the batch creation per product. The COO value is picked up from the master data during batch determination and it can be captured in the delivery note.
Note
Batch management is linked with classification, but can be used without classification, too. You can create several classes for each of the applications that require specific characteristic values in a batch. These class groupings could be for finished goods specifications, inspection of products, process order results recording, inspection results recording, or storage conditions in a warehouse. You assign these classes to the material master. When the batch is created for the material, the class assignment makes it possible for the classification data to be available for batch management. The characteristics for materials managed in batches provide information for any kind of evaluations on particular attributes of batches, whether in connection with quality issues, production issues, or complaints. We make use of this batch management functionality to capture the COO of the material.
You maintain the COO for the product in the material master. From the material master the COO is populated during batch management and maintained as a mandatory characteristic. After the COO is captured during batch management, it can be seen in the delivery document. The information in the delivery document can be transferred to an invoice document and can also be used for reporting requirements for trade purposes.
To capture COO using batch management, you need to complete five steps:
- Activate batch management
- Activate the material for batch management
- Create a custom class and characteristics
- Maintain the COO in the material master
- Create the batch
Step 1. Activate Batch Management
Batch management functionality can be activated at the plant, material, or client level. To capture the COO you activate this functionality at the material level.
To complete this step, follow menu path Logistics General > Batch Management > Specify Batch Level and Activate Batch Management. In the Batch Level and Batch Status Management screen (
Figure 1), click the Batch level bar and press Enter.

Figure 1
Batch level and Batch status management
In the next screen (
Figure 2) select the Batch unique at material level radio button and click the save icon.
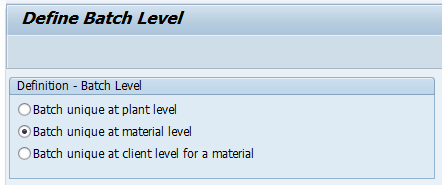
Figure 2
Define the batch level
Make sure the batch status management is active. To make batch status management active, click the Batch status management bar in the Batch Level and Batch Status Management screen (
Figure 1). In the screen that appears (
Figure 3) select the Active radio button if it is not already selected and press Enter. Batch status management is now active.
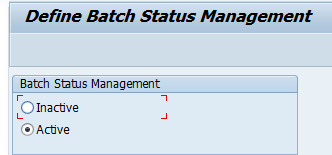
Figure 3
Define Batch Status Management
Step 2. Activate the Material for Batch Management
After you activate batch management for materials, the materials that are to be batch managed need to be activated for this functionality. Before you complete this step, you need to complete these prerequisite steps: Make sure that the stock of the material is zero and that no open order exists for the material being activated for batch management.
To activate the material for batch management, go to the material master and execute transaction code MM02 or follow menu path Logistics > Logistics Execution > Master Data > Material > Material > Change > Immediately. In the initial screen to change material (
Figure 4), enter the material number in the Material field (e.g., 641), click the Select View(s) button, and press Enter.
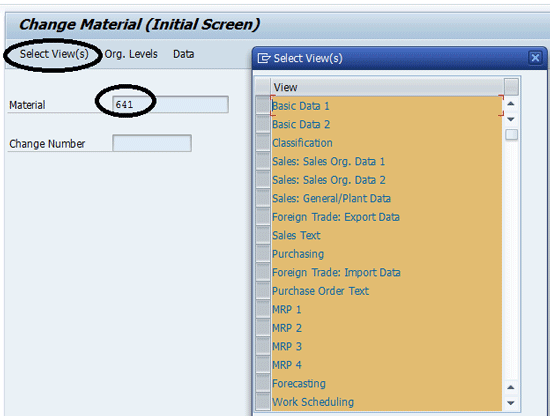
Figure 4
Select the material master
In the next screen (
Figure 5) click the Sales: General/Plant tab. Select the Batch management check box and then click the save icon.
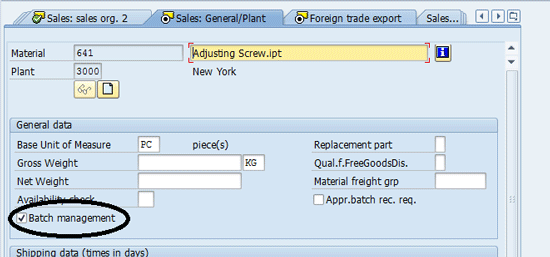
Figure 5
Activate the material for batch management
Step 3. Create a Custom Class and Characteristics
For capturing the COO you first need to define a placeholder for it. To do this you need to create a COO as a characteristic. First, create a custom class by following menu path Cross Application Components > Classification System > Master Data > Classes.
In the screen that appears (
Figure 6), enter a name in the Class field (e.g., 641_CLASS), assign class type 023 (provided for the batch by SAP) to your custom class, and click the create icon. In the section below the Basic data tab, enter a date in the Valid From field and add a description of the class in the Description field. In the Status field select Released so that it can be used when it is ready.
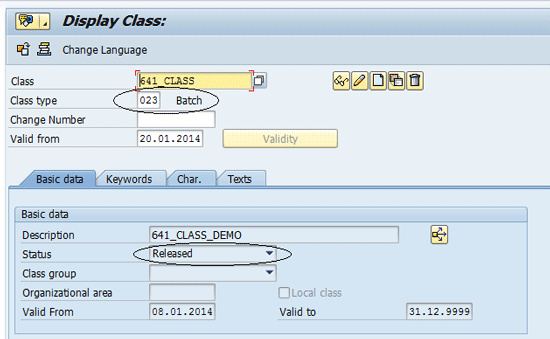
Figure 6
Create a custom class of class type batch (023)
Figure 7
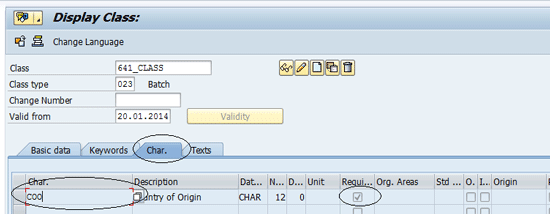
Figure 7
Maintain settings for the COO characteristic
If the COO is not maintained as a characteristic in the system, when you enter the COO in the Char. tab, the system asks for a confirmation to create the characteristic (
Figure 8). Click the Yes button.
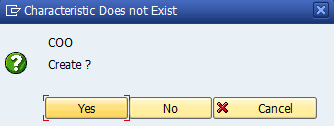
Figure 8
Create the COO characteristic
In the next screen (
Figure 9), under the Basic data Tab, maintain the Description, Data Type of the characteristic, and the length (Number of Chars) of the characteristic. In the Value Assignment section, indicate whether the characteristic has single or multiple values and if an entry is required for the characteristic. In our example, for the COO, we have a multiple value assignment and it is mandatory to have a value for this characteristic. To configure these settings, go to the Value Assignment section in
Figure 9 and select the Multiple Values and the Entry required check boxes. In the Status field make sure the status of the characteristic is Released so that it is ready for use.
Figure 9
Basic data maintenance of the characteristic
The possible values for the characteristics can be maintained in the Values tab while creating the characteristic. Click the save icon to save your entries (
Figure 10).

Figure 10
Allowed values for the COO characteristic
Step 4. Maintain the COO in the Material Master
While you create the material master, the COO needs to be maintained in the foreign trade view or in the classification view of the material master. To complete this step follow menu path Logistics > Logistics Execution > Master Data > Material > Material > Change > Immediately. In the Change Material master screen (refer back to
Figure 4) enter the material number in the Material field (e.g., 641) and click the Select View(s) button. In the pop-up screen select all the views and enter plant-specific details. Press Enter to save your entries.
In the screen that appears (
Figure 11) click the Classification tab.
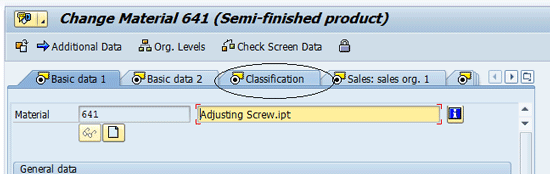
Figure 11
The Classification tab of the Change Material master
Under the Classification view, assign the Class created earlier under the assignments. In the General tab, maintain the value of the Country of Origin from the allowed values that you maintained while creating the characteristic. Click the save icon to maintain the COO for the material (
Figure 12).

Figure 12
Classification view of the material master
Step 5. Create the Batch
After you create the COO characteristic and assign it to the material, you need to create the batch to handle the material. To complete this step, follow menu path Logistics > Central Functions > Batch Management > Batch > Create.
In the screen that appears (
Figure 13) enter the Material, Batch number (e.g., BATCH-641), and Plant in the Material, Batch, and Plant fields, respectively. Click the save icon to save your entries. If you do not enter a batch number, the system assigns it while you click the save icon.
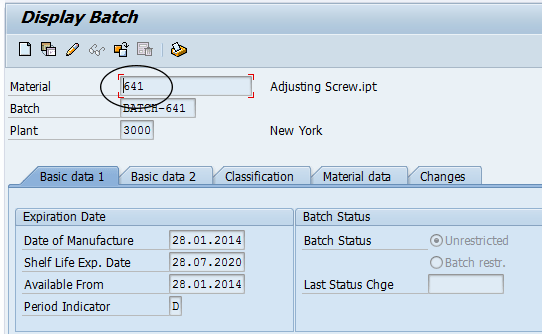
Figure 13
Create a batch
In
Figure 13, in the Basic data 1 tab, you maintain the date of manufacture, shelf life expiration date, available from date of the batch. The Period Indicator is the unit of measurement used for maintaining the shelf life expiration details. In our example this indicator is D (daily maintained by system).
You can create multiple batches for the same material, and batch numbers can be defined either internally by the system or externally by a user. In our example the batch is assigned manually (externally).
To view the batches assigned to the material go to the Stock Overview screen. To open this screen execute transaction code MMBE. In the Stock Overview screen (
Figure 14) you can see the batches created for the material. In our example, BATCH-641 is the external number, and 0000000404 is the number of the batch assigned internally by the system.
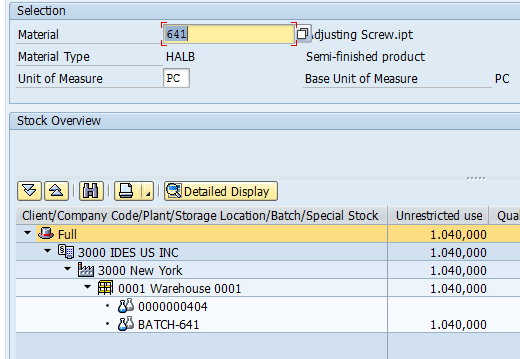
Figure 14
View different batches created for the same material 641
You have now completed the basic setup required for batch management. Now you can see how batch management works for following a business process and see how a COO can be captured in the delivery document. I show you examples of two business processes in which a COO is captured in delivery documents:
- Goods issue against a sales order
- Goods receipt against a purchase order
Goods Issue Against a Sales Order
In this business process, you create a sales order by executing transaction code VA01. In the screen that appears populate the following fields as shown in
Figure 15:
- Sales area
- Sold-To Party
- Ship-To Party
- Material
- Plnt
- Batch
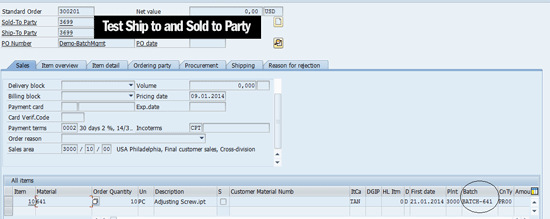
Figure 15
Create a sales order
Click the save icon to save your entries.
To view batch details for the material, you need to create a delivery document by executing transaction code VL01N. In the Create Outbound Delivery with Order Reference screen (not shown) enter a value in the Shipping point field and a sales order number in the Order field. Click the save icon.
In the screen that appears click the Item Overview tab to view batch details for the material (
Figure 16).
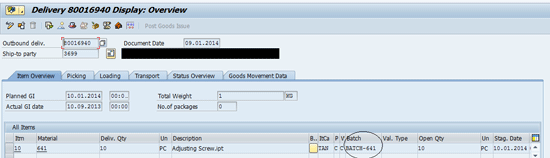
Figure 16
Delivery document displaying the batch number of the material order
To view the COO data select the line item shown in
Figure 16. In the menu bar, select Goto > Item > Foreign Trade/Customs. In the screen that appears (
Figure 17) click the Foreign Trade/Customs tab and then click the Origin/Destination/Business tab to view the COO value.
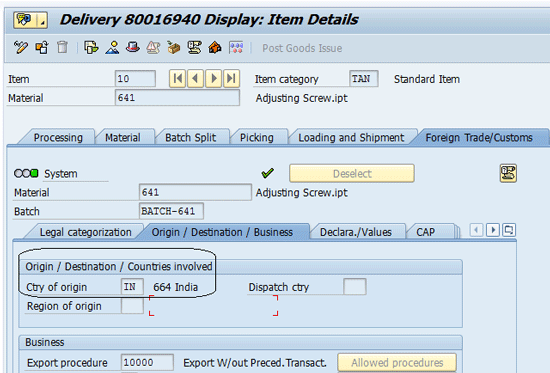
Figure 17
Delivery document displaying the COO of the material
After you view the COO information of the material from the delivery document, this data can be transferred further down the sales process through invoicing. It can be transferred to other systems in the supply chain such as SAP Global Trade Services and made available for reporting (standard SAP functionality).
Note
Details of how the transfer happens are beyond the scope of this article as it follows standard SAP sales and interfacing processes.
The goods issue of 10 pieces is done from the BATCH-641, which can be seen from the material document generated because of the movement of data from BATCH 641.
To access the material document information from the Stock Overview Screen of the material, execute transaction code MMBE. Select the batch used in the sales order BATCH- 641, right-click this item, and select the Material Movement from the drop-down list of options. (This screen is not shown.) To view the material document execute transaction code MB03. The data for the material document is visible in the screen that appears (
Figure 18).
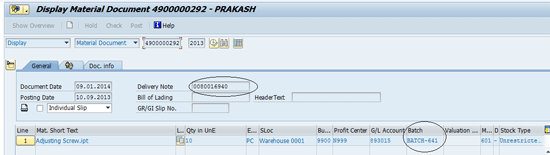
Figure 18
The material document displaying the batch assigned to the incoming material
Goods Receipt Against a Purchase Order
In this business process, a purchase order is created using transaction code ME21N. In the screen that appears (
Figure 19) populate the following fields:
- Vendor (e.g., 10090)
- Material (e.g., 641)
- Plant (the field in the Plnt column) 3000

Figure 19
Create a purchase order
Note
When you enter values in the Vendor and Plnt fields, the sytem populates the number and a named. For example, when we enter 3000 in the field in the Plnt column, New York appears.
Enter the batch BATCH -641 that needs to be assigned to the received goods and save the document by clicking the save icon.
Now you need to create the inbound delivery document against the purchase order you created above. To do this execute transaction code VL31N. In the screen that appears click the Item Overview tab to view the batch number that is assigned to the material (
Figure 20).
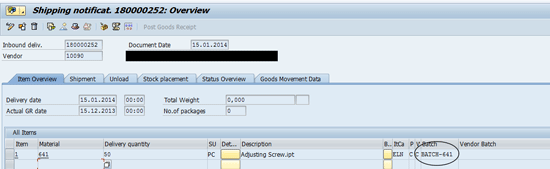
Figure 20
An inbound delivery document
To view the COO value of the incoming material, select the box in the first column beside the line item in the inbound delivery document (
Figure 20). From the menu click Goto and choose Item and Foreign Trade/Customs from the list of options.
In the next screen (
Figure 21) click the Foreign Trade/Customs tab and then click the Origin/Destination/Business tab. In the Ctry of origin field you can see the COO of the incoming material (e.g., 641) is 64 for India.
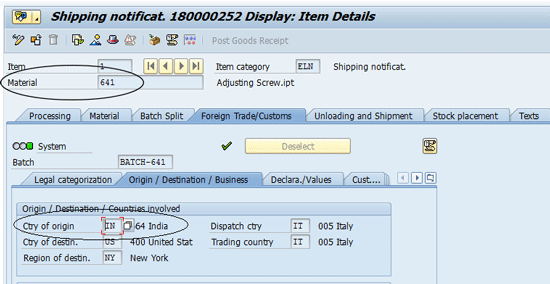
Figure 21
The COO of the inbound material
As in case of a goods issue, COO details obtained in shipping notification for the goods receipt process can be made available further down the purchasing process. The details can also be made available to other SAP applications in the supply chain and can be used for reporting.
You now have completed all the steps to maintain a COO as a characteristic and fetch the COO through delivery documents in the sales and purchasing process using batch management.
Rajen Iyer
Rajen Iyer is the cofounder and CTO at Krypt, Inc. Rajen has written several in-depth, best practice articles, white papers, patents, and best-selling books on SAP Logistics and SAP Global Trade Services, including
Effective SAP SD and
Implementing SAP BusinessObjects Global Trade Services. He is also an invited speaker at industry conferences.
You may contact the author at
Rajen@kryptinc.com.
If you have comments about this article or publication, or would like to submit an article idea, please contact the
editor.
Prakash Mandavia
Prakash Mandavia is an SAP supply chain functional consultant at Krypt, Inc. Krypt’s focus is on helping businesses leverage the SAP SCM suite to gain a competitive advantage and increase their bottom lines. Krypt offers services that include implementations, upgrades, and support.
If you have comments about this article or publication, or would like to submit an article idea, please contact the
editor.