With the introduction of SAP NetWeaver Business Rules Management (SAP NetWeaver BRM) as part of SAP NetWeaver Composition Environment (SAP NetWeaver CE), you can increase your flexibility by externalizing frequently changing rules into a rules management system. See how you can use flow rulesets to manage your rules.
Key Concept
Business rules management systems allow business experts to set up and manage rules. Often systems execute rules by using the Rete algorithm, which evaluates the conditions of if-then rules and optimizes their execution sequence. The calculated sequence is not predictable and can make it difficult to analyze how a certain result was actually achieved. Flow rulesets are an alternative to Rete-based rulesets and allow the rule modeler to precisely define the rule’s execution sequence. SAP NetWeaver Business Rules Management (SAP NetWeaver BRM) supports both models.
SAP NetWeaver Business Rules Management supports two kinds of rulesets: Rete-based rulesets and flow rulesets. Each ruleset uses a different execution engine.
I discussed the inner workings of the engine handling Rete-based rulesets in my SAP Professional Journal articles “SAP NetWeaver Business Rules Management: Externalize Critical Business Logic for Enhanced Flexibility” and “SAP NetWeaver Business Rules Management: Tips for Testing and Working with Business Rules.” In those articles, one big problem I encountered as I went through an example for calculating a buyer’s discount was the determination of the rule’s execution sequence when several rules are ready to fire and all of them have the same priority. Rete optimizes the execution sequence taking into account several aspects, such as the rule’s creation timestamp. As a result, identical rulesets deliver different results.
I explained how to solve the conflict by using either priorities or overrides. Both mechanisms allow you to achieve more predictable results. However, sometimes you might want to define the execution sequence yourself. You don’t want to rely on the optimizations done by the Rete algorithm. You want to take control and be responsible for the order in which the system calls the rules.
The solution: use flow rulesets. Flow rulesets allow you to define the exact rule call sequence graphically. I will first take the example from the first article and solve it using a flow ruleset. In a second, more complex example, I will show you how to embed decision tables and rule scripts in your rule flow to help you solve even more complex problems quite elegantly.
Get Started with Flow Rulesets
To set up a flow ruleset in Rules Composer, you have to follow the same steps you did for Rete-based rulesets. You can reuse the project spj_rules you created in the last article or create a new project from scratch. If you create a completely new project, don’t forget the following three steps before you can begin modeling the rules (all steps have been explained in detail in the above mentioned article — refer to it for more details):
Step 1. Import an XSD file containing the fields for which the ruleset will work and which at the same time reflect the interface to the outside world. (You can download the file at the bottom of this page if you have not already downloaded the file for the previous article.)
Step 2. Add the imported fields to the rules project’s resources
Step 3. Create aliases for the imported fields
Continue with the creation of a new flow ruleset. Right-click the Rules Modeling node in the Project Explorer view and choose New Flow Ruleset from the context menu (Figure 1).
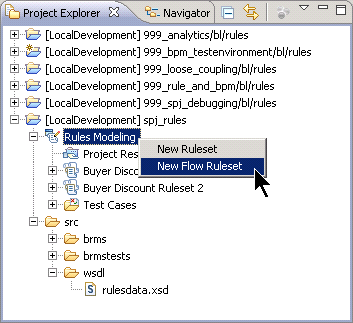
Figure 1
Create a new flow ruleset
A dialog asks for the ruleset’s name. Enter the name Buyer Discount Flow Ruleset 1 and click the OK button. The flow ruleset editor opens in the main area of SAP NetWeaver Developer Studio. As you can see in Figure 2, which depicts the flow ruleset editor Overview tab, you can create rule flows, rule scripts, decision tables, and rules.
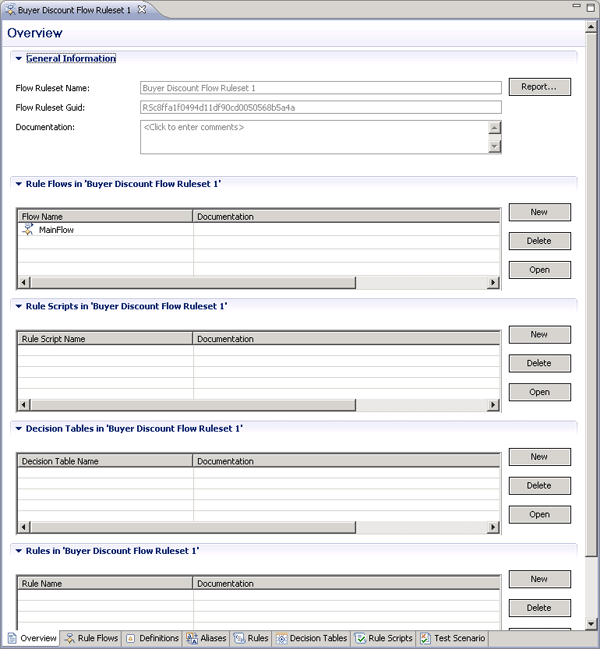
Figure 2
The flow ruleset editor Overview tab
This differs significantly from the Rules Editor you know from the previous article. If you take a closer look at the flow ruleset editor, you can see the first two tables are new: one for Rule Flows and one for Rule Scripts. I discuss the latter table in the second exercise.
The Rule Flows table contains a list of all the rule flows in your project. In Figure 2 you can see that the system has created one flow already. It is called MainFlow and must exist in every flow ruleset because it is the starting point for the engine — it determines where the execution starts. You cannot delete it.
The Rules table at the bottom of Figure 2 is also different in that it doesn’t contain the columns Priority and Overrides. Why? Simply due to the fact that the Rete engine does not handle the flow rules. Instead, a completely different engine unrelated to the one handling Rete rules handles the flow rules. Therefore you don’t need conflict management algorithms when you have several rules that the system could potentially fire. Instead, you model the execution in the rule flow.
Before you can chain the rules in a rule flow, you first have to create the rules. You need the same definitions and rules as you used in the example in the first article. For your convenience, Figure 3 provides a short summary.
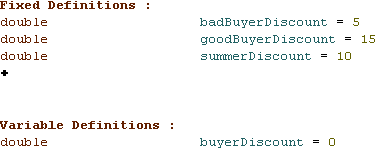
Figure 3
Definitions needed for the rules project
Here are the rules you need. In the following list, the first row (in bold) always contains the rule’s name followed by its condition (if clause) and action (then clause):
- ChkIfDiscountHigh
If
buyerDiscount Greater Than 20
Then
Assign :: buyerDiscount = 20
- ChkIfDiscountLow
If
buyerDiscount Less Than 5
Then
Assign :: buyerDiscount = 7.5
- GoodCreditBuyer
If
DiscountCalculation/credit Equals GOOD
and buyerDiscount Equals 0
Then
Assign :: buyerDiscount = summerDiscount+goodBuyerDiscount
- BadCreditBuyer
If
DiscountCalculation/credit Equals BAD
and buyerDiscount Equals 0
Then
Assign :: buyerDiscount = summerDiscount-badBuyerDiscount
- SetBuyerDiscount
If
buyerDiscount Greater Than 0
Then
Execute :: DiscountCalculation/discount = buyerDiscount
If you still have your old rules project, you can simply copy and paste the definitions and rules to the new flow ruleset.
Model a Rule Flow
Now that you have the definitions and rules in place, you can start creating the rule flow. Remember from the last article that you want to calculate the discount for your customers based on their status. A customer with a good buying behavior receives a higher discount compared to those with a bad rating. In addition, you want to assure that the discount is in a certain range and does not exceed or fall below predefined values. In the following process, you define the sequence in which the above modeled rules will be executed. Open the Rule Flow Editor by clicking the Rule Flows tab in the flow ruleset editor in Figure 2. The editor displays the MainFlow consisting of just a start and an end event (Figure 4).
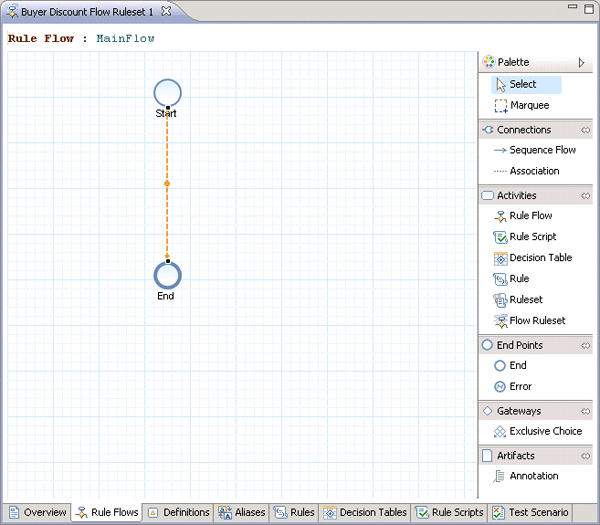
Figure 4
The rule flow editor with MainFlow
The editor looks similar to the process composer in SAP NetWeaver Business Process Management (SAP NetWeaver BPM). It consists of the main modeling pane and a palette containing all the artifacts and shapes you can use to model the rule flow. The most important shapes are the ones listed in the Activities and Gateways areas. The Exclusive Choice in the Gateways area splits the flow in several branches depending on certain conditions.
The activities invoke the respective artifact (e.g., a rule, a decision table, or another rule flow). However, every time you drag an activity from the palette to the modeling area, it is empty. It is not yet connected to a concrete implementation for that artifact. If you drag and drop a rule into the canvas, the shape that appears is a placeholder for a rule. You have to connect it later to a concrete rule that actually fills the shape with life.
Another way of modeling the flow is to drag and drop existing rules, decision tables, and the like into the model. This is the approach I explain because it saves time and speeds up your development efforts. Before starting, delete the existing connection between the start and end event by right-clicking it and choosing Delete from the context menu.
In the Project Explorer view (typically in the upper-left corner of the SAP NetWeaver Developer Studio), expand all the nodes of your flow ruleset (Figure 5).
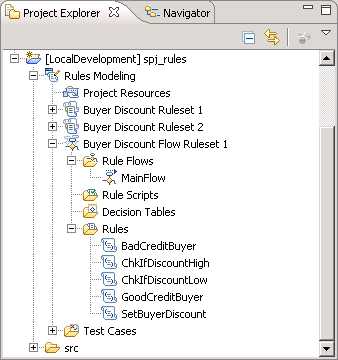
Figure 5
Expanded nodes of the flow ruleset
You can easily identify the five rules you’ve previously created. Take each rule and drag and drop it somewhere into the modeling area. Finally, arrange them as depicted in Figure 6.

Figure 6
Arrange the rules in the rule flow editor
Next, drag-and-drop the Exclusive Choice gateway from the palette and place it in the space beneath the start event and above the two rules BadCreditBuyer and GoodCreditBuyer (Figure 7).
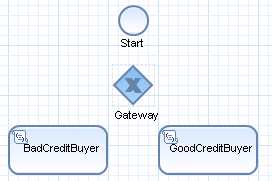
Figure 7
Position the gateway
What is missing is the modeling of the rules execution flow. For this you have to connect the shapes in the sequence you want the system to execute the rules. Move the mouse pointer over the shape from which the connection should start. Once the mouse pointer is over the shape (e.g., the Start event), context buttons appear displaying all the possible shapes you can drag from the current artifact. For this example, select the Create Connection context button, but don’t release the mouse button (Figure 8). Instead, drag the connection on to the gateway shape and release the mouse button there (Figure 9). The system draws the connection.
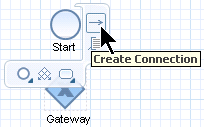
Figure 8
Select a connection from the context button
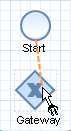
Figure 9
Connect the start event with the gateway
Repeat connecting the shapes so that your final model looks like the one depicted in Figure 10.
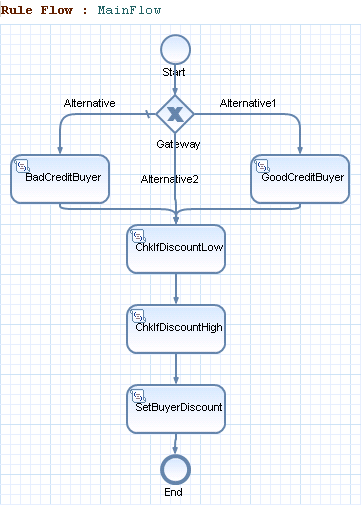
Figure 10
Final rules flow
The idea behind this sequence flow is that you always want the BadCreditBuyer/GoodCreditBuyer rules to be called before the ChkIfDiscountLow/High rules are invoked. This was one of the biggest problems faced for Rete rulesets: Depending on the Rete algorithm’s optimization approach, the outcome was different. You were only able to solve it for Rete rulesets by using priorities.
This is not necessary for this rule flow as you clearly define the rule’s call sequence. In addition, the graphical representation helps you better understand the sequence, another advantage of rule flows. However, they have one big disadvantage: you can easily model infinite loops, which is not possible for Rete rulesets as the system cannot invoke rules that were already fired.
The last thing you have to add to the model before you can test it is the definition of the conditions for the gateway. For each flow leaving the gateway you have to define the condition when this path should be followed. Right-click the gateway and select Properties from the context menu. On the Properties tab beneath your flow model, click the Conditions button on the left side of the screen (Figure 11).
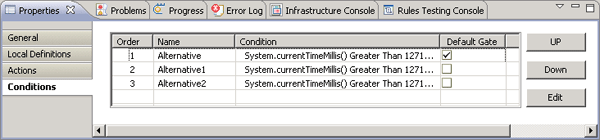
Figure 11
Define the conditions for the gateway
You can identify the three alternatives that were assigned automatically at the time you created the connections from the gateway to the rules. I’ll start with Alternative1. Alternative1 connects the gateway with the GoodCreditBuyer rule (compare Figure 10). Note: Depending on the sequence in which you modeled the connections from the gateway to the respective rules, they might be named differently in your model.
Next, rename Alternative1 to express that this path will be followed if the customer has a good rating by double-clicking its name in the table and replacing the text with Good Credit Buyer. The associated condition must be adapted as well. Again, double-click the associated field in the Condition column. A little in-place editor opens that is similar to the rules editor. It allows you to pick either imported or newly defined fields to formulate your condition (Figure 12).
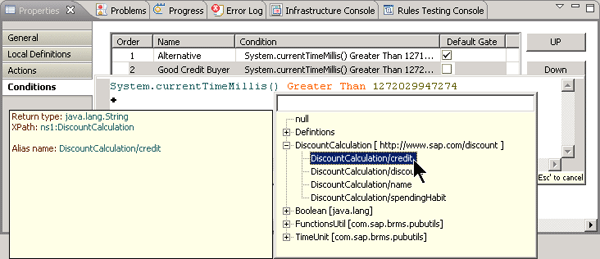
Figure 12
Model the condition for the gateway
In this example, click the System.currentTimeMillis() string in the default formula and select the field on which the rule should rely. This is the field you receive as the parameter from the caller of the ruleset, defined as DiscountCalculation/credit. The logical operator automatically changes to Equals, which is the required operation.
What’s left is to adapt the value you want to compare against (the right side of the Equals operator). The Equals operator by default compares against the string Default Value. Click it and replace it with the string GOOD. The final result should look similar to the one depicted in Figure 13. To leave the editor, press Alt-Enter.
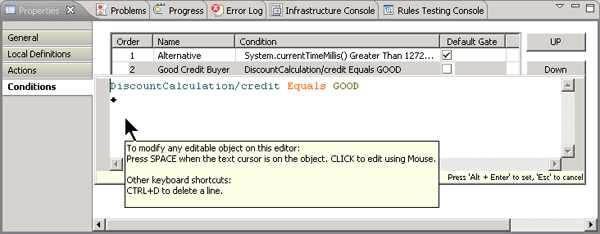
Figure 13
The final formula of the Good Credit Buyer alternative
Tip!
I also want to make you aware of another useful key combination. As the tool tip in Figure 13 indicates, you can easily delete a line within the editor by pressing Ctrl-D.
You have now defined the first condition. Next, continue with the connection from the gateway to the Bad Credit Buyer rule. Follow the description above to adapt the name (change the string Alternative in the Name column of the table to Bad Credit Buyer) and the condition (DiscountCalculation/credit Equals BAD) accordingly. The result is depicted in Figure 14.

Figure 14
Define the second condition
Finally rename Alternative2 to Neither Good Nor Bad. The question is which condition should you assign to this connection? You can solve this problem easily. You probably noticed the Default Gate column in the Conditions table. Because you want to follow this path in case neither the Bad nor the Good Credit Buyer conditions is evaluated to true, you simply have to set the Default Gate for this condition by marking the associated check box (Figure 15).

Figure 15
Set the Default Gate for the Neither Good or Bad condition
Note
If the Default Gateway check box is set, the associated condition will never be evaluated during runtime. The path will always be followed when all the gate conditions (except the default) fail.
Save all your changes. You are now ready to test the flow rule. Create a test scenario as described in my previous article and run the test. In short, you have to apply the following steps:
Step 1. Switch to the Test Scenario tab
Step 2. Click the create XML icon  in the upper-right corner of the tab. The Create XML dialog opens. Follow the steps of the wizard and create the file rulesdata.xml.
Step 3. Click the Add XML button and select the check box for the rulesdata.xml entry in the dialog that pops up. Continue by clicking the OK button.
Step 4. Open the newly created entry in the XML Documents for Test Input table. The rulesdata.xml file opens.
Step 5. Fill the fields name and credit with some reasonable contents (e.g., and credit=BAD). Save your changes.
Run your test case by clicking the run test case icon  in the upper-right corner of the test scenario editor. The output in the Rules Testing Console, which opens beneath your test scenario editor, should look like the one shown in Figure 16. At the beginning, you have a repetition of the input values (name and credit fields) enhanced by the result value of the test case: 5.0.
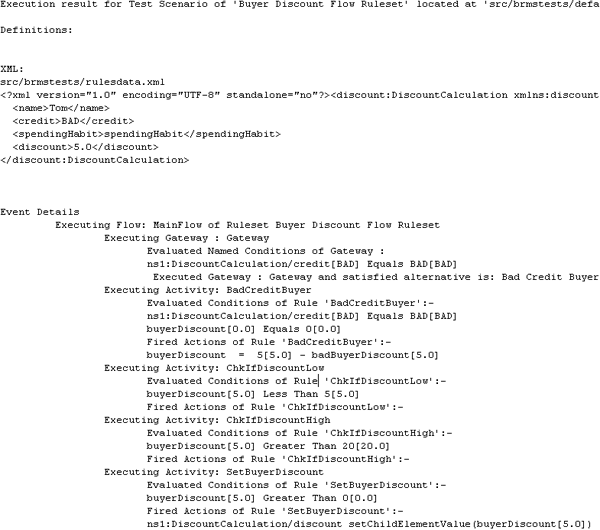
Figure 16
Result of test scenario
You can now analyze the flow execution by looking at the entries in the section called Event Details. The execution starts with the MainFlow. It reaches the gateway and evaluates the condition DiscountCalculation/credit Equals BAD to true. After leaving the gateway, the rules engine executes the BadCreditBuyer rule. As its condition is true, it fires the associated action, which sets the buyerDiscount variable to 5.0. Next, the two rules ChkIfDiscountLow and CheckIfDiscountHigh are executed. The new set value of the buyerDiscount field is neither less than 5.0 nor greater than 20.0, so no actions are fired. Finally the SetBuyerDiscount rule is executed returning the value 5.0 as final result.
Try the flow rule with several other input parameters to verify that it works correctly. You can follow the execution sequence by analyzing the trace in the Rule Testing Console.
Working with Scripts and Decision Tables
I promised you at the beginning of the article that I would also take a look at the two other elements you can use within flow rules: scripts and decision tables. Scripts are a kind of macro language for the rules environment. It allows you to formulate logic in a programming language like fashion, but without typing the commands. I follow the same modeling approach as you know it from the rules editor, as you will see in the example that is about to follow.
Decision tables are a more structured approach to define rules. Instead of individual if-then rules, you arrange the rule’s conditions and actions in the form of a table when the rules rely on the same conditions. For example, assume you want to create a ruleset that should return whether an additional approval is necessary for a particular order. You can define an appropriate decision table for this use case (Figure 17).
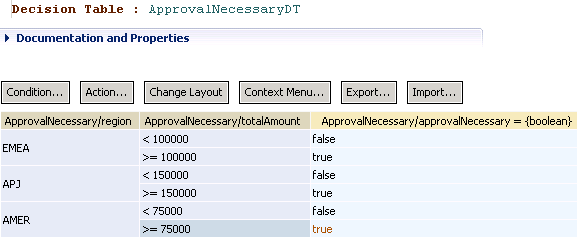
Figure 17
Decide if an approval is necessary based on a decision table
The decision depends on the region the order is coming from and the total amount of the order. If, for example, the order comes from the Europe, Middle East, and Africa (EMEA) region and exceeds $100,000, then an additional approval is necessary.
I’ll show you how to model a solution for this scenario. I’ll explain how to create a flow ruleset that decides whether an approval is necessary or not based on the region and the total amount.
You start with the data on which the flow ruleset is working. For this, you have to import an XSD file that looks like the one in Figure 18. (You can download this file at the bottom of the page.)
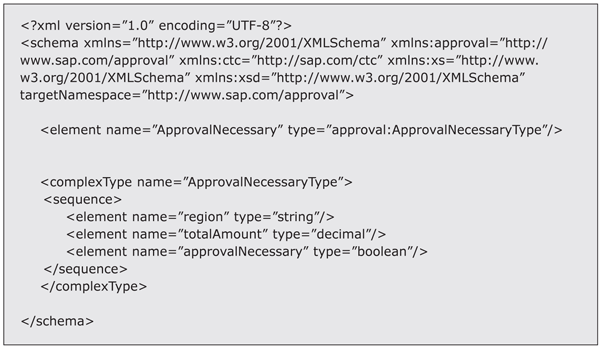
Figure 18
XSD file
The region and the totalAmount fields represent the input variables for the flow ruleset whereas approvalNecessary stands for the return parameter you want to hand back to the calling consumer. Import this file and make it available to the flow ruleset as I described it in my previous article.
Next you have to determine what the flow of your ruleset should look like. From Figure 17 you can conclude that the decision table only works for the three regions: EMEA, Asia Pacific and Japan (APJ), and the Americas (AMER). However, what if the region parameter doesn’t contain one of these regions? How should the ruleset behave in this case and how can I model this?
This is where the scripting feature of SAP NetWeaver BRM comes in handy. You can model this logic using scripting. You can verify the input parameter region against the allowed values. If the value of region is correct, you leave the decision up to the decision table. Otherwise, something obviously went wrong and you always want somebody monitor the order. Therefore, return true as the value for the approvalNecessary parameter in this case.
I’ll start with the creation of a new flow ruleset as described in the beginning of the article. Name the flow ruleset Approval Necessary Flow Ruleset 1.
On the Definitions tab, create a new Boolean variable called regionCorrect. It will hold the result of the verification whether the region parameter contains a valid value or not. Figure 19 depicts the Definitions tab after creating the variable. Don’t forget to save your changes after each modification.
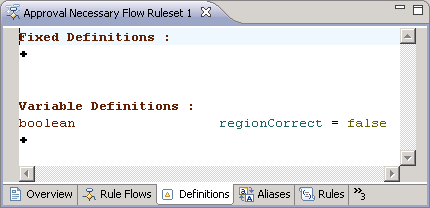
Figure 19
Define the regionCorrect local variable
Next, continue with the creation of the first script. On the Overview tab, click the New button next to the Rule Scripts table and name your script RegionCorrectScript. The rule script editor opens. The handling of the editor is identical to the rules editor. Click the plus sign icon  beneath the Actions title to add new statements. In my example, I want to add an if statement that sets the regionCorrect variable to true when the region field contains a valid value. The final if statement is depicted in Figure 20.
Tip!
Each region has to be entered separately behind the In operator. You can add a new region by clicking the last entered region and selecting Add a new expression from the context menu. A new default string is added to the list of regions that you can then override with the appropriate region name. Don’t type EMEA, APJ, AMER as one string while overriding the default string. Although the result of this looks almost identical to Figure 20, this will not work during runtime as the value of the input parameter region will then be compared against the whole string and not only against one region.
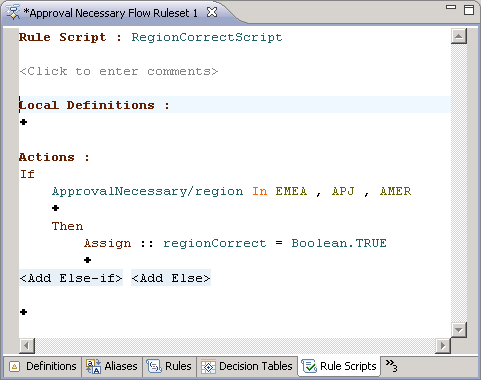
Figure 20
The RegionCorrectScript verifying the region parameter
Perfect! That’s all you have to do to define a script. Go ahead and define yet another script named SetApprovalNecessaryTrue. As the name indicates, it sets the return parameter to true when the region is incorrect. Remember that you want be able to review the order in case you have ambiguous content for the region parameter. The script looks like the one depicted in Figure 21.
Note
Recall the difference between the Assign (Figure 20) and the Execute (Figure 21) actions: You use Assign for internal variables whereas Execute is for imported fields.
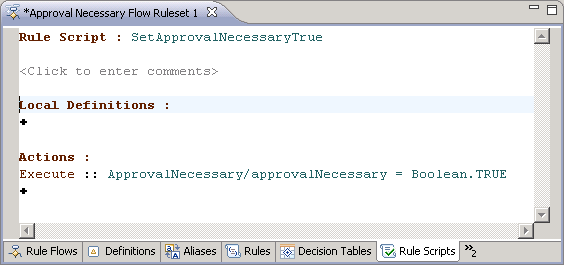
Figure 21
The SetApprovalNecessaryTrue script
Finally, you need to define the decision table. A wizard guides you through the creation process. On the Overview tab, click the New button next to the Decision Tables table and name the table ApprovalNecessaryDT. Click the Next button to proceed.
A row within a decision table consists of conditions and actions. First, define the conditions. In essence, this is a list of fields on which the actions rely. In my example, the row relies on the region from where the order is coming and the total amount of the order. You can either select those fields by double-clicking them in the upper part of the Decision Table Creation Wizard or by selecting them with a single click and adding them via the Select Conditions button (Figure 22). Add the fields region and totalAmount in this order. Once added, click the Next button to proceed.
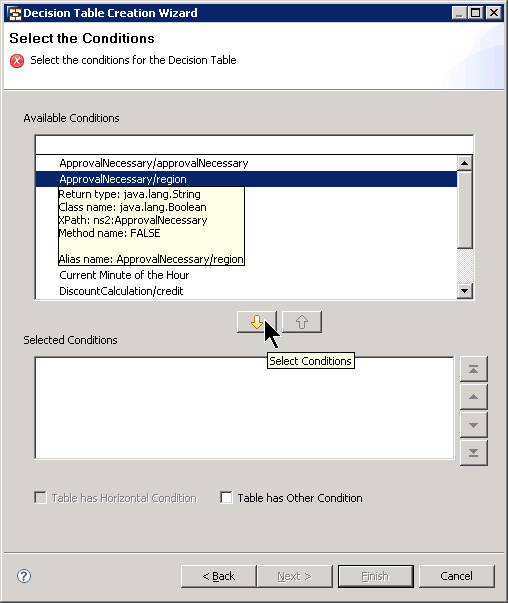
Figure 22
Choose the fields for the conditions
You’ve reached the Select the Actions step of the wizard. Add the approvalNecessary field as you did on the previous screen and click the Finish button (Figure 23). As result, the Decision Table editor opens, which contains the skeleton of your decision table (Figure 24).
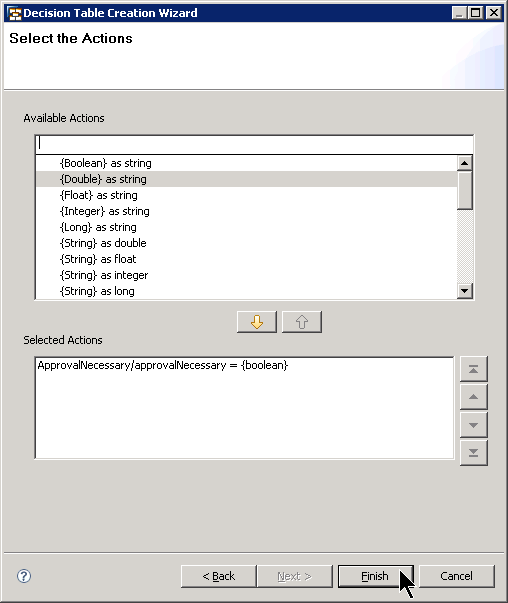
Figure 23
Select the action field
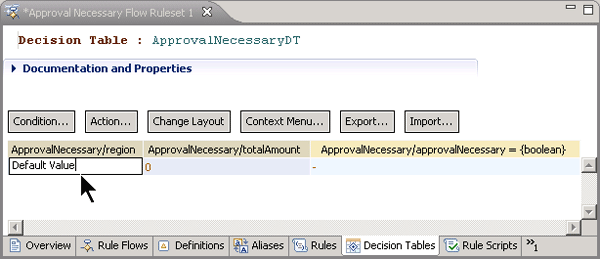
Figure 24
Editing entries in the decision table
Now start editing the entries of your decision table. Double-click the appropriate field in the table so that a local field editor opens containing the field’s contents as shown in Figure 24. Overwrite the value by replacing the Default Value string in the region column of the first row with EMEA. You always finish your editing by pressing Enter.
Next, change the totalAmount value from 0 to <100000. Finally, double-click the first entry in the approvalNecessary column and double-click to select false from the drop-down list. The final table row should now look like the screen in Figure 25.
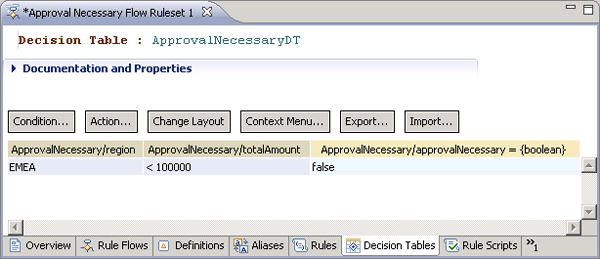
Figure 25
Result after editing the first table row
Note
In Figure 25, the Export and Import buttons allow you to export your decision table as an Excel sheet. You can modify it within Excel and reload it into the SAP NetWeaver Developer Studio by clicking the Import button. This allows business experts — who most probably are quite familiar with Excel but not with development environments such as SAP NetWeaver Developer Studio — to handle the decision tables.
Then you have to add a new row to the table. The next row should still belong to the EMEA region, so right-click in the field containing the <100000 condition and select Add Condition Values from the context menu (Figure 26). This adds a new sub condition for the EMEA region.
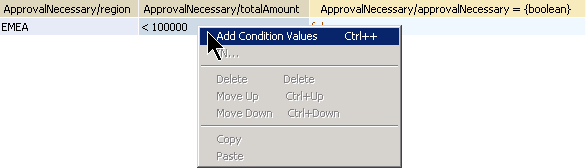
Figure 26
Add a new row
The Add Condition Values editor opens, which allows you to define multiple conditions at once. For this example, you only need one more condition. Enter >=100000 in the first row of the table and click the OK button. A new row for the EMEA region appears. Change the approvalNecessary value to true. This completes the definition for the EMEA region. Figure 27 shows the final result.

Figure 27
Final result for the EMEA region
To add the other regions (APJ and AMER) right-click in the EMEA field and again choose Add Condition Values from the context menu. This time, add two entries (APJ and AMER) to the table of the Add Condition Values dialog and click the OK button (Figure 28).
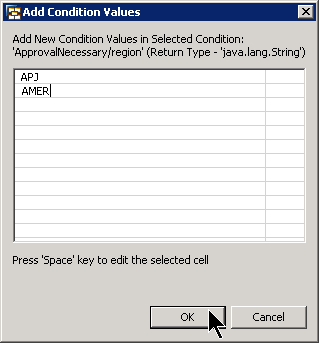
Figure 28
Add more regions to the table
This copies the entire structure of the first region to the table, which saves you a lot of effort. You only have to adapt the values in the totalAmount column so that the final table looks like the one shown in Figure 17. Save your changes.
Congratulations! With that you have everything in place to model the final flow. As I modeled a flow before (the first exercise in this article), I can keep the description short.
Step 1. Navigate to the Rule Flows tab that contains your main flow
Step 2. Drag-and-drop the two scripts, the decision table (from the Project Explorer view), and an exclusive choice gateway (from the palette) into the modeling area
Step 3. Connect them as shown in Figure 29
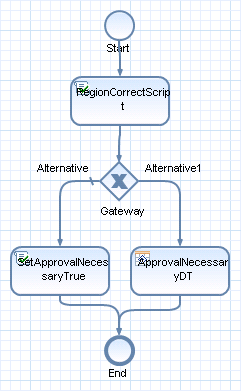
Figure 29
Connected flow for the “Approval Necessary” example
Step 4. Adapt the conditions for the gateway as shown in Figure 30:
- Rename Alternative to Region Wrong and mark its Default Gate check box
- Rename Alternative1 to Region Correct
- Change the condition of the Region Correct alternative to:
regionCorrect Equals Boolean.TRUE

Figure 30
Conditions of the exclusive choice gateway
Now I can explain the rule flow model in Figure 29. First it checks the correct value of the region input parameter via the script RegionCorrectScript. The script sets the internal variable regionCorrect on which the gateway relies. Depending on its contents, the flow either calls the decision table (if regionCorrect was set to true) or calls the script SetApprovalNecessaryTrue, which always forces an approval as something went wrong with the region parameter.
Step 5. Save all your changes and test your flow with some sample data. For an example of a test scenario, refer to Figures 31 and 32. Figure 31 contains sample data whereas Figure 32 depicts the trace for the test run.
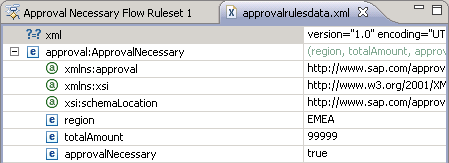
Figure 30
Sample data for testing the flow ruleset
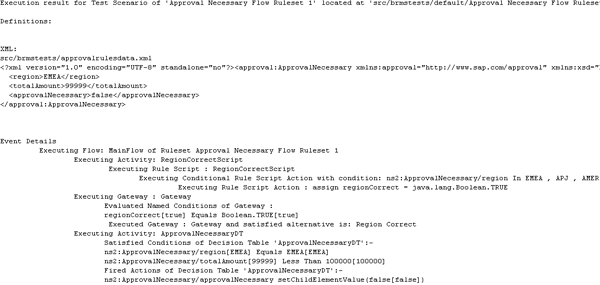
Figure 32
Trace of the executed flow ruleset with the sample data of Figure 31
The script checks whether the region is correct and finds EMEA to be valid. Next, the decision table is called and because the value is below 100,000 an approval is not necessary. As an exercise, change the value to 100,000 and see how the engine reacts.
Now that the flow ruleset is in place, you can also create a Web service out of it as I’ve described it in my other article. Right-click the flow ruleset Approval Necessary Flow Ruleset 1, select Web Service > Create WSDL Artifact from the context menu, and accept all the default values offered by the Web service creation wizard that pops up. Deploy your ruleset and test it with the Web Service Navigator.

Dr. Volker Stiehl
Prof. Dr. Volker Stiehl studied computer science at the Friedrich-Alexander-University of Erlangen-Nuremberg. After 12 years as a developer and senior system architect at Siemens, he joined SAP in 2004. As chief product expert, Volker was responsible for the success of the products SAP Process Orchestration, SAP Process Integration, and SAP HANA Cloud Integration (now SAP HANA Cloud Platform, integration service). He left SAP in 2016 and accepted a position as professor at the Ingolstadt Technical University of Applied Sciences where he is currently teaching business information systems. In September 2011, Volker received his Ph.D. degree from the University of Technology Darmstadt. His thesis was on the systematic design and implementation of applications using BPMN. Volker is also the author of Process-Driven Applications with BPMN as well as the co-author of SAP HANA Cloud Integration and a regular speaker at various national and international conferences.
You may contact the author at editor@SAPpro.com.
If you have comments about this article or publication, or would like to submit an article idea, please contact the editor.