Manager
Digital signatures enable you to send documents electronically, thereby avoiding time lost to physically mailing signed documents. To ensure that the digital signatures on your documents are authentic and secure, it is important that you understand all the SAP Solution Manager configuration steps involved. This article breaks down the complex process for creating master documents for statuses and the best way to sign documents with digital signatures.
Key Concept
Configuring digital signatures can be a complicated process and requires carrying out several steps. You need to have a very good understanding of your signature approval requirements so you can configure digital signatures to meet your organization’s needs more closely.
Configuring digital signatures is a one-time activity — once you have the basic building blocks in place, the ongoing maintenance is simple. However, you must proceed with caution when you set up and configure digital signatures to avoid the potential of setting up an incorrect approval process — or worse, system errors. In my previous article on digital signatures, “Configure Digital Signatures in SAP Solution Manager,” I outlined the basic customizing activities in the IMG required for digital signatures. In this article I take the process one step further and show you how to create master data for document statuses. The values you enter become options available to you when you create and change document statuses.
Getting Started with Document Configuration
You can find these activities in the IMG by navigating to SAP Solution Manager > Cross-Scenario Settings > Document Management > Status for Documents. When documents are sent through an approval chain, the document status may change as each approver or approving group takes some action on the document, such as passing it to the next approver or returning it to the sender with comments.
Open the Define Status Values for Documents activity in the IMG to create custom statuses to supplement the standard SAP ones. I created several new statuses (Z01 through Z08) for the states of my SAP Solution Manager documents (Figure 1). You create statuses by simply entering an attribute value and a description in the appropriate columns. These statuses correspond to the various states in which you want a document to be. If your company has a very intricate approval process, you may need to create more statuses than I have. The standard statuses you see in Figure 1 (e.g., COPY_EDITING) are delivered by SAP.
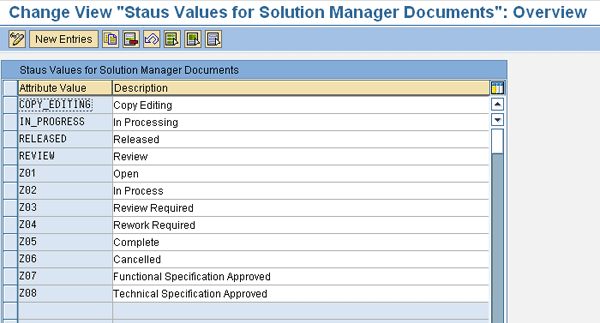
Figure 1
Create document status values
In the next customizing activity, Assign Status Values for Read Authorization, you can maintain statuses that a user with the appropriate authorization objects (and therefore document read authorization) is able to display. In Figure 2, I added the newly created statuses Z01 through Z08 to the list of displayable statuses. You do this by clicking the New Entries button, which opens the Attribute Value box for input. Select the corresponding status value from the drop-down. Note that you should talk to your SAP security administrator to make sure your user has the correct role assigned. These roles are SAP_SOL_RO_COMP or SAP_SOL_RE_COMP. The SAP_SOL_RE_COMP role provides display-only access to SAP Solution Manager transactions (including documents). The SAP_SOL_RE_COMP role provides users that have the appropriate status (as per your configuration in the IMG) with the ability to display documents.
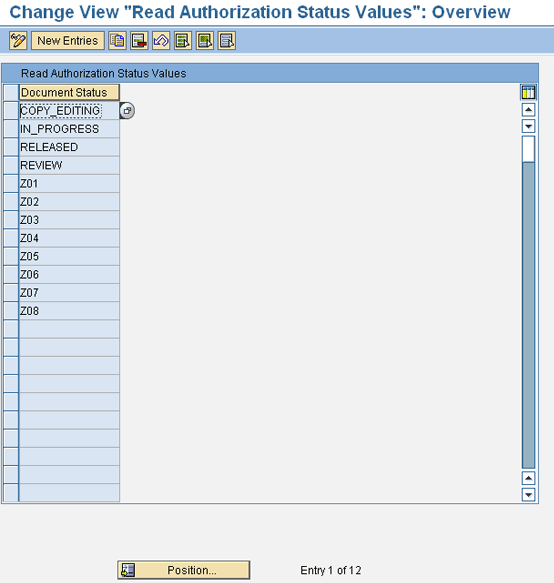
Figure 2
Read authorization status values in the IMG
In the next customizing step, Define Document Status Schemes, you must combine the document status values that you see in Figure 2 into a status schema. A status schema groups approval activities. Each status schema is a profile that contains information such as initial statuses and the sequence in which you can activate user statuses. In this step, you create or maintain these status schemas (Figure 3). You can assign various attributes to this status schema, such as the status values that this document schema can have.

Figure 3
Sample status schemas
Note
Creating your own status schema in the customer namespace (as opposed to using the standard ones delivered by SAP, as shown in Figure 3) is a good practice. You will have far more flexibility in tailoring a schema to meet your signing and approval hierarchy needs.
Assume for the sake of this example that you are assigning attributes to the status schema called FUNDOCS. As with any dialog structure, highlight the specific line for FUNDOCS and double-click the Status Values node in the Dialog Structure on the left. This takes you to another screen where you can maintain these values or attributes. Alternatively, if you want to create a new status value, click the New Entries button and the screen shown in Figure 4 appears.

Figure 4
Create new status values and assign attributes
There are several fields in Figure 4 that you may have to fill out depending on your requirements. I’ll review some of the most important fields. Status pertains to the document status that you created earlier. You can select it from the drop-down list that appears when you press F4 while your cursor is in the Status column. Check the Initial Status check box if the status should appear as an option in that particular schema (FUNDOCS in my example) when you create a new document. Check the Document is locked check box if you want a document to be protected against any potential changes when certain statuses are reached. In the Signature Strategy field, assign the appropriate signature strategy you created earlier (as explained in my previous article).
The final step is to connect the status schemas that you just created to the document type using the Assign Status Scheme to Document Type activity. There are numerous document types in SAP Solution Manager, so this process ensures that all the attributes you assigned to each of the status schemas, including the document statuses, are now available whenever this type of document is created. One of the ways to configure this step (in the context of an SAP Solution Manager project) is by first creating a project, which I discuss in the next section of this article. Once a project is created, you can carry out this configuration activity (i.e., connecting the status schemas to the document type) in the normal sequence.
This activity that is shown in Figure 5 has a few steps you need to carry out in sequence. When you open the Assign Status Scheme to Document Type activity in the IMG, the system displays a screen with a list of all available projects. I selected ZTEST (which is the project I’ll create in the next section). Next, click the Project Standards tab and then click the Documentation Types tab on the left panel. You are shown a list of all the project documentation types. To assign the desired status schema to a particular document type, click the Project template button at the bottom of the screen; a pop-up window is displayed. Here, I assigned the status schema that I had previously maintained (i.e., FUNDOCS in Figure 3) to the document type AD (Additional Documentation). Once I save this information, I am ready to use this status schema for an AD document.
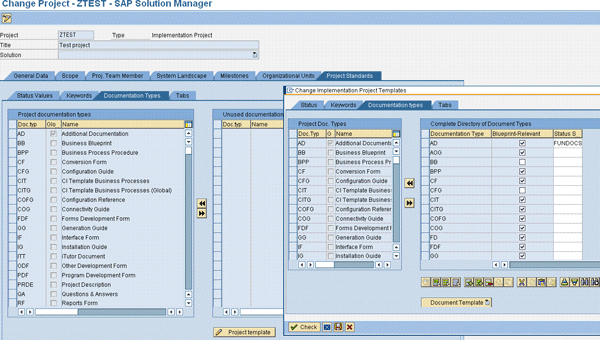
Figure 5
Assign a status schema to a specific document type
Note
It is good practice to assign a new custom-created status schema to a custom-created document type. Assigning a status schema to a standard SAP document type can result in its deletion during an upgrade or support package installation. Also, if the Status Schema field is blank for a given document type, you use the standard SAP document statuses.
Create a New Project
To test digital signature capabilities, create an appropriate test project. Use transaction SOLAR_PROJECT_ADMIN to create a new project, which in my example will be called ZTEST. When you execute this transaction, you are taken to the Project Administration — SAP Solution Manager screen. Click the create icon on this screen and a pop-up screen is displayed (Figure 6). Enter your project name and select the type of project from the drop-down list for this field. The type of project and solution that you select varies based on your requirements. When you press Enter or click the enter icon, you return to the project administration screen.
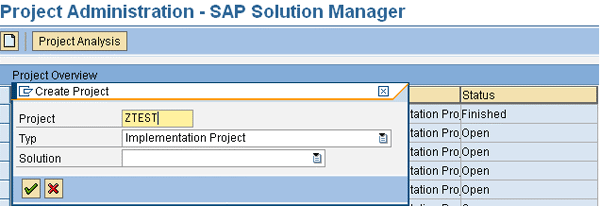
Figure 6
Creating a new project
Because I am creating this project simply to demonstrate digital signature functionality, I did not enter values in all the screens that you will encounter as you navigate the various project administration tabs. These values depend on your particular requirements. However, note that there is one mandatory field to fill in before you can save this project: the language. In the General Data tab, choose the language for your project (I selected English for my example). You can now click the save icon to save your project.
Create and Digitally Sign a Document
Once you have fully configured digital signature functionality, including the steps described in my previous article, you are ready to create and digitally sign a document in SAP Solution Manager.
Use transaction SOLAR02 to ensure the correct project is displayed. Navigate to the Proj. Documentation tab and click the plus sign icon. You see an Add Document pop-up dialog (Figure 7).
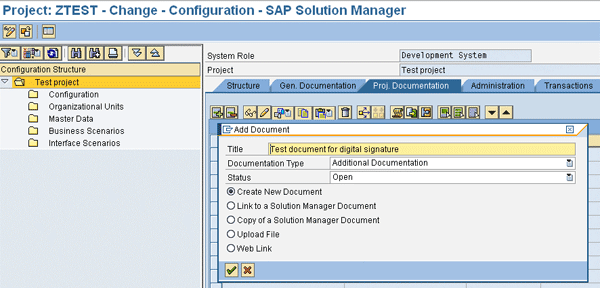
Figure 7
Create a new document
Enter a title, select the appropriate document type, and select the status. You must select the document type that was specified earlier (document type AD in my example in Figure 5 — or alternatively, an appropriate customer-created document type).
Click the save icon and you see the screen shown in Figure 8. The digital signature pop-up screen you see is a confirmation that you have successfully carried out all the configuration activities. You can see that the signatory (me) is defaulted. Enter your password, and you can add an optional comment if you’d like.
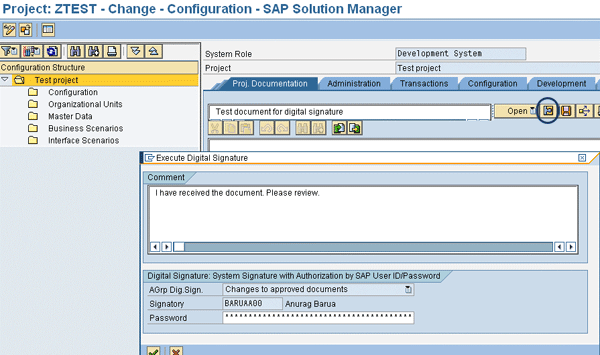
Figure 8
Digitally sign your document
Note that digital signature authentication is done using the combination of your SAP ID and password. If you are successfully authenticated, you receive an Authorization procedure completed pop-up dialog after you press Enter or click the enter icon. To confirm that you have digitally signed this document, click the attributes icon to the left of the save icon in the Proj. Documentation tab. A new pop-up appears and you should navigate to the History tab (Figure 9).

Figure 9
Audit trail of document activity
This tab shows all the activities relevant to this document from the point when it was created. The latest status of this document is Complete Signature Procedure, which validates that I have digitally signed this document.
Anurag Barua
Anurag Barua is an independent SAP advisor. He has 23 years of experience in conceiving, designing, managing, and implementing complex software solutions, including more than 17 years of experience with SAP applications. He has been associated with several SAP implementations in various capacities. His core SAP competencies include FI and Controlling FI/CO, logistics, SAP BW, SAP BusinessObjects, Enterprise Performance Management, SAP Solution Manager, Governance, Risk, and Compliance (GRC), and project management. He is a frequent speaker at SAPinsider conferences and contributes to several publications. He holds a BS in computer science and an MBA in finance. He is a PMI-certified PMP, a Certified Scrum Master (CSM), and is ITIL V3F certified.
You may contact the author at Anurag.barua@gmail.com.
If you have comments about this article or publication, or would like to submit an article idea, please contact the editor.


