The United Nations (UN) Common System Compensation Package was revised following the UN General Assembly decision on December 2015. To achieve this, the International Civil Service Commission (ICSC), in cooperation with SAP, developed the Entitlement Validation Engine (EVE) to be implemented for all UN organizations, by the first of January 2017. On the SAP ERP level, SAP ERP 6.0 enhancement package 7 is mandatory to deploy this new compensation package. Learn all the required steps leading to this deployment in detail.
Key Concept
The new
United Nations (UN) Common System Compensation Package was recommended by the International Civil Service Commission (ICSC), following the UN Assembly General decision in December 2015 (
https://commonsystem.org/cp/). Mainly, the ICSC recommendation was to simplify the salary scale and educational grants through a streamlined field package.
In fewer than eight months, the International Telecommunication Union (ITU,
www.itu.int) achieved an important SAP ERP 6.0 enhancement package 7 upgrade. The upgrade was performed to implement the new United Nations (UN) Common System Compensation Package. The package, dedicated to the UN community and non-profit organizations (NPO), was developed by SAP through the Entitlement Validation Engine (EVE) process and released in 2016.
The challenge was to upgrade the current SAP ERP 6.0 enhancement package 5 system to enhancement package 7, required for EVE implementation, and to fulfill all new functionalities in the SAP ERP system, mainly in FI, CO, and SAP ERP HCM, including all new components related to the UN system. Another important challenge was to ensure the integration with other applications (Customer Relationship Management [CRM], Supplier Relationship Management [SRM], Business Intelligence [BI), SAP Enterprise Portal [EP]), and external interfaces such as interfaces for bank payments and e-commerce.
The first technical requirement was to perform an operating system (OS)/database (DB) upgrade for all systems from SQL 2005 to SQL 2012. The upgrade was performed in a sandbox (SBX) environment with full integration with satellite systems (copied from production [PROD]). All issues were gathered and fixed in two months. After that, we performed the upgrade on the development (DEV) and quality assurance systems (QAS) with an intensive power application key-users test minimizing all risks for go-live on PROD, which was performed on the weekend of December 2, 2016 (about 37 hours of run time) with zero issues. After four weeks of post-go-live activities, the feedback from all the users was positive and the new compensation package was implemented and productive as of January 1, 2017.
This case study takes you through our upgrade journey, giving you tips and best practices for upgrading to enhancement package 7. It focuses on all the preparation steps as well as on the upgrade plan, including go-live and post-go-live activities’ checklists. Also, relevant information and potential issues faced by users during enhancement package 7 upgrade are exposed.
The target audience is any SAP users who are contemplating an SAP ERP enhancement package 7 upgrade, the UN SAP community, and SAP Basis and upgrade specialists.
SAP ERP Enhancement Package 7 Upgrade
As usual, it is important for companies running SAP software to stay up-to-date with the SAP technology evolution. A minimal reason is the technical one, based mainly on an SAP technical upgrade, 1 to 1, ensuring the existing applications run in the new SAP versions. For SAP ERP, enhancement package versions are crucial to this evolution and improvement. The current SAP ERP 6.0 version is enhancement package 8, but the most stable and most used worldwide is the ERP 6.0 enhancement package 7. If you add other constraints (OS/DB harmonization, performance, and integration) and new application requirements, enhancement package upgrades become key for your SAP architecture strategy for facing new technology challenges as well as new business needs.
For ITU, the first SAP customer in the UN community, SAP ERP 6.0 enhancement package 7 became mandatory to implement the new UN Common System Compensation Package imposed by the International Civil Service Commission (ICSC) as of January 2017.
Summary of the ERP Enhancement Package 7 Upgrade
Prior to the SAP ERP 6.0 enhancement package 7 upgrade, we built an SBX environment with a synchronized copy of the PROD system. This was the key to mitigate all technical risks and ensure the integration and connectivity with other SAP and non-SAP systems. Also, all employee self-service (ESS) applications and web access from outside were tested. The upgrade was performed in this healthy SBX environment. All issues were gathered, analyzed, and fixed over an eight-week period.
After implementing the new UN HR Compensation Package and activating all related new functionalities, preliminary application tests were performed by application key users, minimizing risks on the business level. The ICSC recommendation was designed by SAP through a specific HR package (EVE) that is valid for the UN Common system only.
The DEV and QAS environments were upgraded following the same scenario as the SBX environment, but with fewer issues and a good performance, since most of issues were fixed during the SBX upgrade. On the QAS environment, which was an exact copy of PROD, intensive key-user tests were performed over six weeks, allowing optimal preparation of the PROD upgrade. Finally, the go-live PROD upgrade was performed during one weekend with zero issues (see the upgrade log:
ISUMabaplog) and with good performance.
Note
Additional technical aspects may be provided upon request. Contact the author at ali.sbai@itu.int.
Once the SAP ERP 6.0 enhancement package 7 upgrade was complete and released to users, the EVE and new ICSC Compensation Package implementation were configured by the SAP ERP HCM team with the support and supervision of Jürgen Limpert, the SAP HR UN specialist.
This important project was implemented on time and with minimal external cost. On behalf of the ITU IS Department and ERP team, I would like to thank the ITU management for its confidence in this team, which has led to its completion; my ERP colleagues for their full involvement during the entire project; and key business users for their intensive tests in the QAS phase validation.
Prerequisites to the Upgrade
In this section, the focus is on the main technical prerequisites of the source platform on the OS/DB level, and the required SAP ERP enhancement package 7 documentation and tools.
Figure 1 is an overview of the SAP landscape architecture. It shows the SAP ERP central system and back-end systems, SRM, CRM (including Web Channel), SAP Gateway, and the BI and EP landscapes. Each landscape contains DEV, QAS, PROD, and SBX environments.

Figure 1
An integrated view of the ITU SAP landscape architecture: P stands for Production, Q for Quality, D for Development, and S for Sand Box (i.e., ERD-ERQ-ERP (SAP ERP landscape) and BWD-BWQ-BWP for BI)
Prior to the SAP ERP 6.0 enhancement package 7 upgrade, an OS/DB upgrade was performed via a homogenous system copy (HSC).
Figure 2 shows an overview of the source status at the OS/DB level. For HSC, we used Software Provisioning Manager (SWPM) tools (always use the latest version). Then we tested integration and connectivity.

Figure 2
OS/DB upgrade performed, with the check of all connectivity between systems, prior to the SAP ERP 6.0 enhancement package 7 upgrade
Figure 3 shows the OS/DB version and setting.
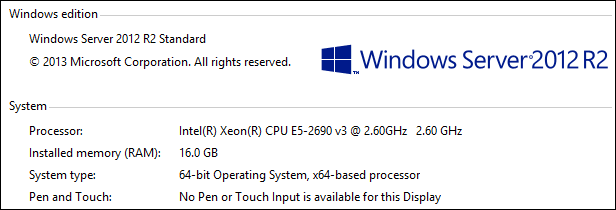
Figure 3
Windows OS setting: Windows Server 2012 R2 standard edition with RAM memory of 16 GB
After upgrading the OS/DB to Windows NT X86_64 2012 R2 6.03.9600 SP1 (OS) and SQL Server 2012 SP3: 11.0.6020 SP3 (DB), the source was prepared with appropriate sizing as shown in
Figure 4.
- Upgrade directory: 500 GB (including the Software Update Manager [SUM] directory and the download directory).
- SAP DB increase: 30 percent to 40 percent for a DB source of 300 GB. We prepared for a DB target of 400–450 GB.
- Transaction log increase during the upgrade: 50–100 GB
- The Download Directory contains more than 800 Support Packages (about 50 GB)
- SUM Directory: Prepare for more than 100 GB to avoid disk-space issues
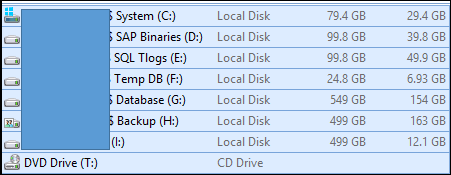
Figure 4
Sizing and file preparation for the upgrade; local disk drive I, with disk space of 499 GB, is dedicated to the SUM upgrade directory
Figure 5 indicates the memory and sizing requirements for the source OS/DB settings.

Figure 5
OS/DB information, memory, and DB size
Figure 6 shows the memory and page file settings on the OS level.
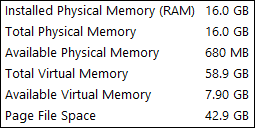
Figure 6
Memory and page file setting
To avoid performance and disk-space issues, physical memory is set to 16 GB, swap to 42 GB, and DB size to 500 GB. The target DB increases more than 30 percent for an SAP ERP 6.0 enhancement package 7 upgrade.
ERP Enhancement Package 7 Upgrade Documentation, Upgrade Guides, and Notes
The upgrade documentation for SUM 1.0 is based mainly on the Upgrade Master Guide and SAP Note 2277058. Use the latest version of SAP Note 2277058 and download the latest SUM Support Packages. The SUM Support Package 18 [lmt_004] was used for the enhancement package 7 upgrade, in our case. For more information go to
https://launchpad.support.sap.com/#/notes/2277058.
Source Preparation: Check the Source System and Prepare Solution Manager
In this section, I explain how we prepared the source system and Solution Manager.
Check and Update the Support Package Level and Kernel (If Required)
Check the OS/DB and SAP Product Availability Matrix (PAM). Read the Master Upgrade Guide:

Figure 7
Check the PAM
- Note that SAP ERP 6.0 enhancement package 7 runs under Kernel 7.45 Unicode (Platform Windows x86_64, for our case). You may also check in the PAM link, Kernel, and product instances for SAP ERP 6.0 enhancement package 7, web browser platforms, and maintenance validity. In general, it’s recommended that you update the source SAP system to the latest Support Package level and use the latest Kernel and latest SPAM/UPDATE.
Solution Manager Preparation and Configuration
First, the Solution Manager Support Package level must be at Support Package 14 as the minimum. In our case:
- Service Tools (ST) 710, Support Package 14, Basis 7.02 Support Package 17
- Java 7.02 Support Package 15, LM-SERVICE Support Package 13
Figure 8 shows the Solution Manager Support Packages on the ABAP- and Java-stack levels.
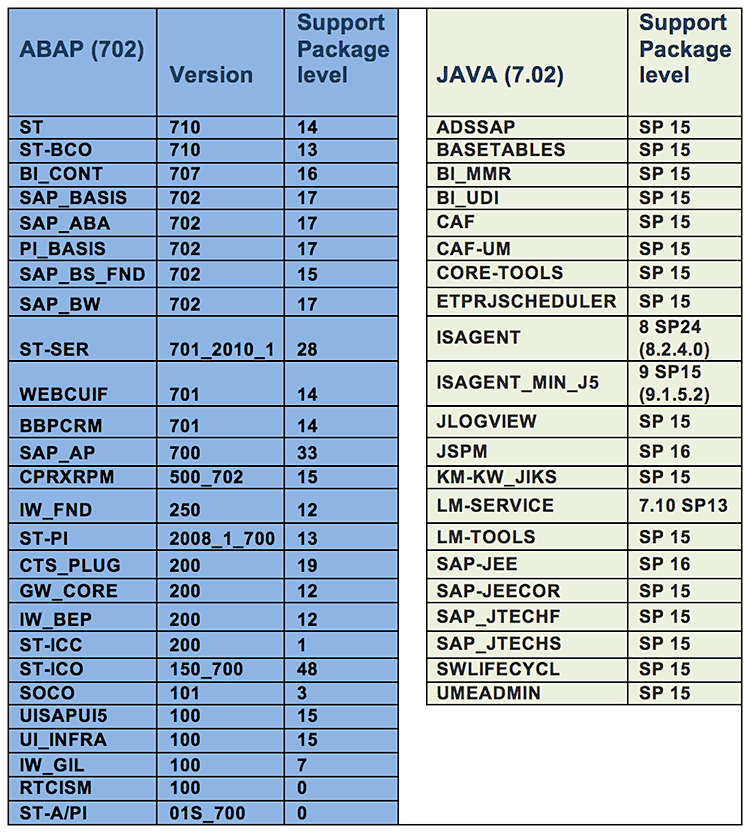
Figure 8
Solution Manager Support Package levels
Step 1. Install Diagnostic Agents (DAs) on your satellite systems and synchronize the System Landscape Directory (SLD) by using transaction code RZ70 on the system to be upgraded. DAs must be installed on the source system allowing you to collect OS/DB information from the server in the SLD. During DA installation, via Software Provisioning Manager (SWPM), the source system must be registered in the SLD. Use the latest SAP Host Agent Support Package.
Use transaction code SWPM and install the DA on Solution Manager as well as on the satellite systems, following the SWPM wizard (
Figure 9).

Figure 9
DA installation, via SWPM
Continue through the diagnostics installation wizard and register the system in the central SLD (
Figure 10).
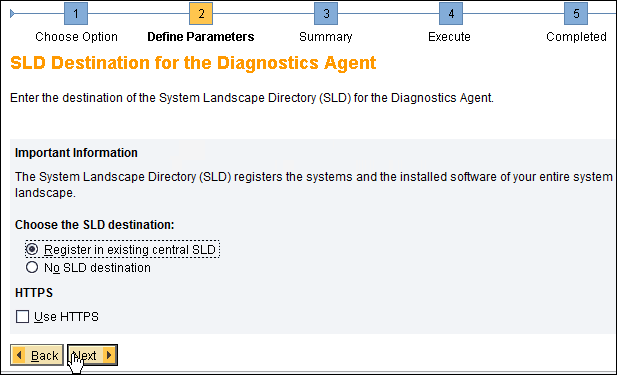
Figure 10
Register the satellite system in the central SLD
The SLD Host agent must be defined with a dedicated port to access the SLD Host server. SAP recommends that you use a separate SLD rather than the Solution Manager SLD.
During DA installation, Solution Manager with a dedicated HTTP port must be provided to allow synchronization between the SLD and the Landscape Management Database (LMDB). Use J2EE port (i.e., 50101 in
Figure 11) and the SLD Data Supplier User with dedicated authorizations.
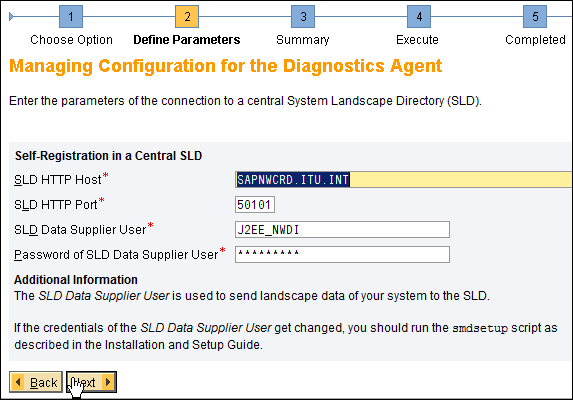
Figure 11
The central SLD, which is different than the Solution Manager SLD
Enter the Solution Manager information: Solution Manager Host name, HTTP port (i.e., 8101 as shown in
Figure 12), and dedicated User SMD_AGT.
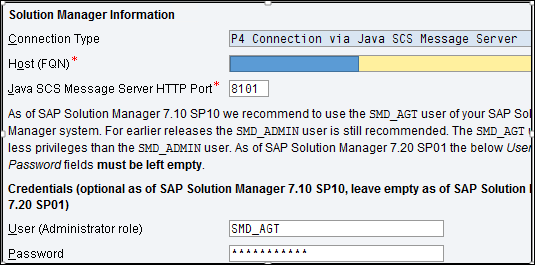
Figure 12
Solution Manager information
Run transaction code RZ70 to synchronize the source information (such as Support Package levels and OS/DB information) with the SLD. Now all the source information is collected in the SLD and is used later in the LMDB of Solution Manager. A dedicated user, SMD_AGT, ensures connectivity between the SLD and the LMDB.
Note
Do not create your technical system manually. Use transaction code RZ70 and SLD-LMDB synchronization instead.
Solution Manager system preparation and basic configuration are mandatory steps (
Figure 13) for any upgrade project. Prior to this, the satellite system must be registered in the SLD, via transaction code RZ70. After that, step-by-step system preparation and basic configuration must be performed successfully, using a dedicated system administrative user.
Figure 13
Use transaction code SOLMAN_SETUP on Solution Manager in the productive client, and go through the wizard step by step
Step 2. Run the System Preparation wizard
. This import phase must run successfully. Check the Solution Manager installation, prerequisites notes, connectivity, and the LMDB setup. All steps must be in green status, as shown in
Figure 14. During system preparation, the main users, installation, SAP Notes, connectivity, and the LMDB are set, checked, and configured.

Figure 14
The system preparation wizard is complete and all the steps are green
Note
The Connect Diagnostics Agents entry in Figure 14 is not on our ERP system. Also, the Configure Gateway entry is optional. All the Gateway services were activated successfully.
Some important steps in system preparation are:
Maintain and test users allowing connectivity, as shown in
Figure 15.

Figure 15
Maintain users in system preparation ensuring connectivity between Solution Manager and Diagnostic Agents on satellite systems


Set up the LMDB (
Figure 16).
Figue 16
The LMDB is set up correctly
Check all the parameters of system preparation (i.e., SAP Support Portal, SLD, and LMDB synchronization), and SDCCN activation in the Configure Automatically step (
Figure 17).

Figure 17
Run the Configure Automatically step
Step 3. Run the Basic Configuration wizard (
Figure 18). The result must be successful before taking the next step in the SOLMAN_SETUP transaction menu (
Figure 13, Managed Systems Configuration). In this phase, you ensure that Basic Configuration is set up and that Solution Manager is ready to manage your upgrade and other services, such as Early Watch Reports Management (EWR) and Technical Monitoring. Mainly, the upgrade solution, users and connectivity data, Wily Introscope configuration, and Remote Function Call (RFC) connections must be complete. All steps must be green.
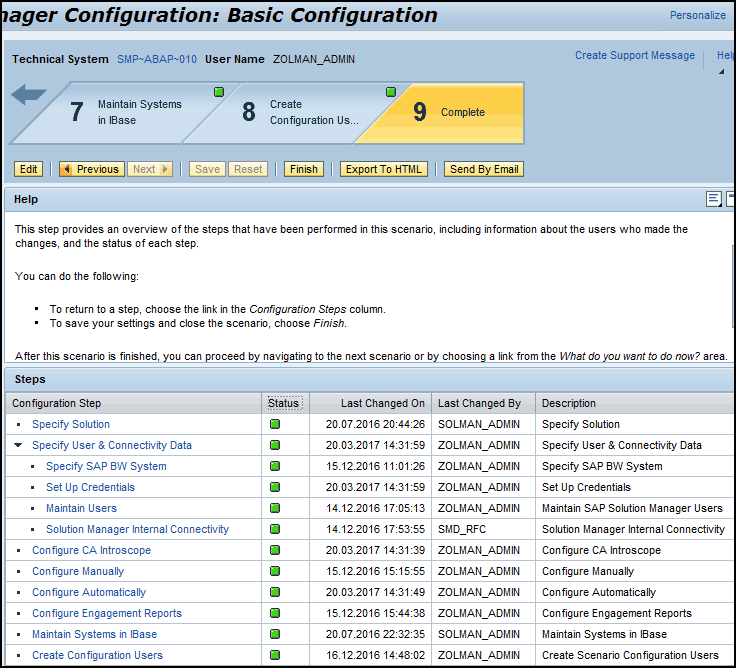
Figure 18
The Basic Configuration steps are complete
During Basic Configuration, all system users and RFC connections must work. Run the Configure Automatically step, then check the jobs parameters in transaction code SM37, schedule Solution Manager background jobs, and provide all parameters, as shown in
Figure 19.
Figure 19
Configure automatically to check all parameters of Basic Configuration
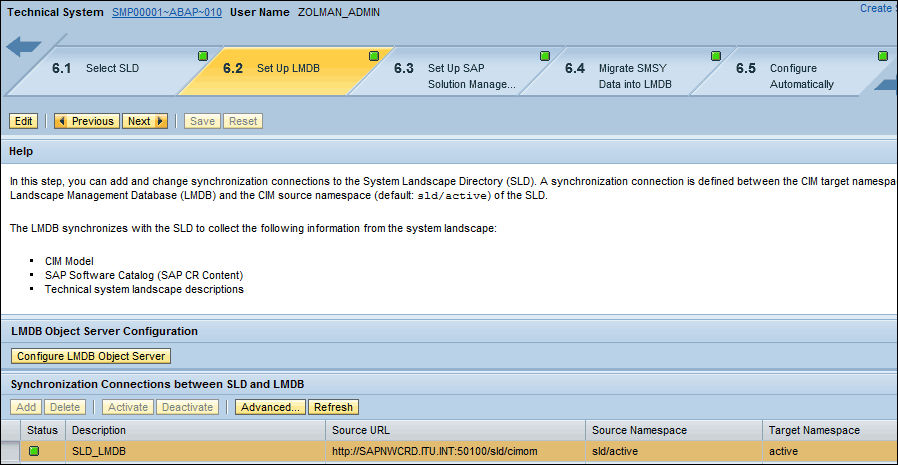
Step 4. Synchronize the SLD and the LMDB. Run transaction code LMDB in Solution Manager and check the synchronization. In this step, the synchronization between the SLD and the LMDB must be successful, as shown in
Figure 20.
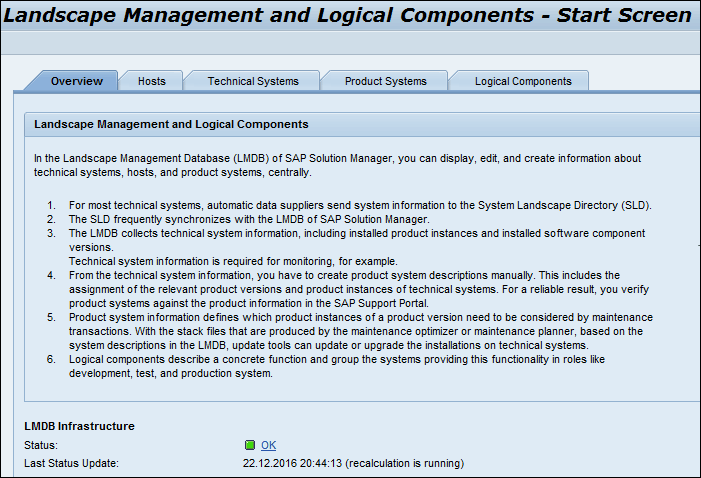
Figure 20
The LMDB Status indicator must be green to allow real-time synchronization with the SLD
Figure 21 shows the successful synchronization.
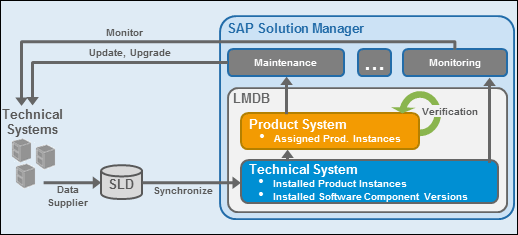
Figure 21
Synchronization of the technical systems, the SLD, and the LMDB
Step 5. Configure the managed system. In this important phase, you must prepare your source system to be upgraded. Use transaction code SOLMAN_SETUP or SM_WORKCENTER with dedicated authorizations. Your technical system must be defined and configured to be upgraded as shown in
Figure 22.
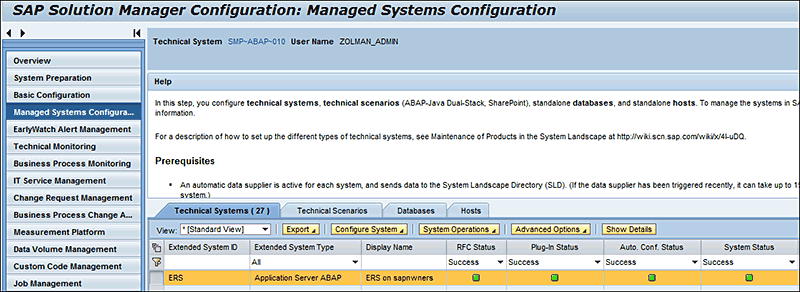
Figure 22
The managed system must be configured
Step 6. Generate an XML upgrade file, the main input of the upgrade. Since January 9, 2017, the Maintenance Optimizer is no longer used. It was too complicated. SAP offers this functionality directly via the SAP Support Portal (
https://support.sap.com/home.html#) instead. How? Go to the link
https://support.sap.com/release-upgrade-maintenance.htm shown in
Figure 23.

Figure 23
Click the Maintenance Planner tile
Click the Maintenance Planner box, which takes you to
Figure 24.

Figure 24
The Explore Systems window
In
Figure 24, click the Explore Systems window to select your system.
Once your system is selected, check the synchronization with the SAP Support Portal (https://apps.support.sap.com/sap(bD1lbiZjPTAwMQ==)/support/mp/index.html) ensured by the LMDB (from Solution Manager to SAP), and verify it as shown in
Figure 25. Once these two functions are green you can proceed to plan your upgrade and generate the upgrade XML file that the SUM tools use later.

Figure 25
Maintenance Planner menu with the schedule, synchronize, verify, and plan (upgrade) steps
Click the Plan box in
Figure 25,
which takes you to
Figure 26, and select enhancement package 7 for ERP 6.0
.
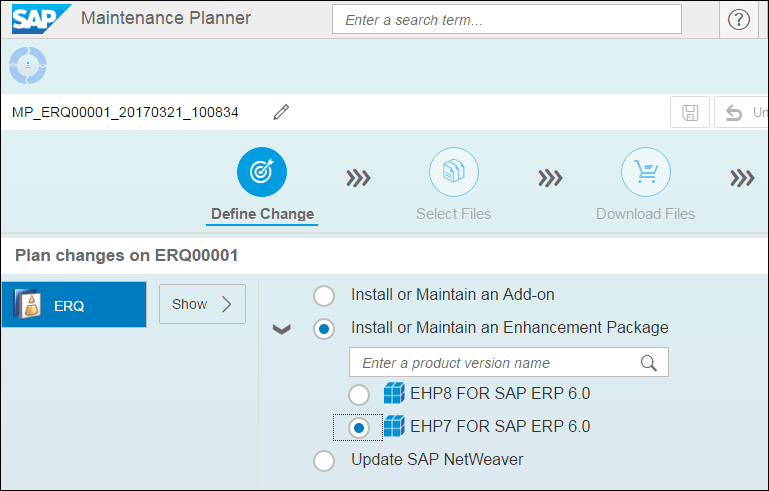
Figure 26
Select enhancement package 7 for ERP 6.0
Follow the menu path and select the EHP7 FOR SAP ERP 6.0 radio button, the latest stack version (last stack release date), and the ERP components (
Figure 27).

Figure 27
ERP 6.0 enhancement package 7 components selection
The target components are displayed in
Figure 28. Check all the components and add-ons that fulfill your active ERP components and click the Confirm Selection button.

Figure 28
Target components selection
Select the OS/DB files, mainly your platform (Windows x64 64Bit in our case), as shown in
Figure 29.

Figure 29
OS/DB platform selection for the Kernel
Figure 30 lists the dependent and independent stack files that you need to select. Click the Confirm Selection button (not shown).
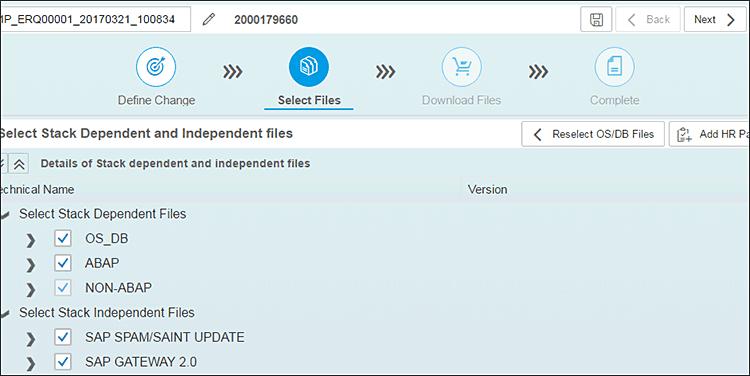
Figure 30
Stack-dependent and stack-independent files
Download the selected files as shown in
Figure 31.
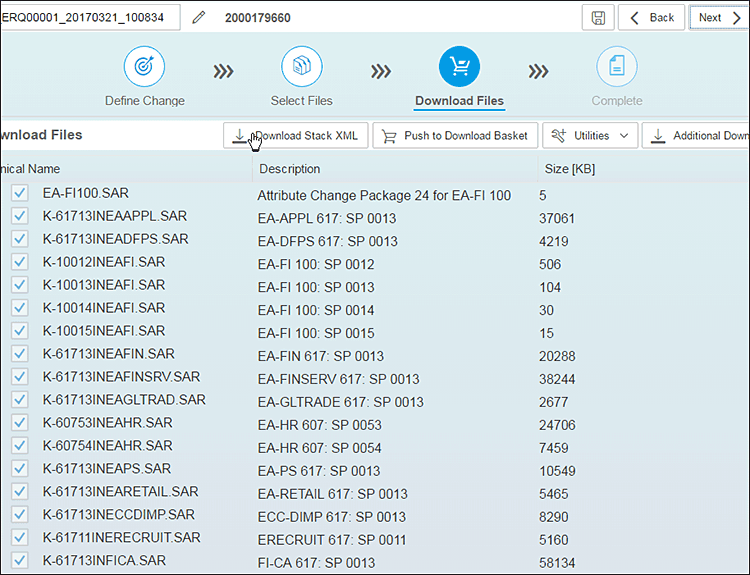
Figure 31
All selected Support Packages to be downloaded and included in the stack XML file
Check if any components or add-ons are missing and revise if necessary. Download and save the stack XML file. Check the report of the generated Maintenance Planner as shown in
Figure 32, paying special attention to the Source and Target versions.

Figure 32
The Maintenance Planner report
Tip!
To avoid any issues with missing components during the SUM procedure, download all Support Packages included in the stack XML file.
SAP ERP Enhancement Package 7 Upgrade Plan: SBX, DEV, QAS, and PROD
As mentioned, the ERP enhancement package 7 documentation common for all environments (SBX, DEV, QAS, and PROD) should be analyzed, particularly the Upgrade Master Guide and SAP Note 2277058. All related notes must be examined.
SBX Upgrade
Take the following steps in the SBX environment to prepare for the upgrade.
Step 1. Prior to the upgrade, you need to do an integration test in the SBX environment. The setup of the SBX environment for the SAP and non-SAP systems connected to the central ERP system is crucial for the upgrade. Indeed, the connectivity and integration (such as RFCs, replication, interface jobs, ESS, and web access) must be tested before the upgrade to mitigate any issues related to the integration of ERP enhancement package 7 with existing satellite systems that remain unchanged. Prior to this, we performed synchronized copies from all PROD systems (ERP, SRM, CRM, BI, and EP).
Figure 33 is an overview of the integrated SBX environment.
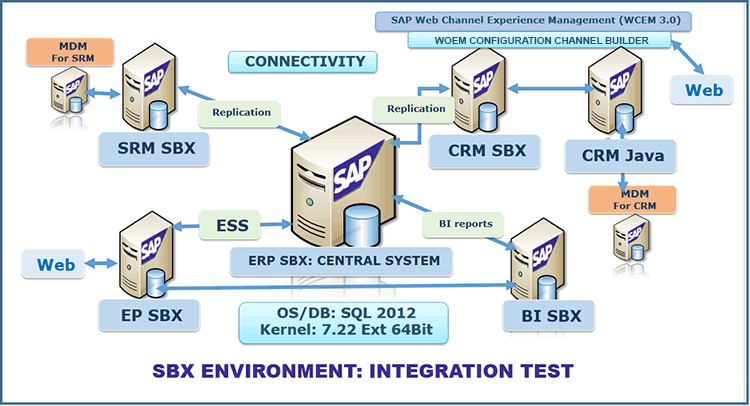
Figure 33
The SBX environment copied from the PROD environment
Tip!
The key preparation of this upgrade was building an SBX environment via synchronized HSC from all PROD systems, to minimize all technical risks and to fulfill all integration requirements.
Step 2. The ERP enhancement package 7 upgrade on the SBX environment took place on an exact copy of PROD. All satellite systems were copied in synchronization with the ERP copy, via SWPM with the HSC.
The upgrade procedure was accomplished via SUM. This procedure was simulated on this SBX environment and repeated for DEV, QAS, and PROD. Once the source system was configured in Solution Manager and a stack XML file was generated, all components in the XML file, the latest Kernel, and the latest SUM tools were downloaded from SAP Service Marketplace and gathered in a dedicated download directory. This is valid for any environment.
Tip!
Copy a valid download directory from SBX to the other environments. Since SBX is an exact copy of PROD, all downloaded Support Packages must be used in the whole SAP ERP landscape (DEV, QAS, and PROD).
We ran the SUM procedure through the six upgrade phases shown in
Figure 34 for the ERP systems. We examine these phases in detail for the PROD system only.
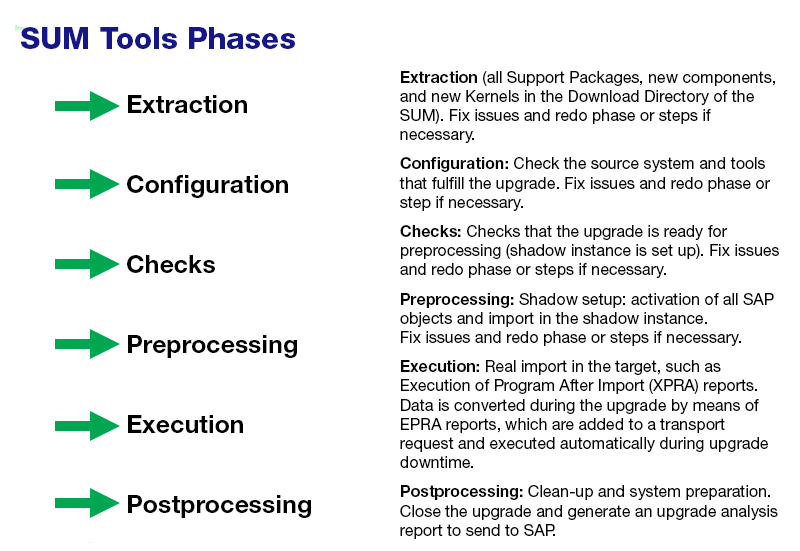
Figure 34
SUM phases overview: Extraction, Configuration, Checks, Preprocessing, Execution, Postprocessing
Run the SAP ERP enhancement package 7 upgrade on the SBX environment, via SUM.
Figure 34 shows the six main phases of the SUM procedure. During this procedure, we followed the same process: Run SUM, analyze (logs), and fix (redo if necessary).
Step 3. Gather and fix issues in the SBX environment. To minimize all risks during the PROD upgrade, gather and document all issues, mainly issues related to customer-specific environments.
Tip!
Use transaction codes SPAU and SPDD during ATC_UPG phase activation to analyze and decide whether to revert to the SAP version or to maintain the customer version. Clean obsolete SAP Notes and unnecessary customer developments (covered by the new enhancement package 7 version: Reset to Standard).
DEV Upgrade
Once the SBX environment upgrade is performed and all issues are fixed, including the integration with satellite systems, perform the DEV upgrade following the same procedures described in the section on running the upgrade for SBX via SUM (
Figure 34). The integration part is not tested in the DEV environment. This is done in the QAS upgrade, which is the exact copy of PROD. We used the SAP-recommended scenario: temporary landscape during the DEV and QAS environment upgrades, as shown in
Figure 35. In the following, T stands for temporary.

Fgure 35
The upgrade of T-DEV and T-QAS, copied from DEV and QAS (enhancement package 5)
Step 1. Freeze development in the DEV and QAS environments. Copy DEV and QAS to T-DEV and T-QAS (temporary DEV and QAS). For the DEV upgrade, we adopted the scenario with T-DEV and T-QAS landscapes (
Figure 35). The DEV source was frozen for development during the whole T-DEV and T-QAS upgrades. Some duplicate maintenance may be required in the source landscape and the temporary one.
The scenario steps are:
Step 2. Run the ERP enhancement package 7 upgrade on T-DEV. Follow the steps described in the section on running the upgrade on the SBX environment via SUM (
Figure 34).
Step 3. Analyze customer-specific developments. Use the input of step 3 in the SBX Upgrade section (on gathering and fixing issues on the SBX environment). Run transaction codes SPAU and SPDD to minimize adjustments.
We encountered only one blocking issue (Return code 8: the object must be activated):
Table PRH_CPET_PERIODDET_PRCQUOT
DDIC ACTIVATION ERRORS and RETURN CODE in SAPA742EPU.ERS
1EEDO519 "Ddl Source" "PPH_DDL_MDUB_2" could not be activated.
1EEDO519 "DB Prozedur Proxy" "PPH_V02_MRP_CHECK_SEL" could not be activated.
1EEDO519 "DB Prozedur Proxy" "PPH_V02_MRP_COMPARE_MDPS" could not be activated.
1EEDO519 "DB Prozedur Proxy" "PPH_V02_MRP_MAT_PLANT" could not be activated.
Tip!
The solution for this blocking issue was to delete field QUOTGROUP, which is not present in the new SAP version, as shown in Figure 36.
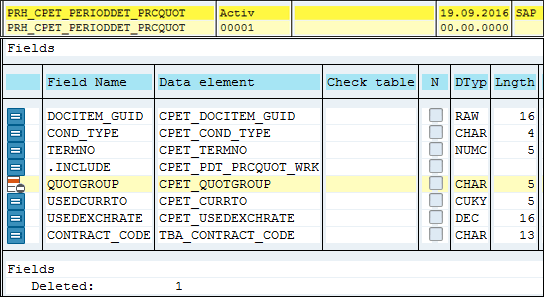
Figure 36
Delete field QUOTGROUP in table PRH_CPET_PERIODDET_PRCQUOT
During the DEV upgrade process, in the Preprocessing phase, you are prompted to clean up or adjust custom developments. You also get the candidate objects to reset to standard (recommended option). See the file in SUMAbaplog, here: PDD_RESET_CANDIDATES.SID.
In our case, after running transaction codes SPAU and SPDD during the DEV upgrade to minimize adjustments, only 14 objects were requested to be reset to standard.
Figure 37 shows the objects in the SUMabaplog SPDD_RESET_CANDIDATES.SID log.
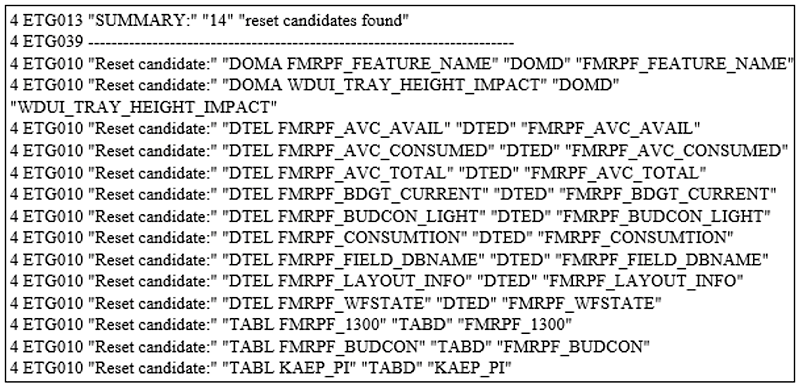
Figure 37
Candidates to reset to standard
Note
All adjustment clean-ups were recorded in one transport request. This transport request is transported in QAS and PROD to avoid all issues encountered in DEV.
QAS Upgrade: Real Simulation of the PROD Environment
The QAS upgrade is the real test of the PROD go-live upgrade. The upgrade takes place on a fresh HSC of PROD, connected to all the satellite systems. As per
Figure 35, SUM will run on a temporary QAS.
Step 1. Run the ERP enhancement package 7 upgrade on the QAS environment (copied from PRD). As for the SBX- and DEV-environment upgrades, run the SUM procedure following the process described in the section on upgrading the SBX environment via SUM (
Figure 34).
Step 2. Gather and fix all the issues in the QAS. During the QAS upgrade, you should target zero issues in the SUM procedure, since the QAS is dedicated to real business tests, including integration. Also, performance parameters should be optimized (minimizing run time and downtime). In our case, we had a few issues in QAS. After applying the adjustments made in DEV, all the QAS issues were fixed, and the QAS system was delivered to key business users to perform intensive tests during a six-week period.
Step 3. Run intensive key-business-user tests. The key-user tests were organized through the main application areas: FI, CO, Logistics (LO), SAP ERP HCM, and integration with satellite systems via RFCs, BI reports, ESS, and external web access (for CRM Web Channel and E-Commerce). For each area, a dedicated checklist was established and test results were recorded. All these tests were conducted in close collaboration with key business users and validated by the responsible business.
Step 4. Prepare the go-live PROD upgrade. Create a precise checklist with time evaluation. The aim of the QAS upgrade is not only to test all business scenarios and the entire integration of ERP and satellite SAP and non-SAP systems, but also to prepare a precise checklist for the go-live and post-go-live PROD upgrade. This preparation includes time and resource evaluation during the go-live upgrade.
Go-Live PROD Upgrade: During a Weekend
The go-live PROD upgrade was planned for the weekend of December 2–4, 2016, after six weeks of intensive tests in the QAS environment, validated by the business responsible for each area (FI and CO, LO, SAP ERP HCM, and integration with EP, SRM, BI, and CRM). First you prepare the source at the server level (OS/DB). PROD OS/DB source preparation is like SBX, DEV, and QAS preparation, except for the performance parameters to minimize run time and downtime (during one weekend). Preparation included these steps.
Step 1. Check the OS/DB (based on the QAS-environment check). See the section on prerequisites for upgrading servers (
Figure 2 PROD OS/DB source configuration).
Step 2. Ensure required sizing, files partition, and performance (PROD performance parameters on the OS level are done). See
Figures 4,
5, and
6.
Step 3. Create and prepare the SUM directory with the latest SUM version. A SUM directory of 500 GB was created, and the latest SUM was downloaded from SMP (Support Package 18, level 4, released November 2016). See
Figures 5 and
6.
Step 4. Download all the required Support Packages based on the stack XML file. All Support Packages were copied from QAS and checked according to the PROD XML file.
A quick check on the source system, via Solution Manager, shows the product and add-on product versions (
Figure 38).

Figure 38
The source technical system and the product version in the Solution Manager LMDB (synchronized from the SLD)
It is important to check and compare the source Support Package levels with the generated .txt file via the Maintenance Planner (
Figure 31). First check the source Support Package levels before the upgrade (
Figure 39).

Figure 39
Check the source Support Package levels against the generated stack XML file
Source Preparation: SAP Level
Follow these steps for source preparation on the SAP level.
Step 1. Apply the required SAP Notes for an ERP enhancement package 7 upgrade. Some SAP Notes are required in the SUM procedure, step PREP_CONFIGURATION/CHECK4NOTES_TOOL.
Note
SAP Notes 0001834712, 0001861585, 0001941711, 0002122333, 0001994245, 0002091348, 0002344014, and 0002122333 must be imported into the source system before running SUM.
In any SAP upgrade, SAP recommends that you clean up the source (such as open queues, open processes, update errors, system-log errors, dumps, hanging jobs, or batch-input sessions [BTCI]) and apply the latest SAP tools (SUM, Kernels, and SPAM/UPDATE). The JOB_RSVBCHCKCK2 phase in PREPARE checks the outstanding update tasks (SM13) and queued RFCs (SMQ1). For each error in a log file, you receive a message from SAP inviting you what to do. If you do not clean up your source system, you are prompted to do so during the SUM procedure. Proactively, we tested all this in the SBX environment and cleaned up PRD accordingly.
In the following, I explain the main steps performed on the source system, prior to the upgrade.
Step 2. Check and clean up the error update using transaction code SM13. If you find any errors in transaction code SM13, correct or delete them.
Step 3. Check that all jobs are finished and clean them up using transaction code SM37. SAP recommends that you delete all finished jobs. During the upgrade, all application jobs are de-scheduled by SUM. Check the finished jobs for errors and fix them prior to the upgrade.
Step 4. Check dumps and fix any errors you find using transaction code ST22.
Step 5. Check that there are no open BTCIs using transaction code SM35. Open BTCI sessions may not be able to run after the upgrade. It’s recommended that you finish any open BTCI sessions and fix all the sessions with errors or delete them.
Step 6. Check and clean up all queues using transaction code SMQ1 or SMQ2. Delete the BI queues. It is very important that you clean up all queues and delete the BI queues, to avoid a SUM abort in the CHECKS phase.
Step 7. Clean up old spool requests. Use ABAP reports RSPO0041 and RSPO0141 to clean and delete old requests in the spool and temporary files.
Step 8. Check and save all interface programs with satellite systems. Check and record all interface programs, RFC connections, and logical systems.
Step 9. Import the latest SPAM/UPDATE tool. As mentioned in the source preparation section, the SPAM/UPDATE must be the latest version. This is checked in the beginning of the SUM procedure.
Step 10. Check open transports. Since DEV is frozen for development since the set-up of the temporary landscape, open transport requests should be analyzed regarding the PROD system, which is not yet upgraded. You cannot import from temporary DEV (enhancement package 7) to PROD (enhancement package 5), because they are different versions. By contrast, you can transport any transport requests in the old PROD landscape.
Step 11. Find objects locked in repairs or requests and unlock them.
Step 12. Prior to starting the PROD upgrade via SUM, stop the SAP system and make a full DB backup. Take a snapshot of all OS files, mainly OS system files (in general C: drive), SAP system files (…usrsap), and SAP database and log files.
Step 13. Ensure disk space availability according to
Figure 4.
Go-Live ERP Enhancement Package 7 Upgrade: Main SUM Phases
The downloaded SUM tool, SUM10SP18_4-20006676.SAR, should be unpacked in the dedicated SUM directory (i.e., …SUM), with enough space (more than 100 GB, for log file increase during the upgrade).
Step 1. Launch SUM. Use the sidadm user with a dedicated authorization to run SUM. Start the server STARTUP.BAT (
Figure 40).

Figure 40
Run STARTUP.BAT first
Execute the STARTUP Confighostagent command in the SUM directory.
Use the http link in your source server (the hostname) and port 1128 (http): https://yoursapserver:1128/lmsl/sumabap/SID/doc/sluigui/. You get the first SUM screen (
Figure 41), requesting the stack XML file generated by the Maintenance Planner (
Figure 31).

Figure 41
Enter a valid stack XML file generated in Maintenance Planner (Figure 31) or via Solution Manager (the Maintenance Optimizer is no longer valid as of January 9, 2017)
Step 2. Extraction: In this phase, all Support Packages in the stack XML file, Kernel, and SPAM/UPDATE tools are checked and extracted in the SUM directory. You are prompted to give DDIC and SAPServiceSID users’ passwords (
Figure 42).

Figure 42
Enter the DDIC and SAPServiceSID users' passwords
You are requested to give a password for the DDIC, client 000 in the source system, and SAPServiceSID users. The SPAM/UPDATE check may request you to use the latest version. If so, add it in the download directory. SUM automatically recognizes and imports it. During the extraction phase the download directory is scanned, and you are prompted to add any missing Support Packages. When upgrading to enhancement package 7, select the No migration radio button, as shown in
Figure 43.
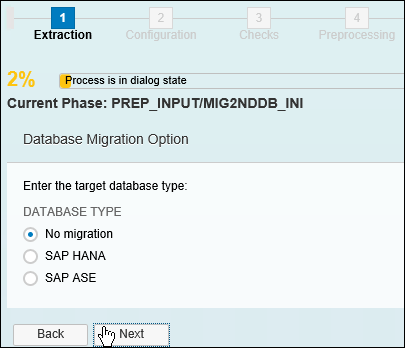
Figure 43
Select the No migration option for the enhancement package 7 upgrade
During the Extraction phase, first use transaction codes SPAU and SPDD to check your source system (
Figure 44). This is the first phase in SUM as shown in
Figure 34.
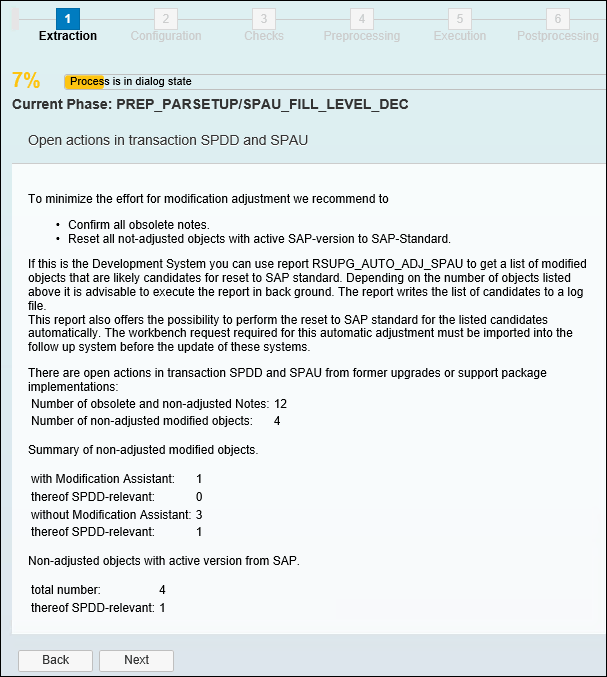
Figure 44
The last step in the Extraction phase
Use transaction code SPAU to check obsolete SAP Notes and customer developments. SAP objects are overwritten by the upgrade. Adjustments may be done after preprocessing, as well. In general, SAP recommends that you confirm all obsolete SAP Notes and reset all not-adjusted objects with an active SAP version back to SAP standard.
The Extraction phase is complete and the Configuration phase starts (
Figure 45).

Figure 45
The Extraction phase is complete and the Configuration phase starts
Step 3. Configuration: Check the source system and tools that fulfill the upgrade. In our case, we used the Standard option proposed by default (
Figure 46).

Figure 46
Select the Standard radio button
Click the Next button to go to
Figure 47.

Figure 47
The parameters to configure the SUM procedure including some dialog and batch processes
The configuration parameters depend on your hardware (HW) and OS/DB settings, RAM, and SWAP file size (
Figures 3,
5, and
6). In our case, we tested the configuration in QAS (copy of PROD) to optimize these parameters (
Figure 6).
Figure 48 (which is the same screen as
Figure 47), shows Jobs and SGEN generation parameters.

Figure 48
Transaction code SGEN parameters
Use six SGEN PROCESSES (there is a maximum of eight) and select ICNV for incremental table conversion (e.g., the Calculate tables for ICNV radio button). Incremental table conversion is proposed for big tables.
Step 4. This is the Checks phase. During this phase, space allocation is checked for the shadow instance. That includes open queues and RFCs. Clean up with transaction codes SMQ1 and SMQ2, as recommended in step 6 of the “Source Preparation: SAP Level” section. Analyze the CHECKS.TXT log after each phase before proceeding further, as suggested in
Figure 49.
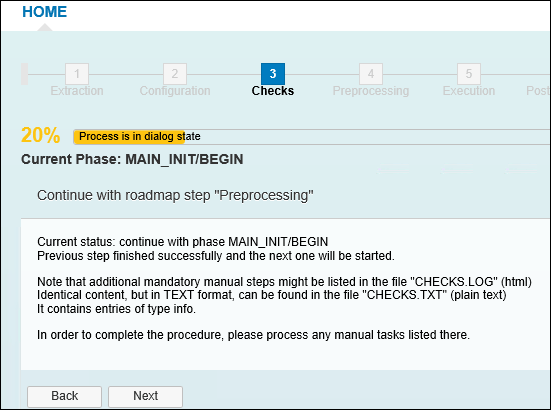
Figure 49
Perform space-calculation checks and general checks
In this phase, space calculations checks are performed and the preliminary upgrade processing is set. Also, general checks, via the NTACT_CHK step, are performed.
Step 5. Next is the Preprocessing phase for shadow-instance configuration. During this important phase, the shadow instance is set up and all SAP objects in new Support Packages are activated and imported as clones of your target system. The development environment is locked at the REPARCHK_CLONE phase (
Figure 50). This phase may take hours (15 to 20 hours).

Figure 50
Development locked at the beginning of the cloning of the shadow instance
During the DDIC_UPG phase, all SAP Support Packages are imported and SPDD results are checked (
Figure 51).

Figure 51
DDIC_UPG phase
In the shadow-system operation, SPDD and DDIC are activated. You import all activated objects in the shadow instance. The phase DDIC_UPG may take hours (five to seven hours). In our case, it took five hours and 36 minutes.
During the SHADOW_IMPORT_INC phase, add-ons and Support Packages are imported in the shadow instance and new tables (
Figure 52). This may take several hours if any issues occur. In our case, it was almost 10 hours (without any issues).
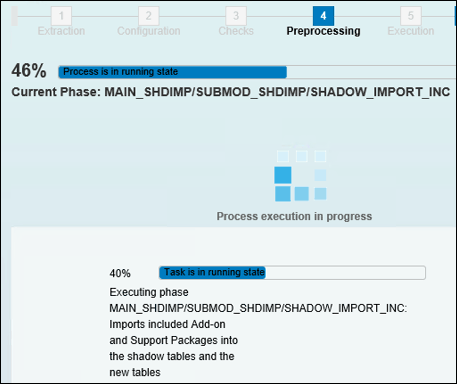
Figure 52
SHADOW_IMPORT_INC phase
Note
It may take hours to generate program loads in the shadow instance during the RUN_SGEN_GENER8 phase, depending on the profile parameters of your system regarding background processes.
The Preparations for Downtime phase is shown in Figure 53. The Preprocessing phase ends with the transition to the downtime period, the DOWNCONF_DTTRANS phase (Figure 53). After confirming by selecting the Actions completed radio button, perform a full DB backup. The backup of the SUM and USR directories must be performed at this point as well.
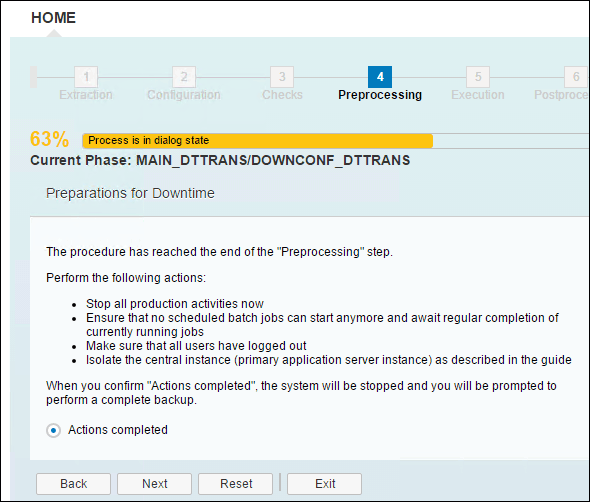
Figure 53
Preparations for downtime: Stop all production activities and select the Actions completed radio button prior to performing a complete backup
Before starting, check the file CHECKS.LOG in the SUM log directory. After each important phase, the CHECKS.LOG contains manual activities, if necessary (
Figure 54).
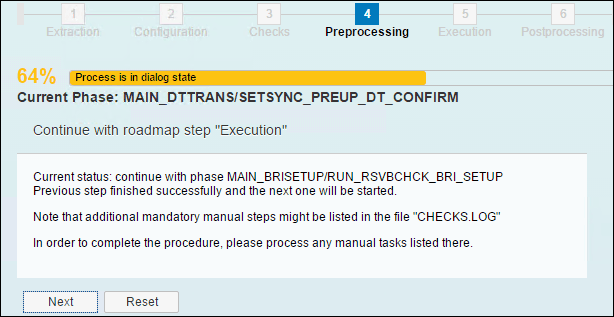
Figure 54
Start the downtime
Step 6. The Execution step is next, which is the real import into the target system. The TABIM_UPG phase consists of real Support Packages imports into the target system (
Figure 55). In our case, we imported 1,395 Support Packages over five hours of downtime. By comparison, the QAS upgrade TABIM_UPG took double that amount of time (10 hours).
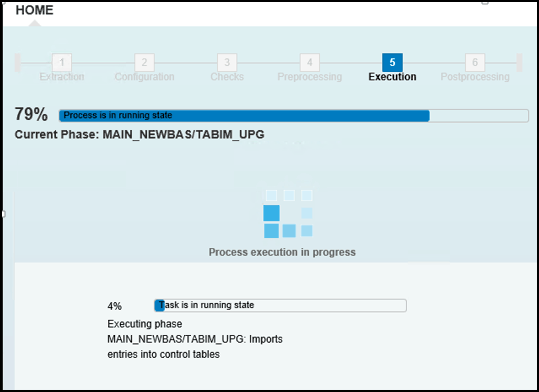
Figure 55
TABIM_UPG phase (Support Packages import)
After the TABIM_UPG phase is complete, the preparation for the end of downtime starts (
Figures 56,
57, and
58) and a new full backup is requested.

Figure 56
Prepare the end of downtime
Make a full DB backup at the end of downtime (
Figure 57) and click the Next button when the backup is complete.

Figure 57
The UPCONF phase is the end of downtime
Now you transition to the Postprocessing phase (Figure 58).

Figure 58
Execution is completed successfully and the the Postprocessing phase starts
Step 7. Postprocessing begins. Use transaction code SPAU
(Figure 59) and check your adjustments regarding the new SAP ERP version (enhancement package 7). Select the Continue radio button and click the Next button.
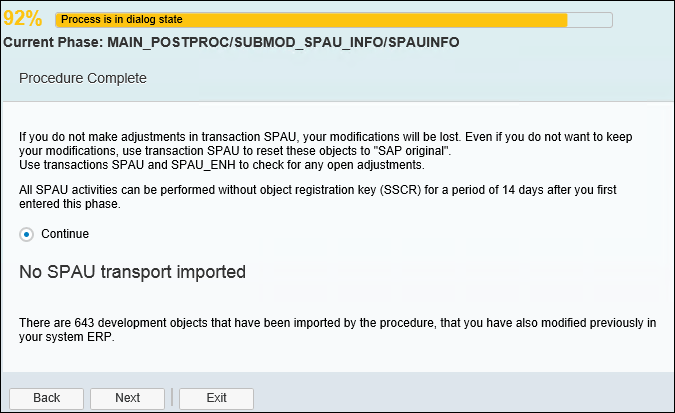
Figure 59
Transaction code SPAU adjustments after the upgrade
Note
At this step, your system is upgraded to ERP 6.0 enhancement package 7. However, the first transaction code SPAU and SPDD checks show that many objects need to be adjusted. Indeed, 643 objects present differences from the standard. Most of them must simply be reset to the standard. SAP warns that you have 14 days to perform this. In our case, more than 200 SAP Notes were obsolete. All other developments were already analyzed in the DEV environment and selected to go back to the original (SAP version). A few objects were related to specific customer developments and were transported after releasing the new system.
Start the clean-up process by clicking the Next button in
Figure 60, which takes you to the next screen. The clean-up processing starts.
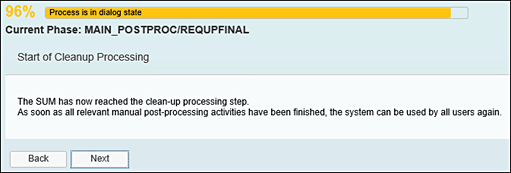
Figure 60
Clean-up and Postprocessing
The last important step in Postprocessing, RUN_RSAIMMERGE_TRANSFER, is shown in
Figure 61.
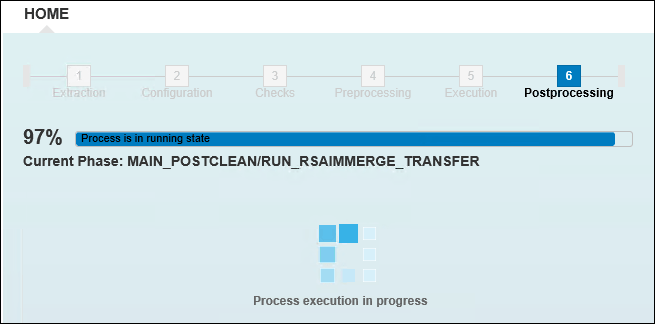
Figure 61
Postprocessing: RUN_RSAIIMMERGE_TRANSFER phase
The upgrade is 100 percent complete (
Figure 62).
Close the upgrade and generate an upgrade evaluation report to send to SAP. The upgrade evaluation report is generated only after the SUM procedure is complete and closed.

Figure 62
Close the upgrade
When you reach the CREATE_UPGEVAL phase, corresponding to 100 percent of a successful process, your upgrade is complete as shown in
Figure 63.
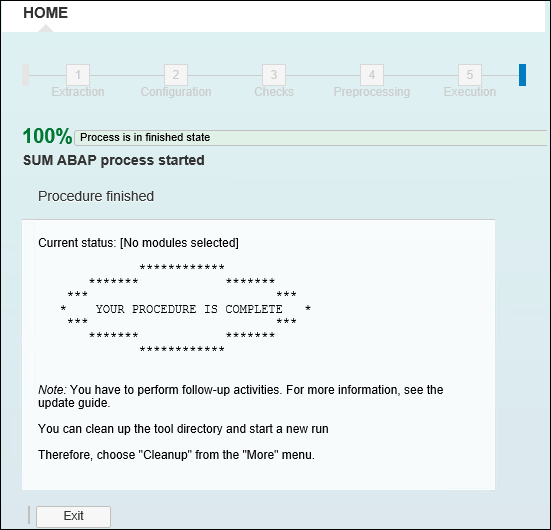
Figure 63
The SUM procedure is complete
Figure 64 is a summary of the SUM procedure statistics.

Figure 64
Times for SUM phases
To view SUM statistics, use link …SUMabaphtdocUPGANA.XML. The SUM procedure generates a statistics report, UPGANA.XML, which contains the main information gathered on the upgrade (such as system information, configuration, run times, tool versions, and source and destination Support Packages). See
Figures 65,
66, and
67.
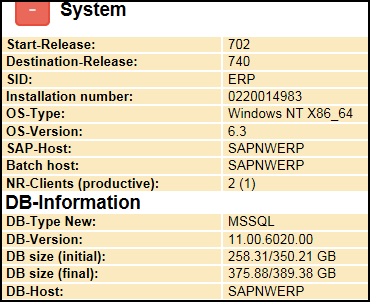
Figure 65
System info: source (702) and destination (740), DB-size evolution
Figure 66 shows the configuration parameters.

Figure 66
Configuration parameters, 1393 packages imported, SUM version, tool version, Downtime: 5:16:09, Runtime: 37:30:32 (hh:mm:ss)
Figure 67 details the Support Package levels.

Figure 67
Support Package levels with sources and destinations
The ERP enhancement package 7 upgrade was successful. Cleanup and preparation of the system can start. Run report BTCTRNS2 to release suspended jobs. All jobs that were suspended during the upgrade are released after running this report.
Step 8. Perform basic checks. Stop the SAP system and update the new Kernel 7.45. Restart the SAP system and log in with DDIC in 000. Perform basic tests, mainly:
- STMS: Check the transport system. Rebuild it if necessary in DEV (client 000)
- RZ10 and RZ04: Check profile parameters and update them accordingly
- SM59: Check all RFCs with satellite systems
- ST22: Check and analyze dumps
- SMQ1/SMQ2: Clean up queues, if necessary
- SM37: Check all jobs (system jobs and application jobs)
- SICF: Check and activate services, if necessary, particularly services related to ESS applications
- SM12: Check locked objects
- SM21: Check system logs
- Backup: DB02: Re-plan DB and transaction log backups, as they were before the upgrade
- Test ESS applications, via the web
- Test main connectivity’s with satellite systems
- Check external interfaces, if any, connecting your ERP system to non-SAP systems
The new Support Package levels are shown in
Figure 68.
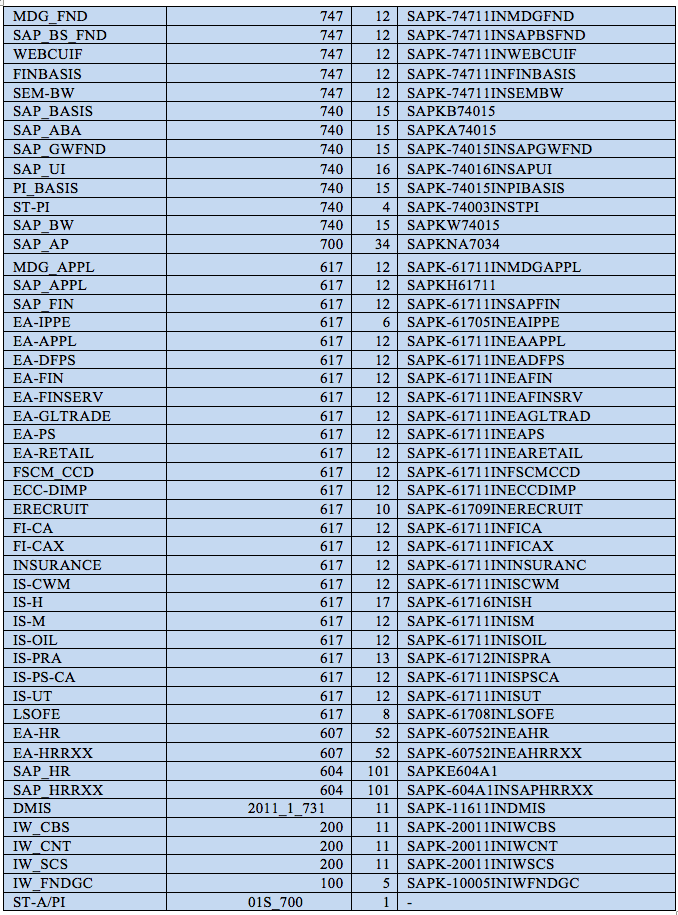
Figure 68
The target Support Package levels after the upgrade
Step 9. Key-user application tests. Prior to releasing the new upgraded system to all users, we organized preliminary tests with key users on Monday, December 5, from 8 a.m. to 10 a.m. We provided specific checklists. The tests were successful and the system was validated by the business side.
Step 10. Validation and release to users. An official communication was sent afterwards to all ITU SAP users to use the new system.
The Upgrade Evolution
For any upgrade project, the SAP evolution should be considered on a technology level as well as on the business level.
Figure 69 shows the evolution of an ERP 6.0 enhancement package 7 upgrade.
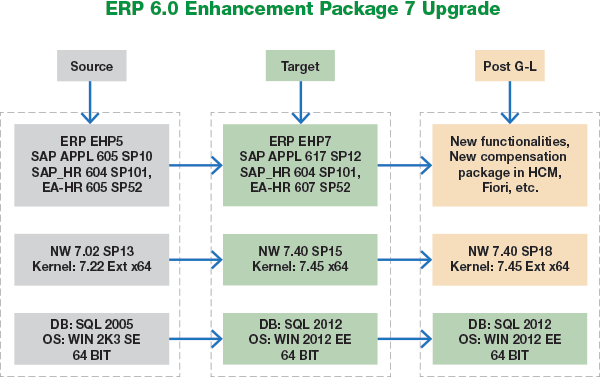
Figure 69
Evolution of the upgrade
Figure 69 shows the ERP upgrade evolution through three interlinked levels:
- OS/DB configuration on the server level
- Basis level (the SAP core technology based on SAP NetWeaver and the SAP Kernel)
- Application level (ERP applications, extensions EA-XX, and add-ons)
These three levels evolve differently over time. In general, OS/DB is stable and may be upgraded in a three-to-four-year period. The SAP NetWeaver Basis components’ stack changes two times per year, while ERP applications’ stacks change three to four times a year. The SAP Kernel level changes every two weeks, particularly the Kernel component disp-work (dw), ensuring the integration and performance of the whole SAP system. The SAP ERP HCM components’ stack evolves monthly, due to the HR regulation evolution for many countries. To ensure stability, performance, and regular maintenance of your SAP system, SAP recommends that you respect this evolution and update your system accordingly.
Keys to Success
Gathered here are the main success keys of this important project, achieved in less than eight months, with minimum external resources, and with the full involvement of the ITU IS/ERP teams. According to the SAP evaluation of ERP enhancement package 7 upgrade support by SAP Basis experts, 100-man days should be planned, at a minimum. This corresponds to the estimated 200.000–250.000 EUR saved by doing this project in house.
The keys for success for this ERP 6.0 enhancement package upgrade are:
- Prepare—read all the relevant documentation prior to starting
- Establish all technical prerequisites, particularly an OS/DB upgrade, if necessary, and Solution Manager preparation and configuration
- Set up the entire SBX environment with synchronized copies from all PROD systems (ERP and satellite systems such as SRM, CRM, and BI)
- Perform the upgrade in the SBX environment and test everything, including the integration
- Gather, analyze, and fix all issues in SBX
- Perform the DEV upgrade by analyzing and cleaning, if necessary, any custom developments
- Perform a QAS upgrade on a fresh copy of PROD and conduct intensive tests with business key users, following a dedicated checklist for each business scenario. Target: zero issues.
- Prepare a precise checklist based on QAS tests. Evaluate the performance and time parameters for the go-live upgrade during one weekend
- Go-live PROD upgrade: Zero issues, zero messages sent to SAP. Run time: 37 hours. The system was ready and released on Monday morning,
- Summary of number of issues evolution:
- SBX: 50 issues (mainly activation and customer development)
- DEV: 20 issues (some related to SUM tools level)
- QAS: 4 issues, all fixed
- PROD: 0 issues
- Enhancement and new functionalities after the upgrade:
- The EVE and new Compensation Package were implemented after the upgrade (January 2017)
- SAP Fiori was installed and configured allowing mobile services for ESS applications (including leave requests and Travel Management)
Ali Sbai
Ali Sbai has a Ph.D in physics. He works at the International Telecommunications Union (ITU) in Geneva, Switzerland, as the SAP system administrator. As such, he has led several upgrade projects for ITU. Ali has advanced SAP Basis skills and SAP NetWeaver architecture skills covering integration, maintenance, performance, and upgrades for complex SAP configuration (including ERP, CRM, SRM, BI, and EP).
You may contact the author at
ali.sbai@itu.int.
If you have comments about this article or publication, or would like to submit an article idea, please contact the
editor.