Most organizations using SAP systems are looking forward to implementing or upgrading key business applications in less time. If these applications are not thoroughly tested before the release, then it can have a huge impact on the business. Under such circumstances test automation using HP QuickTest Professional can help an organization achieve quality objectives within the constraints of schedule and budget.
Key Concept
To ensure a quality product, reduce costs, and meet aggressive delivery schedules, organizations using SAP systems are turning over to automation. HP QuickTest Professional is one such tool that helps automate the complex business scenarios in the SAP system. Once the automation scripts are ready, they can be used at different stages of the testing life cycle for any number of times, thereby increasing the testing accuracy and productivity.
Many organizations are upgrading their SAP systems to integrate their day-to-day business processes. SAP implementations are planned in a phased manner, performing go-lives at different geographical locations, upgrades, patch updates, enhancements, and implementations of new functionalities in the subsequent releases to cater to the ever-changing requirements of business users. Keeping in mind the critical nature of SAP ERP software, it is essential to thoroughly test all changes that move to the production system. This calls for quick regression testing of all the business processes. A large team is not necessarily a permanent solution for such a problem; instead the team has to step toward automating these business processes.
Testing your SAP software includes many challenges, such as:
- Testing all enhancements and modifications made to the standard applications
- Each implementation is unique
- Implementations are geographically dispersed
- Interaction with different legacy systems and applications (including SAP and non-SAP applications)
- Large business processes and areas need to be tested
- Handling the associated risk with testing delays affecting project schedule
- Testing the high volume and variety of data
One general solution for testing your SAP software is by using automation. Benefits of automation include:
- Cover maximum business process under regression testing roof
- Reduce manual effort during execution
- Regression testing cycle is repeated many times during different phases of implementation, such as rollouts or enhancements
- Ensure uniformity in the testing process each time a test is executed
- Reduce cost as compared to manual testing
- Increase delivery confidence and minimize risk of incomplete testing due to less time available
- Accuracy and productivity increase
- Reduce dependency on functional or automation knowledge and a minimum amount of expertise is required from both areas
Success in automation hinges on the right testing tool and automation framework for the SAP application. The tool should be able to test legacy systems that run alongside the SAP system as well. SAP provides the SAP extended Computer Aided Test Tool (eCATT), but it has some limitations. eCATT does not support third-party application automation. It is also not flexible enough to allow rerecording (in case the user realizes they missed a step and need to record the missed part later) from any step or making enhancements in the same script.
As an alternative, you can use HP QuickTest Professional (QTP), which is used for functional or regression testing. QTP uses Visual Basic (VB) script as the scripting language and includes record and playback methodology.
We’ll start by looking at QTP’s architecture, before showing you how the functionality works.
QTP Architecture
The QTP framework consists of the key components shown in Figure 1.

Figure 1
QTP framework
Tier 1
Tier 1 comprises elements such as a test management tool (e.g., HP Quality Center) and the system being tested (e.g., SAP and other legacy systems). You can store both the automated and manual test scripts in the test management tool. The automation script can be started from the test management tool itself.
Tier 2
Tier 2 comprises QTP and elements such as the driver script, which in turn calls a reusable function within the business logic layer. It has one more layer for error handling and reporting logic. The components of tier 2 are:
Tier 3
Tier 3 consists of the file system and scripting standards:
Working Principle of QTP
QTP works on the principle of record and run. The test steps that are required to be tested are recorded; logic is implemented in them and then run with input data entered in the datatable (if required). Figure 2 shows the workflow for the QTP suite.

Figure 2
QTP workflow
Now let’s look into each of the steps in this workflow — prepare, create, verify and enhance, and integrate — as you automate your business scenario for plant-to-plant transfer.
Prepare
To get started, it is mandatory that scripting permission has been enabled from the server side as well as the client side. To enable the scripting permission, log in to the SAP server. At the top of the GUI screen click the Customize Local Layout icon and select Options (Figure 3).

Figure 3
Select Options
Go to the Scripting tab in the pop-up screen and select the Enable Scripting check box (Figure 4).

Figure 4
Select Enable Scripting
On the server side, the system parameter sapgui/user_scripting needs to be set to TRUE, which you can do via transaction code /nRZ11.
Create
In this step the script is recorded and run. Before proceeding with the details of QTP scripting, it is advisable to become acquainted with the QTP interface. Figure 5 shows a QTP window as it would appear after you record a test, with all toolbars and the datatable and active screen panes displayed.

Figure 5
QTP interface
The QTP window contains the following key elements:
Recording a Test
Start QTP and open a new test. In the Add-in Manager (which comes up automatically), confirm that the SAP and Web Add-ins are selected (Figure 6). Clear any other add-in that may appear in the start-up screen. Click the OK button to close the Add-in Manager and open QuickTest.
Note
The sample company Mercury Tours was created by Mercury Interactive, which originally developed QTP. Mercury Interactive was later acquired by HP.

Figure 6
Confirm the Add-ins are selected and click OK
In the next window, click Blank Test to open a new QTP test. Otherwise, choose File > New > Test, or click the New button down arrow and choose Test (Figure 7).
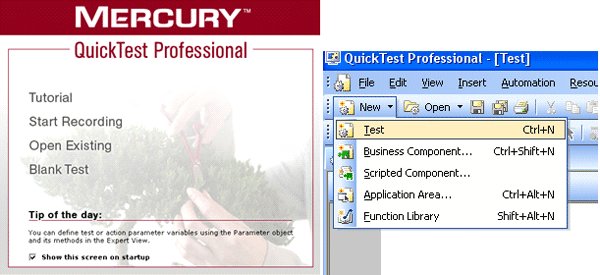
Figure 7
Create a new test
Then select Automation > Record and Run Settings… (Figure 8). This brings up the screen in Figure 9.

Figure 8
Select Record and Run Settings…

Figure 9
Select the record and run settings
Select the SAP tab and choose the Record and run test on any open SAP Gui for Windows application option. This option enables QTP to record on any SAP screen that is opened by the user after logging in. Confirm that Do not record and run on sessions that are already open and Close the SAP Gui for Windows application when the test is closed are selected. Click the Apply button and then click the OK button.
You can also opt to select the second radio button, Open the following SAP Gui client when a record or run session begins, if you need to create QTP scripts only on a single SAP server every time (Figure 10). If you must log into different SAP servers each time, the first radio button is a better option. You need to select the Server description in which you want to create the QTP script and select the Enable auto-logon check box. Then you must enter the user ID, password, and client. Confirm that Do not record and run on sessions that are already open and Close the SAP Gui for Windows application when the test is closed check boxes are selected. Click the Apply button and then click OK.
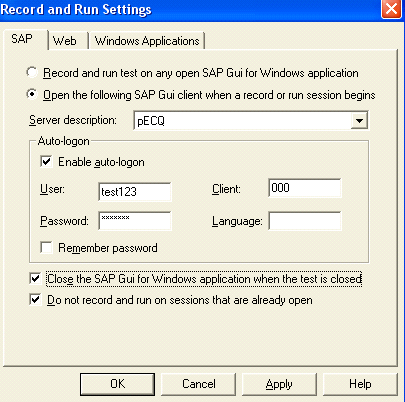
Figure 10
Select the appropriate settings
To start recording, click the Record button on the toolbar (Figure 11). Now you need to perform the steps in SAP GUI that need to be automated. While executing the steps manually, QTP continues to record these steps and create the script.

Figure 11
Select Record
When you complete the entire set of steps, click the Stop button to stop the recording process and end the test (Figure 12). To save this test script, choose File > Save or click the save icon on the menu bar (Figure 13).

Figure 12
Select Stop

Figure 13
Save the test script
Running a Test
Start QTP and open the already recorded test by clicking Open Existing. If QuickTest opens without displaying this window, choose File > Open > Test or click the Open button down arrow and choose Test (Figure 14). Then click the Run button from the toolbar (Figure 15).
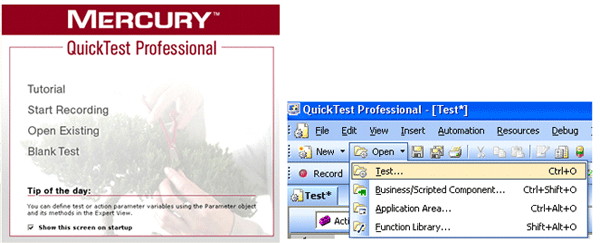
Figure 14
Open the test

Figure 15
Run the test
The Run dialog box opens. Select the New run results folder option (Figure 16). You can store the results in a folder specified in this field. This result is not overwritten when the same script is executed later. You can also select the Temporary run results folder option. In this case, the test results are overwritten every time you run the test. Click the OK button to close the Run dialog box.
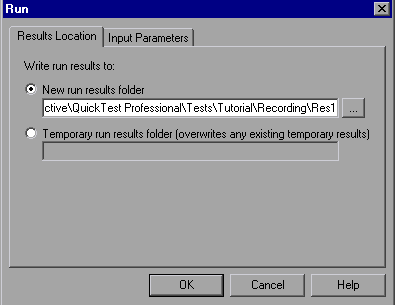
Figure 16
Click OK
Verify and Enhance
Now check for any errors in the script. You can also enhance the QTP script to fit any specific requirements.
Analyzing Test Results
When QTP is finished running the test, the Test Results window opens (Figure 17). The Test Results window consists of two panes. The left pane displays the results tree, an icon-based view of the steps that were performed while the test was running. The right pane displays the test results details. The iteration summary table indicates which iterations passed and which failed. The status summary table indicates the number of checkpoints or reports that passed, failed, and raised warnings during the test.

Figure 17
Test Results window
Simple recording and running the QTP script accelerates the test execution but does not serve the whole purpose of automation. We’ll go through some basic enhancing techniques to modify the automation script based on our requirement.
Getting or Putting Value from a Datatable
By default there are two sheets present in the datatable: Global and Action1. Generally the input values are entered in the Global datasheet and the resultant values are obtained from the Action1 datasheet.
Following are the syntax of getting and putting values in the datatable:
- Getting a value: Variable = Datatable.Value(“column name”, sheet name”). For example, look at intvar = Datatable.Value(“Name”,”Global”). This code fetches the value present in the Name column in the Global sheet to the variable intvar.
- Putting a value: Datatable.Value(“column name”,”sheet name”) = “Variable”. For example, consider Datatable.Value(“Location”,”Action1”) = “USA”. This code enters the value USA in the Location column in the Action1 sheet.
- Outputting value from the screen: QTP has the provision for outputting any value from the screen to the datatable so that it can be used further. Go to the active screen and right-click the property, select Insert output value, and then select the column in which it has to be stored. For example, let’s say you need to output a purchase order number (via transaction code ME21N) created in the SAP system to the Action1 sheet in the datatable. When you record a QTP script, then QTP stores each of the SAP screens you have gone through. You can view the SAP screens in the Active Screen section of QTP (Figure 5). In this case, when you used transaction ME21N, QTP recorded it. Figure 18 shows the Active Screen of QTP after transaction ME21N is recorded.

Figure 18
Select Insert Output Value…
QTP prompts you to select the value that needs to be the output. Select the corresponding property (in this case, item2) and click the Modify button (Figure 19).

Figure 19
Select the output value
QTP then allows you to select the datasheet where this value needs to be inserted. Select Current action sheet (local) from the resulting screen (Figure 20). In the Name field enter the name of the column in which this value needs to be stored. If the columns are already defined in the datasheet then it can be selected from the drop-down in the Name field. Click the OK button. Select the option for whether the value has to output after the current step or before it at the bottom of Figure 19.

Figure 20
Choose output options
Parameterization
Whenever you record steps, you come across situations in which you enter a value in particular text boxes (e.g., entering selection criteria in one SAP screen and then going to the next screen, or entering the input values to create or change some SAP transactions). This is recorded as shown in this example:
SAPGuiSession("Session").SAPGuiWindow("Create Purchase Order").SAPGuiEdit("Purch. Group").Set "002"
This code sets the value of the Purch.Group field to 002 whenever the script runs (Figure 21). If you want to enter different data in this field in different iterations then you need to set a column in the datatable as a parameter and set different values to it. Go to the Keyword View and click the Value column against Purch. Group.

Figure 21
Parameterization using the Keyword view
Click the <#> icon, which is displayed beside the value 002. Choose the Parameter option (Figure 22). Give a name to the column in which this parameter will be stored (Purch_Grp in this case). Select the datasheet in which this parameter will be stored (Global sheet in this case). Click the OK button to complete the parameterization.

Figure 22
Select value options
The above code is changed accordingly by QTP. The new code looks like this:
SAPGuiSession("Session").SAPGuiWindow("Create Purchase Order").SAPGuiEdit("Purch. Group").Set DataTable("Purch_Grp", dtGlobalSheet)
Now you can enter any number of values for Purch.Group. QTP picks up the values from the Purch_Grp column during the script execution.
Integrate
The primary advantage to QTP lies in the fact that once the script is ready, you can execute it any number of times using all the possible different data sets. This enables extensive coverage in less time. To run a script multiple times, follow these steps.
In the QTP script, go to File > Settings. In the Test Settings window, click the Run tab (Figure 23). Select the Run on all rows option to allow the script to run for all the rows present in the datatable.

Figure 23
Select test settings
The first option, Run one iteration only, only runs the first row of the datatable. You can also select in between rows present in the datatable using the Run from row (number) to row (number) option.
While recording, you should always keep in mind that the scripts should always end with the same screen of the SAP system from which they begin. This is very important for multiple iterations.
Case Study: Automate a Plant-to-Plant Transfer Scenario in the SAP System Using QTP
With all the above concepts in mind, let’s now create a QTP script for plant-to-plant transfer in the SAP system. We will break this entire business scenario into certain units based on the unique SAP transaction codes that are used during this process.
The following example has been carried out with SAP GUI 7.10, QTP 9.2, and SAP Add-in 8.2.
Table 1 shows the steps involved in plant-to-plant transfer. Let’s now see how QTP automates each of these steps.

Table 1
Plant-to-plant transfer steps
Step 1. Create a Purchase Order
To create a purchase order in the SAP system, the manual steps in transaction ME21N are (Figure 24):
- Select order type as Standard PO
- Enter the Vendor, Purch. Org., and Purch. Group in the header data
- Enter the Material, PO Quantity, and the receiving plant (Plnt)
- Click the save icon and note the purchase order number that is displayed

Figure 24
Manually creating a purchase order
Now let’s look at the automated process in QTP. Before starting off with recording, define a column for each of the input parameters required to create a purchase order in the global datasheet and enter the data (Figure 25). In the Action1 sheet, create one column for the purchase order, which is the output in this case. Similarly create other columns in the Action1 sheet for the variables that you want to get from the SAP system during the script execution.

Figure 25
Enter purchase order data in the Action1 sheet
The automation script recorded by QTP for creating the purchase order is shown in Figure 26, which is the datatable section from the screen in Figure 5.

Figure 26
Automation script
Step 2. Create Outbound Delivery
In the SAP system, the manual process from transaction VL10B is (Figure 27):
- Navigate to the Purchase Orders tab. Enter the purchase order number you created above in the Purchasing Document field and click the execute icon.
- Select the row and click the Background button (Figure 28)
- Highlight any of the rows shown. Click the Show / hide delivery icon (fourth from the left in the menu bar).
- The outbound delivery number is generated

Figure 27
Enter the purchase order number

Figure 28
Click the Background button
The automation script recorded by QTP for creation of outbound delivery is shown in Figure 29.

Figure 29
Automation script for outbound delivery creation
Step 3. Fetch the Handling Unit Number from Outbound Delivery
The manual steps in the SAP system via transaction VL03N are (Figure 30):
- Enter the outbound delivery number created in the last step and display it by pressing Enter
- Note the Picking date that appears in the Picking tab (Figure 31). Then click the pack icon.
- Handling units are displayed. Mark down the handling unit numbers that are shown in the Line identification column (Figure 32).

Figure 30
Enter the outbound delivery number

Figure 31
Click the pack icon

Figure 32
Mark down the handling unit number
The automation script recorded by QTP for fetching the handling unit is shown in Figure 33.

Figure 33
Automation script for fetching the handling unit
Step 4. Create a Wave
A wave is a group of deliveries that must be processed at the same time. In the SAP system, via transaction VL35, the manual process is as follows:
- Enter the warehouse number in the Whse number field, Reference date (as the picking date displayed in the outbound delivery), and timeslot group in the Timeslot grp field (Figure 34). Then click the execute icon.
- Select the outbound delivery for which the wave is to be created and save
- Outbound deliveries selected are saved into the wave and the wave number is displayed (Figure 35)

Figure 34
Enter the warehouse number

Figure 35
Wave number displayed
The automation script recorded by QTP for creating the wave is shown in Figure 36.

Figure 36
Automation script for creating the wave
Step 5. Release the Wave
The manual steps in transaction VL37 in the SAP system are as follows (Figure 37):
- Enter the warehouse number and click the execute icon
- Check the check box next to the wave related to our outbound delivery and click the Release Wave(s) button (Figure 38)

Figure 37
Enter the warehouse number

Figure 38
Release the wave
The automation script recorded by QTP for releasing the wave is shown in Figure 39.

Figure 39
Automation script for releasing the wave
Step 6. Select the Equipment
To perform the process in the SAP system, use transaction SE16 and perform the following steps (Figure 40):
- Enter the Table Name as EQUI and press Enter
- Enter the material number in the Material field (Figure 41)
- A list of equipment is displayed (Figure 42). Choose any equipment based on your requirements, such as if you need to adhere to last-in, first-out or first-in, first-out policies.

Figure 40
Enter the table name

Figure 41
Enter the material number

Figure 42
Choose equipment
The automation script recorded by QTP for selection of equipment is shown in Figure 43.

Figure 43
Automation script for selecting equipment
Step 7. Associate the Purchase Order Number with the Equipment
For the manual steps in the SAP system, use transaction IE02 and perform the following process (Figure 44):
- Enter the equipment number obtained from the above step in the Equipment field and press Enter
- Go to the Device Data tab (Figure 45). Enter the purchase order obtained from step 1 in the Purchase Ord.(STO) field and click the save icon.
The automation script recorded by QTP for kitting (the process by which related items belonging to a single purchase order are packed and shipped as one unit) is shown in Figure 46.

Figure 44
Enter the equipment number
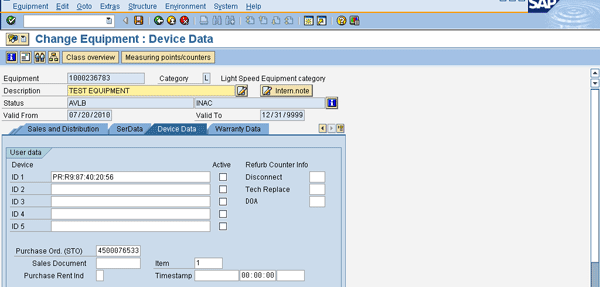
Figure 45
Enter the purchase order number
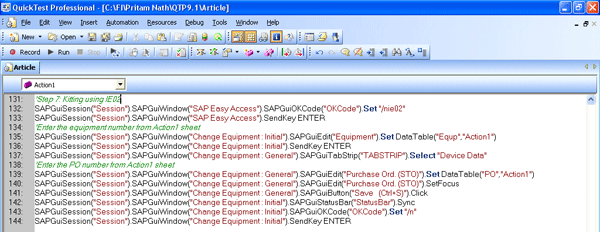
Figure 46
Automation script for associating the purchase order number with the equipment
Step 8. Create an Inbound Delivery
The manual steps in the SAP system start from transaction VL31N and continue as follows (Figure 47):
- Enter the purchase order obtained from step 1 in the Purchase Order field and press Enter
- Click the pack icon
- Enter the handling unit and press Enter. The material will be packed.
- Click the save icon and the inbound delivery is generated. You see the confirmation shown in Figure 48.

Figure 47
Enter the purchase order number

Figure 48
Inbound delivery is saved
The automation script recorded by QTP for creating the inbound delivery is shown in Figure 49.

Figure 49
Automation script for inbound delivery creation
Step 9. Post Goods Receipt
For the manual process, use transaction VL32N in the SAP system and perform the following tasks (Figure 50):
- Enter the Inbound delivery number
- Click the Post Goods Receipt button and you get the confirmation in Figure 51

Figure 50
Enter the inbound delivery number

Figure 51
Save the inbound delivery
The automation script recorded by QTP for posting of goods receipt is shown in Figure 52.

Figure 52
Automation script for posting goods receipt
The scripts corresponding to step 1 to step 9 when run together automate the end-to-end business process of plant-to-plant transfer.
Test Result
I have executed this whole automation script for five different sets of data as mentioned in the Global datatable of the QTP script (Figure 53).
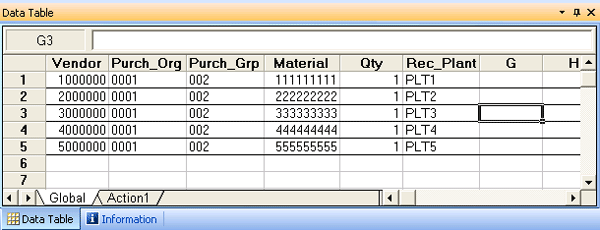
Figure 53
Data in the Global datatable
The output values are stored in the Action1 sheet as stated during each of the steps (Figure 54). The Global datatable contains the user input values. Based on these input values, the QTP script performs the actions already recorded by the user. As the script runs, the Action1 datatable is populated with the result from each of the steps mentioned in the case study. Essentially, the Action1 datatable is where the user checks the output values for his test execution based on the inputs provided in the Global datatable.

Figure 54
Action1 sheet
The result summary is also displayed once the execution is over for all iterations. Figure 55 shows a snapshot of the results for the five different sets of data processed by the QTP script, confirming that it worked properly.

Figure 55
Results
Malti Rawat
Malti Rawat is a senior consultant for Infosys Technologies, Ltd., with six years of consulting experience. She has worked in SAP MM, WM, and ESM. She is currently working as a consultant for a market leader in the telecom sector. She has a bachelor’s of engineering degree from MNNIT, Allahabad, and an MBA from SCMHRD, Pune.
You may contact the author at rawatmalti@gmail.com.
If you have comments about this article or publication, or would like to submit an article idea, please contact the editor.
Pritam Nath
Pritam Nath is a technical test lead for Infosys Technologies Ltd., with five years of QA experience. He has worked in FI/CO and SRM. He is currently working as a QA lead in SAP IS Retail for a reputed client. He has a B.Tech degree from NSEC, Kolkata.
You may contact the author at daktar2005@gmail.com.
If you have comments about this article or publication, or would like to submit an article idea, please contact the editor.


