Meet the Experts
Meet the Authors
At SAP TechEd in the fall of 2017, Björn Goerke, SAP’s Chief Technology Officer, announced that ABAP would become available in SAP Cloud Platform in 2018, and as of September 2018, the new ABAP development and runtime environment — SAP Cloud Platform ABAP environment — is here. SAP Cloud Platform ABAP environment is a completely new environment for SAP Cloud Platform, comparable to SAP Cloud Platform for the Neo, Cloud Foundry, and Kubernetes environments.
Anyone familiar with ABAP knows that it is not just a programming language with a compiler and runtime — it is an integrated environment based on a primary database that contains the ABAP repository and all related ABAP artifacts, such as ABAP classes and the data definitions based on the core data services (CDS) data modeling infrastructure. SAP Cloud Platform ABAP environment not only brings this architectural blueprint — which is currently the foundation of more than 100,000 productive on-premise installations — to the cloud, it also enables you to bring your existing ABAP development expertise and on-premise assets with you, smoothing the transition to the cloud.
Moving your ABAP development and execution environment to SAP Cloud Platform allows you to immediately benefit from the latest features of ABAP and SAP HANA, as well as the innovations available in all existing SAP Cloud Platform services, such as SAP Leonardo with its machine learning, blockchain, and Internet of Things technologies, which enable new scenarios that are not currently possible in the on-premise world. It also allows you to delegate all infrastructure, lifecycle management, and system operations tasks to the development and operations teams at SAP and enables you to scale with your business needs rather than making large upfront investments in hardware and services. In addition, you can take advantage of innovations much faster, since updates are delivered quarterly rather than years apart.
Explore related questions
This article prepares SAP customers and partners for this new world by explaining the basic architecture and mechanics of SAP Cloud Platform ABAP environment and, through practical examples, shows you how to use this new environment for ABAP development. It walks through how to set up the development environment, how to use the development tools to create a back-end service, and how to enable the newly created back-end service for consumption by an SAP Fiori application.
The Architecture of SAP Cloud Platform ABAP Environment
Figure 1 provides an architectural overview of SAP Cloud Platform ABAP environment. Administrators (and developers with the appropriate privileges) can launch SAP Cloud Platform cockpit via their SAP Cloud Platform account and create a new ABAP instance — that is, a complete ABAP stack with an underlying SAP HANA database — in the cloud. The cloud-based ABAP system is then up and running and can be accessed by the Eclipse-based ABAP development tools, which are the standard development tools for SAP Cloud Platform ABAP environment.
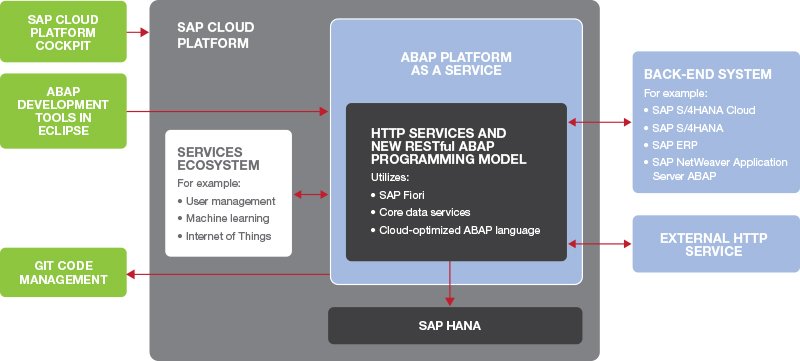
The cloud-based ABAP system is based on the same ABAP kernel used for SAP S/4HANA Cloud 1808. Its primary purpose is to provide a development and runtime environment for SAP Fiori applications that are decoupled from the digital core and optimized for SAP HANA using a RESTful programming model, a services-based approach, and a cloud-optimized ABAP language. While SAP Fiori applications created in the cloud-based ABAP environment are based on the consumption of CDS views that are exposed as services through the OData protocol and presented with corresponding SAP Fiori elements, simple transactions are also supported. The ABAP applications connect to back-end systems through standard protocols such as HTTP and OData. In the initial version of SAP Cloud Platform ABAP environment, these applications can connect to an SAP S/4HANA Cloud back end, and in planned future versions, access to on-premise back ends will be enabled through the Cloud Connector component for SAP Cloud Platform.
It is important to note that with SAP Cloud Platform ABAP environment, SAP Fiori is the only supported user interface (UI) technology — SAP GUI and Web GUI are strictly prohibited, since screen processing is not ideal for the cloud. In addition, unlike in the on-premise ABAP stack, the ABAP development tools do not call any embedded SAP GUI tools in SAP Cloud Platform ABAP environment. All tool access in SAP Cloud Platform ABAP environment is done with the native Eclipse plug-ins available at https://tools.hana.ondemand.com.
SAP Cloud Platform ABAP environment is embedded into the Cloud Foundry environment of SAP Cloud Platform, which allows ABAP applications to use other services of SAP Cloud Platform, such as SAP Leonardo. The traditional change and transport concept is still in place from a logical perspective, meaning that you can develop an ABAP application in one system and then transport it into a test or productive system, for example. However, in contrast to the on-premise world, where transport requests are exported to the central directory of a landscape (typically under /usr/sap/trans) and then imported into the target system, in SAP Cloud Platform ABAP environment, the transport requests are exported in readable format to a Git repository. This enables you, for example, to export the same ABAP artifact in different versions, which is not possible in the traditional on-premise world. With this approach, Git-aware tools that support continuous integration and delivery can benefit from the source representation in Git, making the ABAP world more open to cloud innovations.
So, what does development look like in SAP Cloud Platform ABAP environment? Let’s take a look.
Setting Up the Environment
To give you an idea of how development works in SAP Cloud Platform ABAP environment, we will walk through how to develop an ABAP back-end service for consumption in an SAP Fiori application. Before we start our development work, however, we must set up the development environment by creating an ABAP instance in SAP Cloud Platform and creating a project in the Eclipse IDE.
Create an ABAP Instance with SAP Cloud Platform Cockpit
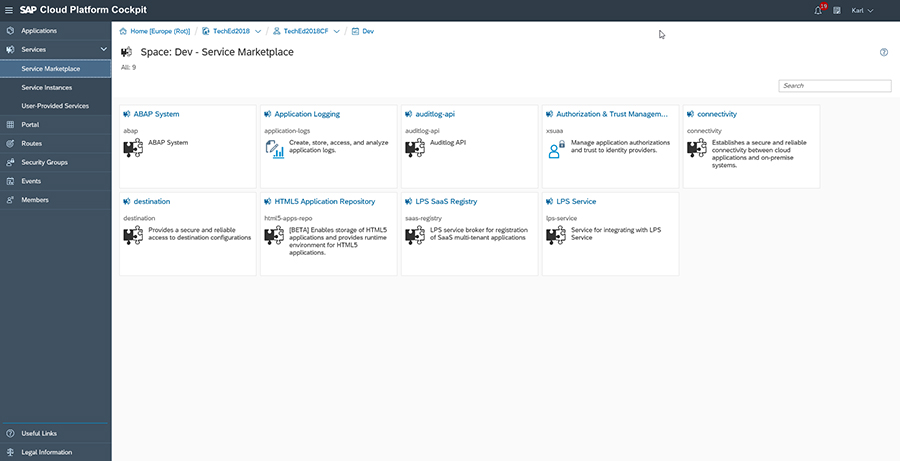
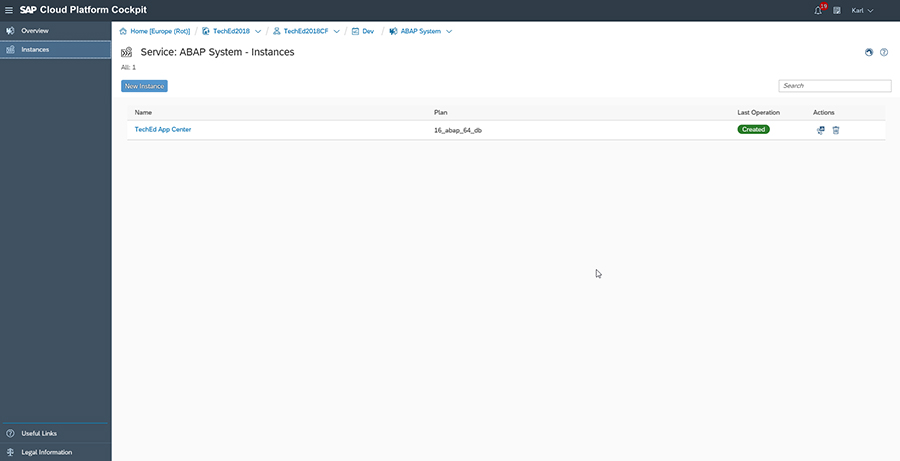
The first task is for an administrator — or a developer with the appropriate privileges — to create an ABAP instance. The Service Marketplace within SAP Cloud Platform cockpit lists all the available services, including SAP Cloud Platform ABAP environment, which is listed as ABAP System (see Figure 2). Clicking on ABAP System displays a list of already active ABAP instances that you have started in your SAP Cloud Platform account (see Figure 3). You can create a new ABAP system by clicking on New Instance. In the example, we have created the instance TechEd App Center.
Create an ABAP Cloud Project in Eclipse
Next, we need to create an SAP Cloud Platform ABAP environment development project using the Eclipse IDE. You will find this task fairly easy if you are familiar with using the Eclipse-based ABAP development tools for on-premise ABAP development, since SAP Cloud Platform ABAP environment uses the same set of tools. Cloud development is simply carried out in a new Eclipse project perspective: ABAP Cloud Project.
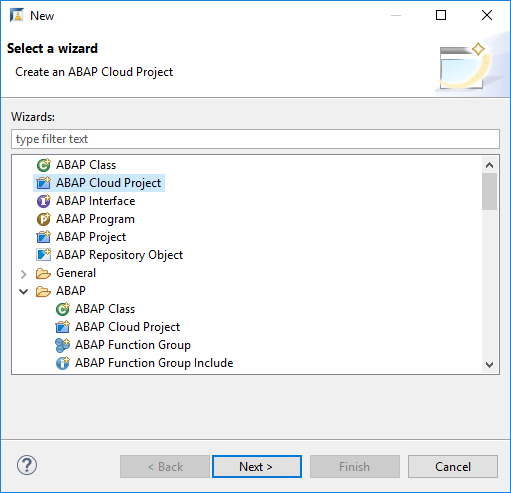
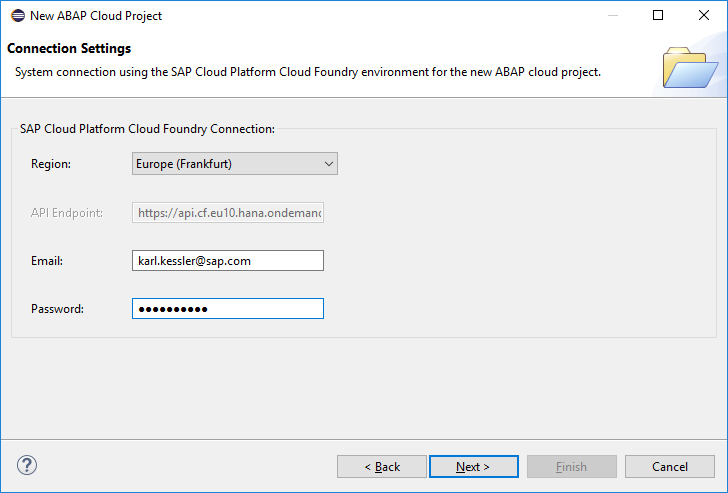
In the Eclipse IDE, create an ABAP Cloud Project by following the menu path New > Project and selecting the corresponding wizard (see Figure 4). Then configure the system connection to the Cloud Foundry environment for SAP Cloud Platform. First, select a “region” — that is, where your cloud provider runs the data center you want to work with (see Figure 5). (While initially only the Amazon Web Services cloud provider in the Frankfurt region is supported, additional regions and cloud providers will become available in the future.) Then enter the credentials for your SAP Cloud Platform account.
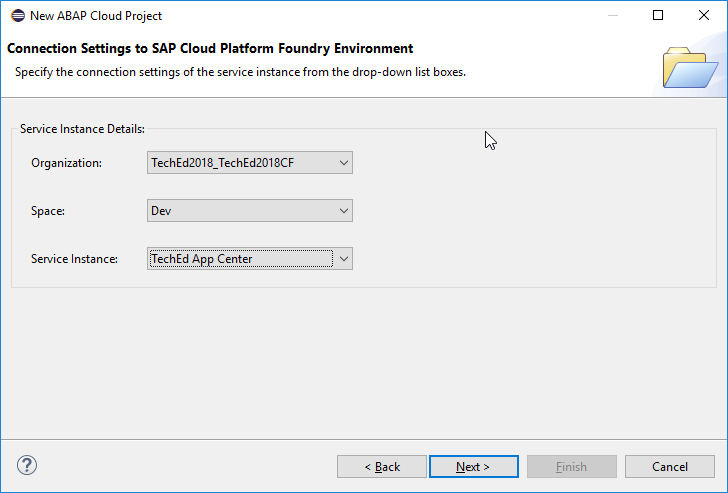
Next specify the instance details, including the Cloud Foundry organization and space, and select the ABAP instance to use for the connection from the drop-down list of available instances that were displayed in SAP Cloud Platform cockpit (see Figure 6). For the example, we select the instance TechEd App Center.
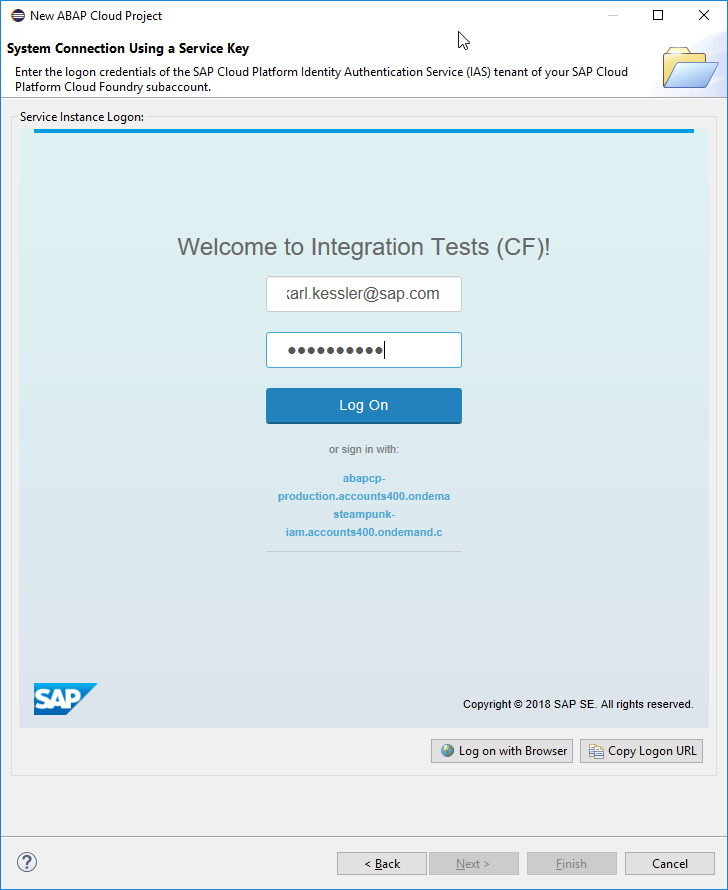
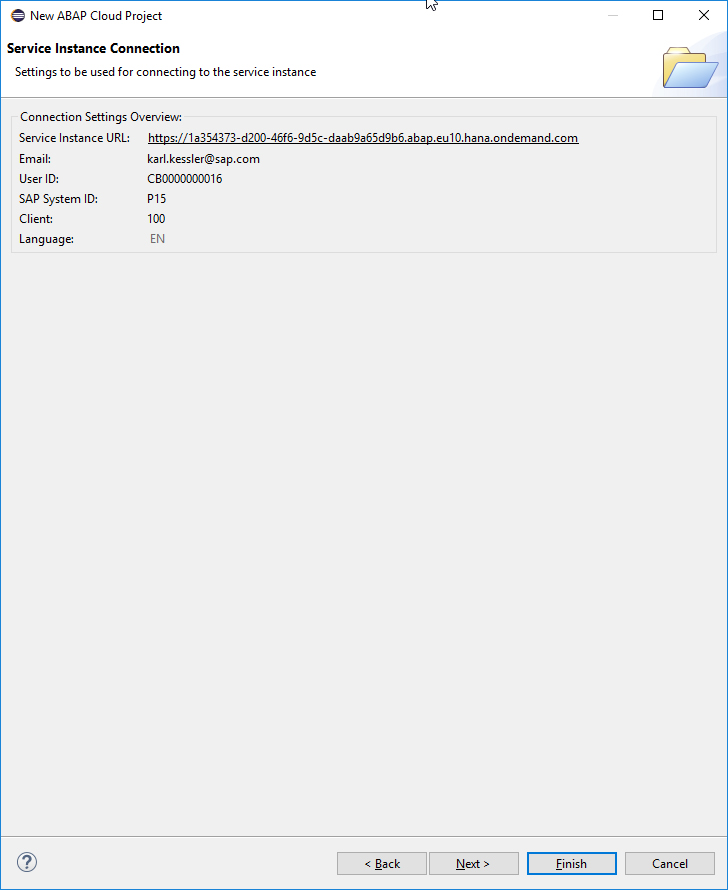
Log in to your ABAP back end — TechEd App Center in the example — using your SAP Cloud Platform credentials (see Figure 7). The system responds with a URL for the ABAP back end, which will be used to identify your back-end connection (see Figure 8).
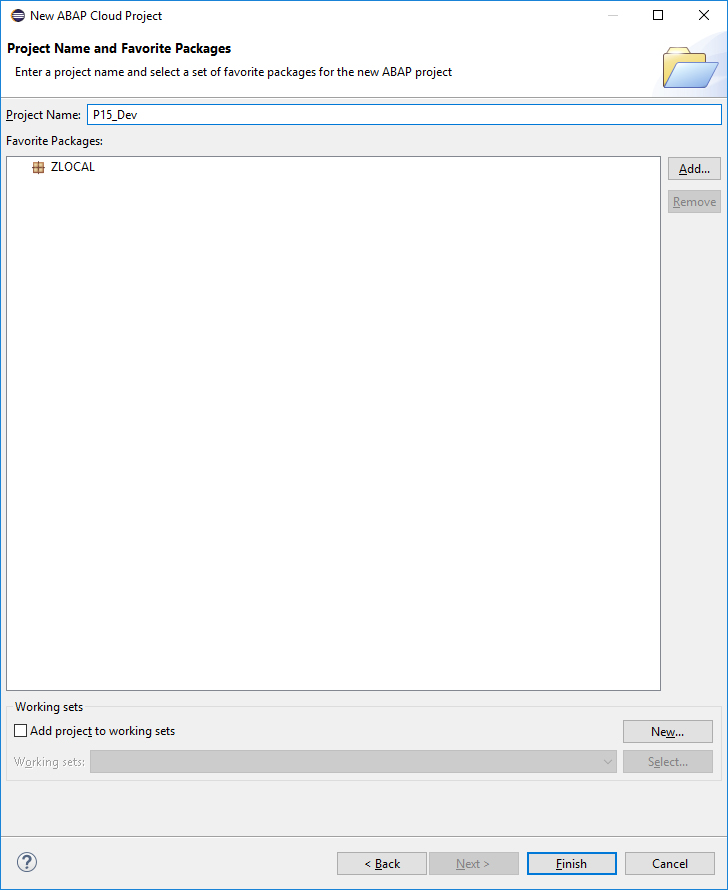
You can then name your project (P15_Dev in the example) and add a favorite package to contain your local development objects — for the example, we choose the predefined package ZLOCAL for local development (see Figure 9). Clicking on Finish takes you to the familiar Project Explorer overview in the Eclipse IDE workspace, which now includes your newly created project and the package for local development (see Figure 10). From this point on, your development work will be similar to any other project that uses the Eclipse-based ABAP development tools.
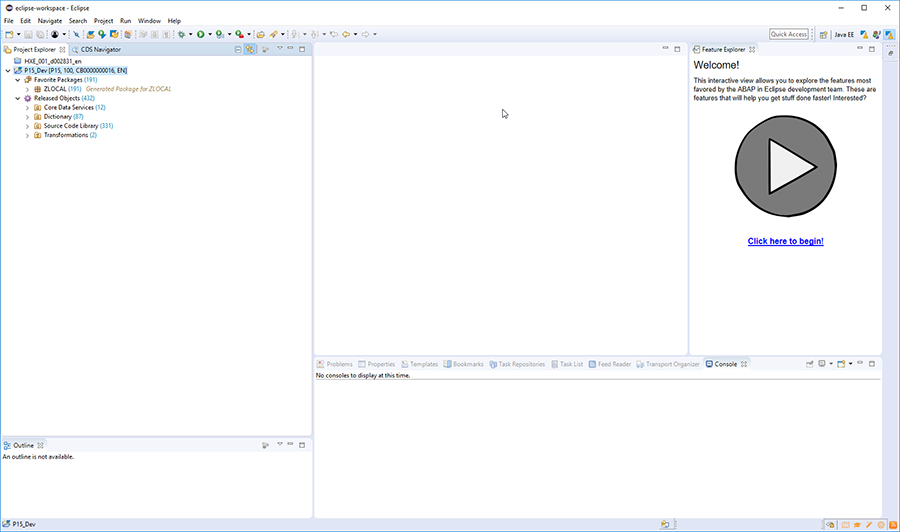
When you next log in, you can select your development project by simply logging in to the ABAP back end — just click on the project name in the Eclipse IDE and log in with your credentials — without the need to drill down from the Amazon Web Services data center in Frankfurt.
Using the Development Tools
With the ABAP Cloud Project configured, we’re now ready to start our development work. Here, we’ll create an ABAP back-end service for consumption in an SAP Fiori application using the well-known flight example to demonstrate the steps in the development environment. Before beginning the development tasks, however, it is important to understand that with SAP Cloud Platform ABAP environment, the ABAP language has been optimized for cloud operations, meaning that certain language elements that have been used in on-premise development are no longer allowed.
To help ensure smooth operations in the cloud, the Released Objects node in the Project Explorer navigation tree lists all the whitelisted objects available for development use in SAP Cloud Platform ABAP environment, including APIs, CDS views, and dictionary objects (see Figure 11). This list contains important ABAP classes for the ABAP runtime environment and various dictionary elements. It is important to note that tables are not included as whitelisted objects, which means that an ABAP statement referring to a standard ABAP table will cause a Syntax error. You must use a whitelisted API to access any underlying tables. This approach is different from ABAP on premise, where you can access almost any ABAP repository element, even if it was never intended for use in custom code.
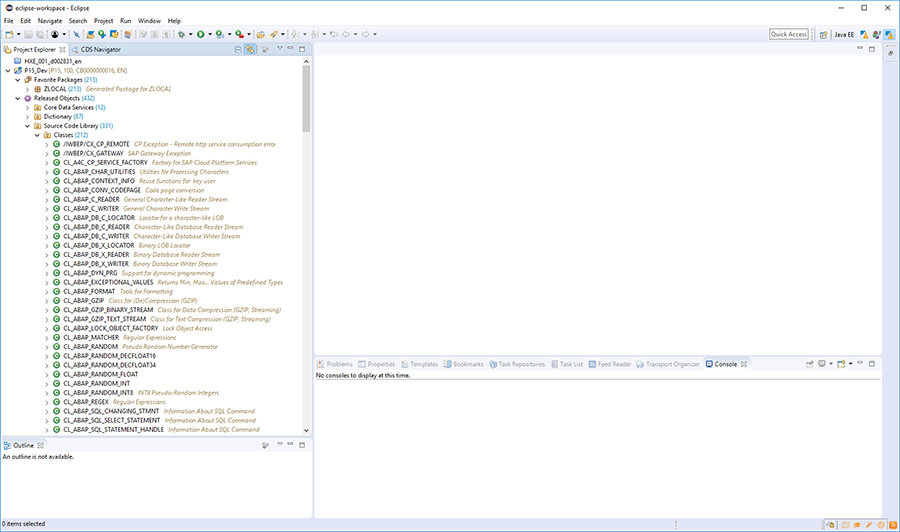
With SAP managing the cloud-based environment — and not the customer, as in on-premise deployments — all upgrades, patches, and hotfix collections are applied independently of the customer’s project at predefined maintenance intervals, which are kept as short as possible to provide maximum availability of the cloud environment. For cloud operations, this means that custom code must strictly adhere to the whitelisted objects, which are managed in a compatible way so that the customer can continue with development or production uninterrupted by maintenance. In an on-premise environment, a customer would execute transaction SPAU (Process After Upgrade) to adjust any custom code to the new SAP repository version. In cloud environments, this approach is simply unacceptable.
SAP will extend the whitelist based on customer and partner demand, but to keep ABAP innovation up to speed, not all legacy frameworks can be moved to the cloud. This is similar to Java, where frameworks such as Web Dynpro could not be moved to SAP Cloud Platform and were instead replaced with SAP Fiori and SAPUI5.
With these guidelines in mind, let’s now begin our development work, which starts with creating a package to contain our development objects.
Create an ABAP Package to Contain the Development Objects
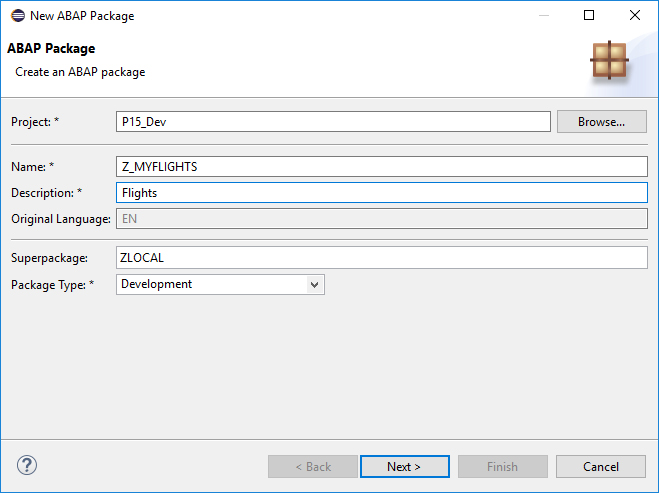
First, create an ABAP package in your ABAP Cloud Project (the P15_Dev project in the example) that will contain all the artifacts for the ABAP back-end service. In the Project Explorer navigation tree in the Eclipse IDE workspace, right-click on the ZLOCAL package you added for local development, which will serve as the superpackage for the new package, and select ABAP Package to start the wizard. Name the package Z_MYFLIGHTS, add a description, and specify a package type (see Figure 12).
Create a Database Table to Hold the Data
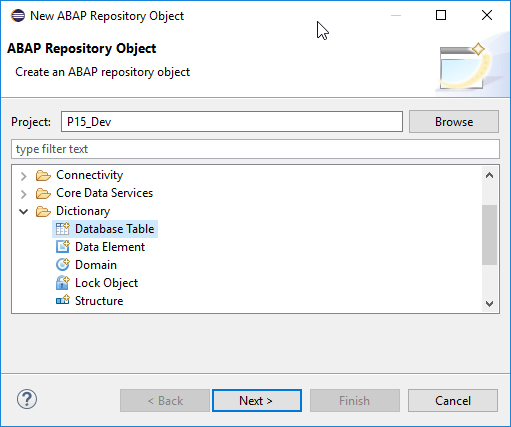
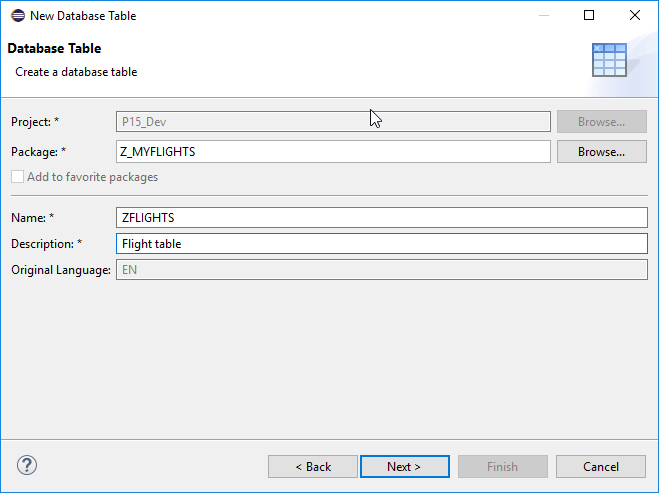
Next, create a database table by right-clicking on the newly created package (Z_MYFLIGHTS), selecting ABAP Repository Object, and choosing Database Table from the list of Dictionary tools (see Figure 13). Enter a name (ZFLIGHTS) and description for the table (see Figure 14).
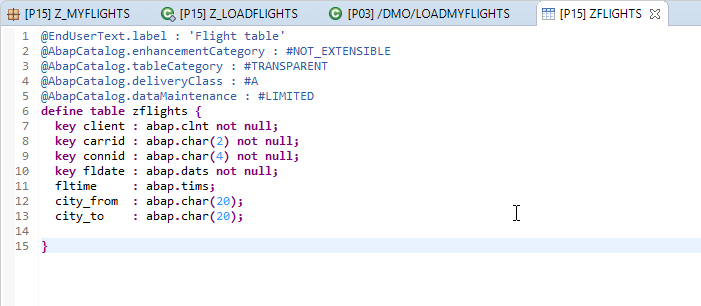
The ZFLIGHTS table now appears in the Project Explorer navigation tree and is displayed in the table editor within the Eclipse IDE workspace (see Figure 15), which replaces the former ABAP dictionary transaction (SE11). Note that with SAP Cloud Platform ABAP environment, all ABAP artifacts are represented by native Eclipse editors within the workspace.
Develop a Console Application to Populate the Database Table
To spool some data into the new ZFLIGHTS database table, we need to develop a console application, which is similar to a traditional ABAP report in the on-premise world. The console application is essentially an ABAP class that performs some actions — in the example, it performs database insert operations — and writes messages to the console.
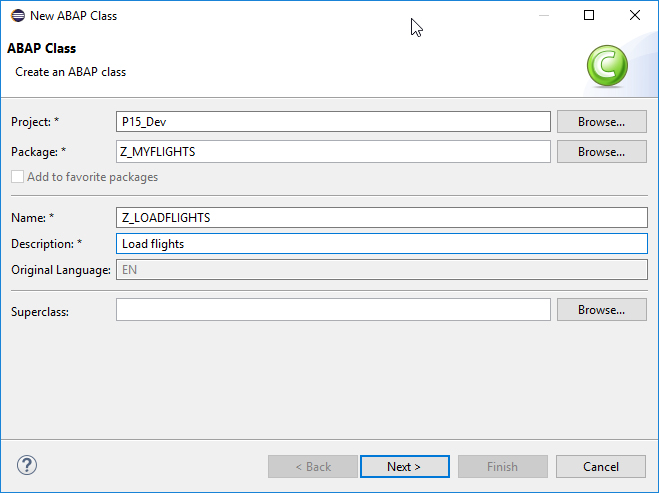
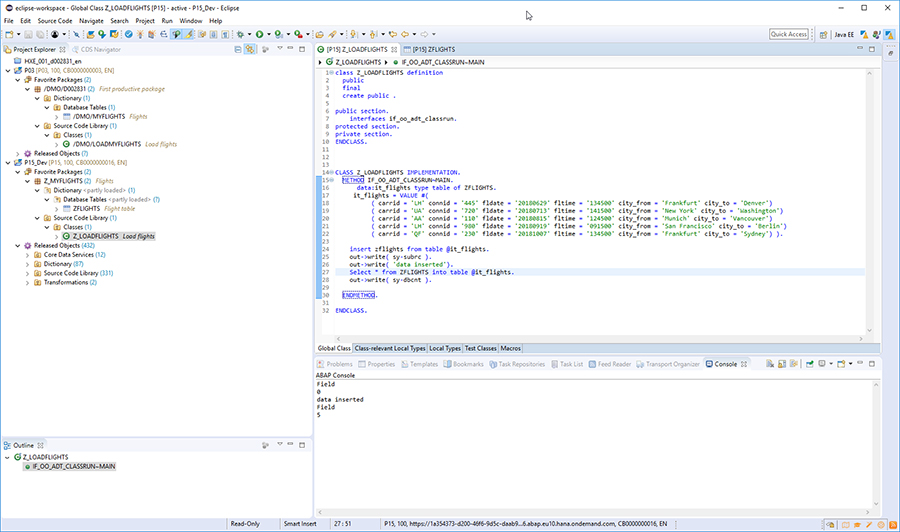
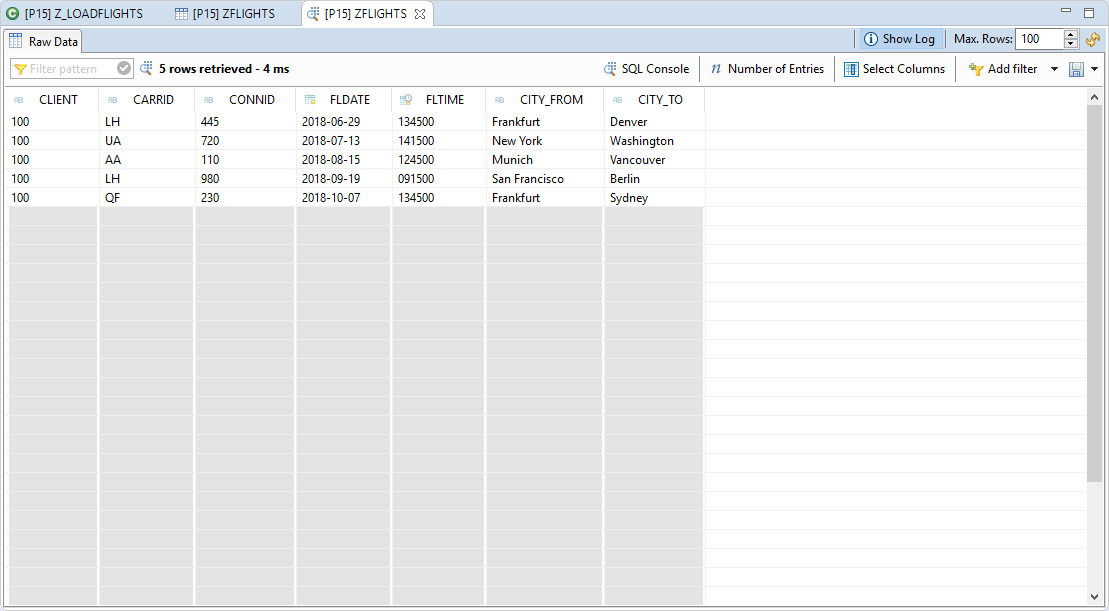
To create the class, right-click on the ABAP package, select ABAP Class to start the wizard, and then enter a name (Z_LOADFLIGHTS) and description for the class (see Figure 16). The class is now included in the Project Explorer and displayed in the editor within the Eclipse IDE workspace (see Figure 17). The class uses the previously defined table ZFLIGHTS and creates database records from an internal table called it_flights, which is defined by the data declaration statement. Running this class (by pressing F9) inserts data into the ZFLIGHTS table (see Figure 18).
When developing an application in SAP Cloud Platform ABAP environment, keep in mind that statements that violate the previously mentioned whitelist, such as dynamic SQL, will raise a syntax error. When SAP Cloud Platform ABAP environment has more comprehensive runtime checks, some of the dynamic capabilities in ABAP will again be released, but as with the whitelist approach, the philosophy is to start small and extend the cloud capabilities step by step.
Define a CDS View to Retrieve Data from the ABAP Back End
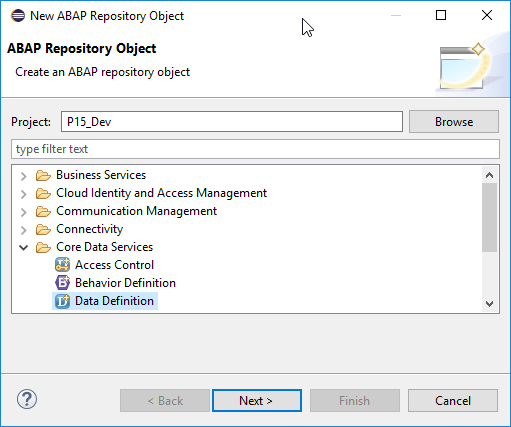
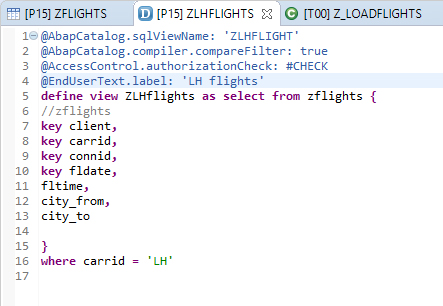
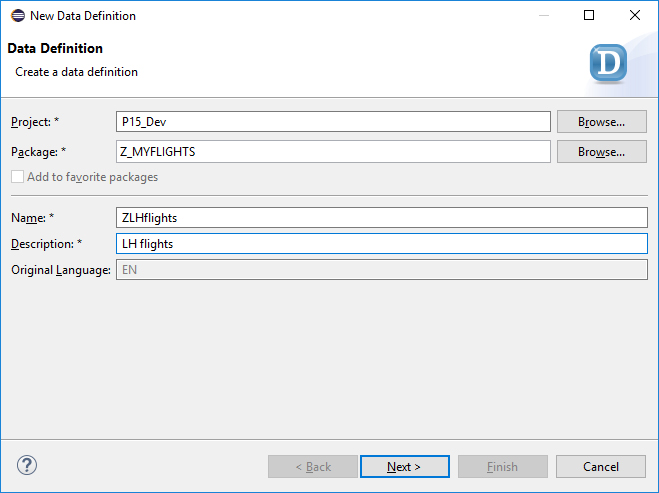
Now that we have a base table for the CDS definition, we can define a CDS view that retrieves data from the ABAP back end (the ABAP instance TechEd App Center specified earlier) — in the example, it selects an LH flight. To create the CDS view, right-click on the ABAP package, select ABAP Repository Object, and choose Data Definition from the list of Core Data Services tools (see Figure 19). Enter a name (ZLHflights) and description for the view. The code for the CDS view is now displayed in the editor within the Eclipse IDE workspace, where the developer can then define the necessary fields and the data from the base table is restricted simply by a corresponding where clause.
Create a Service Definition to Expose the CDS View
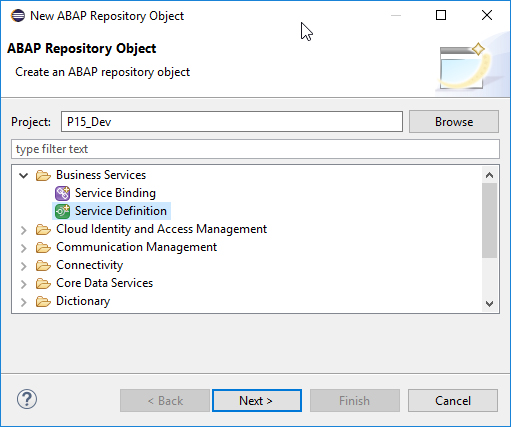
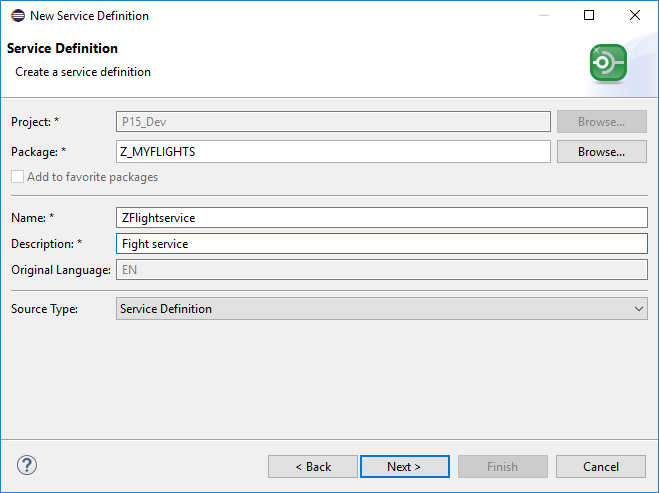
To expose the CDS view through OData, you must create a service definition — right-click on the ABAP package, select ABAP Repository Object, and then choose Service Definition from the list of Business Services tools (see Figure 22). Enter a name (ZFlightservice) and description (see Figure 23). The code for the service definition is displayed in the editor within the Eclipse IDE workspace, where the developer can specify the services to be exposed (see Figure 24). While the service definition corresponds roughly to the @odata:publish: true annotation well-known in the on-premise world, with SAP Cloud Platform ABAP environment, you need to define the nature of your service more precisely using a service binding.
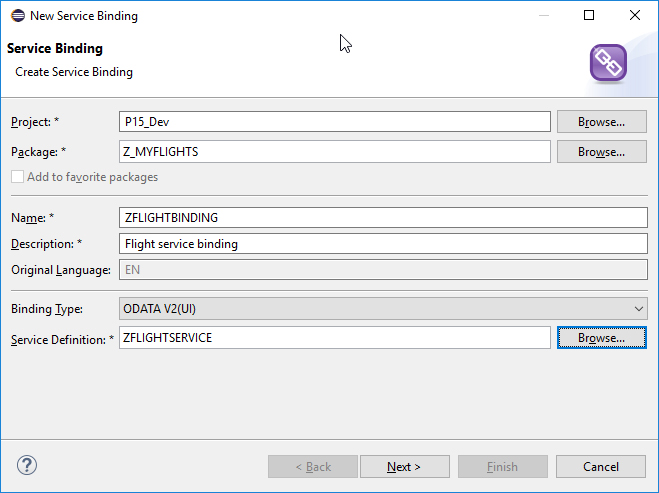
OData comes in two different versions, which both support application-to-UI communication and application-to-application communication. To enable an application-to-UI communication for the example, we create a service binding based on the version 2 specification by right-clicking on the ABAP package and selecting Service Binding from the list of Business Services tools. Name the binding (ZFLIGHTBINDING), provide a description, and associate the newly created flight service (ZFLIGHTSERVICE), as shown in Figure 25.
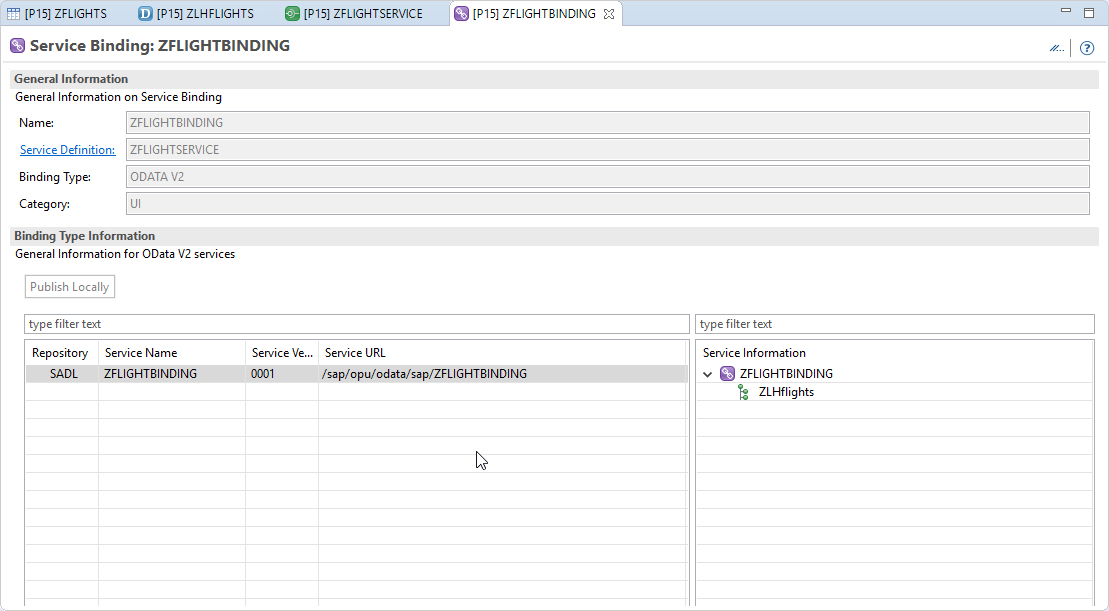
Next, in the editor pane within the Eclipse IDE workspace, publish the service by clicking on Publish Locally, which populates the fields under Binding Type Information in the editor pane (see Figure 26). The information includes an executable URL that shows the metadata of the OData service. A preview functionality is planned for a future version that will enable you to examine the data provided by the service independent of a concrete UI client.
Create a Communication Scenario to Provide Authentication
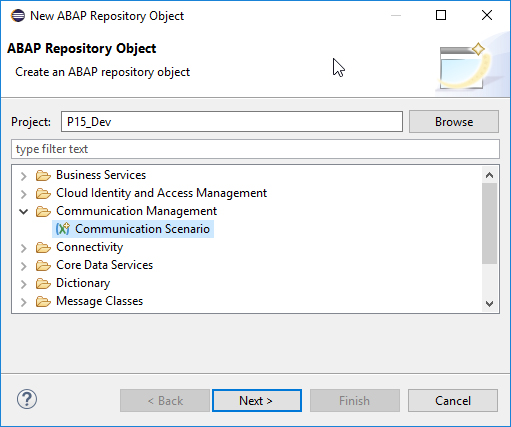
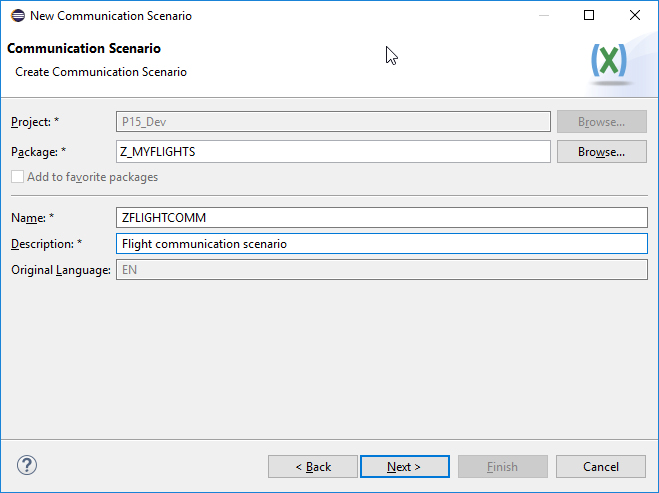
The final ABAP development task required to make the service ready for use is to create a communication scenario. Right-click on the ABAP package, select ABAP Repository Object, and choose Communication Scenario from the list of Communication Management tools (see Figure 27). Name the communication scenario (ZFLIGHTCOMM) and provide a description (see Figure 28).
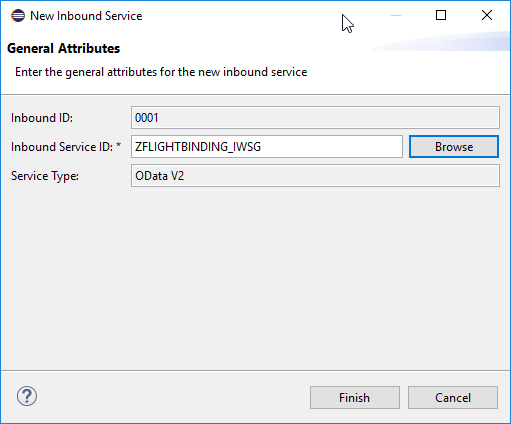
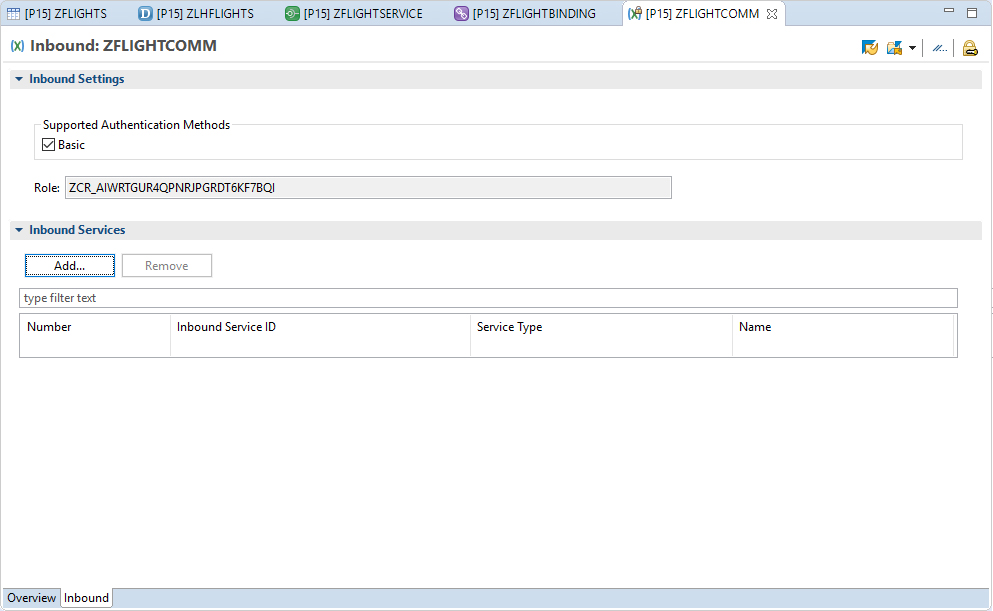
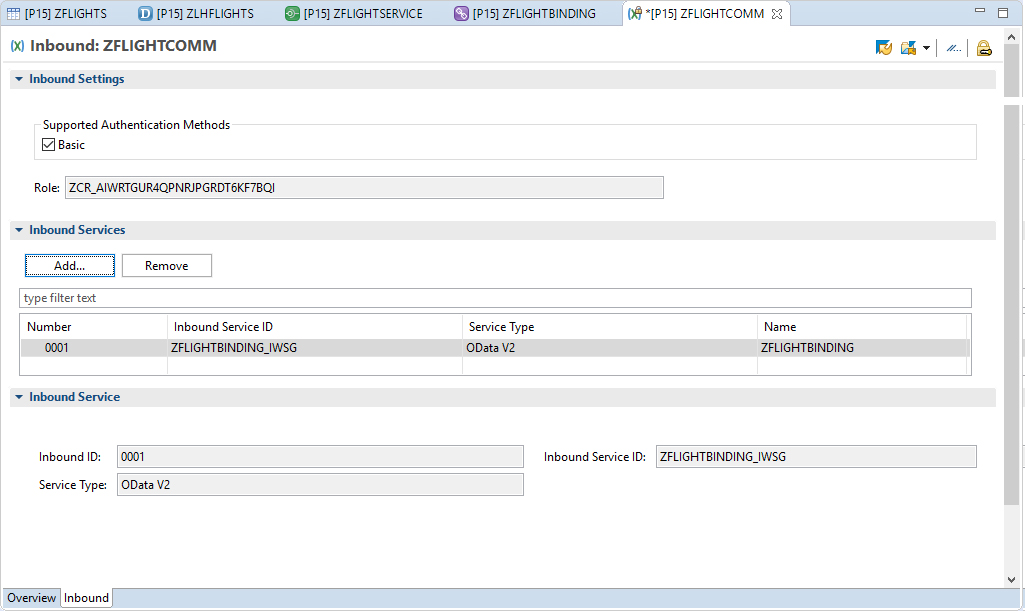
Next, in the editor pane within the Eclipse IDE workspace, specify the authentication and authorization for the communication scenario in the Inbound Settings on the Inbound tab (see Figure 29). For simplicity, we use basic authentication (that is, user name and password) for the example. The role is assigned automatically. We then add an inbound service for the communication scenario (ZFLIGHTBINDING_IWSG), which is derived from our flight service binding (see Figure 30). The communication scenario can then be published on the Overview tab in the editor pane, which adds the service details to the Inbound Service fields on the Inbound tab (see Figure 31).
Enabling Access to the ABAP Back End
With the ABAP development steps complete, there are just two tasks that remain to enable access to the ABAP back end and make the service ready for consumption:
- An administrator must configure communication with the service
- The developer must create an SAP Fiori template that consumes the service
It is useful for developers to understand the mechanics of the administrative tasks described here — in particular, because the settings contain information required for creating the SAP Fiori template.
Configure Communication with the Service
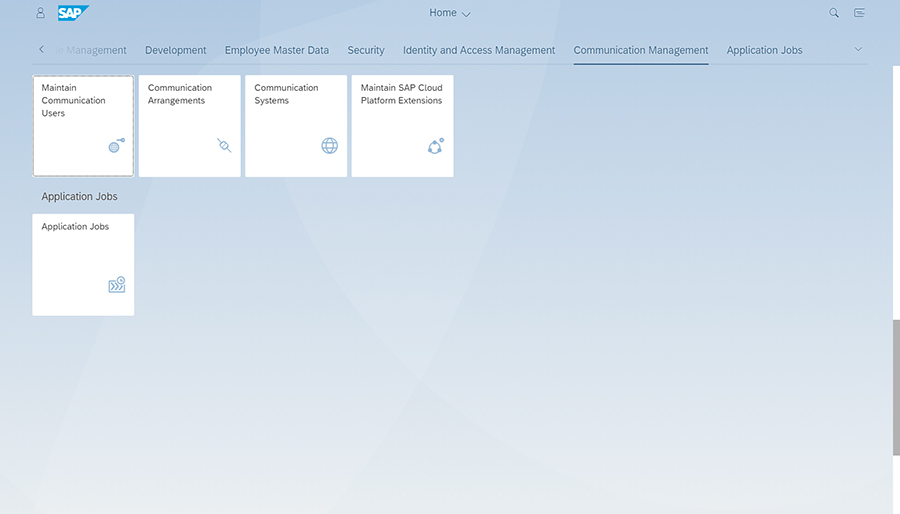
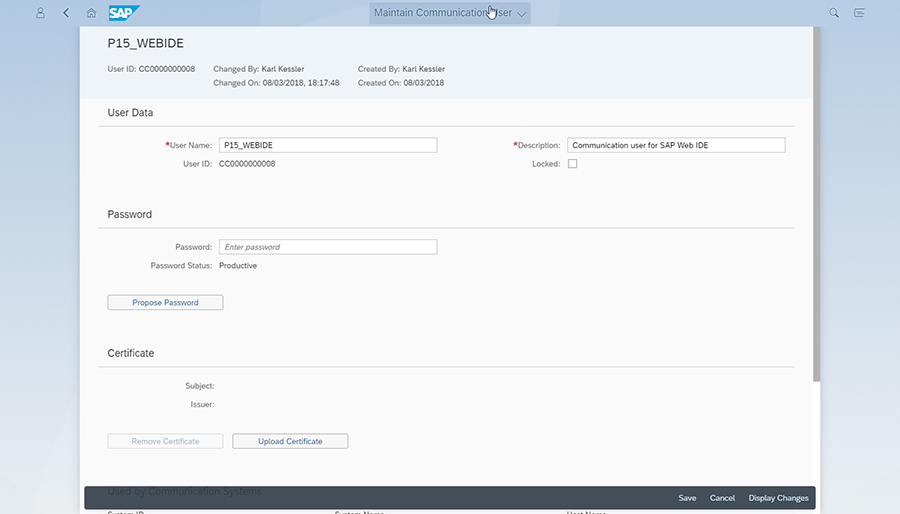
To make the service available for consumption, several administrative tasks are required. Instead of using the ABAP development tools, the administrator uses SAP Fiori launchpad, which contains tiles for the administrative tasks (see Figure 32). First, the administrator must configure a communication user that logs on to the ABAP back end (the TechEd App Center ABAP instance) and executes the flight service returning the LH flights. Enter a user name (P15_WEBIDE in the example), a description, and a password (see Figure 33).
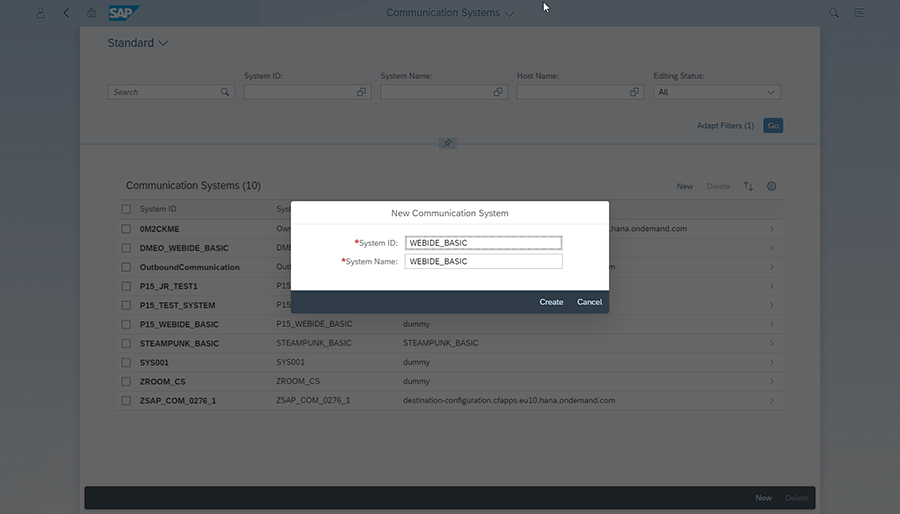
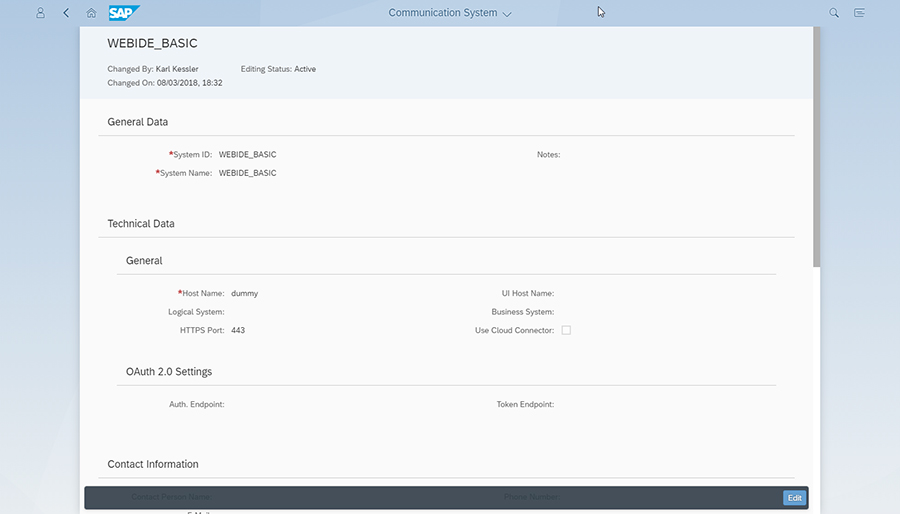
Next, to handle the inbound and outbound communication, a communication system must be defined — in the example, with WEBIDE_BASIC as the system ID and name (see Figure 34) — that describes the ABAP back end (see Figure 35).
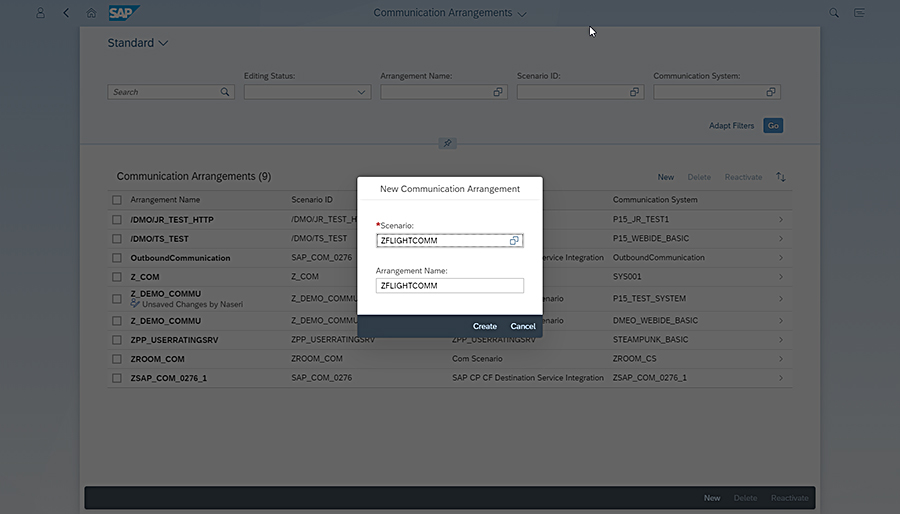
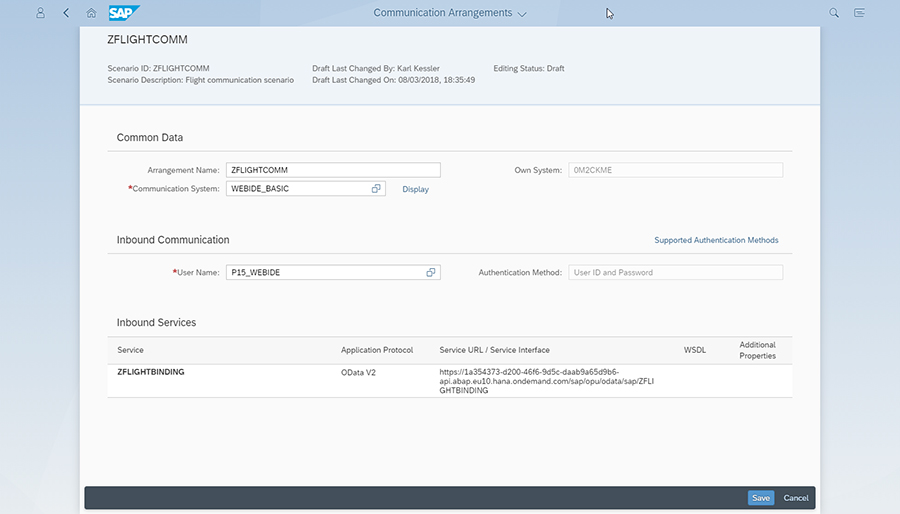
Lastly, a communication arrangement is defined, named ZFLIGHTCOMM in the example (see Figure 36), that bundles together the communication user and communication system (see Figure 37). Note that the communication arrangement contains the URL that identifies the service (ZFLIGHTBINDING), which will be used in the SAP Web IDE project when creating the SAP Fiori template to consume the service.
Create an SAP Fiori Template to Consume the Service
The final task is to create an SAP Fiori template that consumes the service using SAP Web IDE, which is an SAP Cloud Platform service for the Neo environment. Remember that SAP Cloud Platform ABAP environment is a service for the Cloud Foundry environment — for this reason, we use the full stack SAP Web IDE that can access Cloud Foundry services, which is accessible via SAP Cloud Platform cockpit.
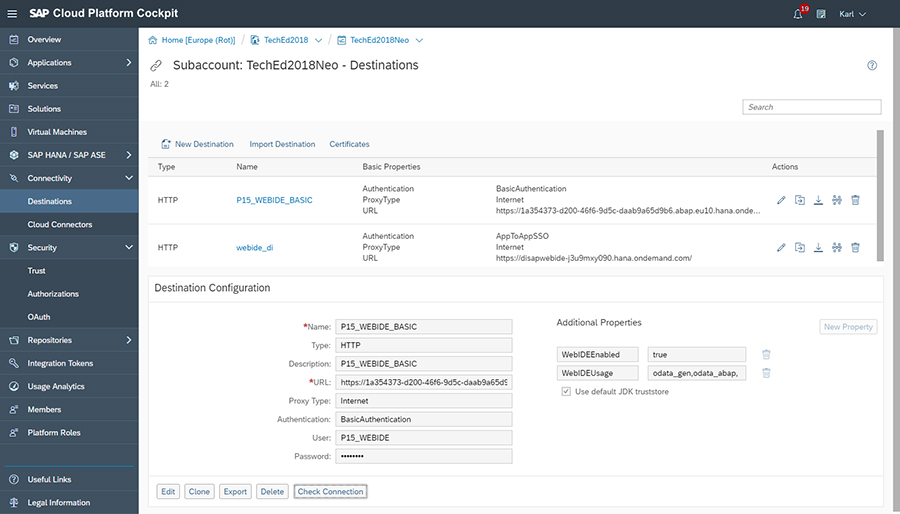
First, in SAP Cloud Platform cockpit, define a destination that provides access to the ABAP back end. Specify the destination information, including a name (P15_WEBIDE_BASIC in the example), the URL from the communication arrangement definition, and the corresponding communication user defined previously (see Figure 38).
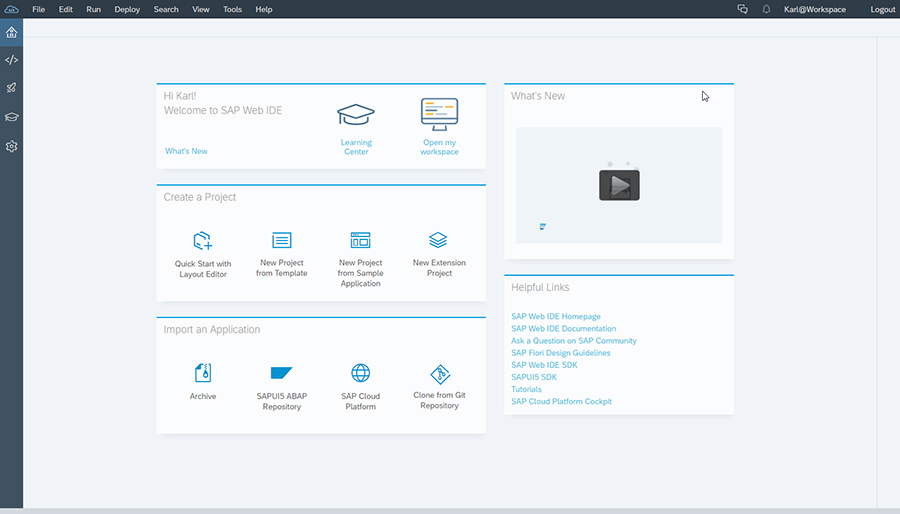
Next, select New Project from Template on the start screen of SAP Web IDE (see Figure 39).
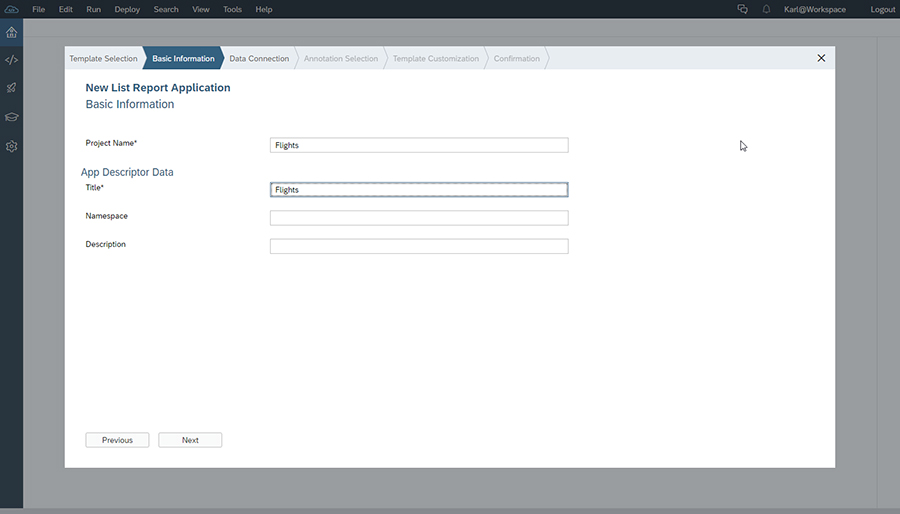
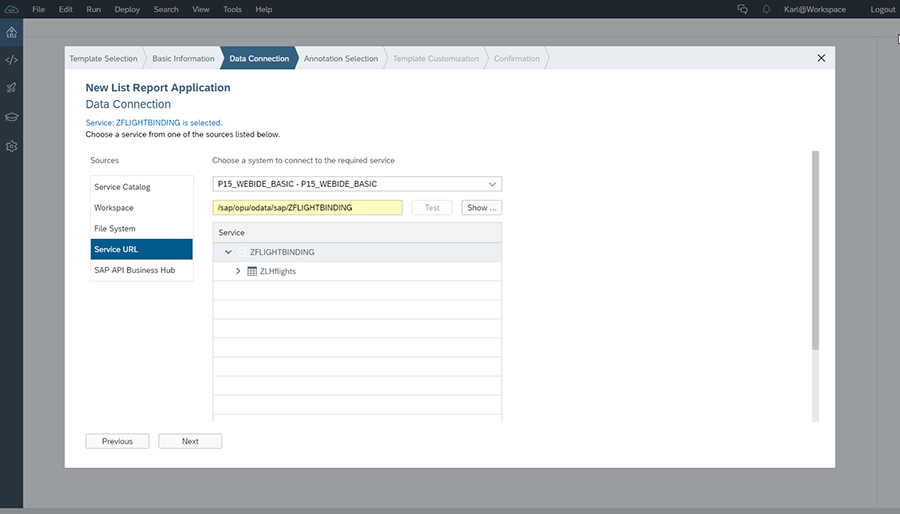
Name the project — Flights in the example (see Figure 40) — and specify the service URL from the communication arrangement definition that represents the LH flights, which will display the metadata of your service (see Figure 41).
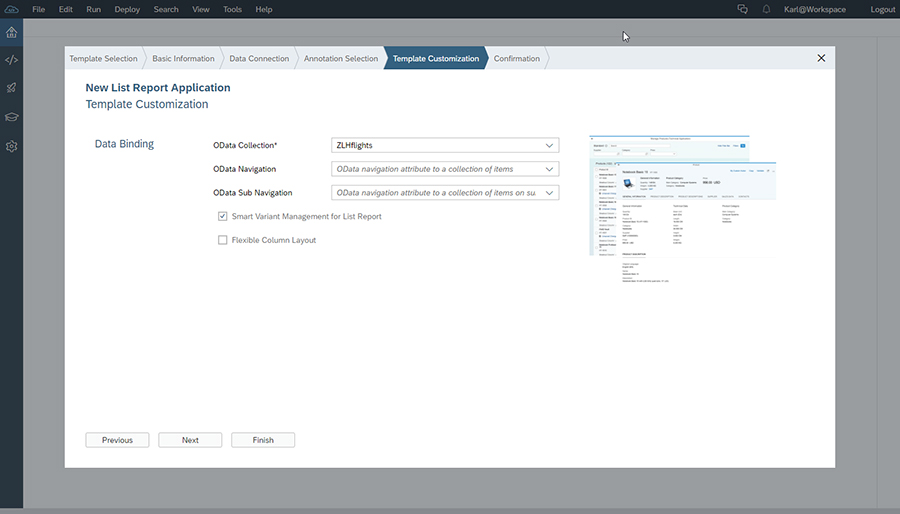
Specify the OData collection — the CDS view created earlier, ZLHflights (see Figure 42) — and generate the project.
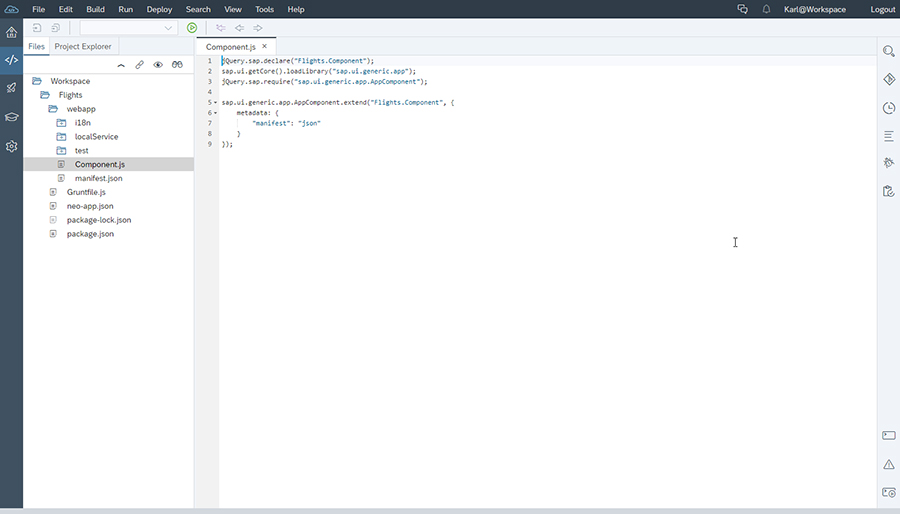
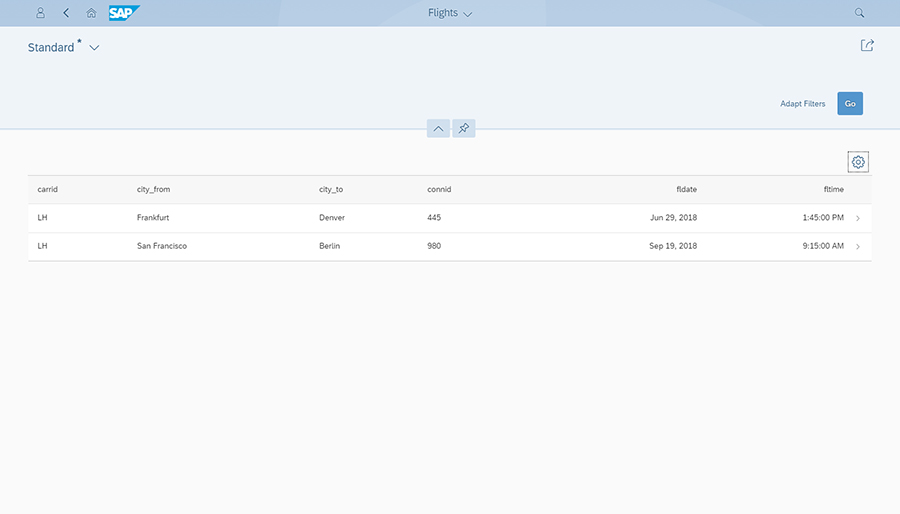
The components of the finished project are shown in the Project Explorer of SAP Web IDE (see Figure 43). From there, you can launch the application, which retrieves the data and displays it in a list report template (see Figure 44).
Summary
SAP Cloud Platform ABAP environment is available as of September 2018 and is priced in two dimensions: ABAP memory and SAP HANA memory. The minimal setup is a 16GB ABAP application server running on a 64GB SAP HANA database, which is €3,000 per month per customer. Customers can choose between subscription billing and pay-per-use billing, similar to other services offered through SAP Cloud Platform.
With SAP Cloud Platform ABAP environment, SAP customers and partners have the opportunity to move their ABAP skills and assets to the cloud. Cloud operation requires stricter compatibility rules compared to on-premise ABAP development, but the benefits are significant and include access to innovative ABAP capabilities on top of SAP HANA. The development tools are fully based on the user-friendly Eclipse IDE, and the development environment can be used to extend SAP S/4HANA Cloud as well as recent on-premise installations of SAP S/4HANA and SAP Business Suite (version 7.0 of SAP NetWeaver and higher), enabling you to use your existing ABAP expertise together with cloud innovation to tap into a new world of opportunity.

