Smart Forms is a tool first delivered with R/3 Release 4.6 for printing and sending documents via email, Web, and fax. The supporting technology allows you to configure and deploy Smart Forms as a workflow-based or event-driven functionality. Find out more about Smart Forms and see how to implement it or convert existing SAPscripts to Smart Forms.
Key Concept
Form development, including output generation format, printout, PDF, and email output, consists of page layout and windows within the page. These windows include main, text, footer, logo, and title. Smart Forms provide an interface to build and maintain layout and logic of the form. Smart Forms architecture works on three tiers: the application program, which retrieves the data from the database; the Smart Forms ABAP function module, also called the "form logic," and the output device — Web browser, printer, or fax.
To ease printing woes, SAP introduced a new tool called Smart Forms. Introduced with SAP R/3 4.6C, it is
fully integrated with SAP core applications, such as HR and mySAP ERP. It also supports Web applications, which is a key
area of expansion for most companies. Smart Forms may be used with interactive Web forms that are based on generated XML
output XSF, Basis Release 4.6C; HTML+XSF, and SAP Web Application Server (Web AS) 6.10. Smart Forms is standard for
various central business processes (starting with CRM 2.0, SD, FI, and HR 4.6C).
The documentation for Smart Forms, however, is scattered; there is no easy way to learn what it entails
and how to use it. The conversion process is completely undocumented. I'll walk you through some of the tools available to
help you migrate from SAPscript to Smart Forms and teach you how to develop Smart Forms from scratch. Though
implementation time can be
substantially decreased with the standard, predefined forms Smart Forms provides, developing your own might
be necessary to meet unique needs.
What Can I Expect from Smart Forms?
Smart Forms (transaction
SMARTFORMS) includes a standard component known as Smart Styles
(transaction
SMARTSTYLES). Smart Styles allow you to define the paragraph and character attributes at the
format level, similarly to a template. Texts and fields are assigned to these paragraphs and characters in the Smart
Forms. You specify the style in the output options of the form attributes. All Smart Forms have their own Smart Style, and
when converting a Smart Form, you must convert the Smart Style as well.
Features of Smart Forms include:
1. Smart Forms contain enhanced form-development tools (drag-and-drop, multiple tables, background images,
interactive Webforms, etc). Multiple-page formats are possible in Smart Forms, which is not the case with SAPscripts. This
allows you to create different design formats for each page.
2. Smart Forms has an easy-to-use, graphical user interface. No programming skills are required.
3. Smart Forms generates a function module when activated, doing away with the need to write code. In
SAPscript, you must create a program separately, code it, and then assign the SAPscript and program to the output types.
The code is delivered in terms of standard data extraction, but any customer-specific logic needs to be coded
additionally.
4. Smart Forms features interactive Web forms based on generated XML output. You can download Smart Forms
onto local PCs in XML format. Conversely, you may also upload the XML format into Smart Forms, making it easy to maintain,
with no migration needed. You can download it as an .xml file and upload it for reuse where needed, which isn't possible
with SAPscript.
5. In addition to using the printer for standard output, you can also select the Internet (by using a
generated HTML output), fax, PDF, or email as the output medium without the additional coding that SAPscript requires.
6. The migration of SAPscript forms to Smart Forms is supported.
Data retrieval using Smart Forms is done by the traditional model, which is to extract the data from the
database through the application program. The form logic is built through the generated ABAP function module. Output may
be Web browser content, printed documents, email attachments, or fax.
Form Builder provides a navigation tree for building the form. Select the node and you can select the
attributes for the selected node (for example, position and size). The node may be painted using
Form
Painter on the right side of the main window, as shown in
Figure 1.

Figure 1
Smart Forms transaction with Form Builder
The
Form Painter tool bar helps you paint the selected window. Size the boxes as images
within the window using the ruler at the top. Use the window to add text or graphics. Create
personal settings for ease of use by zooming or by using a grid or ruler.
You can choose from the available text types. Text elements are local to each form. Create text modules
for reusability. You may also include SAPscript texts and then drag and drop these texts into the selected node or window
(
Figure 2).
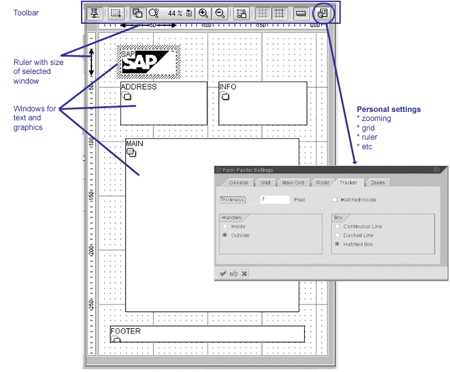
Figure 2
Form Builder window demonstrating the drag-and-drop feature
Once the form is built, you can run a list of error messages by navigating to the corresponding node. For
example, you may check if a field exists, test warnings for fields that have no values, and see whether Smart Forms have
been activated.
Migration to Smart Forms
If you have many forms already built in SAPscript, you may migrate them into Smart Forms to avoid building
the Smart Forms from scratch and save development time. Two types of migration are available: individual migration and
mass migration. You can migrate a SAPscript form into a Smart Form and convert a SAPscript style into a Smart Style.
Smart Styles contain the formatting information for the text. In Smart Style, you take the smaller
components (paragraph and character formats) for conversion individually, whereas for Smart Forms, you take the entire
Smart Form for conversion. Each conversion of a Smart Form requires a separate conversion of the accompanying Smart Style;
some of the steps, however, are the same. The first phase of the migration is the download. Use program
RSTXSCRP to download SAPscripts to your local hard disk (
Figure 3).

Figure 3
Program to download and upload SAPscripts to and from your local drive
Simply select the object, based on
Form,
Style,
Standard
Text, or
Device Type. You may
EXPORT to download to the local drive and
IMPORT to upload a SAPscript into the system.
You can also specify file selection from your desktop or from a server.
Note
When you convert a SAPscript style into a Smart Style, the system converts all paragraphs and character formats with all their properties and attributes intact. Therefore, you can use the converted Smart Style without making any adjustments.
When migrating a SAPscript form into a Smart Form or Smart Style, the system executes the following
steps:
1. Copies the language attributes and the output options
2. Migrates the layout information including pages and windows, as well as their attributes and positions
on the page
3. Copies the texts in the form
4. Displays the fields (SAPscript notation: program symbols) in the texts
5. Converts the SAPscript commands (such as
NEW-PAGE or
IF...ENDIF) to
comment lines and displays them in the texts
Repeat the above steps for the Smart Style accompanying the form.
Smart Form Conversion
The second phase of migration is conversion. Though the download phase (step 1) is the same, conversion
for Smart Styles must be done differently than conversion for Smart Forms. I explain steps for Smart Styles later.
For converting forms, you have a template that you can enhance and modify according to your needs. Adapt
the form logic by specifying the commands that the system converted to comment lines. The work involved is similar to any
form development; each element, window, page, text, logo spacing, and data mapping has to be validated, but the conversion
tool makes it easier. Follow these steps for SAPscript form conversion:
Step 1. Access the initial screen. Choose
Tools>Forms printout>Smart
Forms (transaction
SMARTFORMS) from the
SAP Easy Access Menu. The dialog
window
SAP Smart Forms: Initial Screen appears.
Step 2. Name the form. In the
Form Field, enter field name you want to
give, for example
ZTF_GR_## (based on your company standard starting with Z to identify this as a customized
form, where "##" is the group number).
Step 3. Access the migrate function. Go to
Utilities>Migrate SAPscript
Form. In the dialogue window enter the SAPscript form name, for example
Y_SAPSCRIPT_STD. Choose the
Check button.
Step 4. View the migrated layout. On the screen that appears, the SAPscript form is
migrated into a rough Smart Form (see
Figure 4). Click on
Form Painter to see an
overview of the form layout.
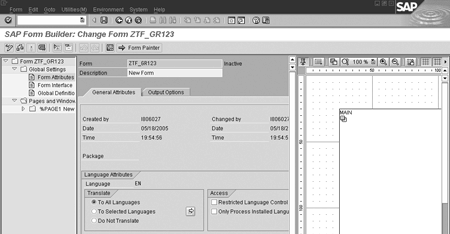
Figure 4
SMARTFORMS transaction for form development or conversion from SAPscript
Use the following steps for mass migration or simultaneous migration of multiple SAPscript forms:
Step 1. Run the mass migration program. In Reporting (transaction
SE38),
select the program
SF_MIGRATE and execute it (see
Figure 5). Select the names and the
language of the SAPscript forms and click the execute icon. The system creates the Smart Forms named for the SAPscript
forms plus the extension
SF. It displays a list of the migrated forms.

Figure 5
Mass-migrating Smart Forms from a range selection
Step 2. Make changes (if necessary). To change and adapt a form, go to transaction
SMARTFORMS. Then activate the changed Smart Form.
Smart Style Conversion
The following are the unique conversion steps for Smart Styles. Note that mass migration is not possible,
as each Smart Style is attached to a specific Smart Form and conversion must be done individually. For migrating a
SAPscript style into Smart Styles, the steps are:
Step 1. Open Smart Styles. Go to the Smart Styles initial screen (transaction
SMARTSTYLES; see
Figure 6).
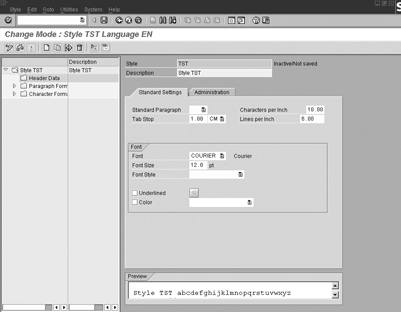
Figure 6
Transaction SMARTSTYLES for creating styles or converting from SAPscript
Step 2. Name the style. In the
Style field, enter the name of the Smart
Style you want to create.
Step 3. Run the program. Choose
Smart Styles Convert SAPscript style.
Enter the name of the SAPscript style you want to convert. Press Enter. A list of the converted styles appears.
Step 4. Make adjustments to the style (if necessary). Choose
Back. You
can now change the Smart Style (using
Change). To activate the Smart Style, choose
Activate.
Other Processes
Once the SAPscripts are converted, whether in Smart Forms or Smart Styles, you should clean up any errors
made during the conversion process, in terms of attributes, window alignment, or syntax errors. Cleaning up errors during
conversion is often standard procedure, as SAPscript might have used local logic. Errors may occur when a field displayed
is extracted or manipulated to display and doesn't exist, or fields exist but appear with no values. Errors may also arise
in ABAP syntax.
Step 1. Define the Import Parameter. Double-click on the
Global Settings> Form
Interface from the navigation menu (
Figure 7).

Figure 7
Use Form Interface within Global Settings focr clean- up
Step 2. On the Import Tab, enter the import structure information. For example, enter
Parameter Name (table name, such as
LIKP),
Type Assignment: Type, Reference
Type (table name),
Optional (or
Mandatory);
Pass Val: (Passing
value indicator). This must be done for all the data retrieved from the SAP tables.
Step 3. Remove irrelevant or unnecessary windows. To delete a navigational menu node,
right-click on the node, and select
Delete. Since you start with windows in SAPscript, there might be
redundant windows created for text.
Step 4. Set the first page. Delete the
NEXT page node on the menu tree.
Double-click on the first page node. In the
General Attributes tab, change the
Next Page
value to
FIRST.
Step 5. Delete the DETAIL frame window. Expand the
MAIN window and
delete all its text nodes.
Step 6. Adjust the text nodes. Click on the text nodes and let the system fit the
text.
Step 7. Save and check the syntax.
Modification
Smart Forms allows you to customize the newly migrated forms and styles, adding images, headers,
templates, and standard text.
To insert the company logo (or any image):
Step 1. Open the Form Painter for graphics (Figure 8). Select the
Form
Painter button. Click the
LOGO window in Form Painter. Right-click and choose
Create>Graphics.
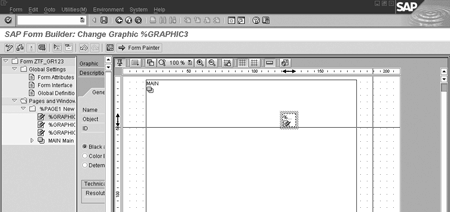
Figure 8
Form Painter with graphics insertion
Step 2. Insert the logo or image. In the maintenance screen of the node (the center of
the frame) under the
General attributes tab, enter the company logo or other image as
Graphic
Image,
Graphics as
Object type, and
bmap as
ID. Choose the grid screen color and press Enter. You can position the logo as you wish.
To import standard text for addresses and other purposes:
Step 1. Access the text creation tool (
Figure 9). In the navigation menu
tree, click on the
INFO1 window node. Right-click and select
Create>Text.
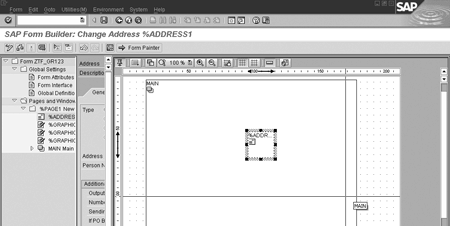
Figure 9
Insert standard text in the form painter
Step 2. Prepare the new text node. On your new text node under
INFO1, in
the
Maintenance frame, on the
General Attributes node, change the
Text Type to
Include text. Select
OK on the popup
menu.
Step 3. Set the text attributes. Under
Text Name, enter the name of the
form. For
Text Object, enter
text. For
Text ID, enter
ST. For
Language, enter
WN. Check the checkbox for
No error when no text exists.
To create a template for your header and line items:
Step 1. Insert the company logo (or any image). Right-click on the
MAIN
window node and select
Template (
Figure 10).
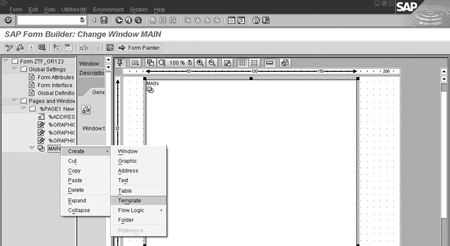
Figure 10
Use menu path Form Painter>Create>Template
Step 2. Click on your new Template node. The attributes associated with your new template
will appear.
Step 3. In the tab labeled Template, enter the following:
1. In the column
Name, enter
Line1. This will be the first row in your
template.
2. Click on the
Table Painter button. Click on the
Pattern button and
select the pattern on the upper left hand side of the pop-up window.
Activation
Step 1. Save and activate your form. Select
Activate (
Figure
11).
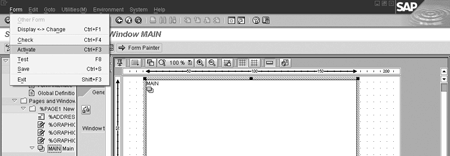
Figure 11
SMARTFORM transaction with Activate option to activate the form
Step 2. Test your form. Click on the
Test button or press the F8 key.
Step 3. Execute. When the
Function Module screen comes up, click on the
Execute button or press the F8 key again.
Step 4. Preview the document. On the
Print pop-up menu, click on the
Print Preview button. Your new form will appear.
Step 5. Return to Form Builder. Close the print preview and press the Back key until you
return to the Smart Form Builder screen.
Rajen Iyer
Rajen Iyer is the cofounder and CTO at Krypt, Inc. Rajen has written several in-depth, best practice articles, white papers, patents, and best-selling books on SAP Logistics and SAP Global Trade Services, including
Effective SAP SD and
Implementing SAP BusinessObjects Global Trade Services. He is also an invited speaker at industry conferences.
You may contact the author at
Rajen@kryptinc.com.
If you have comments about this article or publication, or would like to submit an article idea, please contact the
editor.