Learn how to post journal entries for audited and controlled adjustments to planning data with SAP BusinessObjects Planning and Consolidation, including how to post, unpost, and delete journal entries.
Key Concept
All functionality in SAP BusinessObjects Planning and Consolidation is designed with the business user in mind, and Journals is no exception. Traditionally, tasks such as posting journal entries are in the realm of a financial department, and SAP BusinessObjects Planning and Consolidation aims to keep these business users in an environment that is familiar to them (e.g., Microsoft Excel). In fact, Journals has been seamlessly woven into the SAP BusinessObjects Planning and Consolidation Excel client so you do not have to learn new tools or technology to start using it.
Within the finance department, companies post journal entries at the end of their monthly or quarterly financial close process to recategorize or adjust their actual financial transactions. SAP BusinessObjects Planning and Consolidation allows you to manage journal entries and provides the full realm of controls to post, unpost, and track journal entries in your planning applications.
We’ll address the capabilities available for business users to work with and adjust their financial transactions using journals. We address journals generically, but all examples are from SAP BusinessObjects Planning and Consolidation, version for SAP NetWeaver. Typically you use the Journals functionality when implementing financial consolidations with SAP BusinessObjects Planning and Consolidation, but it is important to note that even if you are just using the planning capabilities, you may still use the Journals module if desired.
Note
The term SAP BusinessObjects Planning and Consolidation actually refers to two products:
- SAP Business Planning and Consolidation, version for the Microsoft platform
- SAP Business Planning and Consolidation, version for SAP NetWeaver
Journal Fundamentals
Journal entries allow business users to carefully track changes to their financial data. Typically, journal entries are used on actual data because any adjustments are typically done to recategorize financial information. However, it would also be possible to use journals on plan data to make late adjustments to a financial plan.
Imagine this example of a possible journal process during company closing. The source system (e.g., SAP General Ledger) data is loaded into an application using Data Manager. A user may need to make an adjustment, such as a reclassification of a balance. The user creates a journal entry to make the adjustment in a balances format (e.g., debit/credit). When journal entries are saved and posted, the changes are appended to the data. That means, for example, if an asset account had a balance of $100 for a given month, and you create a debit entry of $10, the account balance now has a total of $110. This may seem fairly obvious to anyone who has posted a journal entry before, but it is important to highlight here because this is not how the SAP BusinessObjects Planning and Consolidation Excel client typically works.
In a typical input schedule (most commonly used for planning), if a cell shows a value of $100 for a given account, and you want to adjust it to have a value of $110, then you simply overwrite the cell value by typing in $110. This is the behavior a user would expect of the system, but it is just important to note the difference in behavior to a journal entry. The result allows the user to track the adjustments to the data via a report that Journals tracks, which includes an extensive audit trail.
To use the Journals feature, you need to follow a few steps. First, the application administrator sets up a journal template for each application that he wants to enable with journal entries. You can only have one journal template per application.
By default, authorization for posting journals is not enabled for users. Therefore, the administrator must subsequently grant access to business users for this functionality. Once this is done, the business users can use the journal template to post adjustments to data.
Business users make use of the journal template to enter changes to transaction data. We cover the steps to set up the journal templates and then take you through the process to post and unpost journal entries. Finally, we discuss some best practices when posting with journal entries.
Set Up the Journal Templates
Before we dive into how to set up the journal template, it is helpful to understand what we are trying to define first.
Figure 1 shows the different sections of an example journal template. This is the Microsoft Excel layout/workbook in which the end user posts journal entries. The journal template defines what appears in the header, in the detail dimension, and so on.

Figure 1
Example journal template
To create a journal template for an application, the application administrator should first go to an application and click Journals within the Administration Console (
Figure 2).

Figure 2
Journals within an application in the Administration Console
Within the Action Pane, click the Journal wizard link in
Figure 3 to create a journal template.

Figure 3
Journal wizard in the Action Pane
Note
If you have an existing journal template, you should be cautious before using the journal wizard. If you make any structural changes to the template (i.e., you change any header or detail dimensions), then your existing journal template is deleted and replaced with the new definition. Doing so deletes your existing journal audit trails, but any changes made to your data are kept. If you do not make any structural changes, then you can keep the existing journal entries if you want.
The journal wizard has five steps.
Step 1. Choose the header dimensions for a journal template. In the Select header dimensions step, select what you want to keep as fixed (i.e., constant) dimension members for all journal entries. The header dimensions become page keys for the journal entry. You need to include the following dimensions in the header: CATEGORY, TIME, and RPTCURRENCY (if defined in the application) as shown in
Figure 4.

Figure 4
Select header dimensions within a journal template
Step 2. Set the order of dimensions in the header. This is just for controlling the layout of the dimensions (i.e., the order in which they appear) in the journal template. To change the order, click the UP and DOWN buttons in
Figure 5.

Figure 5
Set the header dimension order in the journal template
The remaining dimensions in your application that have not been placed in the header become detail dimensions. These are the dimensions to which you add line items for a journal entry.
Step 3. Set the detail dimensions. You can change the left-to-right order of the detail dimensions and then set the maximum number of detail lines, as in
Figure 6.
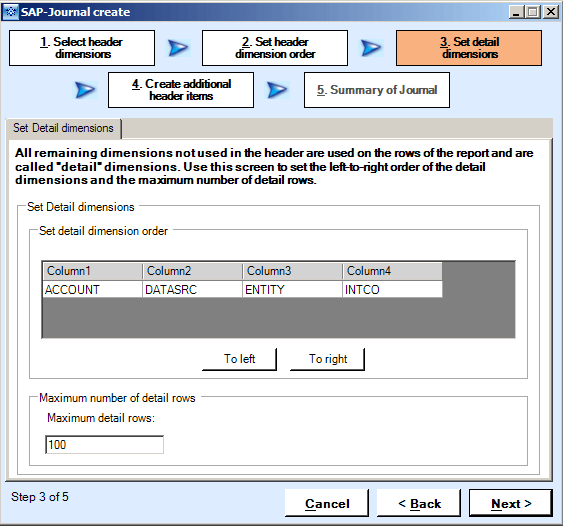
Figure 6
Set the detail dimensions and maximum detail rows
The detail dimensions are the remaining dimensions that contain the values to change by posting debit or credit entries. In the next section, we discuss how business users can fill in members for each of the dimensions and enter the debit or credit amount for that detail line.
Step 4. Create additional header items. After the header and detailed dimensions are chosen for the journal entry, the application administrator can choose to create additional header items for the journals. In doing so, you can categorize journal entries using text fields or predefined entries, which are called sub-items (
Figure 7). The system displays these additional header fields to the business user and saves them along with the journal entry.
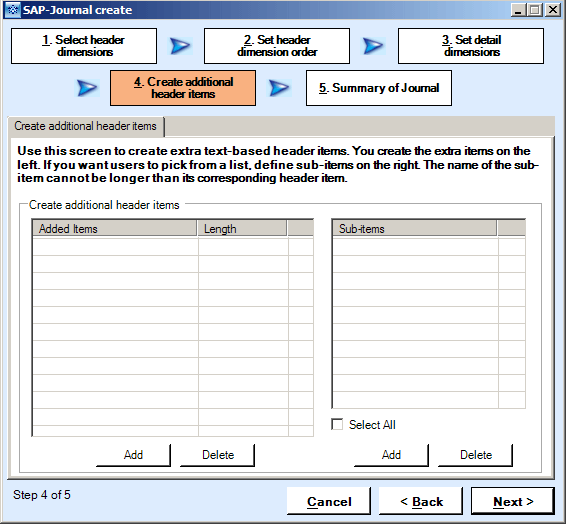
Figure 7
Create additional header items
Step 5. Review your selections. The final step in creating a journal template is to review all your selections and then click the Finish button as shown in
Figure 8.

Figure 8
Review and create the journal template
When the journal template is created, you can preview the format as shown in
Figure 9.

Figure 9
Preview the journal template
Use Journal Templates to Post Journals
When the journal templates are set up, then business users can use these templates to post journal entries. Journal entries are created in SAP BusinessObjects Planning and Consolidation for Excel. To get to the journal template, business users first log in to SAP BusinessObjects Planning and Consolidation for Excel and click Journals in the action pane. Then they can click Open an existing journal or Enter a new journal as shown in
Figure 10.
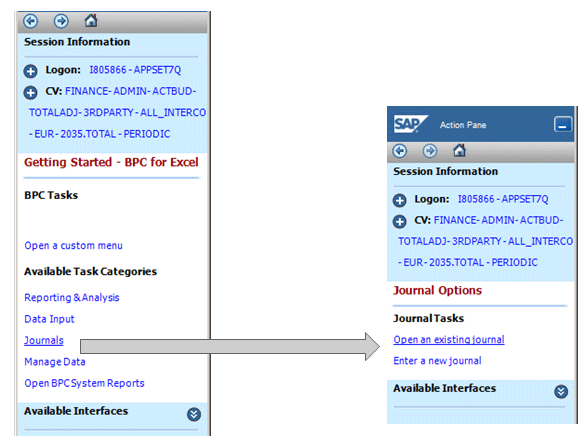
Figure 10
Enter journals within SAP BusinessObjects Planning and Consolidation for Excel
Creating a journal entry is easy. The user clicks Enter a new journal and then populates the journal entry (
Figure 11). The system automatically fills in the Appset, Application, Server Name, Journal ID, and Journal Group. The user then selects the dimension members for the header and detail dimensions, and enters the relevant debit and credit amounts. All other fields are optional user input.
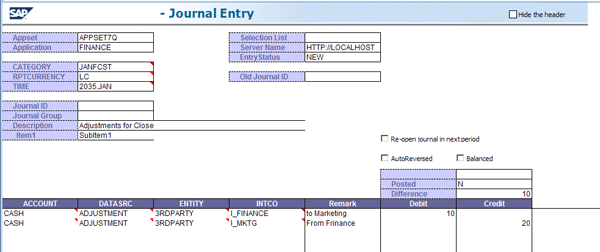
Figure 11
Sample journal entries
Complete the entry and click Save journal in the action pane before posting. The system produces a message saying the journal entry was saved. A saved journal entry isn’t saved to the application data yet, it is just an adjustment that you have planned to make.
When you are satisfied that your journal entry is accurate, you can post the entry. Posting is a significant step that updates the application data. In fact, by choosing to post an entry, the system performs the following steps:
- Validates the journal entry for completeness and accuracy. If balanced entries are required, debits must equal credits.
- Locks the journal entry so that it cannot be edited
- Writes the values in the journal entry to the application, so application data is appended to the numbers in the database (as described earlier)
- Updates the entry to record the user who posted the entry keeps audit trails
- Changes the journal entry status to posted when the entry is complete
- Posts all data in the local currency when currency is a dimension
After posting, the system produces a summary of the posted journal entries and an example of any failed journal entry posting and the reason that the posting failed (e.g., the data was locked because of work status) (
Figure 12).

Figure 12
Journal posting results
If your administrator has granted the business user proper access rights, the business user can also unpost journal entries to make any necessary changes. Unposting does the following:
- Reverses the changes to the application data
- Changes the journal entry’s status to Unposted
- Audits the change
After unposting, the user can then change the journal entry, make the changes to dimension members or debit/credit values, and post the journal entry again.
If your administrator has granted the proper access rights, you can also delete a journal entry. Delete does the following:
- Checks that the entry is in status Unposted because only unposted journal entries can be deleted
- Changes the status to Deleted — it doesn’t remove journal entries from the table to ensure the audit trail is kept. Furthermore, the journal number associated with the deleted cannot be reused either.
- Audits the change
Journal Security
In most organizations, not all users should have the authorization to post journal adjustments. Therefore, security for journals allows the administrator to decide who can save journal entries versus who can post or unpost journal entries.
The users who are only assigned the ability to create a journal should only be able to execute these UI tasks:
- New journal
- Save journal
- Reopen journal
- Delete journal
- Copy (if implemented)
These tasks don’t make any changes to the actual data and don’t post or unpost journal entries. Therefore, this task is generally granted to a broader community of users who can create new journal entries.
Only a few users are granted access to the Post/Unpost Journal task. This task allows users to execute the following actions:
- Post and unpost journal
- Auto-reverse (which we describe in the next section)
Even fewer users are granted access to create journal templates as these are typically the application administrators. This is controlled by the Admin Journal task and grants access to the following actions:
- Create journal template
- Clear journal template
- Set translations
Other Journal Options
Journals within SAP BusinessObjects Planning and Consolidation have some advanced options as well. You can read more about these features at help.sap.com in the SAP BusinessObjects Planning and Consolidation help section; however, some of the key items to be aware of are:
- Multi-Journal Format: Used for posting multiple journal entries
- Balanced: Used to ensure that all debits and credits are aligned so a journal entry is completely balanced
- Auto-Reversed: Allows you to reverse the credit or debit value in the journal entry in the next time period. Note that this option only sets up a new journal — it does not actually create the postings.
- Journals Reporting: Used to report on journal entries to see who posted which journal entries or how many journal entries are saved but not posted
- Reopen: Ability to automatically copy journal entries to the next period and keep these open for posting
- Journals.lgf: Ability to execute script logic upon posting a journal
Prakash Darji
Prakash Darji is currently director of product management in the Enterprise Performance Management area within SAP Business Objects. In his current role as a director of product management for the SAP BusinessObjects Planning and Consolidations product, his responsibilities include inbound product management through working on the short- and longer-term roadmap for SAP's Planning Solutions, managing deliverables for multiple releases, as well as creating product specifications for innovative features and functions to differentiate against key competitors. His full bio is available at: www.linkedin.com/in/prakashdarji.
You may contact the author at
prakash.darji@sap.com.
If you have comments about this article or publication, or would like to submit an article idea, please contact the
editor.
Ryan Leask
Ryan Leask currently runs the SAP BusinessObjects Planning and Consolidation solution management team for SAP, based out of Palo Alto, CA. Prior to this position, he led the EPM solution architecture team with a main focus on the design of SAP BusinessObjects Planning and Consolidation 7.0, version for SAP NetWeaver. Ryan has also worked on SAP xApp Analytics, SAP NetWeaver Visual Composer, SAP NetWeaver BW, SAP SEM, ABAP, SAP CRM, analytics/data mining, and whatever else seemed interesting. He has also co-authored
SAP xApp Analytics (SAP PRESS, 2006), written many articles, and presented at numerous conferences.
You may contact the author at
ryan.leask@sap.com.
If you have comments about this article or publication, or would like to submit an article idea, please contact the
editor.