Kamal Jain demonstrates how to upload external documents onto the SAP Document Management System (DMS) content server via a Document Information Record (DIR) for FI transaction codes FB02 and FB03.
Key Concept
Normally when you upload a document using transaction codes FB02 or FB03, it would be stored in the SAP database as an object, which has a high impact on memory. The SAP Document Management System (DMS) content server is an additional document storage medium to keep documents apart from the SAP database. A Document Information Record (DIR) is an interface between the document on the content server and the SAP FI document object.
DMS has some limitations. By default it does not support:
- Master transaction codes to link the documents
- Uploading migrated documents in bulk
- Mass deletion of documents
- Uploading the long description of a document
- A link at the transaction header level
Standard objects such as EKPO include a facility to attach documents directly onto DMS, but for some objects such as BKPF (transaction codes FB02 or FB03) this facility is not there. Therefore, I explain how to attach documents and upload them into the content server for this type of object. The method includes implementing some standard Business Add-Ins (BAdIs) and some configuration as well as preparing a custom object link with DIR.
Upload a Document into SAP DMS via DIR
You have created an FI accounting document and now you need to upload the external file (PDF) via transaction code FB02 or FB03. As per SAP standard functionality there is an option provided to create an attachment, as shown in
Figure 1. Select Create > Create Attachment. Standard functionality opens the dialog box to choose the file you want to upload. However, per the custom design that I explain in this document it opens the DIR screen.

Figure 1
Create an attachment
This attachment can be stored in the SAP database as an object. However, because there is a high volume of documents to be attached in each accounting document, it makes for a heavy load into the database. To overcome this, you can add a design to upload the document into the DIR screen and store that in the content server via storage category.
To achieve this you first need to implement BAdI GOS_SRV_REQUEST. Execute transaction code SE18 to open the BAdI definition (
Figure 2). This BAdI is filter dependent, which means each interface method automatically has importing parameter FLT_VAL assigned to it.

There is one BAdI method, START_SERVICE (
Figure 3), that you can use to make your own solution to upload documents.
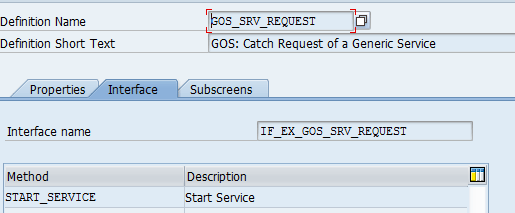
Figure 3
BAdI method START_SERVICE
The START_SERVICE method has importing parameters (
Figure 4). You can use a filter value to check user actions such as creating or viewing an attachment.
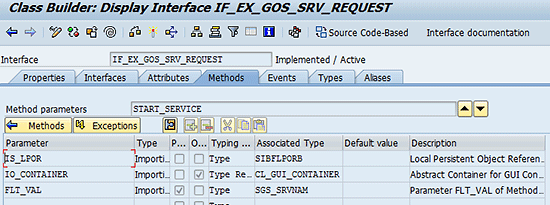
Figure 4
Method parameter
There is one exception you can use for the START_SERVICE method (
Figure 5). It allows the standard service call to be continued if custom checks added in the BAdI method are not passed.

Figure 5
Method exception
Note
You can refer to the documentation of this BAdI by clicking the Documentation button on the application toolbar (not shown).
The name of the service (such as create or view an attachment) is used as the filter value. You can add the filter values by using the insert row icon

in
Figure 6. As required, I added two filters to create and view an attachment. Press F4 to choose the filter value. You implement BAdI START_SERVICE by clicking the save icon and then the activate icon.
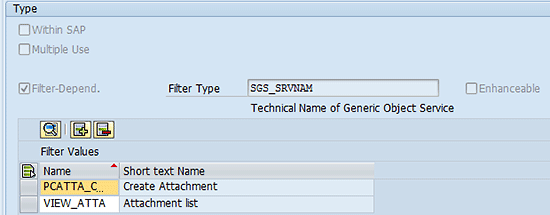
Figure 6
Add filter values
A new BAdI implementation is created to be active for two filter values–create and view attachments (
Figure 7).

Figure 7
Filter values added
Method Implementation
You can restrict the implementation to specific business object types and leave the methods for other objects with an exception. The purpose of raising an exception is to make standard functionality workable for transaction codes other than FB02 or FB03. You can add a check for a transaction code, activity, and filter value to see if you need a user to take action to upload a document into DIR or to let the standard service call continue.
Note
Related to the solution to upload an FI document, you can add a
transaction code check. Use field TCODE in system table SYST. The system
then populates the transaction code that is currently executing. When a
user executes transaction FB02 and starts to upload a document, the
BAdI triggers and checks if the transaction code is FB02. If yes, then
the system takes the user to the DIR screen to attach the documents. If
no and the user executes any other transaction and uploads documents,
then it is not necessary to display the DIR screen.
Following is the design you add in method START_SERVICE for filters PCATTA_CREA (upload attachment) and VIEW_ATTA (view attachment).
Step 1. Upload an attachment. When a user creates an attachment, service PCATTA_CREA is called and method START_SERVICE starts. Inside method START_SERVICE, the standard function module CV110_DOC_DIALOG is used to have DIR enable the user to upload a document and store it into a specific storage category (content server).
The importing parameters of function module CV110_DOC_DIALOG that the system uses to export data into the function module are shown in Figure 8. Basically the parameters that are mentioned in the Import tab of the function module need to be exported from the program in which you are calling this function module.
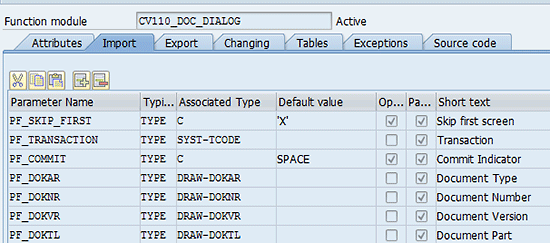
Figure 8
Importing parameters
The following values are passed while calling the function module:
- PF_SKIP_FIRST (X): To facilitate the user not to populate the Document Type field on the first screen of transaction CV01N.
- PF_TRANSACTION CV01: To create DIR.
- PF_COMMIT (X): To save DIR.
- PF_DOKAR: Document Type (used INV)
- PF_DOKNR: Blank
- PF_DOKVR : Blank
- PF_DOKTL:BLANK
Other parameters are not required.
The function module has an exporting parameter (PSX_DRAW. PSX_DRAW) that contains the DIR date (Figure 9).

Figure 9
Exporting parameter
Figure 10 shows the table screen of the function module.

Figure 10
Function module tables
Table PT_DRAD_X is used to pass a document object. You take the FI document number using the import parameter BAdI IS_LPOR to pass the OBJKY field and value BKPF into field DOKOB. This attaches the DIR with object BKPF and a record is inserted in database table DRAD (Figure 11).

Figure 11
Table DRAD data
Function module table parameter PT_DRAD_X is used to pass the data value for the custom object link screen in DIR (Figure 12).
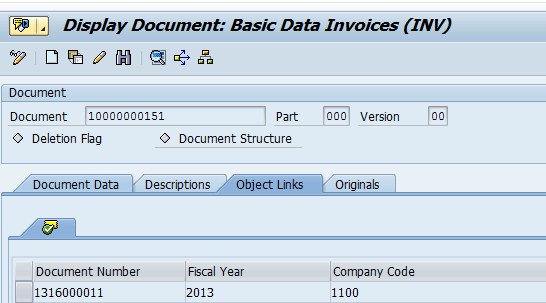
Figure 12
The DIR Object Links tab screen
At last if function module CV110_DOC_DIALOG does not raise any exception then the system displays the message Attachment successfully saved. Developers add code in method START_SERVICE to display the message to inform the user who is uploading an attachment into transaction code FB02 or FB03.
Step 2. View the attachment. Users can view the attachment created in step 1. Call Service Object VIEW_ATTA. Inside the method START_SERVICE you fetch the DIR number from DRAD by passing object key objky and document object DOKOB. To display the DIR you need a DIR key. You can get the key from method importing parameters is_lpor-instid and DOKOB = BKPF. If a record is retrived from DRAD (shown in Figure 11), then pass that document number, document type, document version, and document part to the standard function module CVAPI_DOC_VIEW to open the DIR.
Attach the Custom Object BKPF Link to the DIR
Figure 13
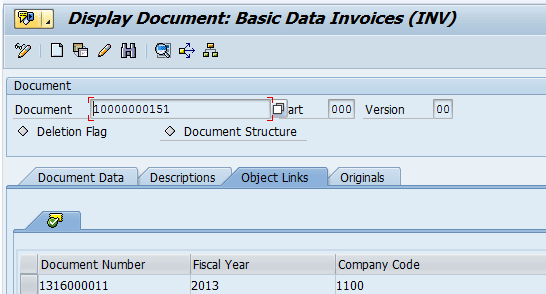
Figure 13
Additional tab for Object Links
To add the tab into the DIR, use BAdI DOCUMENT_OBJ implemented for filter object BKPF. This is done to show custom objects (on a custom screen) in document management transactions (e.g., CV01N, CV02N, CV03N, and CV04N) without making modifications.
Configuration
Following is the configuration required for the custom object link. This custom object tab is required to link the FI document and the DIR. This is important as otherwise the user does not know to which FI document the attachment in the DIR is related.
To define document types use transaction SPRO and follow menu path SAP Customizing Implementation Guide > Cross-Application Components > Document Management > Control Data > Define Document Types. That takes you to Figure 14. The user searches for document type INV, selects the INV line, and double-clicks Define object links in the left navigation pane.
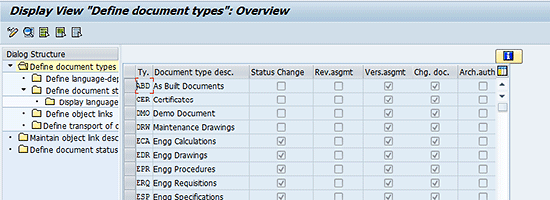
Figure 14
Define document types
That takes you to the overview screen for maintaining the object links (
Figure 15). Click the New Entries button, which opens the new entry screen (
Figure 16). Enter object BKPF and screen number 500 manually in the entry screen. Click the back icon

to go back to the previous screen (
Figure 17).

Figure 15
Maintain the screen by adding the object

Figure 16
Add the object details

Figure 17
Object links
I specified screen number 500 for the screen container 1500 as required by the documentation. Screen 1500 is in the subscreen exit. The application program applies the flow logic for subscreen container 1500.
The next configuration step is to maintain key fields by executing transaction code SPRO and following menu path > SAP Customizing Implementation Guide > Cross-Application Components > Document Management > Control Data >Maintain Key Fields. That takes you to Figure 18.

Figure 18
Maintain key fields
Click the New Entries button to go to
Figure 19. Enter Object BKPF in the Table column and click the save icon

. (Other column values such as Transaction Code and Field Name can be blank.)

Figure 19
Maintain the Table key
BAdI Implementation
After the configuration is complete you implement BAdI DOCUMENT_OBJ BADI by using transaction code SE19. The implementation that I created is displayed in Figure 20.

Figure 20
BAdI implementation
This BAdI DOCUMENT_OBJ has a subscreen exit that you need to implement to display the Object Links tab in the DIR. Screen 9002 (Figure 21) is created in program SAPLZFI_DOC_LINK for three fields: Document Number, Fiscal Year, and Company Code.

Figure 21
Screen 9002
BAdI DOCUMENT_OBJ has the methods of interface IF_EX_DOCUMENT_OBJ shown in Figure 22. You can use the methods to implement the solution.
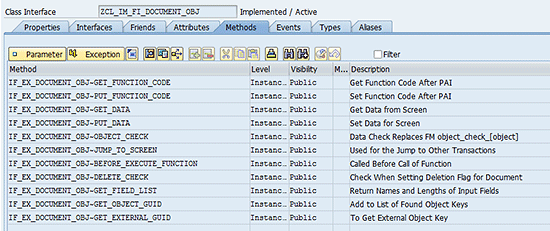
Figure 22
BAdI implementation methods
Figure 23 shows the attributes of the interface. You can add others as required to show data on the Object Links tab screen in the DIR.

Figure 23
Attributes of the interface
This BAdI has several methods you need to implement. To see the default implementation IMPL_DOC_TRIAL of BAdI DOCUMENT_OBJ, execute transaction code SE18. Enter the BAdI name DOCUMENT_OBJ and select Enhancement Implementation > Overview (
Figure 24). That takes you to
Figure 25, which is the implementation list of BAdI DOCUMENT_OBJ. It offers help and references to developers.

Figure 24
Implementation overview
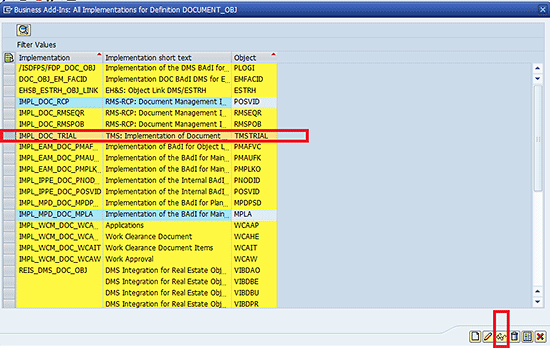
Figure 25
Implementations list of BAdI DOCUMENT_OBJ
Figure 25 Figure 26
This is the BAdI implementation IMPL_DOC_TRIAL.
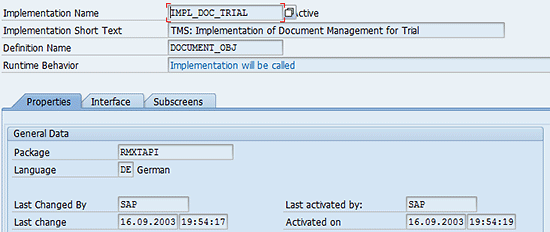
Figure 26
Implementation of IMPL_DOC_TRIAL
Below are the methods of BAdI DOCUMENT_OBJ you need to implement:
- GET_FUNCTION_CODE: To pass the function code into the export parameter.
- PUT_FUNCTION_CODE: To get the function code from the importing parameter and set it into the global class static attribute.
- GET_DATA: To pass data into the exporting parameter from the global class data. You get data from the screen table control. The method picks all the data on the object link screen on DIR.
- PUT_DATA: This method is used to set data on the object link screen on the DIR. You can find the document number, company code, and fiscal year from object BKPF and add them in the table control of custom screen 9002.
Now if the user selects any accounting document to display, it would be in the table control header and the user command can be handled in the subroutine form USER_COMMAND. The function code would be CV130_DISP. You then can call transaction code FB03.
Demo Scenarios
Below is a demonstration of the design with step-by-step details for each scenario:
- Create an attachment in transaction code FB02.
- View the attachment after it has been created and saved.
Create an Attachment
Execute transaction code FB02. Enter the Document Number, Company Code, and Fiscal Year as shown in
Figure 27. Press Enter.
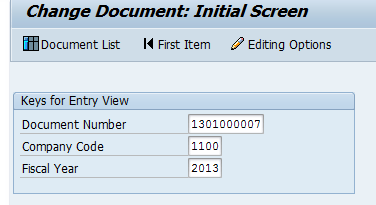
Figure 27
Change FI document via transaction code FB02
On the next screen (
Figure 28), click the service of object icon.

Figure 28
Service of object icon
Then follow menu path Create > Create Attachment. The custom design that takes the user to the second DIR screen is shown in
Figure 29. The system skips the first DIR screen because the Document Type has already been passed while calling transaction code CV01N.

Figure 29
Create a document
The user can use standard DIR functionality to upload the document. First click the create icon

located at the bottom of the screen in
Figure 27 (icon not shown). After clicking the create icon the screen in
Figure 30 appears.
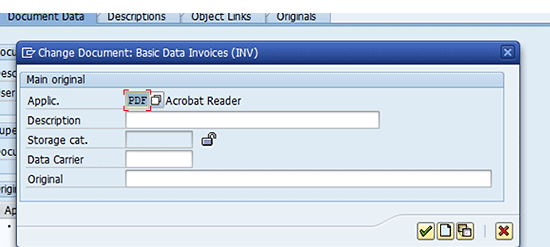
Figure 30
Create a document
The first field is Applic (e.g., the application type). Select PDF as the document type. The Original field is the description of the file path and file name. To get the file path and name, press F4, which takes you to
Figure 31. Choose the file Name and click the Open button.

Figure 31
Select the PDF file
The Original field is then populated by the file path and name (
Figure 32).
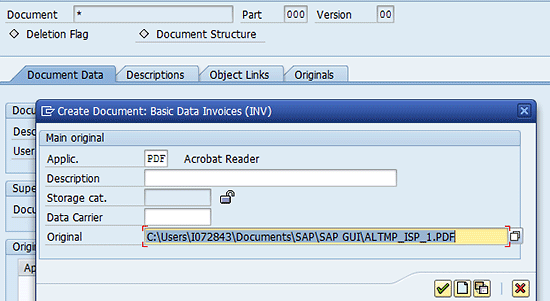
Figure 32
File path and file name
Next click the continue icon

or press Enter. This shows the previous screen where you can see that the file record you selected has been added (
Figure 33).
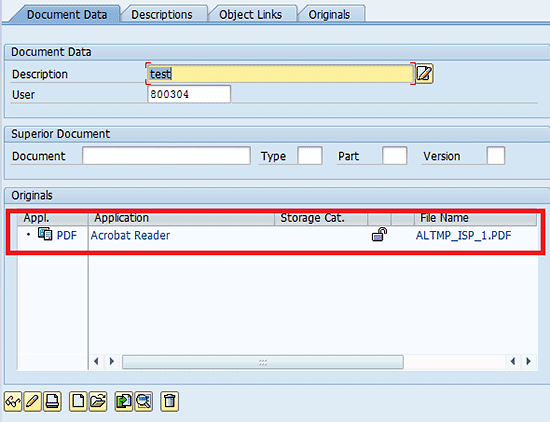
Figure 33
File record successfully added
Note
You can add as many PDF files as required by repeating the above steps.
Now, you need to check the document into the required storage category. Click the check original icon

. This displays all the defined storage categories in the system (
Figure 34).
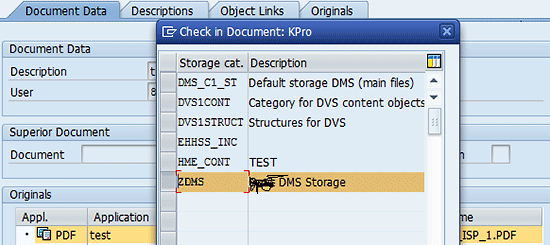
Figure 34
Storage category
Note
The storage category settings have a content repository. Choose storage category ZDMS (Figure 35). Storage category ZDMS is for document area DMS. It is a Basis team task to configure the storage category.
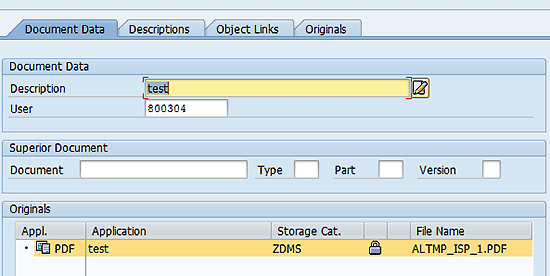
Figure 35
Storage category ZDMS
After uploading the document, the object is added to the Object Links tab (Figure 36). This was accomplished via the screen BAdI implementation done above.
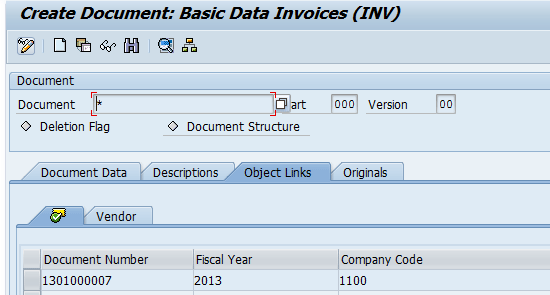
Figure 36
Object Links tab with the document
View the Attachment
Figure 37
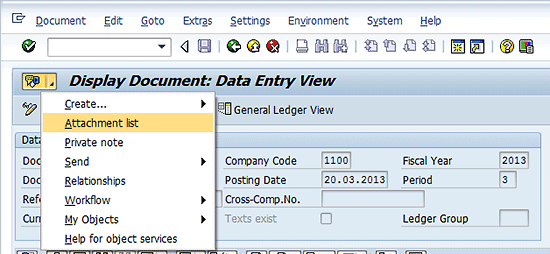
Figure 37
Select the attachment list
View the FI document in the Object Links tab of the DIR by executing transaction code CV03N (
Figure 38). The user enters the DIR details: Document (number), Document Type, Document Part, and Document version. Press Enter to go to
Figure 39.
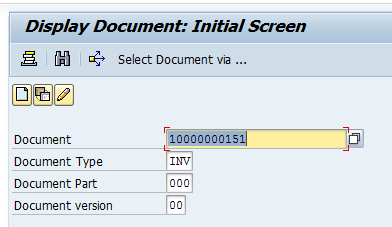
Figure 38
View the document in the Object Links tab
Select the Object Links tab (
Figure 39) and you see the FI Document Number.

Figure 39
Document Number
Select the Document Number field at the bottom of the screen in
Figure 39 and then click the detail icon. That opens transaction code FB03 (
Figure 40).

Figure 40
Display document FB03
Kamal Jain
Kamal Jain is an SAP-certified professional and works with the SAP Global Delivery IS practice. He has around 10 years of extensive experience in design, development, and production support. He has worked in many modules, including SAP IS-OIL, Retail, FI/CO, PP, SD, EHS, QM, PM, and MM. He has been part of many challenging assignments, including SAP implementations for Japan Airlines, PUMA, and Orpic.
You may contact the author at
kamal.jain@sap.com.
If you have comments about this article or publication, or would like to submit an article idea, please contact the
editor.

 There is one BAdI method, START_SERVICE (Figure 3), that you can use to make your own solution to upload documents.


