Learn how to use the BusinessObjects 4.1 Promotion Management application to migrate content from environment to environment. This easy-to-follow, step-by-step guide provides descriptions and illustrates every phase of the content-migration process.
Key Concept
The Promotion Management application is a useful tool included in the BusinessObjects 4.1 suite that allows content (e.g., users, groups, folders, reports, universes, connections, and rights) to be migrated from one BusinessObjects Enterprise environment to another BusinessObjects Enterprise environment. Additionally, Promotion Management is commonly used to migrate to content from a development environment to a test or production environment. The application includes a series of screens that guide administrators through the process of either importing or exporting content and moving that content from one environment to another.
Promotion Management is commonly used to migrate content from a development environment to a test or production environment. It includes a series of screens that guides administrators through the process of migrating, importing, or exporting content. A BusinessObjects administrator needs to have an understanding of the various component types that exist in BusinessObjects, and has to understand the impact of migrating components from one environment to another. In addition, the administrator must determine the exact components to be migrated, if components should be overwritten or copied, and if security for the component should be migrated.
I describe some of the basic concepts for effectively using the Promotion Management application in BusinessObjects 4.1 and provide a number of best practices for most effectively using the tool.
Connecting to the Promotion Management Application
In order to use the Promotion Management application to migrate content between environments of BusinessObjects, an administrator must satisfy the following prerequisites:
- Have access to the CMC
- Have administrative rights to access Promotion Management within the CMC
- Have the server details and credentials of the source and target BusinessObjects environments
First, connect to the CMC with an internet browser, as shown in Figure 1.
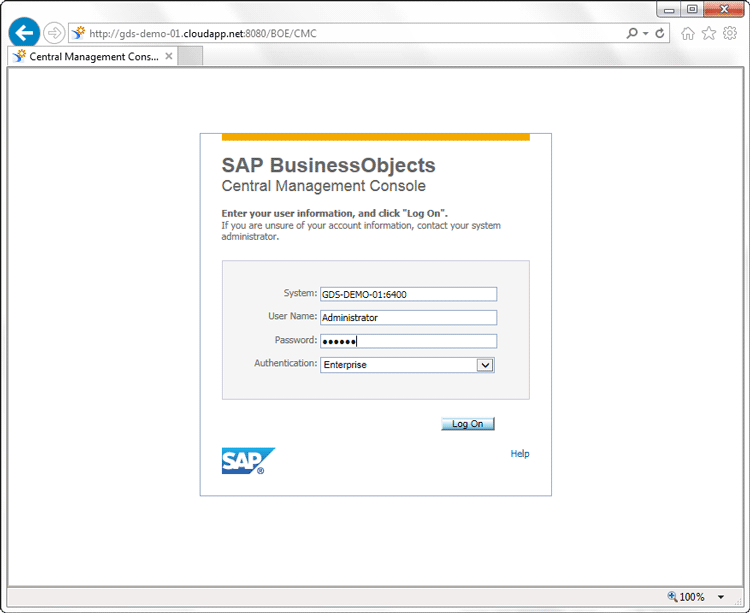
Figure 1
BusinessObjects CMC Log On screen
Then select Promotion Management from the Manage column on the home page of the CMC as shown in Figure 2.
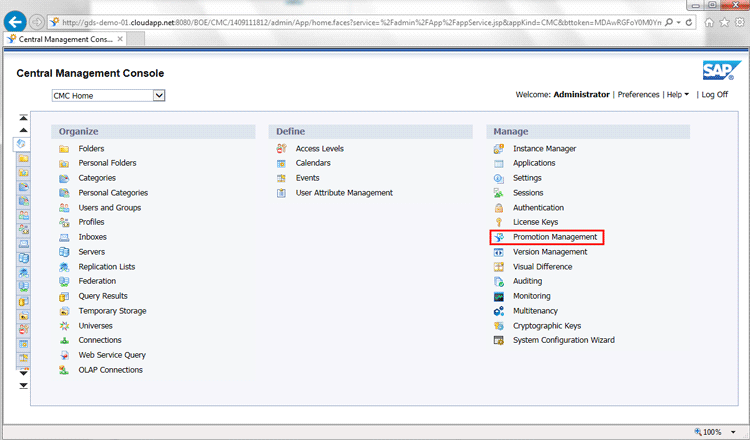
Figure 2
Promotion Management link on the CMC home page
Promotion Management User Interface (UI) Components
This opens the screen in Figure 3, which shows that you’ve successfully connected to the Promotion Management application. On the screen you see a number of interface components:
- Toolbar
- Tree panel
- Workspace panel
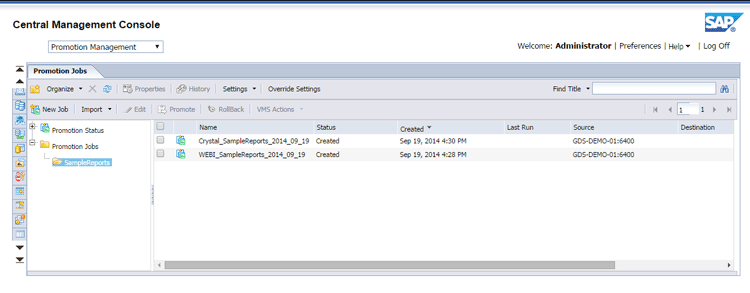
Figure 3
The Promotion Management page in the CMC
The toolbar, at the top of the Promotion Management application, is a graphical control element containing on-screen buttons, icons, and menus. The names and details of each of the toolbar options of the Promotion Management application are listed in Figure 4.
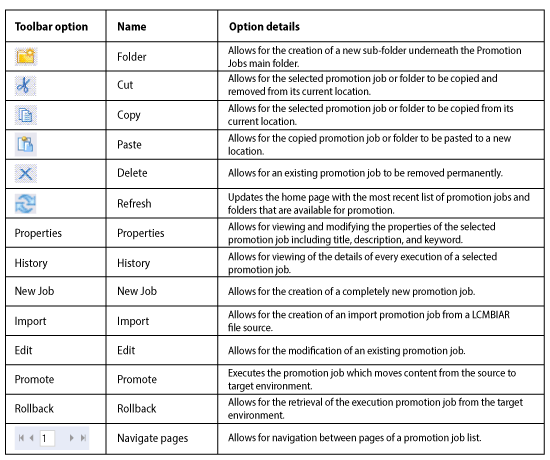
Figure 4
Promotion Management toolbar options
Note
The term “promotion job” is referenced throughout the article. A
promotion job is a collection of objects and components that can be
moved from one BusinessObjects environment to another.
The tree panel is on the left-hand side of the screen in Figure 3. The tree panel has two sub-components:
- The Promotion Status folder, which displays the promoted jobs according to their status (e.g., Success, Failure, or Partial Success).
- The Promotion Jobs folder, which displays all of the existing promotion jobs and folders in a hierarchical format.
The workspace panel is on the right side of the screen (Figure 3). The workspace panel displays the list of promotions along with the name and status of the job, and the created date, last run date, source system, and destination system.
Creating or Executing a Promotion Management Job
To create a new promotion job, click the New Job button in the toolbar of the Promotion Management page (Figure 5).
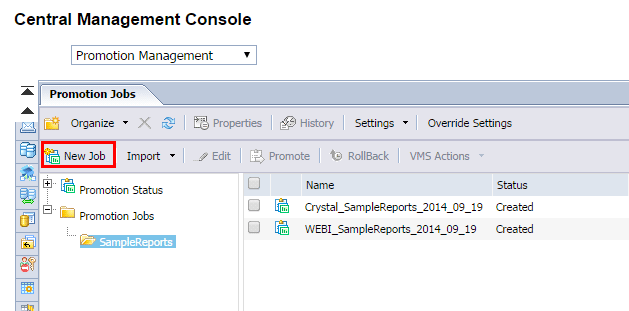
Figure 5
Click New Job to create a new promotion job
The New Job screen appears (Figure 6). Here you can enter the Job Name, Description, Keywords, Save Job in, Source, and Destination details. The Name, Save Job in, Source, and Destination are all required fields. The Description and Keywords fields are optional.
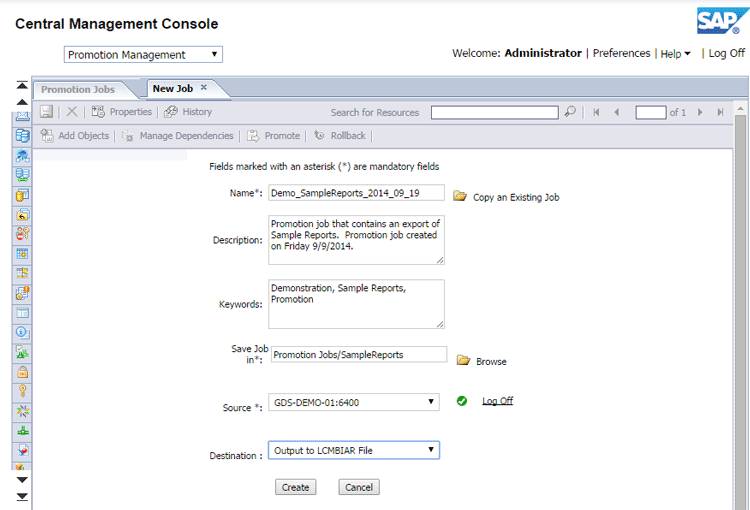
Figure 6
Enter the promotion job details, required and optional
The Save Job in field determines the Promotion Folder in which the Promotion Job will be stored. Click the Browse link (the green checkmark) next to the Source field to open the Save Job in window like the one in Figure 7. Expand the list of folders by clicking the + sign to the left of the Promotion Jobs folder. Click a folder to select it and then click the OK button.
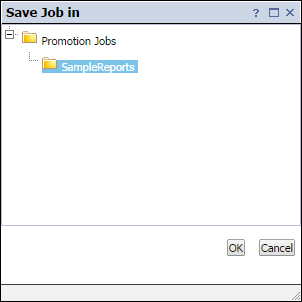
Figure 7
Save Job in window
The Source field determines the BusinessObjects system that contains the components that will be moved to another BusinessObjects system. When clicking the Source field, a drop-down appears like the one in Figure 8. Select Login to a New CMS from the drop-down options, and the Login To System window opens (Figure 9). Here you select the BusinessObjects System (GDS-DEMO-01:6400, in this example) and enter the credentials to log on to the selected BusinessObjects System (e.g., User Name, Password, and Authentication type).

Figure 8
Select the Source drop-down field
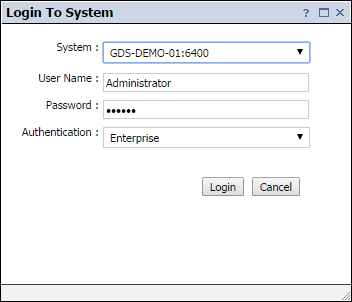
Figure 9
Log on the BusinessObjects system
The Destination field determines the target of the promotion job. Options include Output to LCMBIAR file and Login to a New CMS. When you click the Destination field, a drop-down appears like the one in Figure 10, showing these two options. Make your selection and then click the Create button (not shown), which opens the screen in Figure 11.
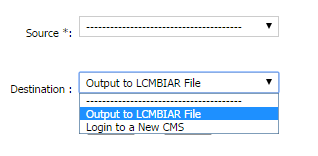
Figure 10
Select the destination system
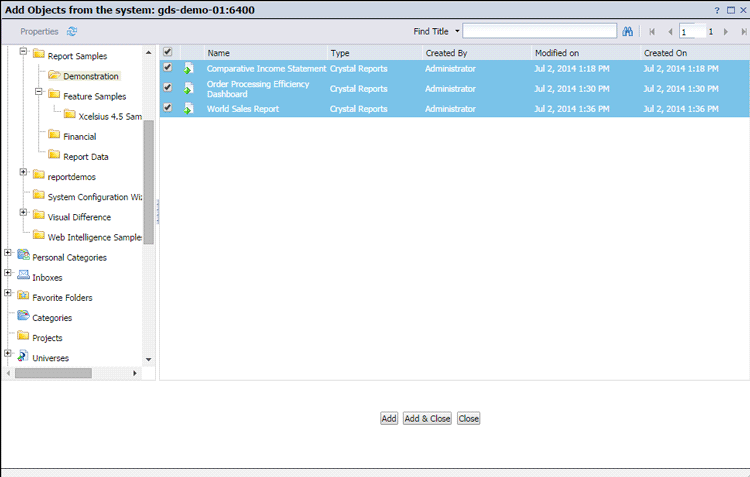
Figure 11
Add objects from the system
In the screen in Figure 11, you select the components to include in the promotion job. Use the navigation tree on the left side to navigate to the appropriate folder within the source BusinessObjects system, and use the details panel on the right side to select the components. If components should be included from multiple folders, make sure you click the Add button before navigating to a different folder. Once all the objects have been selected to promote, click the Add & Close button.
After selecting objects to add to the promotion job and closing the Add Objects window, the new job automatically shows in a new tab on the main page; WEBI_SampleR… in this example (Figure 12).
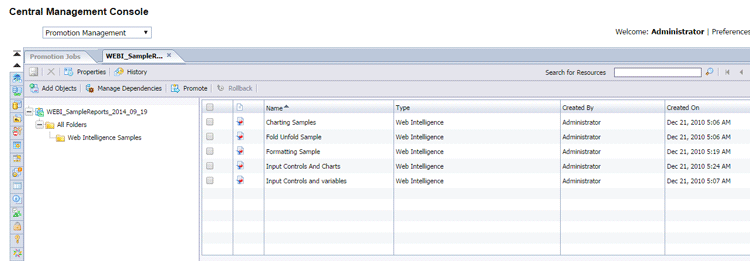
Figure 12
The new tab is added to the Promotion Management main page
While not required, it is considered a best practice to review the related dependent objects to the primary objects that have been included in the promotion job at this point. Dependent objects can include folders, universes, connections, and images. To review them, click the Manage Dependencies button (Figure 13).
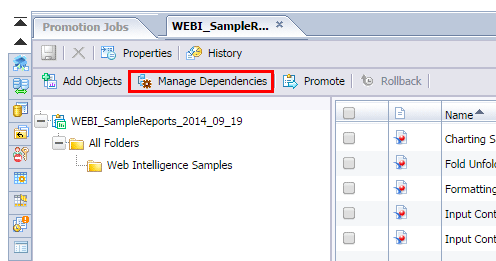
Figure 13
Manage the related dependent objects
This opens the Manage Dependencies screen (Figure 14). In this window, related dependent objects such as universes, connections, and folders can be selected and added to the promotion job. The Apply Changes button adds the selected objects to the promotion job without closing the window. The Apply & Close button adds the selected objects to the promotion job and closes the Manage Dependencies window.
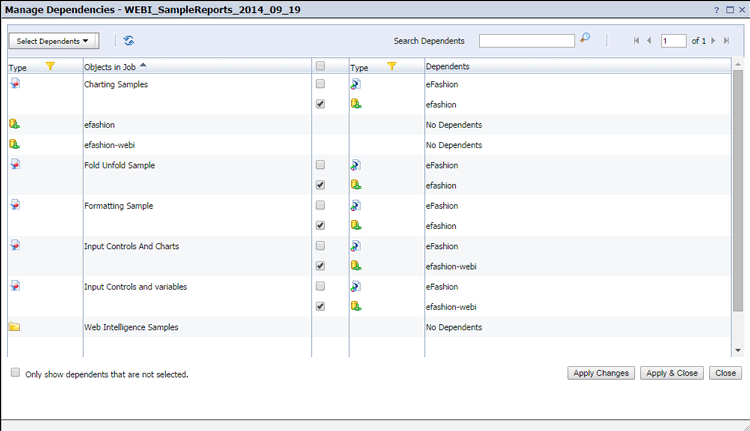
Figure 14
Manage dependencies
If additional objects are selected within this Manage Dependencies screen, then they appear in the home page for the promotion job (Figure 15). In my example, related connections have been added to the promotion job.
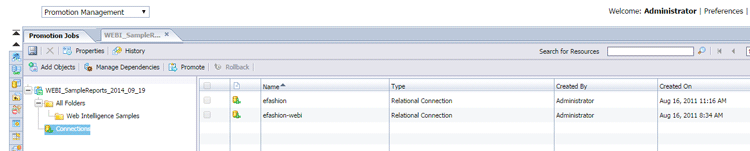
Figure 15
Promotion Jobs tab on the home page with additional objects added
To execute an existing promotion job, click the Promote button in the toolbar of the Promotion Management page (Figure 16).
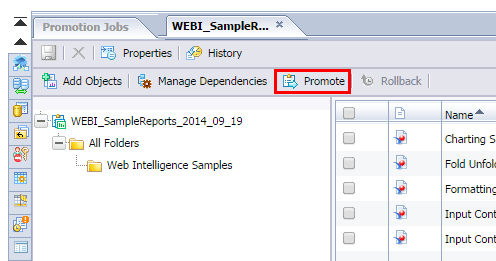
Figure 16
Execute the promotion job
This opens a Promote window with subpages, including Summary, Security Settings, and Test Promote (Figure 17). If the Output to LCMBIAR File Destination drop-down option is chosen, an additional subpage option—LCMBIAR File Destination—appears. If CMS Server is selected instead, this additional subpage option does not appear. In addition, the buttons on the bottom of this window are different depending on the Destination option chosen. If the Output to LCMBIAR file Destination option is chosen, then the buttons Save, Export, Schedule, and Cancel appear. If the CMS Server Destination option is chosen, then the buttons Save, Promote, Schedule, and Cancel appear.
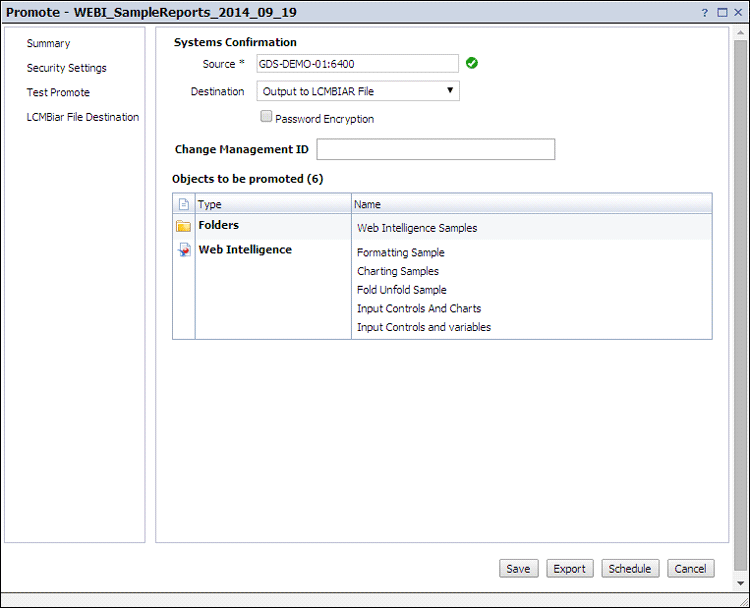
Figure 17
Promote screen default page
Figure 17 shows the promotion window with the Summary page selected (which is also the default page) with the selected Destination option of Output to LCMBIAR File. The Save, Export, Schedule, and Cancel buttons appear at the bottom of the window.
The Security Settings screen is shown in Figure 18. This page provides the option to determine if security attached and related to the objects within the promotion job should also be included in the migration.
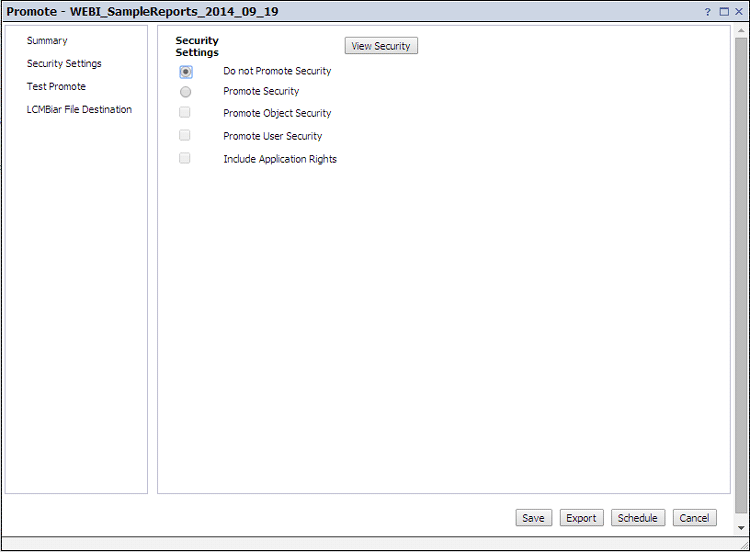
Figure 18
Promote window, Security Settings page view
The Security Settings’ two radio-button selection options are:
- Do not Promote Security – Jobs are promoted without the associated security rights.
- Promote Security – Jobs are promoted along with the associated security rights. Selecting this option enables three sub-option check boxes:
- Promote Object Security – Enables the promotion of security related to objects and folders.
- Promote User Security – Enables the promotion of security rights of users included in the job.
- Include Application Rights – Enables the promotion of objects within the job that inherit any application rights.
The Promote test page is shown in Figure 19. The Test Promote function provides insight into the ultimate success of promotions and any errors that may occur when the promotion job is executed. While not required, it is considered a best practice to use Test Promote before the actual execution of the promotion job.
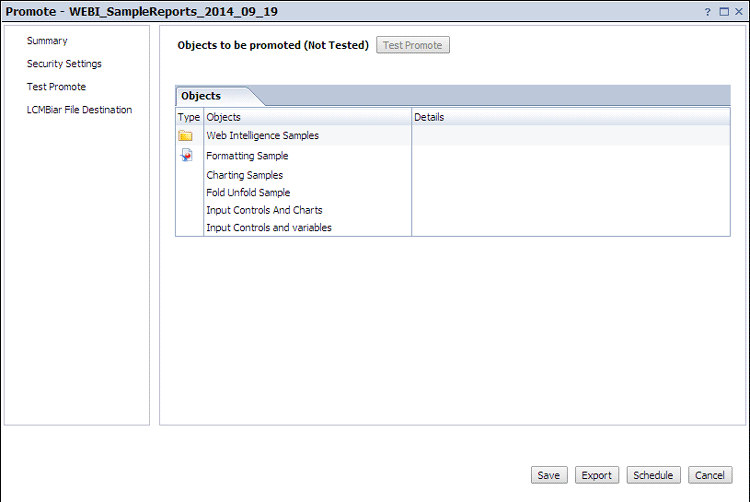
Figure 19
Promote window, Test Promote screen
The LCMBIAR File Destination page of the Promote screen is shown in Figure 20. This page provides the option to designate the file name and folder location of the output LCMBIAR file. This page only appears within the promotion window when the Output to LCMBIAR File Destination option is chosen; this page does not appear when other destination options are chosen. On the LCMBIAR File Destination page, there is an option to export the LCMBIAR file to either the File System or to an FTP location. (The FTP—File Transfer Protocol—is a standard network protocol used to transfer computer files from one host to another host over a Transmission Control Protocol [TCP]-based network.)
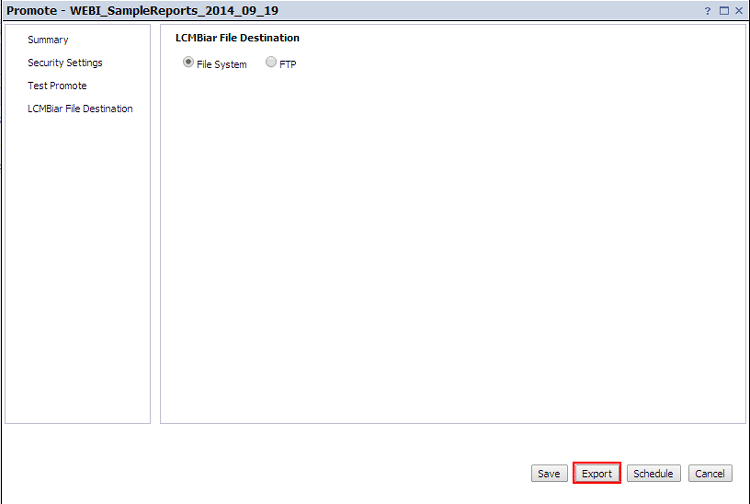
Figure 20
Promote screen, LCMBIAR File Destination page
If the CMS Server option was chosen previously as the destination for the promotion job (Figure 17), then the Promote button appears for you to click and start the execution of the promotion job. Since the Destination option Output to LCMBIAR File was selected instead, the Export button appears. Click it and start the execution of the promotion job (Figure 20).
Once you click the Export button, another window opens (Figure 21) that allows the LCMBIAR file to be saved within a particular location. Click the Save Button to save the file in the selected directory, and the Promote screen closes.
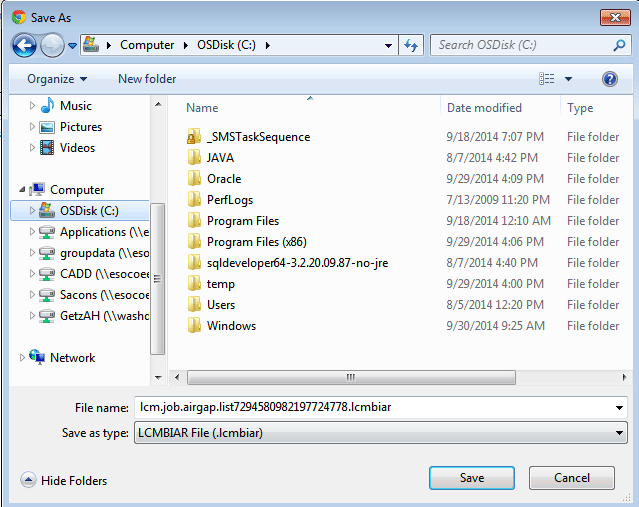
Figure 21
Save the LCMBIAR file
The next step is the actual execution of the promotion job. Once the Promote screen closes, you’re returned back to the Promotion Management home page (Figure 22). The home page now shows the Status of the promotion jobs (in the second column in the details pane—e.g., Created, Failure, Partial Success, or Success).

Figure 22
The Promotion Management home page showing the promotion jobs statuses
Importing a Promotion Management Job from an Archive File
In the BusinessObjects system’s Promotion Management application, it is possible to import components from a BusinessObjects archive file in either BIAR or LCMBIAR format. BIAR is the archive-file format from BusinessObjects versions prior to BusinessObjects 4.0. The LCMBIAR archive-file format is for BusinessObjects 4.0 versions and later.
To import from an archive file, click the Import button in the toolbar of the Promotion Jobs tab (Figure 23).
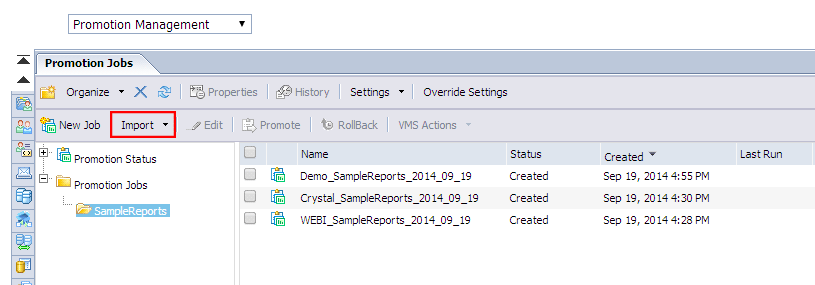
Figure 23
Import an archive file
This opens an Import from file pop-up window (Figure 24). This is where you enter the name and location of the archive file to import from.
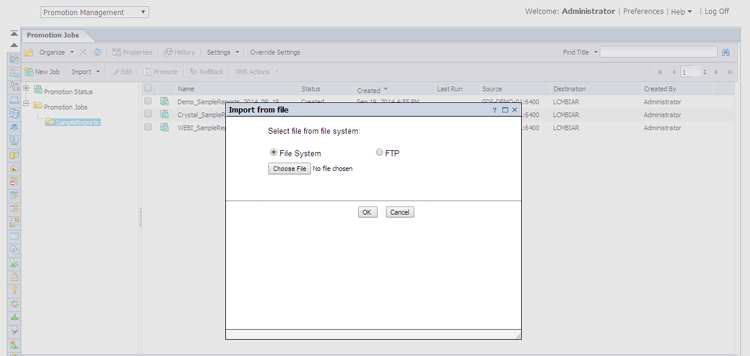
Figure 24
Choose the archive file to import from
In the pop-up window you have the option to either choose a file from the file system or from an FTP site. In this example, I’m importing a file system, so select the File System radio button and click the Choose File Button (Figure 25) to choose the exact archive file to be imported. This opens a browse function where you can choose the file location from which to import the file. Then click the OK button.
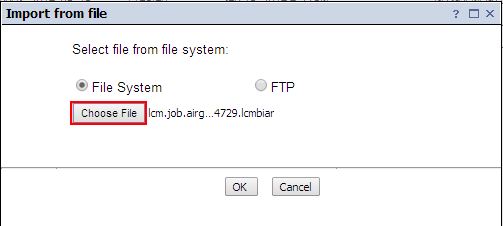
Figure 25
Choose the archive file to import
Once you select an archive file, a screen opens under the New Job tab (Figure 26). The fields Name, Description, and Keywords are automatically populated from the archive file and are disabled. The Save Job in field can be updated by clicking the Browse link, and the Source field is populated with From File.
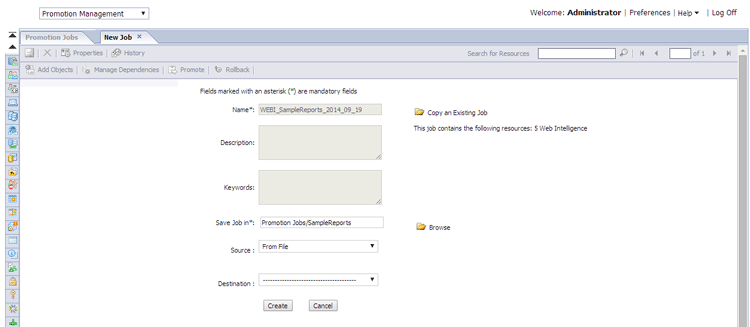
Figure 26
New Job tab from Import File
The only field that is not pre-populated is the Destination field. From the drop-down Destination field options, choose Login to a new CMS (Figure 27). This designates the CMS Server as the destination for the promotion job.
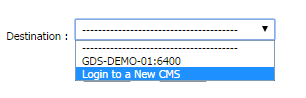
Figure 27
Choose the promotion job destination
Click the Create button (Figure 28) to start the execution of the import promotion job. This opens a new tab (WEBI_SampleR…) in the Promotion Management home page with the contents of the import promotion job (Figure 29).
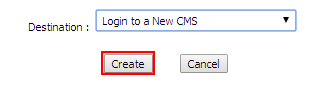
Figure 28
Execute the import promotion job
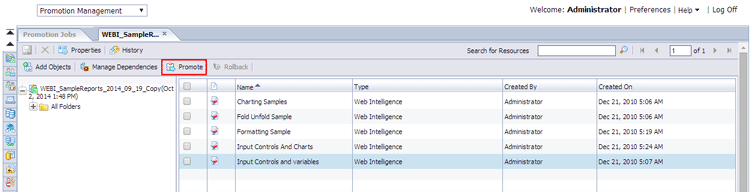
Figure 29
Promotion Management page showing the import promotion job details
The next step is the actual execution of the import promotion job. Click the Promote button (highlighted in Figure 29) and a Promote window opens (Figure 30). It shows the sub-pages Summary, Security Settings, Test Promote, and LCMBIAR File Destination, and the Save, Export, Schedule, and Cancel buttons appear at the bottom of the screen.

Figure 30
Promote screen, Summary page
The Security Settings page of the Promote screen (Figure 31) shows the options to determine if security attached and related to the objects within the promotion job should also be included in the migration.
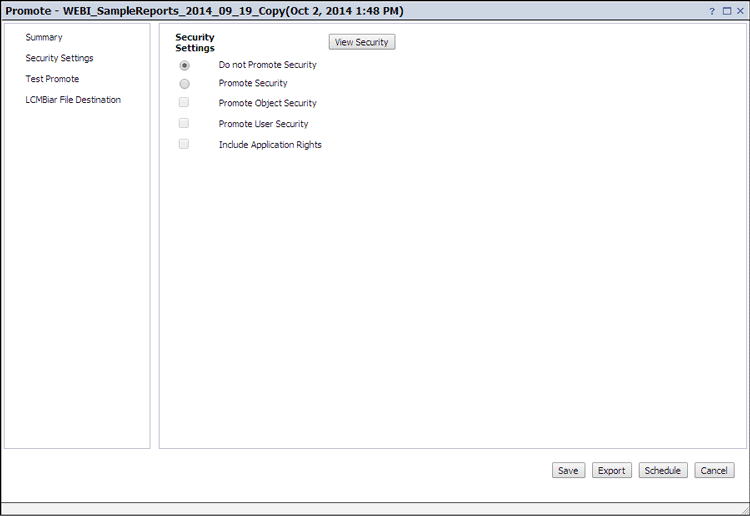
Figure 31
Promote screen, Security page
The Test Promote function (Figure 32) provides insight into the ultimate success of a promotion and any errors that may happen when the promotion job is executed. While not required, it is considered a best practice to use Test Promote before actually executing the promotion job. Then click the Export button to start execution of the promotion job.
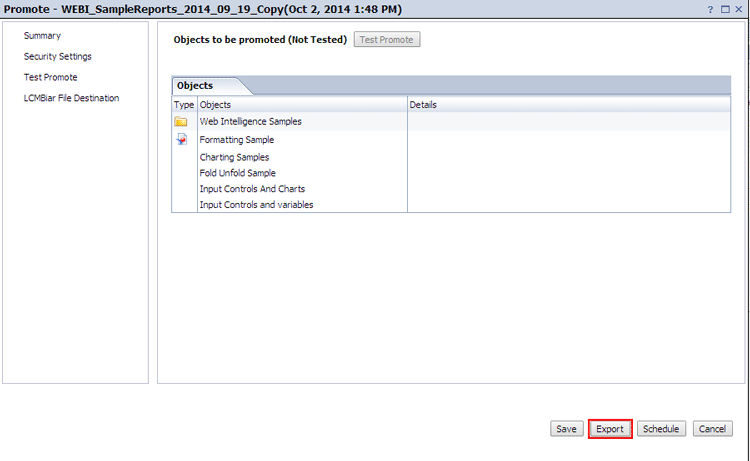
Figure 32
Promote screen, Test Promote page
This closes the Promote screen and takes you back to the Promotion Management home page (Figure 33). The home page now shows the Status of the promotion job in the second column of the details pane (e.g., Created, Failure, Partial Success, and Success).
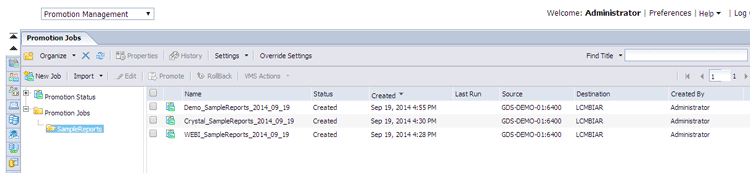
Figure 33
The Promotion Management home page showing the statuses of the promotion jobs
Adam Getz
Adam Getz currently serves as a Manager, Business Intelligence for CGI Federal. In this position, he is leading a large business intelligence and data warehousing implementation for a federal client. He is a thought leader in the field of information technology and an expert in the deployment of leading business intelligence, database management, and data integration products. He has presented at a variety of local, national, and international events, including the 2006 BusinessObjects International Conference, 2007 Oracle BIWA Summit, 2008 Oracle Open World, and 2010 and 2011 ASUG SAP BusinessObjects User Conferences. In addition, Adam is the creator and main author of bi-insider.com, a website, portfolio, and blog that provides rich technical and functional content to business intelligence and data warehousing professionals. He has also published numerous technology white papers that have focused on various topics within business intelligence and data warehousing. Adam currently serves as the chairperson of the Washington DC Business Objects User Group.
You may contact the author at adagetz@yahoo.com.
If you have comments about this article or publication, or would like to submit an article idea, please contact the editor.