Learn the step-by-step process for integrating SAP SuccessFactors Employee Central and the SAP SuccessFactors Compensation solution. Learn an in-depth configuration solution.
Key Concept
SAP SuccessFactors Employee Central is a cloud-based application that stores and processes employee information (job, time, employment, and job relationships) throughout the employee’s life cycle in an organization, from hire to termination. This is the HR system of record. The SAP SuccessFactors Compensation solution, also a cloud-based application, enables managers and business leaders to align compensation to the business goals. This helps managers to set up compensation planning programs to engage, reward, and motivate employees.
Enabling integration with SAP SuccessFactors Employee Central and the SAP SuccessFactors Compensation solution streamlines an organization’s compensation process by minimizing manual administration tasks. The integration also provides compensation planners with more time to make informed pay-for-performance decisions on a day-to-day basis.
This article provides a deep dive into the integration of SAP SuccessFactors Employee Central and the SAP SuccessFactors Compensation solution. Currently, a lot of companies are already live with SAP SuccessFactors Compensation or SAP SuccessFactors Employee Central. I have worked with some companies that implemented the SAP SuccessFactors Compensation solution and then decided to go live with SAP SuccessFactors Employee Central more recently. This requires revisiting the implemented compensation solution to ensure it fits the SAP SuccessFactors Employee Central integration model as-is or if it requires modification.
For example:
- Any changes implemented in Employee Central, such as salary ranges or the addition of new countries, must be re-considered for re-configuration for the SAP SuccessFactors Compensation solution.
- When the integration between the SAP SuccessFactors Compensation solution and SAP SuccessFactors Employee Central is turned on, you must decide if the integration is to be a full or partial (hybrid) integration. If it is a full integration, then you must choose the data source for the employee data as SAP SuccessFactors Employee Central. If it is a partial (hybrid) integration, then the data sources for employee data are both SAP SuccessFactors Employee Central and a user data file (UDF).
- Make sure that the SAP SuccessFactors Employee Central implementation project team considers the compensation module requirements, such as recurring and non-recurring pay components.
If the SAP SuccessFactors Employee Central integration is turned on after the SAP SuccessFactors Compensation solution is already implemented, I would consider this to be a re-implementation of SAP SuccessFactors Compensation and would make the stakeholders aware of the actual time and effort that this seemingly simple integration requires. Some basic steps that must be taken that add to the timeline, including:
- Validating every field used in SAP SuccessFactors Compensation
- Reviewing the eligibility rules setup. Determine if the eligibility rules will read from business objects (which are in SAP SuccessFactors Employee Central) or if there will be a non-Employee Central rule that is created manually. (I have had situations in which companies needed rules from both SAP SuccessFactors Employee Central and non-Employee Central systems.)
- Spending time at the outset to consider the limitations of the integration switch. Things that worked standalone may fail with integration. For example, formulas must be re-calculated.
- Factoring in adequate testing time and resources at the start of the project
Standard Employee Central and Compensation Integration Steps (as of Release Q3 2016)
The SAP SuccessFactors Employee Central system holds Employee Profile information and talent information. For the SAP SuccessFactors Compensation solution to access this information and leverage the SAP SuccessFactors Employee Central data, certain integration steps must be performed, as follows.
Validate Data Fields
The first step is to validate the data fields in the compensation template XML code. Since the data is now read from SAP SuccessFactors Employee Central, the import key option for the fields is not relevant and therefore has to be removed from the SAP SuccessFactors Compensation fields configuration directly in XML code. To verify this, go to the design worksheet in Compensation by following menu path Plan Setup > Design Worksheet > Configuring Form Fields (Figures 1 and 2). The first figure shows the Configuring Form Fields screen before the XML code changes have been added that delete the Import Key; the second figure shows the same screen after the XML code changes have been made to delete the Import Key.
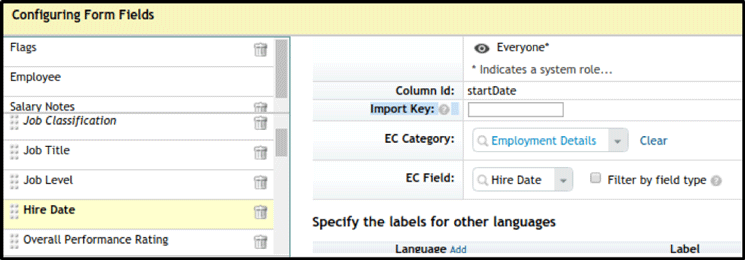
Figure 1
The Configuring Form Fields screen showing the Import Key field

Figure 2
The same screen after the Import Key field has been deleted using XML code (where you can verify that the field is not showing)
In Figures 1 and 2, select Hire Date on the left side of the screen. The field attributes are displayed on the right side. Notice that the Import Key no longer appears on the right side of the screen in Figure 2.
Turn on Employee Central–SuccessFactors Compensation Module Integration
The next step is to turn on the Employee Central–SuccessFactors Compensation integration by setting the effective date in the SuccessFactors Compensation plan set-up settings. This date must be set in the XML template or in plan settings. Follow menu path Compensation Plan Setup > Settings > Employee Central Settings and the screen in Figure 3 opens. This effective date lets the system know that the data must now pull from Employee Central. This date is usually the beginning of compensation cycle. If worksheets are already created, they are disabled automatically by the system and cannot be used.

Figure 3
Enter the Effective date to turn on integration in Employee Central
Adding Rating Sources
With the Q3 release of SuccessFactors, multiple rating sources can be added to the compensation template by using performance management forms or the employee profile. If there are no performance management forms the rating comes from Employee Central. When there is no form, the Compensation system provides Employee Central field mappings (for companies that have not implemented the Performance module). Follow menu path Compensation Plan Setup > Plan Details > Rating Sources > Add New Rating source, and make the required entries in Figure 4.

Figure 4
Add new rating sources using EC Field Mapping
Field Mappings
The next step is to map the fields from the SuccessFactors Compensation module to Employee Central. Field mapping is the heart of Employee Central integration and is not as simple as it first appears—this is the stage in which many integration errors occur. There are multiple places that the field mappings need to be validated. Here are some examples of common field mappings.
Example 1: Map the EC Field (Compensation Field) to the Hire Date
To configure and map the compensation field Hire Date to the Employee Central Hire Date field, follow menu path Plan Setup > Design Worksheet > Design Worksheet, and Figure 5 opens. Select Hire Date on the left side, and on the right map the Employee Central component (category) to the employmentInfo (Employment Details) field and the Employee Central fields to Hire Date (as shown in Figure 5).
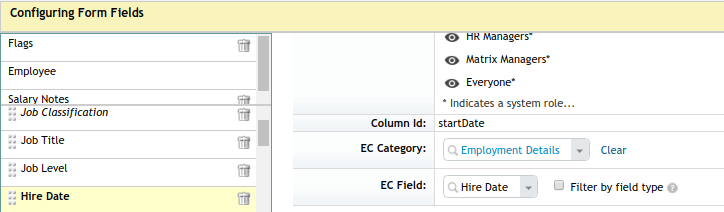
Figure 5
Map the compensation Hire Date field (on the left) to the Employee Central Hire Date field (on the right)
Example 2: Map the EC Field (Compensation Field) to Department
To configure and map the compensation field Department to the Employee Central field Department, follow menu path Plan Setup > Design Worksheet > Design Worksheet, Figure 6 opens. Select Department on the left side, and on the right side map the Employee Central component (category) to the jobInfo (Job Information) field and the Employee Central field to Department (as shown in Figure 6).
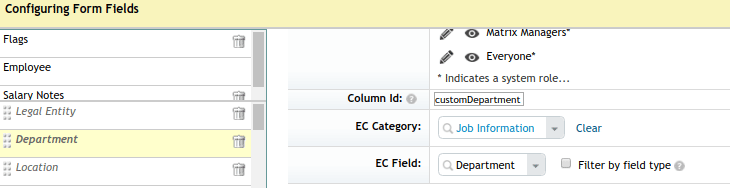
Figure 6
Map the compensation Department field (on the left) to the Employee Central Department field (on the right)
Example 3: Map the EC Field (Compensation Field) to Amount
To configure and map the compensation field Current Salary to the Employee Central field Amount, follow menu path Plan Setup > Design Worksheet > Design Worksheet, and Figure 7 opens. Select Current Salary on the left side, and on the right map the Employee Central component (category) field to compInfo (Compensation) field and the Employee Central field to Amount (as shown in Figure 7).
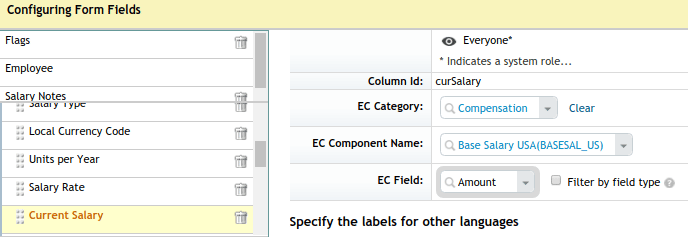
Figure 7
Map the compensation field Current Salary (on the left) to the EC Field Amount (on the right)
This mapping can be done in the compensation plan template XML code as well. Sample code is shown in Figure 8 for mapping the Annual Salary compensation field to the Employee Central HRIS-element id=payComponentRecurring field in the compensation template XML.
Comp fields: Annual Salary and Salary Type come from Employee Central
Component: payComponentRecurring;  Add tag <comp-field-definition id =
"AnnualSalary". Map the Employee Central field component using tag <comp-ect-
input-field-map componentType="payComponentRecurring"
Figure 8
Code to map the Annual Salary compensation field to Employee Central
Note
In the back end, the compensation template and data model talk to each other via HRIS-element ID = payComponentRecurring.
If you use more than one recurring pay component (abc), then you need the additional clause component code = "abc" in the <comp-ect-input-field-map> tag. For accurate XML code to do this, refer to the data-type definition (dtd) file or the SuccessFactors Implementation Guide.
Some examples of multiple recurring payments are recurring monthly pay components on the first day of every month and recurring bi-weekly pay components. The unique identifiers for each pay component are component type, component code, and effective date. Follow menu path Admin Center > Manage Organization, Pay and Job Structures, and Figure 9 opens. The component code is not a field to be used for recurring payments, however. When a component code is not specified, the SuccessFactors Compensation system knows to use the payComponent attribute Used for Comp Planning when set to Both or Comp (Figure 9).
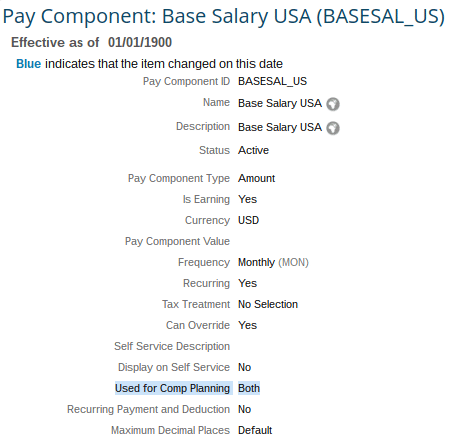
Figure 9
The system uses the Base Salary USA (BASESAL_US) pay component
Understanding HRIS Elements in Employee Central and Compensation Module Field Mappings
To map the Compensation fields successfully to the Employee Central fields it is very important to understand how the HRIS elements are structured in the system, along with their field definitions, data types, and so forth. The details about the definitions of the Employee Central components and the HRIS element structures also must be understood to map the fields accurately. To learn more about the definitions of the Employee Central components and to verify that the correct HRIS fields are used for mapping, follow menu path Admin Center > Company Settings > Manage Business Configuration, which opens the screen in Figure 10.
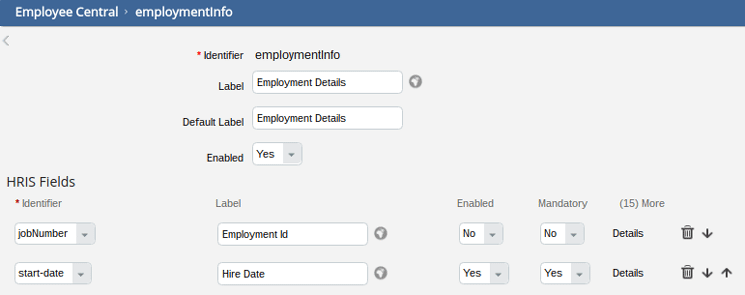
Figure 10
Select Employee Central Component employmentInfo and verify that the HRIS field name is start-date
Example 1: Verify That the HRIS Field Name for Hire Date is the Start Date
After following menu path Admin Center > Company Settings > Manage Business Configuration, in the screen that opens (Figure 10), select the Employee Central component employmentInfo and scroll down to find the Hire Date. The HRIS field name for hire date is start-date. Verify that this selection is correct.
Example 2: Verify that the HRIS Field Name for Department is Department
Follow menu path Admin Center > Company Settings > Manage Business Configuration and the screen in Figure 11 opens. Here you select the Employee Central component employmentInfo and scroll down to find the department. The HRIS field name for Department is department. Verify that this selection is correct.
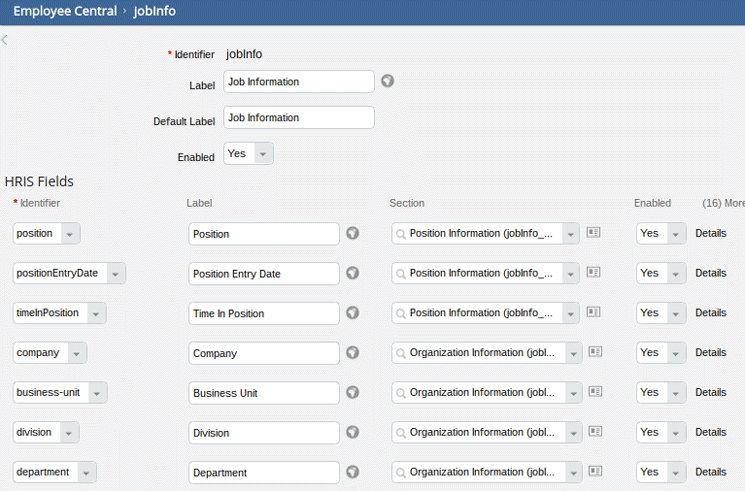
Figure 11
Select Employee Central component JobInfo and verify that department is the HRIS field name for Department
Example 3: Verify that the HRIS Field Name for Current Salary is Custom-double5
Follow menu path Admin Center > Company Settings > Manage Business Configuration. In the screen that opens (Figure 12), select Employee Central component employmentInfo and scroll down to find Current Salary. The HRIS field name for Current Salary custom-double5. Verify that this selection is correct.

Figure 12
Select the Employee Central component compInfo and verify that custom-double5 is the HRIS field name for Current Salary
Sometimes fields do not populate in the compensation form because the compensation fields are mapped to Employee Central-derived fields such as custom-stringxx, which is populated when a certain Employee Central rule is triggered. To avoid this issue, map the HRIS compensation fields directly to the Employee Central source fields. Look at the Succession Data Model to find a list of HRIS field information, which you can download from Provisioning (the back end of the SuccessFactors system).
For example, the Employee Central-derived custom-string10 field could be triggered by an onSAVE Employee Central rule. Find the definition of the custom-string10. It could be, say, a customSalaryType field that is created when the actual salaryType of employee data is saved. Sample XML code for doing this is shown in Figure 13. This code is updated in the compensation plan template XML.
<comp-ect-input-field-map componentType="compInfo" fieldName="custom-string10"/>.
Figure 13
Code to show the field that is mapped to a derived field custom-string10
If you want to map the derived HRIS field to the source field instead, use the code in Figure 14.
<comp-ect-input-field-map componentType="jobInfo" fieldName="customSalaryType.name"/>
Figure 14
Code to show the field that is mapped to a source field customSalaryType.name
Understanding the Structure of Pay Component Groups and Pay Component
To map the Employee Central pay component information with compensation data, take the following steps. Follow menu path Admin Center > Employee Files > Manage Organization, Pay and Job Structures to identify the actual Employee Central pay component group ID and pay component ID that need to be mapped to the compensation data (Figure 15).
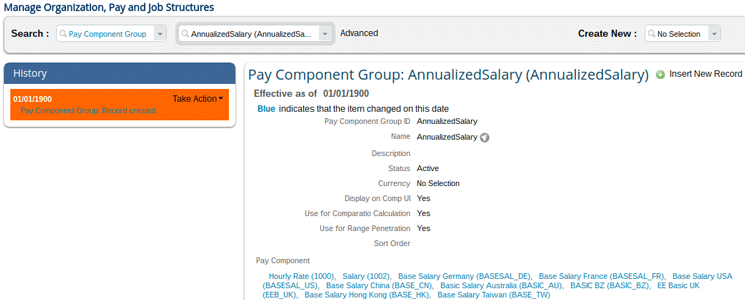
Figure 15
Verify that the Employee Central pay component group ID is AnnualizedSalary
Follow menu path Admin Center > Employee Files > Manage Organization, Pay and Job Structures. In the screen that opens (Figure 16) identify the pay component ID and make note of this. In this case, the pay component ID is BASESAL_US.

Figure 16
Identify and note that the pay component selected is ID BASESAL_US
Compare the fields in Figures 16 and 17 to verify that the pay component value that appears in Figure 16 is mapped to the EC component mapping in Figure 17. The Compensation Field Current Salary is mapped to the above Employee Central pay component Base Salary USA(BASESAL_US) in the compensation worksheet.
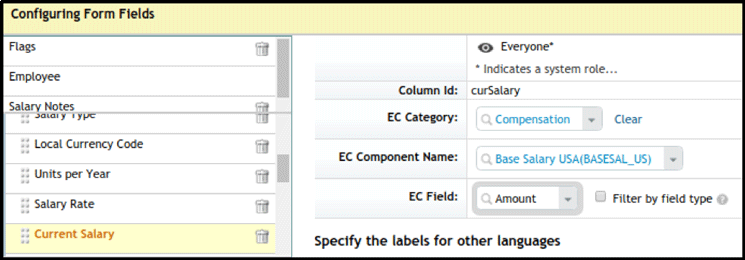
Figure 17
Verify that the compensation field Current Salary is mapped to the Employee Central component BASESAL_US
Eligibility Rules
With Employee Central integration, the eligibility rules perform correctly more often and under a wide range of conditions, and can accommodate complex business logic. To create new business rules, follow menu path Admin Center > Configure Business Rules in Employee Central. Once created, these can be used in the Compensation eligibility engine to make employees ineligible for certain components, such as merit pay and stock.
As of the Q3 2016 release there is a simple setting in the template to make employees ineligible or eligible. You can select the starting point for eligibility as:
- All active employees are eligible: If you select this option, define eligibility rules to exclude employees.
- No employees are eligible: If you select this option, define eligibility rules to include employees.
Follow menu path Admin Center > Compensation > Compensation Home> Plan Setup > Settings > Eligibility Settings. In the screen that opens (Figure 18), set the starting point for eligibility by choosing one of the options mentioned above.

Figure 18
Enter the settings for the eligibility rules
The system does not allow you to make this setting if there is already a launched worksheet. To change the eligibility settings in the middle of testing or configuration, you must delete all the Compensation Template worksheets. You can do so by following menu path Admin Center > Compensation > Compensation Home > Plan Set up > Manage Worksheets and, in the screen that opens (not shown) delete the worksheets. Keep in mind that changing the plan eligibility setting in Figure 18 affects the behavior of your existing employee eligibility rules to include or exclude employees.
To check the existing employee eligibility rules, follow menu path Admin Center > Compensation > Compensation Home > Plan Set up > Plan Details > Eligibility. In the screen that opens (Figure 19), you see a message that says: Starting point for eligibility is “All employees are eligible.” Define rules to EXCLUDE employees. You can change an existing rule or click the plus-mark icon next to Add Rule to add a new rule. In the screen that opens (not shown) you can make your new entries for any rule exceptions—for example, define rules to exclude employees from countries Austria and Spain, or define rules to exclude employees from business unit marketing.
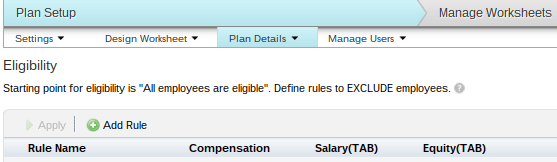
Figure 19
The eligibility rules' details
Salary Pay Matrix
SAP SuccessFactors recommends using the Employee Central salary pay matrix if Employee Central integration is turned on. However, you can also use the Compensation salary pay matrix table. The Compensation system is designed to know from where to automatically pull the salary pay matrix information. This functionality must be thoroughly tested to ensure the compa-ratio or range penetration values are being calculated accurately when you switch from a Compensation salary pay matrix table to the Employee Central salary pay matrix.
The required fields that need to be mapped to Employee Central are payGrade, salaryType, and localCurrencyCode. These can be added in Admin Center in Calculation Settings by following menu path Admin Center > Compensation > Compensation Home > Plan Setup > Settings > Calculation Settings > Salary Pay Matrix (Figure 20). Here you can set up Attribute 1 and Attribute 2 for the salary pay matrix. Note that the salary pay matrix mappings can also be done directly in the XML template.
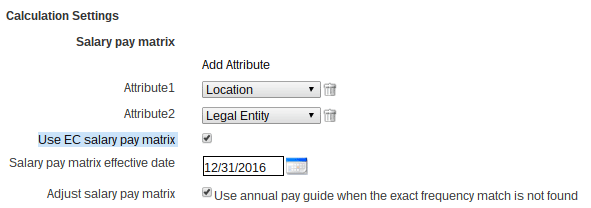
Figure 20
Salary pay matrix settings
The attributes for the salary pay matrix are linked to Employee Central HRIS element payRange. The values for Attribute 1 and Attribute 2 come from the Pay Range information, as shown in Figure 21.
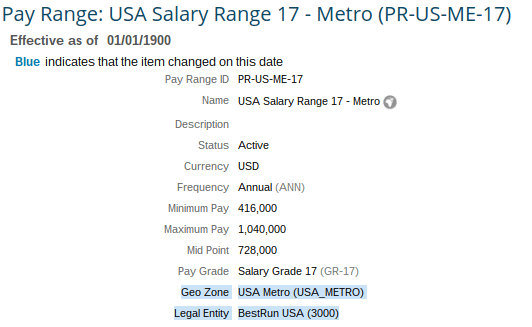
Figure 21
Attribute 1 is Geo Zone or Location and Attribute 2 is Legal Entity
Figure 20 is an example of an attribute-based salary pay matrix. Make sure the salary pay matrix in the compensation template has the attributes defined in the HRIS payRange element ID. To verify this, follow menu path Admin Center > Employee Files > Manage Organization, Pay and Job Structures (Figure 21). Here you select the Pay Range that is used in the Compensation Plan and verify the Attribute 1 and Attribute 2 values.
Publishing Compensation Results to Employee Central
The new calculated salary is stored in the Compensation form and must be posted to the Employee Central CompInfo record. An employee’s base compInfo record in Employee Central with current salary details is used as the basis for calculating the new salary. The source system in this scenario is the Compensation module and the target system is Employee Central.
Next, you need to map the Employee Central payComponentRecurring component (as previously explained in the field-mapping section of this article). In the XML template code, look for the <comp-ect-output-component> tag. This is used to map the Compensation recurring pay component with the Employee Central recurring pay component. Next, to write back to the employee data, map the <comp-field> to the HRIS field under <comp-hris-field-map>. All the Employee Central field values are based on this mapping.
Standard and custom compensation fields can be used for Employee Central. Keep in mind that the custom fields in the Compensation module are type double (64 bit). The compensation system automatically converts functional currency to the employee’s local currency when the compensation results are published to Employee Central.
Six Quick Tips for Troubleshooting
These tips help you resolve the most common issues that arise during Employee Central-Compensation Integration.
Tip #1
Budget groups and user-based budgets are not supported in integration. The workaround is to use budget mapping fields in Add/Edit Budget Calculation if the budget is based on users. To do this, follow menu path Admin Center > Compensation > Compensation Home > Plan Setup > Plan Details > Add Budget Calculation > Edit Budget Calculation (Figure 22). Here you select the Employee Central field to map to the budget fields.
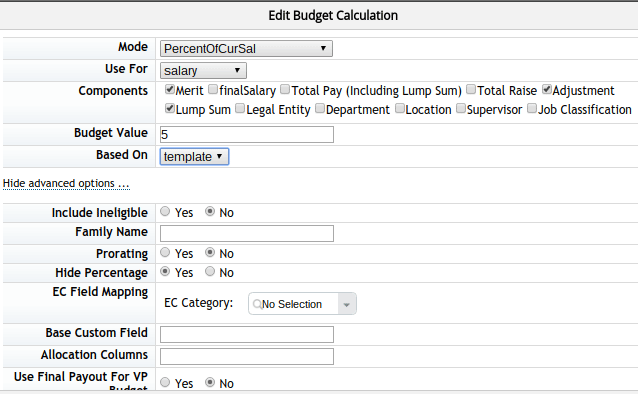
Figure 22
Map the budget fields to the Employee Central fields
Tip #2
When you publish the completed compensation form back to Employee Central, the business rules you have configured for the Compensation Information portlet (as onChange and onSave) are triggered when the new Compensation Information record is created through the Employee Central to Compensation module integration. The Compensation module to Employee Central integration always triggers the Employee Central rules when creating the new Compensation Information record.
If you do not want this to happen, you can turn this feature off by following menu path Admin Center > Compensation > Compensation Home > Plan Setup > Advanced settings (Figure 23). Select the Do not trigger Employee Central rules when publishing from Compensation to Employee Central check box, and then click the Update Form Template button at the bottom of the screen to save your settings.

Figure 23
Select the check box to not trigger Employee Central rules when publishing from Compensation to Employee Central
Tip #3
In Employee Central-enabled compensation plans, there is now an option to select the UserName column type for custom fields. Follow menu path Admin Center > Compensation > Compensation Home > Plan Setup > Design Worksheet (Figure 24). This displays the Employee Central jobRelationshipInfo—for example, the Employee Central field supervisor’s username. To have the supervisor’s name to show up, click Column type field options on the right and select UserName from the drop-down list that opens. Click the Save button on the top left to save your settings.
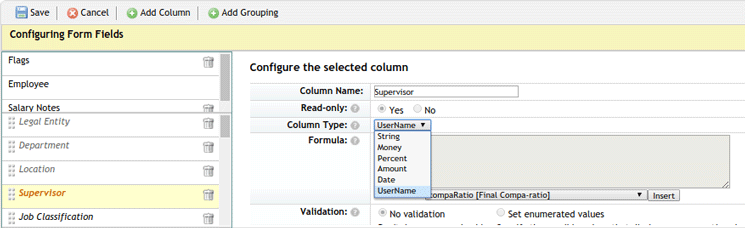
Figure 24
Select UserName as the Column Type
Tip #4
The concept of a hybrid template in Employee Central is to support both Employee Central and non-Employee Central users. Data for Employee Central users still comes from the Employee Central system, while the data for non-Employee Central users comes from a UDF. For non-Employee Central users, do not configure anything under Employee Files > Employment Information.
The Import Key option re-appears for hybrid templates, indicating that the data can be pulled from the Employee Central system or the UDF file. To verify this, follow menu path Admin Center > Compensation > Compensation Home > Plan Setup > Design worksheet (Figure 25). Here you see that the Import Key field re-appears when you select a hybrid template as opposed to the example earlier in this article, when the Import Key is deleted from the configuration field options (refer to Figure 2).
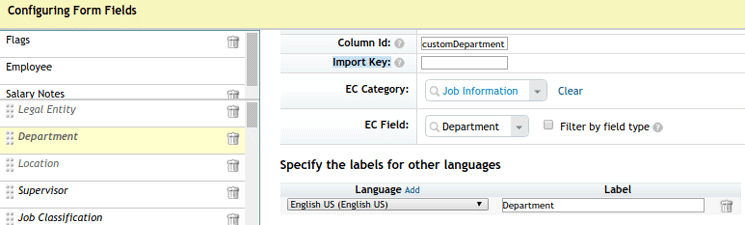
Figure 25
Hybrid mode with Import Key and Employee Central category/field mapping
When hybrid mode is turned on (Compensation > Plan Set up > Settings > Employee Central Settings > Hybrid Template), the Compensation system knows that the data is being pulled from Employee Central for employees aaaa, bbbb, if the Employee Central category and Employee Central field are provided, or is pulled from the UDF file for employees yyyy, zzzz, based on the importKey value as shown in Figure 25.
In a hybrid model, you can use both Employee Central eligibility rules as well as non-Employee Central eligibility rules to define eligibility for Compensation. Non-Employee Central eligibility rules are defined directly in the Compensation module. To use these rules, hybrid template settings on the Plan settings page in Compensation Plan Setup must be enabled. Follow menu path Admin Center > Compensation > Compensation Home > Plan Setup > Plan Details > Eligibility (Figure 26). Click the plus-mark icon next to Add Rule and you have the option to display EC Rule or Non-EC Rule.
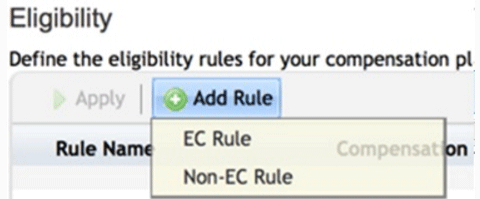
Figure 26
The eligibility rules' options in hybrid mode
Tip #5
In hybrid mode, you can use both an Employee Central salary pay matrix structure or a Compensation pay matrix table to derive the compa-ratio or range penetration. SAP SuccessFactors recommends using the automated Employee Central salary pay matrix to avoid manual errors.
When using hybrid templates, both the comp-ect-input-field-map and importKey values are required to import Performance Management ratings from Employee Central and UDF. To update this information, follow menu path Admin Center > Compensation > Compensation Home > Plan Setup > Plan Details > Rating Sources (Figure 27). Here you provide the Import Key mapping and the EC Field Mapping to map the rating source fields for a hybrid template.
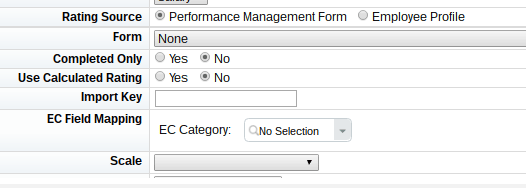
Figure 27
Map the Performance Rating sources in hybrid mode
Tip #6
When using the hybrid mode to do budget calculations, both the importKey and comp-ect-input-field-map values are required. To do this, follow menu path Admin Center > Compensation > Compensation Home > Plan Setup > Plan Details > Budget > Add Budget Calculation (Figure 28). Here you can add the Import key and EC field mappings for a hybrid template.
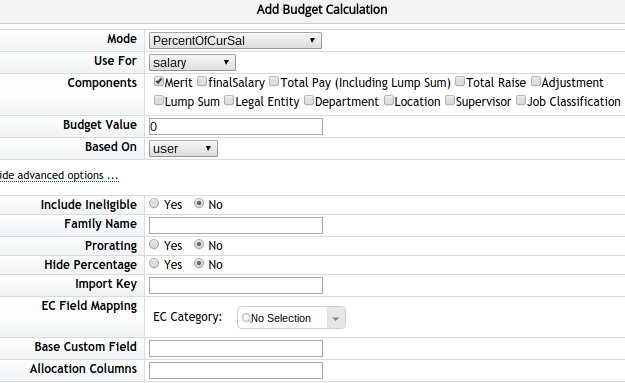
Figure 28
Budget calculation mapping in hybrid mode
Malle Alam
Malle Alam is a senior consultant at a Global Professional Services firm in the SAP/SuccessFactors practice. She is a certified SAP SuccessFactors consultant, certified in Compensation, Variable Pay, Succession Management, Performance and Goals Management, and SAP HR v4.7. She has more than 16 years of experience working on SAP ERP HCM/SuccessFactors implementations. Malle has a strong passion for technology and the HCM domain.
You may contact the author at malle.agina@gmail.com.
If you have comments about this article or publication, or would like to submit an article idea, please contact the editor.