Learn about the Meeting Agenda functionality of the SAP SuccessFactors Goal Management module.
Key Concept
The Goal Management module is one of the most used modules within the SAP SuccessFactors suite. Outside the plain vanilla feature of tracking goals, the module offers three other features that provide a better user experience for tracking goals: Meeting Agenda, Status Report, and Execution Map. One of the most useful is the Meeting Agenda feature, which allows users to filter goals and create an actual meeting agenda that can be integrated with a calendar in email service providers.
The Meeting Agenda feature is part of the Goal Management module of the SAP SuccessFactors suite. This helpful functionality allows you to select the people whose goals you would like to see, filter those goals by their attributes, sort results, and generate an actual meeting agenda that can be integrated with the calendar of an email service provider such as Microsoft Outlook or Google Gmail.
The SAP SuccessFactors Meeting Agenda feature, although simple, is a useful tool that greatly enhances user experience and encourages users to use the system by letting them select goals based on different criteria, create PDFs of goals, schedule meetings, and send email invitations to team members. Using this tool allows users to schedule meetings documenting team’s goals in an easier and more standardized way.
How to Configure the Meeting Agenda Feature
Although Meeting Agenda is licensed with the Goal Management module, it still requires some configuration to make it available in the system. Let’s look next the steps necessary to configure the Meeting Agenda functionality in SAP SuccessFactors.
Provisioning Settings
Configuring the Meeting Agenda feature requires access to Provisioning. This functionality belongs to the Goals Execution feature within the Goal Management module.
To configure Meeting Agenda, follow these steps.
1. Log on to SuccessFactors Provisioning (Figure 1) and navigate to Company Settings.

Figure 1
Select Company Settings in Provisioning
2. Once in Company Settings, scroll down to the Configure Goal Execution section (Figure 2). Click the Enable Meeting Agenda – requires “Version 11 UI framework (ULTRA)” check box and then click the Save button on the right.

Figure 2
Enable the Meeting Agenda functionality in Provisioning
Security Settings
Once Meeting Agenda has been enabled in Provisioning, security needs to be granted. Follow these steps to grant authorization to use Meeting Agenda to users.
1. Navigate to the Admin Center (Figure 3). Hover your cursor over the Set User Permissions option under Manage Employees. When the pop-up window in Figure 3 opens, click the Manage Permission Roles option.
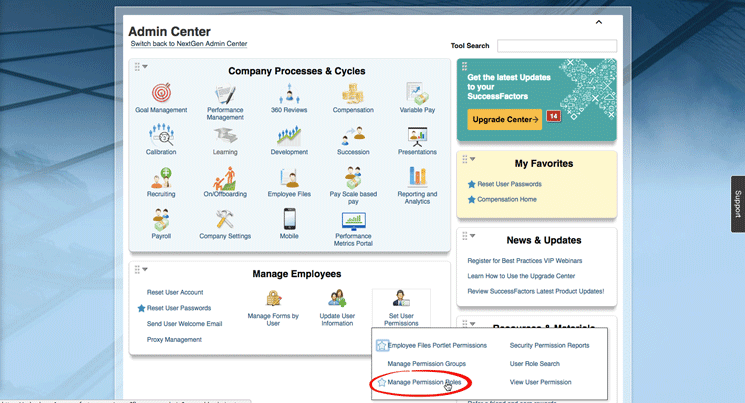
Figure 3
Manage Permission Roles in the Admin Center
2. This action opens the Permission Role List screen in Figure 4. Here you look for the group of users to whom you would like to grant permission to use Meeting Agenda. In this case, I am granting permissions to the Manager Role group. Select Manager Role on the left and a new window opens, as shown in Figure 5.
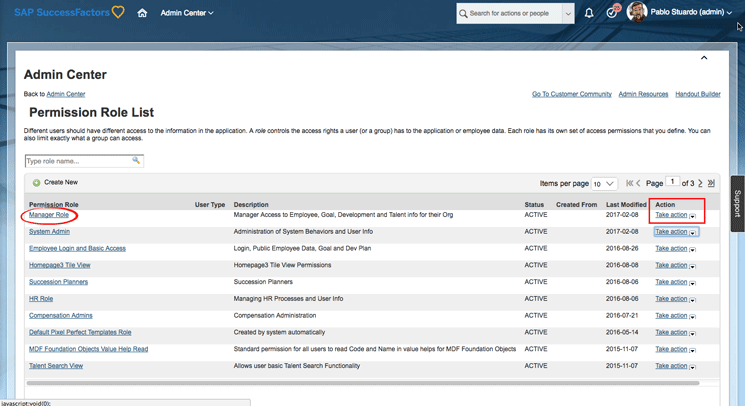
Figure 4
Select the group to add permission to access the Meeting Agenda feature
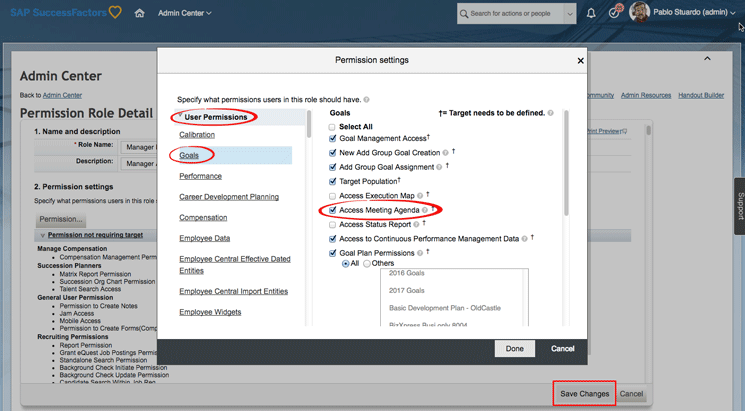
Figure 5
Grant permission to the manager roles to have access to the Meeting Agenda feature
3. In the Permission Role Detail screen for the manager group (at the back of Figure 5), click the Permission button referenced by each module (permissions for goals is under Goals, for example). This opens the Permission settings pop-up window (Figure 5), where you select each permission you want to grant to users by selecting the check boxes next to each option (for example, Access Meeting Agenda) in the screen that expands on the right. After you select your desired settings, click the Done button. This takes you back to the screen at the back of Figure 5, where you click the Save Changes button to save your settings.
Now the users defined for the permission group (in this case, users in the manager role) have access to Meeting Agenda. Next, let’s review how to access Meeting Agenda once permission has been granted to use it.
Accessing Meeting Agenda
The Meeting Agenda feature is one of three features that compose the concept of goal execution. These three features are:
- Meeting Agenda
- Status Report
- Execution Map
Users can access the Meeting Agenda feature from the Home page (Figure 6). Click Home and then select Goals from the drop-down options. This action opens the Goals module (Figure 7).
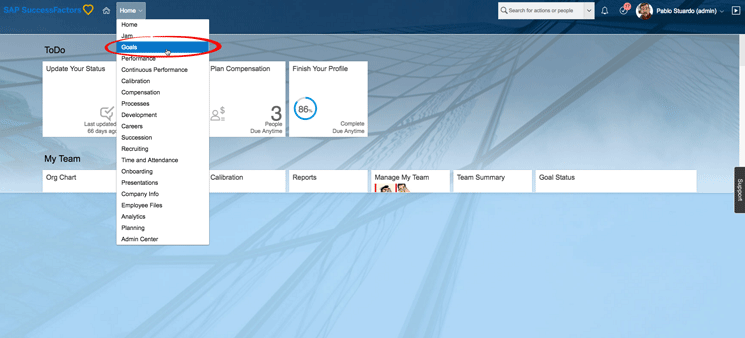
Figure 6
Access the Meeting Agenda feature from the Home page
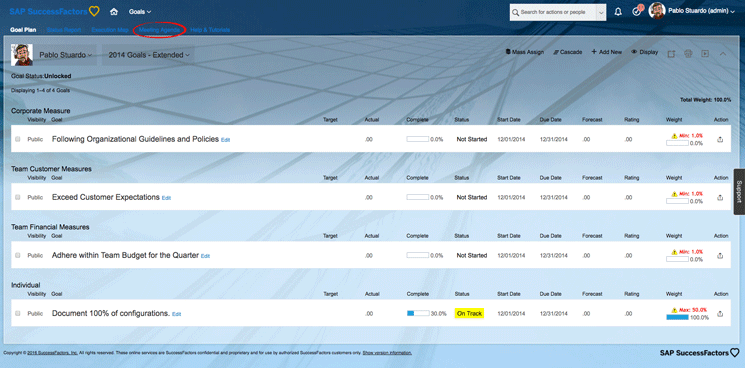
Figure 7
Select the Meeting Agenda option
Click the Meeting Agenda option, which takes you to the Meeting Agenda functionality (Figure 8).
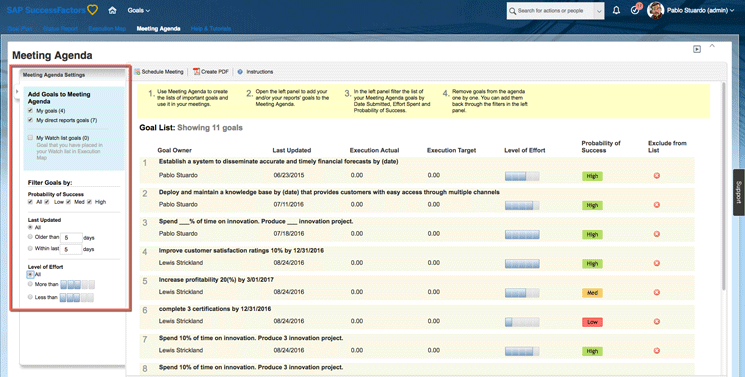
Figure 8
The Meeting Agenda feature’s main page
The Meeting Agenda feature is composed of three functionalities:
- Meeting Agenda settings
- Create PDF
- Schedule meetings
Let’s review each of these in more detail.
Meeting Agenda Settings
Meeting Agenda Settings lets users use different filters to select only the goals that the user is interested in using.
In the screen in Figure 8, select Meeting Agenda Settings to show the options. Here you can add your own goals (using the My goals check box), add goals for your direct reports, or add both. Goals can be added by clicking the check boxes associated with each option. Notice that as soon as you click each option, the goals on the right of the screen automatically appear.
Note
There is also a My Watch list goals option that allows users to add goals that have been selected in the Execution Map feature. More details about this setting are outside the scope of this article, but will be discussed in the upcoming HR Expert article, “Overview of the SuccessFactors Execution Map Tool.”
Once you make your selections in Figure 8, you can then filter the goals. In this case, I choose to filter by Probability of Success, when it was last updated, and the level of effort required to complete the goal. (You can see other options for these goals in the drop-down menus.) After you select the goals to add, they are displayed on the center-right side of the screen as shown in Figure 8.
Before you continue, note that at the very top of the Goal List, there is an Instructions button with general instructions for using Meeting Agenda (Figure 9). These instructions can be viewed—or hidden—by clicking it.
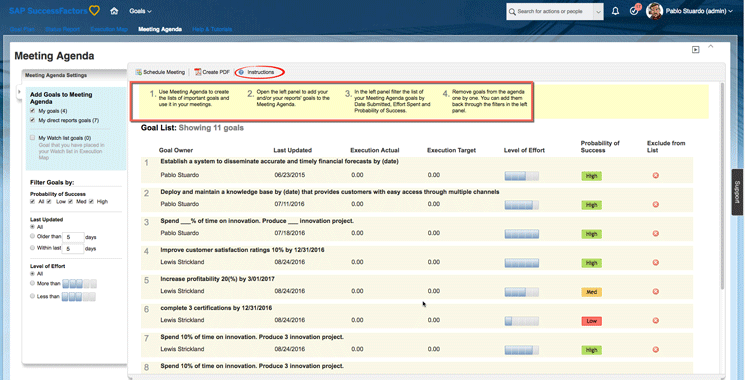
Figure 9
Click the Instructions button to hide (or view) some general instructions for how to use Meeting Agenda
Create PDF
After you add goals, you can create a PDF document that includes all the goals previously added. This feature is handy for sharing purposes (sending the list by email to someone), for record keeping, and for printing and making notes, if necessary. To create a PDF of these goals, click the Create PDF button at the top of the screen (Figure 10).
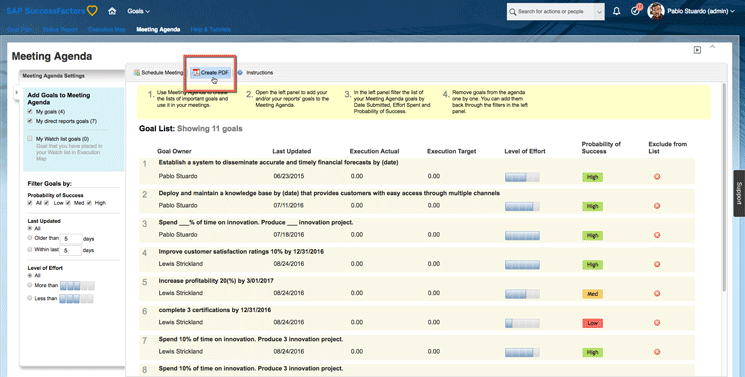
Figure 10
Create a PDF file of the goals
The system then automatically generates a PDF document for you to save (Figure 11).
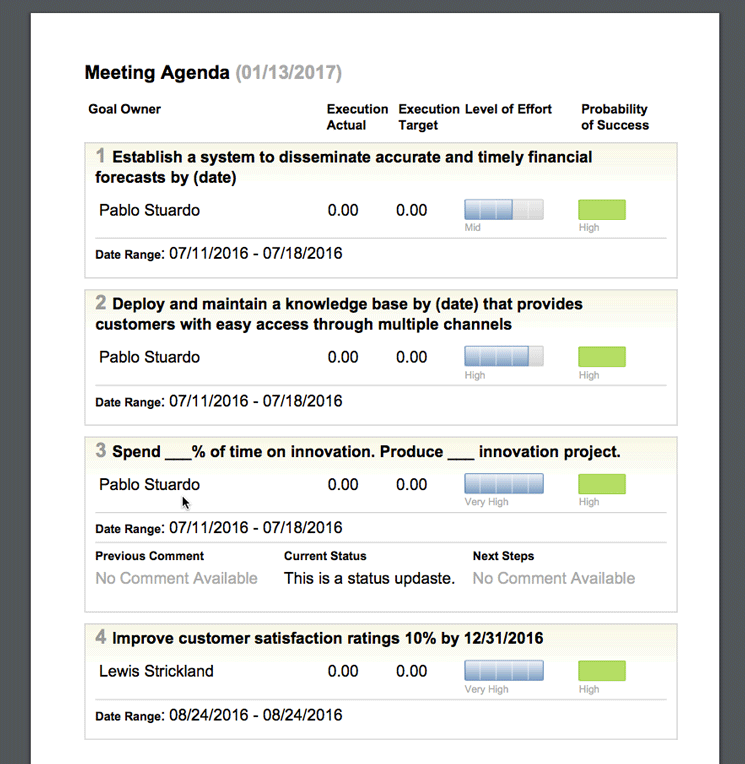
Figure 11
View and save the PDF of the meeting goals
Schedule Meeting
The last functionality included in Meeting Agenda is the schedule-a-meeting feature. This functionality lets users passively integrate (e.g., there is still some manual integration steps that need to be taken) with an email service provider by creating an .ics calendar appointment with the click of a button. To start, click the Schedule Meeting button at the top (Figure 12).
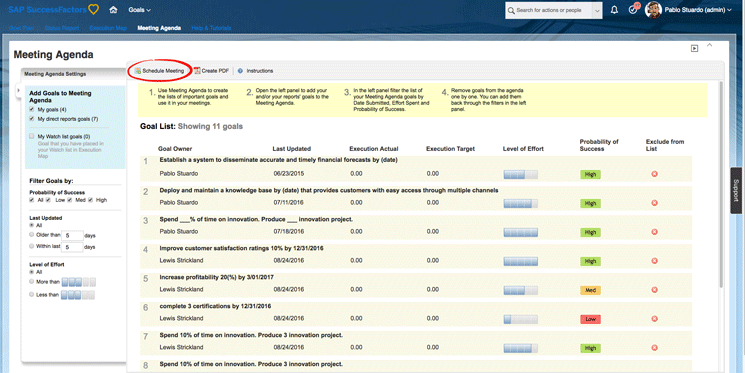
Figure 12
Click the Schedule Meeting button
This action opens a pop-up window that prompts you to save an .ics file (Figure 13). The .ics file format is the one used to import meetings into an email calendar.
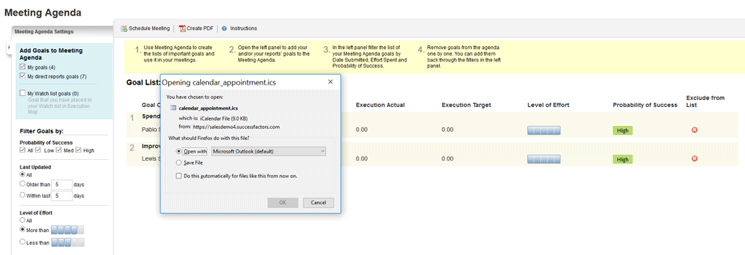
Figure 13
Save the meeting details in an .ics file
You are then prompted with two options:
- Open with: This option opens the document right away without it being saved automatically in your computer.
- Save File: This option allows you to save (and name) the document on your computer before opening it.
After you select the desired option, click the OK button. The system then automatically generates a new meeting invitation in Outlook (or in any other email service provider you might have, such as Google). Once generated (Figure 14), you can review the information before it is sent. Also, the same PDF document that the system previously generated is automatically attached to the invitation (see the bottom of Figure 14).

Figure 14
Schedule a meeting and send a PDF of the goals document
Now all you have to do is add the recipients’ names to the email, add some text describing the meeting, and send it out. Once received, recipients can view the attachments and decline (or accept) the meeting invitation, which is automatically added to their calendars.
Pablo Stuardo
Pablo Stuardo is a SuccessFactors Senior Consultant at Ernst & Young. He focuses on the entire SAP SuccessFactors suite and has supported and implemented a wide variety of projects for different clients at a global level. A native Chilean, Pablo is fluent in Spanish, and graduated from Georgia State University’s Robinson College of Business with a dual degree in Computer Information Systems and Finance.
You may contact the author at pablo.stuardo1@gmail.com.
If you have comments about this article or publication, or would like to submit an article idea, please contact the editor.